Prisma AIRS
AWS Cloud Account Onboarding Prerequisites
Table of Contents
Expand All
|
Collapse All
Prisma AIRS Docs
AWS Cloud Account Onboarding Prerequisites
Prerequisites for onboarding an AWS cloud account in Strata Cloud Manager.
On this page, you will:
| Where Can I Use This? | What Do I Need? |
|---|---|
|
Create an AWS S3 Bucket
- Sign in to the AWS Management Console.Navigate to the S3 service.Click on Create bucket.View the AWS region where your bucket will be created. The region must be the same region in which you have your AI models.Enter a unique Bucket name.Configure options (if needed) and choose Create bucket.Refer to Creating a bucket - Amazon Simple Storage Service for more information.
AWS VPC Flow Logs
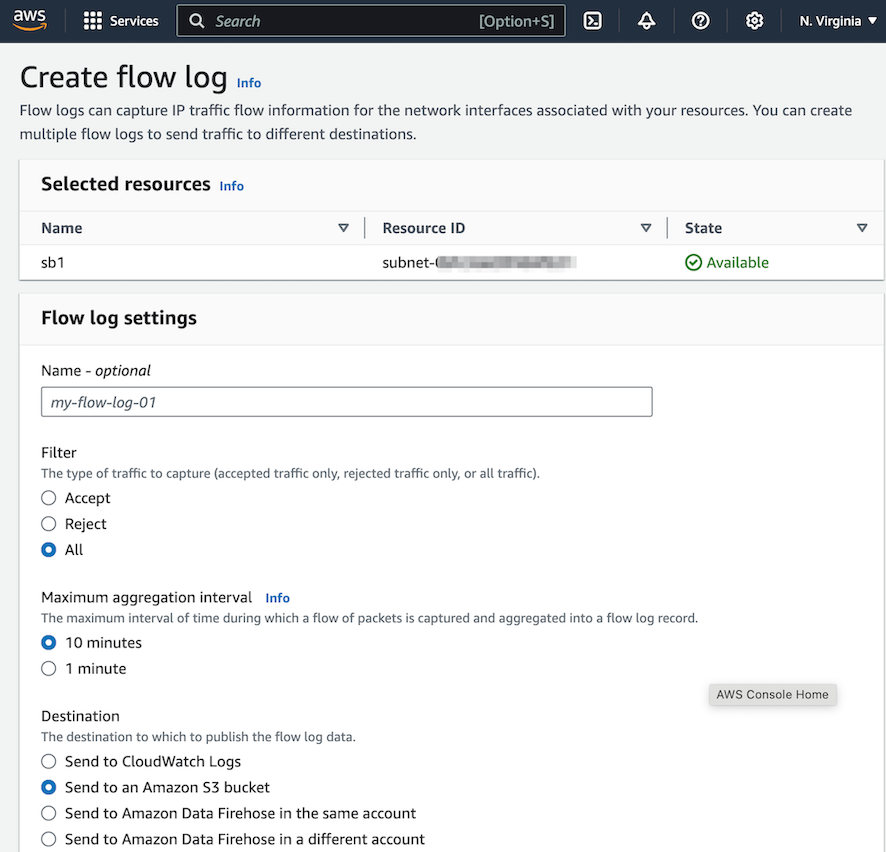
- Sign in to the AWS Management Console.Go to the VPC dashboard > Subnets.Select the subnet for application VPC and switch to the Flow logs tab.Create a flow log or edit an existing flow log.
![]()
- Enter a Name.Under Destination, select Send to an Amazon S3 bucket you created in the previous section and provide the ARN for the S3 bucket.Enter the S3 bucket ARN.For Log record format, choose Custom Format and select all the Standard attributes.To partition your flow logs per hour, choose Every 1 hour (60 mins) in Partition logs by time.Leave the remaining settings as default, unless your use case requires specific configurations.Choose Create flow log or Save.Go to the AWS Bedrock Console to manage model permissions and enable model access.
- In the left navigation pane, select Settings under the Bedrock Configurations section.Toggle Model invocation logging to enable logging.Choose S3 only as the logging destination.In the S3 location field, select the S3 bucket name you created earlier for storing logs.Click Save settings to apply your changes.
Enable Access from AWS in EKS Authentication
Allow the EKS clusters to authenticate users based on their IAM roles. Configure the following so the Prisma AIRS AI Runtime firewall can discover the pod assets. Before you begin, create an Amazon EKS cluster in your cloud environment.- Sign in to the AWS Management Console.Go to Elastic Kubernetes Service.Navigate to the EKS Console.Click on your EKS cluster and select the Access tab within that cluster page.
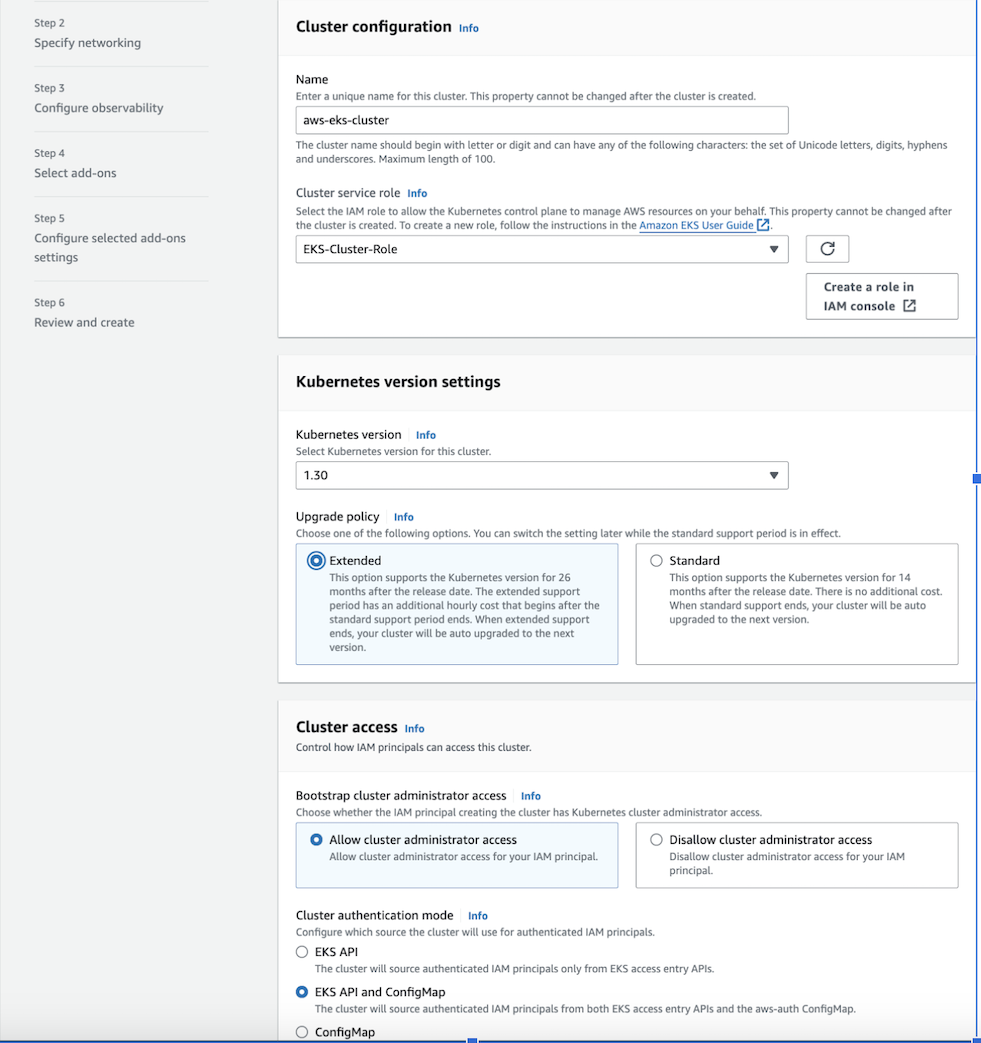
- Click Manage access.Under Cluster authentication mode, select EKS API and ConfigMap.
![]() Save changes.Add the following IP addresses to allow the Strata Cloud Manager to access your public cluster for discovery (This step is applicable when you have enabled Public access to your cluster endpoint):
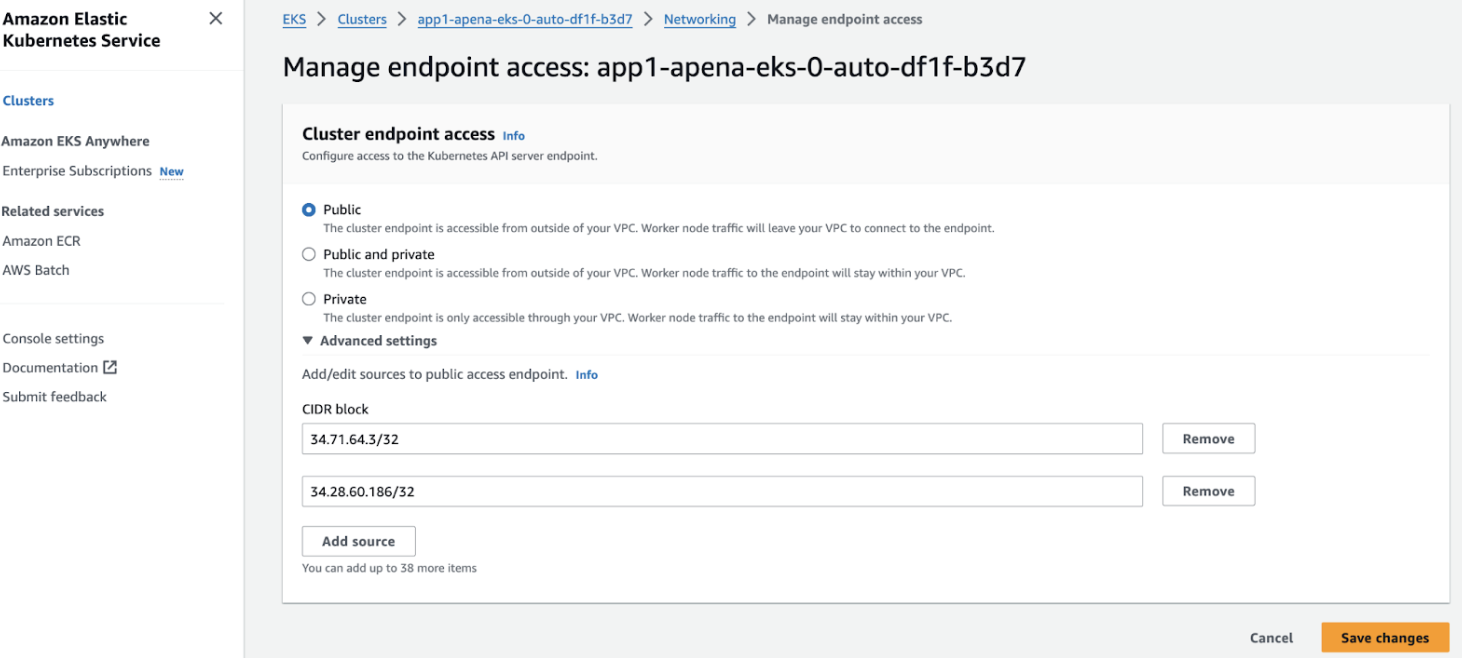
Save changes.Add the following IP addresses to allow the Strata Cloud Manager to access your public cluster for discovery (This step is applicable when you have enabled Public access to your cluster endpoint):- Navigate to your cluster and go to Networking > Manage endpoint access.
- Under cluster endpoint access select Public.
- Expand Advanced settings to allow the perimeter
firewall and add the following IP addresses to access this
cluster:34.71.64.3/32 34.28.60.186/32
![]()
- Save Changes.
Associate a Role for VM Model Invocation
Grant EC2 instances permissions to invoke Bedrock models. Associate a role to log actions under that role, enhancing security and simplifying permission management without using local keys. - Sign in to the AWS Management Console.Navigate to IAM Roles.Create a new role or edit an existing one.Under Trust relationships Select Trusted Entity.Configure Trust Policy and add the following Trust Policy:{ "Version": "2012-10-17", "Statement": [ { "Effect": "Allow", "Principal": { "Service": "ec2.amazonaws.com" }, "Action": "sts:AssumeRole" } ] }This policy grants EC2 instances permission to assume the role, enabling them to use the permissions defined in the role's policy.Under the Permissions tab, click on your policy.
- Search and attach the Bedrock > InvokeModel services under Add actions.Click Next and Save changes.Or, create or attach a policy with the following permissions:{ "Version": "2012-10-17", "Statement": [ { "Sid": "VisualEditor0", "Effect": "Allow", "Action": "bedrock:InvokeModel", "Resource": "*" } ] }This step ensures that the EC2 instances have the necessary permissions to invoke models using the Bedrock service.Review and Create Role.Choose Next: Tags, add any tags if needed, then choose Next: Review.Review your settings and select Create role.
Assign Role to Pods for Model Access
Assign a role to the pods to enable access to the models, similar to the configuration for unprotected VM traffic. - Sign in to the AWS Management Console.Go to Elastic Kubernetes Service (EKS).Select your EKS cluster.Go to Access > Pod Identity associations.


