GlobalProtect
Use the GlobalProtect App for Windows
Table of Contents
Use the GlobalProtect App for Windows
| Where Can I Use This? | What Do I Need? |
|---|---|
|
|
This chapter applies to you only if your setup
requires you to enter your GlobalProtect login credentials after
you have logged in to your endpoint (single sign-on is disabled).
We
typically recommend that organizations allow its GlobalProtect users
to log in transparently following app installation. After you log
in to an endpoint with transparent GlobalProtect login, the GlobalProtect
app automatically initiates and connects to the corporate network
without further user intervention.
If your setup requires
you to enter your GlobalProtect credentials, follow the applicable
steps below.
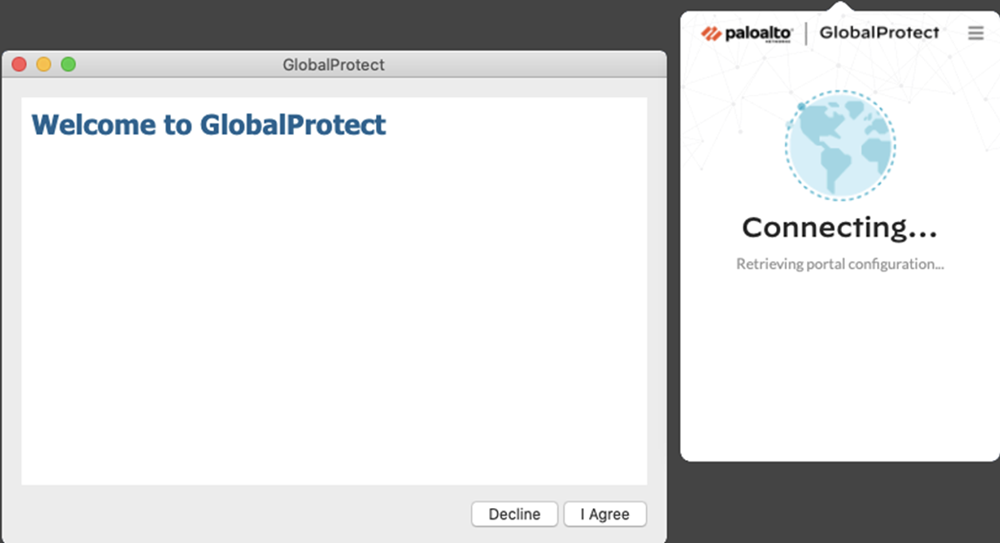
- Log in to GlobalProtect.If you are logging in to the endpoint for the first time, the GlobalProtect app displays a friendly, welcome page upon successful login. Click Get Started.
![]()
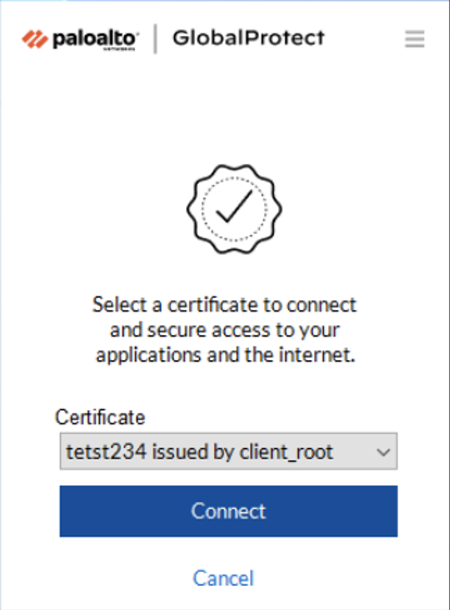
- (Optional) If your administrator configures GlobalProtect with the On-Demand connect method and you are logging in to GlobalProtect for the first time, select the client certificate from a list of valid certificates from the Certificate drop-down to authenticate with the portal or gateway.Launch the GlobalProtect app by clicking the system tray icon. The status panel opens.
![]() (Optional) Review your company’s terms of service before connecting to GlobalProtect if your administrator requires you to see a page to access internal resources.If you do not accept terms of use, you will not be able to connect to GlobalProtect.Optionally, if you click Cancel, you must enter the IP address (or domain) of the GlobalProtect portal, and then click Connect to initiate the connection.
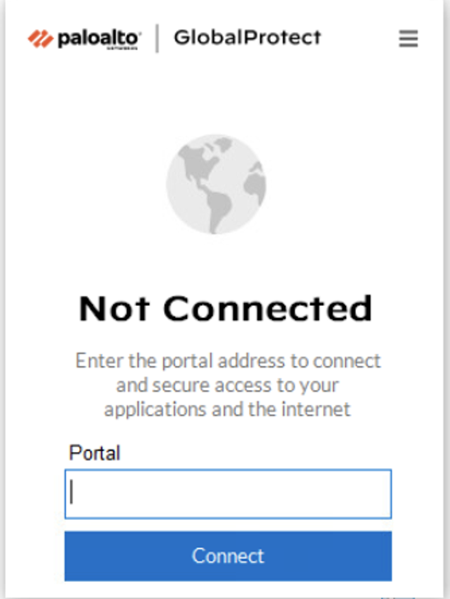
(Optional) Review your company’s terms of service before connecting to GlobalProtect if your administrator requires you to see a page to access internal resources.If you do not accept terms of use, you will not be able to connect to GlobalProtect.Optionally, if you click Cancel, you must enter the IP address (or domain) of the GlobalProtect portal, and then click Connect to initiate the connection.![]() Enter the IP address or domain of the portal that your GlobalProtect administrator provided, and then click Connect.
Enter the IP address or domain of the portal that your GlobalProtect administrator provided, and then click Connect.![]() ( Optional) By default, you are automatically connected to the Best Available gateway, based on the configuration that the administrator defines and the response times of the available gateways. To connect to a different gateway, select the gateway from the Change Gateway drop-down (for external gateways only).This option is only available if your administrator enables manual gateway selection.( Optional) Depending on the connection mode, click Connect to initiate the connection.( Optional) If prompted, enter your Username and Password, and then click Sign In.If your administrator has allowed you to use biometric (fingerprint) information to sign in, you need to first sign-in with a username and password twice (once to save it and again to authenticate); you can then use biometric information to sign in.If authentication is successful, you are connected to your corporate network, and the status panel displays the Connected or Connected - Internal status. If your administrator sets up a GlobalProtect welcome page, it displays after you log in successfully.Connect to the GlobalProtect portal or gateway.You can determine whether you are connected by checking the GlobalProtect system tray icon. If you are not connected, the icon is gray (), and Not Connected appears when the you hover over the icon.
( Optional) By default, you are automatically connected to the Best Available gateway, based on the configuration that the administrator defines and the response times of the available gateways. To connect to a different gateway, select the gateway from the Change Gateway drop-down (for external gateways only).This option is only available if your administrator enables manual gateway selection.( Optional) Depending on the connection mode, click Connect to initiate the connection.( Optional) If prompted, enter your Username and Password, and then click Sign In.If your administrator has allowed you to use biometric (fingerprint) information to sign in, you need to first sign-in with a username and password twice (once to save it and again to authenticate); you can then use biometric information to sign in.If authentication is successful, you are connected to your corporate network, and the status panel displays the Connected or Connected - Internal status. If your administrator sets up a GlobalProtect welcome page, it displays after you log in successfully.Connect to the GlobalProtect portal or gateway.You can determine whether you are connected by checking the GlobalProtect system tray icon. If you are not connected, the icon is gray (), and Not Connected appears when the you hover over the icon.![]()
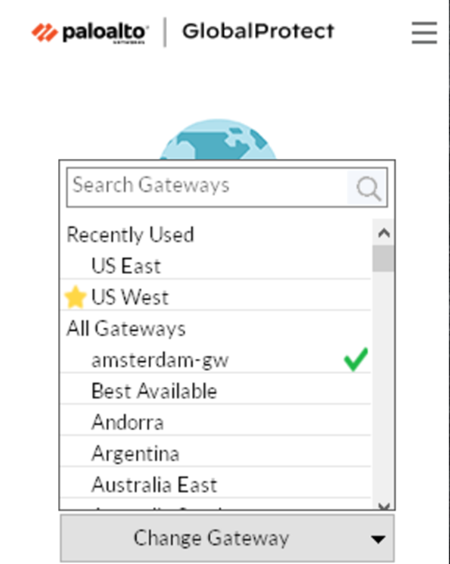
- Launch the GlobalProtect app by clicking the system tray icon. The status panel opens.(Optional) If you are logging in to the GlobalProtect app for the first time, enter the IP address or domain of the GlobalProtect portal, and then click Connect.(Optional) If multiple portals are saved on your app, select a portal from the Change Portal drop-down. By default, the most recently connected portal is pre-selected from the Change Portal drop-down.(Optional) By default, you are automatically connected to the Best Available gateway, based on the configuration that the administrator defines and the response times of the available gateways. To connect to a different gateway, click the Change Gateway drop-down and then use one of the following options:
- Select a gateway manually (external gateways only). This option is only available if your administrator enables manual gateway selection.
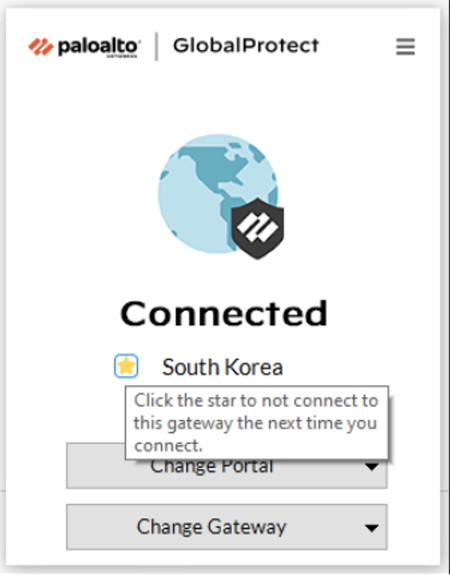
- Assign and automatically connect to a preferred gateway:
- To designate a preferred gateway, click the star icon (). The next time you connect, you will automatically connect to your designated preferred gateway.
![]()
![]() If you later decide you no longer want this gateway as your preferred gateway, you can clear the star icon. The next time you connect you will automatically be connected to the best available gateway
If you later decide you no longer want this gateway as your preferred gateway, you can clear the star icon. The next time you connect you will automatically be connected to the best available gateway![]()
- By default, you automatically connect to the Best Available gateway that is identified by a check mark from the Change Gateway drop-down. If you set the preferred gateway, a star displays by the starred gateway from the Change Gateway drop-down.If your administrator configured manual external gateways in the portal agent configuration, you can choose a specific gateway using the gateway search field.
![]()
(Optional) Depending on the connection mode, click Connect to initiate the connection.(Optional) If prompted, enter your Username and Password and then Connect.If your administrator has allowed you to use biometric (fingerprint) information to sign in, you need to first sign-in with a username and password twice (once to save it and again to authenticate); you can then use biometric information to sign in.When the app connects in external mode, the GlobalProtect system tray icon displays a shield (), and Connected appears when you hover over the icon. When the app connects in internal mode, the GlobalProtect system tray icon displays a house (![]() ), and Internal Network appears when you hover over the icon.
), and Internal Network appears when you hover over the icon.![]() Open the GlobalProtect app.Click the GlobalProtect system tray icon to launch the app interface.A notification appears if your administrator configured the portal to install the Autonomous DEM (ADEM) endpoint agent during the GlobalProtect app installation and has either allowed you to enable the tests or not allowed you to enable the tests. If your administrator has already installed the ADEM endpoint agent and later configured the portal to uninstall the ADEM endpoint agent, a notification appears at the next login.View information about your network connection.After you launch the app, click the hamburger menu on the status panel to open the settings menu. Select Settings to open the GlobalProtect Settings panel, and then select one of the following settings to view and modify the GlobalProtect app:
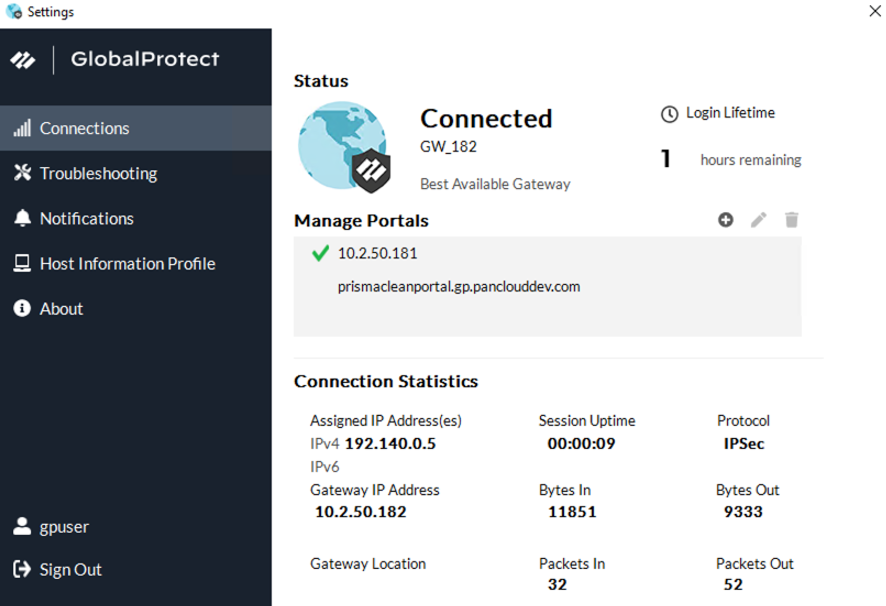
Open the GlobalProtect app.Click the GlobalProtect system tray icon to launch the app interface.A notification appears if your administrator configured the portal to install the Autonomous DEM (ADEM) endpoint agent during the GlobalProtect app installation and has either allowed you to enable the tests or not allowed you to enable the tests. If your administrator has already installed the ADEM endpoint agent and later configured the portal to uninstall the ADEM endpoint agent, a notification appears at the next login.View information about your network connection.After you launch the app, click the hamburger menu on the status panel to open the settings menu. Select Settings to open the GlobalProtect Settings panel, and then select one of the following settings to view and modify the GlobalProtect app:- Connections—The Connections tab displays the portal(s) associated with the GlobalProtect account. You can add, edit, or delete portals from this tab. This tab also displays the gateway to which you are connected. You can view connection statistics about the gateway (for example, gateway IP address, location, and VPN session uptime) when your administrator sets Enable Advanced View to Yes in the GlobalProtect portal agent configuration.The Connections tab also displays the count down timer for the login lifetime.
![]()
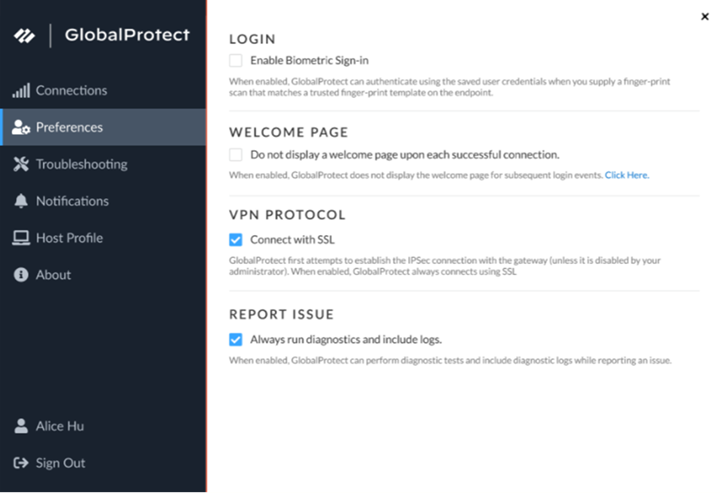
- Preferences—The Preferences tab is now available only if your administrator configures at least one of the following options:
- Enable Biometric Sign-in—You can choose to use biometric (fingerprint) information to sign in. This option is available only if your administrator configures the Save User Credentials to Only with User Fingerprint in the GlobalProtect agent configuration. You must supply a fingerprint that matches a trusted fingerprint template on the endpoint to use a saved password for authentication to GlobalProtect portal and gateways.
- Do not display a welcome page upon each successful connection—You can choose to display a welcome page upon successful login. This option is available only if your administrator sets the Welcome Page to factory-default in the GlobalProtect portal agent configuration.
- Connect with SSL—You can choose to use SSL or stay with IPSec. This option is available only if your administrator sets Connect with SSL Only to User can Change in the GlobalProtect portal agent configuration .
- Always run diagnostic tests and include logs—You can choose to enable the GlobalProtect app to run diagnostic tests and to include diagnostic logs. This option is available only if your administrator enables the GlobalProtect app log collection for troubleshooting on the GlobalProtect portal.
![]()
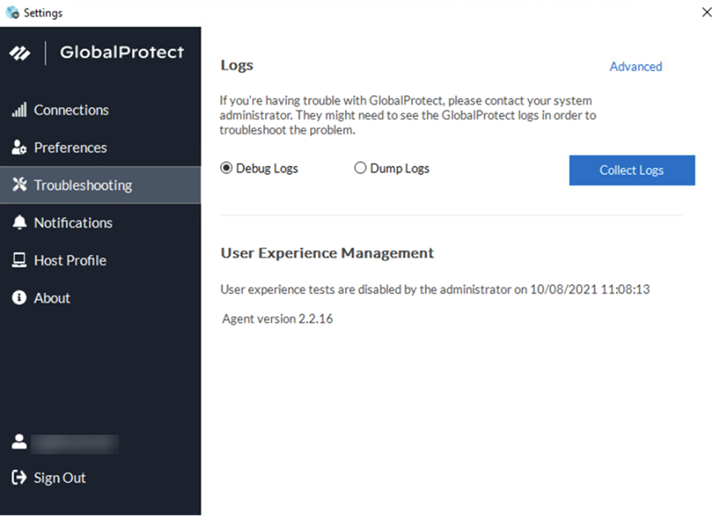
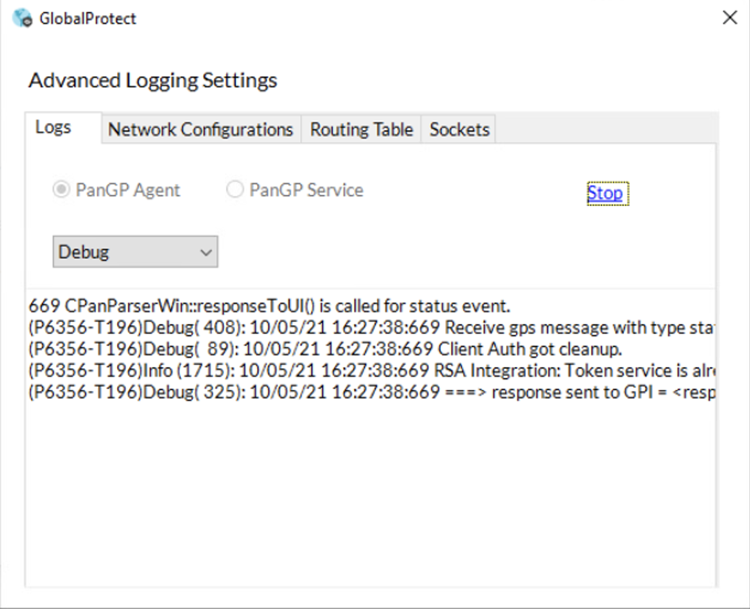
- Troubleshooting—The Troubleshooting tab allows you to Collect Logs and set the logging level to Debug Logs or Dump Logs, and optionally Enable User Experience Tests.In order for the GlobalProtect app to send troubleshooting logs, diagnostic logs, or both to Strata Logging Service for further analysis, you must configure the GlobalProtect portal to enable the GlobalProtect app log collection for troubleshooting. Additionally, you can configure the HTTPS-based destination URLs that can contain IP addresses or fully qualified domain names of the web servers/resources that you want to probe, and to determine issues such as latency or network performance on the end user’s endpoint.You can click Advanced to view detailed information about their endpoint.
![]() The Advanced Logging Settings window displays information about the network configuration, route settings, active connections, and logs.
The Advanced Logging Settings window displays information about the network configuration, route settings, active connections, and logs.![]() When GlobalProtect is connected, you can verify that the Autonomous DEM (ADEM) endpoint agent can perform user experience tests if the Enable user experience tests check box is displayed on the GlobalProtect app. Or you can verify that a message is displayed if your administrator installed the ADEM endpoint agent during the GlobalProtect app installation but does not allow you to enable or disable user experience tests from the GlobalProtect app. By default, heartbeat alerts are still forwarded to ADEM even when GlobalProtect is disabled or disconnected.If your administrator configured the portal to install the Autonomous DEM endpoint agent during the GlobalProtect app installation and has allowed you to enable the tests, select the check box to Enable user experience tests on the GlobalProtect app. This check box does not appear if your administrator does not allow you to enable or disable user experience tests from the GlobalProtect app. Instead, a message is displayed, confirming that the app is enabled to run user experience tests.If you do not select the check box to Enable user experience tests, heartbeat alerts are still forwarded to ADEM.
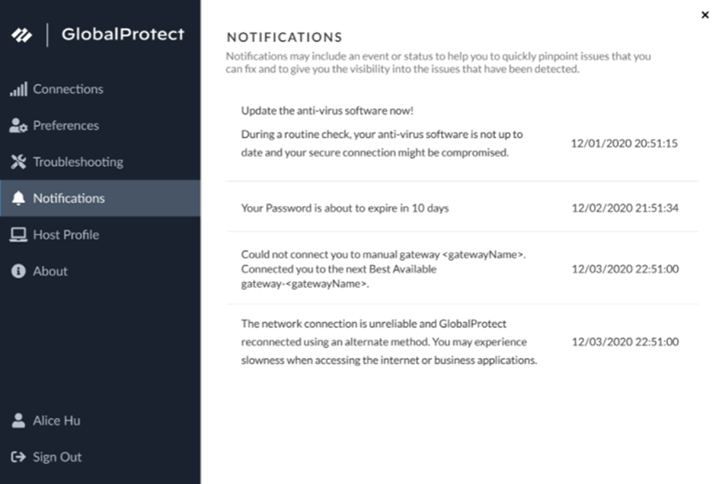
When GlobalProtect is connected, you can verify that the Autonomous DEM (ADEM) endpoint agent can perform user experience tests if the Enable user experience tests check box is displayed on the GlobalProtect app. Or you can verify that a message is displayed if your administrator installed the ADEM endpoint agent during the GlobalProtect app installation but does not allow you to enable or disable user experience tests from the GlobalProtect app. By default, heartbeat alerts are still forwarded to ADEM even when GlobalProtect is disabled or disconnected.If your administrator configured the portal to install the Autonomous DEM endpoint agent during the GlobalProtect app installation and has allowed you to enable the tests, select the check box to Enable user experience tests on the GlobalProtect app. This check box does not appear if your administrator does not allow you to enable or disable user experience tests from the GlobalProtect app. Instead, a message is displayed, confirming that the app is enabled to run user experience tests.If you do not select the check box to Enable user experience tests, heartbeat alerts are still forwarded to ADEM. - Notifications—The Notifications tab displays the detailed information about specific notifications triggered on the GlobalProtect app. You can configure end-user notifications about expiry of GlobalProtect app sessions on the gateway and schedule the display of these custom notifications on the app.
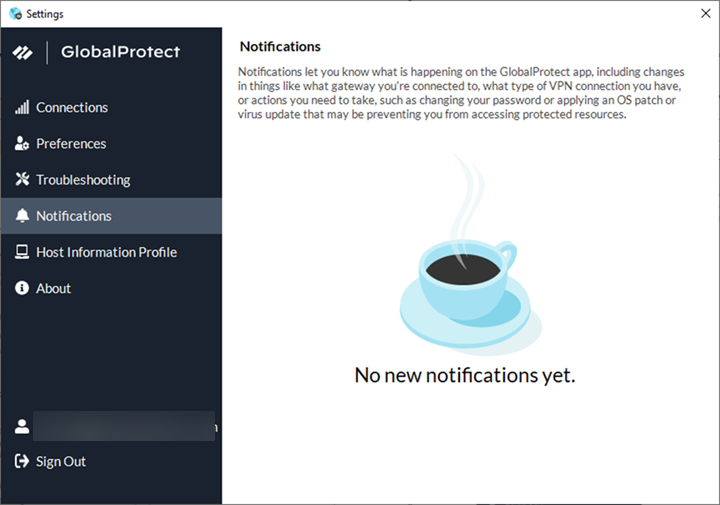
![]() You are also notified if there are no new notifications triggered on the GlobalProtect app.
You are also notified if there are no new notifications triggered on the GlobalProtect app.![]()
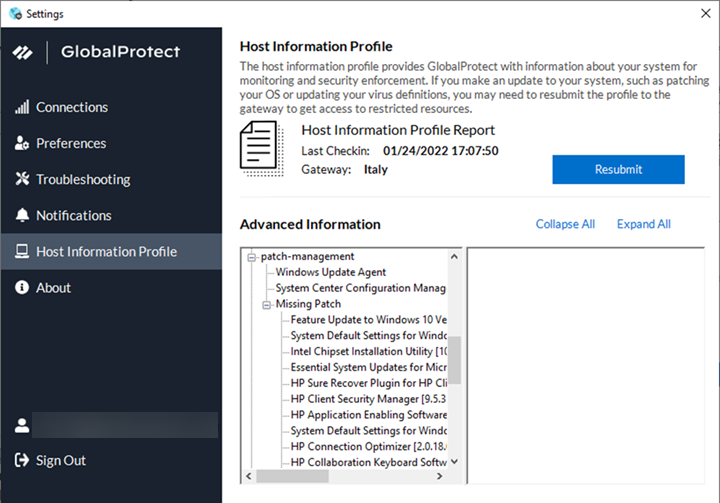
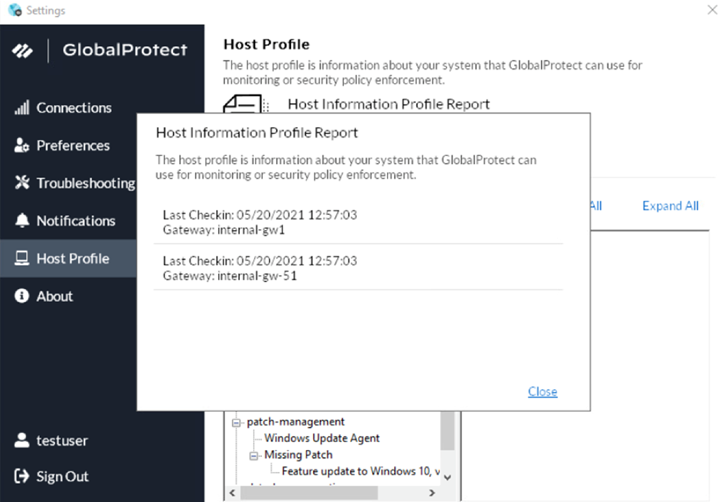
- Host Information Profile—The Host Information Profile tab displays the endpoint data that GlobalProtect uses to monitor and enforce security policies using the Host Information Profile. You can Resubmit to manually resubmit HIP data to the gateway.
![]() If your administrator configured multiple internal gateways in non-tunnel mode and internal host detection, you can click More Details to monitor the Host Information Profile (HIP) report submission for each gateway from a central location to help you to quickly troubleshoot HIP related issues.
If your administrator configured multiple internal gateways in non-tunnel mode and internal host detection, you can click More Details to monitor the Host Information Profile (HIP) report submission for each gateway from a central location to help you to quickly troubleshoot HIP related issues.![]()
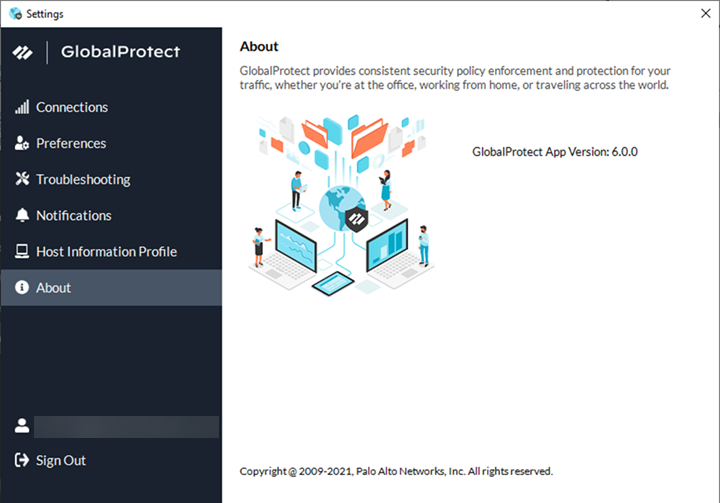
- About—The About tab displays the version of GlobalProtect currently installed on the endpoint and allows you to Check for Updates.
![]()
(Optional) Log in using a new password.If your GlobalProtect administrator configures the GlobalProtect portal agent to Save User Credentials, your credentials are automatically saved to the GlobalProtect app. If your password for accessing the corporate network changes, you must log in to GlobalProtect using your new password.- Launch the GlobalProtect app by clicking the system tray icon. The status panel opens.Click the hamburger menu to open the settings menu.Select Settings to open the GlobalProtect Settings panel.On the GlobalProtect Settings panel, Sign Out to clear your saved user credentials from the GlobalProtect app.After you clear your user credentials, you can reconnect to GlobalProtect with your new username and password.(Optional) Disconnect from GlobalProtect.If your administrator configures GlobalProtect with the On-Demand connect method, you can disconnect from GlobalProtect by clicking Disconnect on the status panel.