Next-Generation Firewall
Configure BGP on an Advanced Routing Engine
Table of Contents
Configure BGP on an Advanced Routing Engine
Configure BGP for a logical router on an Advanced Routing
Engine.
| Where Can I Use This? | What Do I Need? |
|---|---|
|
Perform the following task to configure BGP
for a logical router on an Advanced Routing Engine.
Before you configure BGP, consider the many useful routing profiles and filters that you can apply to BGP peer groups, peers, redistribution
rules, and aggregate route policies, and thereby save configuration time and maintain
consistency. You can create profiles and filters in advance or as you progress through
configuring BGP.
- configure-a-logical-router.html#tabs-id83b76f3d-1148-43e8-b784-502628a974ab_id83b76f3d-1148-43e8-b784-502628a974ab.Enable BGP and configure general BGP settings.
- Select and select a logical router.Select and Enable BGP for this logical router.
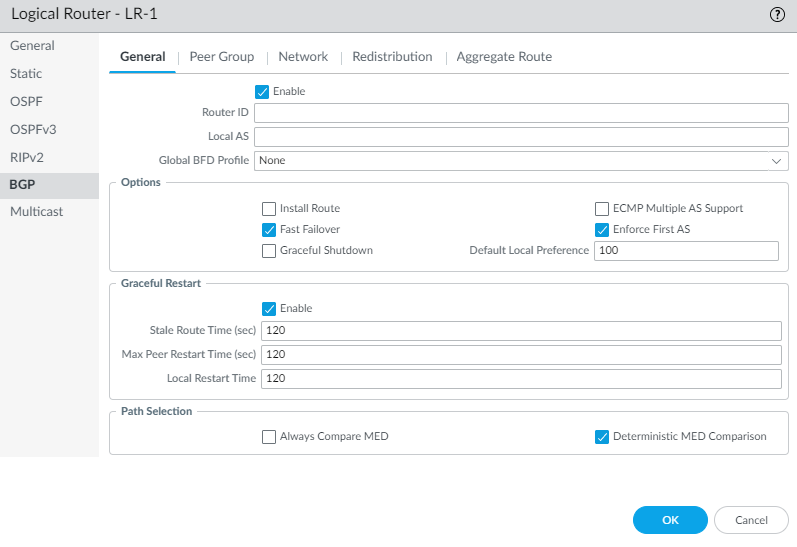
![]() Assign a Router ID to BGP for the logical router, which is typically an IPv4 address to ensure the Router ID is unique.Assign the Local AS, which is the number of the AS to which the logical router belongs; range is 1 to 4,294,967,295.If you want to apply BFD to BGP, for Global BFD Profile select a BFD profile you created, or select the default profile, or create a new BFD profile; default is None (Disable BFD).Select Install Route to install learned BGP routes into the global routing table; default is disabled.Select Fast Failover to have BGP terminate a session with an adjacent peer if the link to that peer goes down, without waiting for the Hold Time to expire; default is enabled.Select Graceful Shutdown to have BGP lower the preference of eBGP peering links during a maintenance operation so that BGP can choose and propagate alternative paths, based on RFC 8326; default is disabled.Select ECMP Multiple AS Support if you configured ECMP and you want to run ECMP over multiple BGP autonomous systems; default is disabled.Enforce First AS to cause the firewall to drop an incoming Update packet from an eBGP peer that does not list the eBGP peer’s own AS number as the first AS number in the AS_PATH attribute; default is enabled.Specify the Default Local Preference that can be used to determine preferences among different paths; range is 0 to 4,294,967,295; default is 100.Enable Graceful Restart and configure the following timers:
Assign a Router ID to BGP for the logical router, which is typically an IPv4 address to ensure the Router ID is unique.Assign the Local AS, which is the number of the AS to which the logical router belongs; range is 1 to 4,294,967,295.If you want to apply BFD to BGP, for Global BFD Profile select a BFD profile you created, or select the default profile, or create a new BFD profile; default is None (Disable BFD).Select Install Route to install learned BGP routes into the global routing table; default is disabled.Select Fast Failover to have BGP terminate a session with an adjacent peer if the link to that peer goes down, without waiting for the Hold Time to expire; default is enabled.Select Graceful Shutdown to have BGP lower the preference of eBGP peering links during a maintenance operation so that BGP can choose and propagate alternative paths, based on RFC 8326; default is disabled.Select ECMP Multiple AS Support if you configured ECMP and you want to run ECMP over multiple BGP autonomous systems; default is disabled.Enforce First AS to cause the firewall to drop an incoming Update packet from an eBGP peer that does not list the eBGP peer’s own AS number as the first AS number in the AS_PATH attribute; default is enabled.Specify the Default Local Preference that can be used to determine preferences among different paths; range is 0 to 4,294,967,295; default is 100.Enable Graceful Restart and configure the following timers:- Stale Route Time (sec)—Specifies the length of time, in seconds, that a route can stay in the stale state (range is 1 to 3,600; default is 120).
- Max Peer Restart Time (sec)—Specifies the maximum length of time, in seconds, that the local device accepts as a grace period restart time for peer devices (range is 1 to 3,600; default is 120).
- Local Restart Time—Specifies the length of time, in seconds, that the local device waits to restart. This value is advertised to peers (range is 1 to 3,600; default is 120).
For Path Selection:- Always Compare MED—Enable this comparison to choose paths from neighbors in different autonomous systems; default is disabled.
- Deterministic MED Comparison—Enable this comparison to choose between routes that are advertised by IBGP peers (BGP peers in the same autonomous system); default is enabled.
Click OK.Configure a BGP peer group.- Select and select a logical router.Select and Add a BGP peer group by Name (maximum of 63 characters). TThe name must start with an alphanumeric character, underscore (_), hyphen (-), or dot (.) and can contain alphanumeric characters, underscores, hyphens and dots. A space is not allowed. The name must be unique within the logical router and across all logical routers.
![]() Enable the peer group.Select the Type of peer group: IBGP or EBGP.To specify many IPv4 Address Family options for the peer group, select an AFI Profile that you created, select the default profile, or create a new BGP Address Family profile; the default is None.To specify many IPv6 Address Family options for the peer group, select an AFI Profile that you created, select the default profile, or create a new BGP Address Family profile; the default is None.To apply IPv4 Filtering Profile options to the peer group, select a BGP Filtering Profile that you created or create a new BGP Filtering profile; the default is None.A BGP Filtering Profile describes how to configure many BGP options for IPv4, such as import or export BGP routes, accept or prevent routes being added to the local BGP RIB, conditionally advertise routes, and unsuppress dampened or summarized routes.To apply IPv6 Filtering Profile options to the peer group, select a BGP Filtering Profile that you created or create a new BGP Filtering profile; the default is None.A BGP Filtering Profile describes how to configure many BGP options for IPv6, such as import or export BGP routes, accept or prevent routes being added to the local BGP RIB, conditionally advertise routes, and unsuppress dampened or summarized routes.For Connection Options, select an Auth Profile or create a new BGP Authentication profile to control MD5 authentication between BGP peers in the peer group. Default is None.Select a Timer Profile or create a new BGP Timer Profile to control various BGP timers that affect keepalive and update messages that advertise routes. Default is None.Set Multi Hop—the time-to-live (TTL) value in the IP header (range is 0 to 255; default is 0). The default value of 0 means 1 for eBGP. The default value of 0 means 255 for iBGP.Select a Dampening Profile or create a new Dampening Profile to determine how to penalize a flapping route to suppress it from being used until it stabilizes. Default is None.Add a BGP peer to the peer group.
Enable the peer group.Select the Type of peer group: IBGP or EBGP.To specify many IPv4 Address Family options for the peer group, select an AFI Profile that you created, select the default profile, or create a new BGP Address Family profile; the default is None.To specify many IPv6 Address Family options for the peer group, select an AFI Profile that you created, select the default profile, or create a new BGP Address Family profile; the default is None.To apply IPv4 Filtering Profile options to the peer group, select a BGP Filtering Profile that you created or create a new BGP Filtering profile; the default is None.A BGP Filtering Profile describes how to configure many BGP options for IPv4, such as import or export BGP routes, accept or prevent routes being added to the local BGP RIB, conditionally advertise routes, and unsuppress dampened or summarized routes.To apply IPv6 Filtering Profile options to the peer group, select a BGP Filtering Profile that you created or create a new BGP Filtering profile; the default is None.A BGP Filtering Profile describes how to configure many BGP options for IPv6, such as import or export BGP routes, accept or prevent routes being added to the local BGP RIB, conditionally advertise routes, and unsuppress dampened or summarized routes.For Connection Options, select an Auth Profile or create a new BGP Authentication profile to control MD5 authentication between BGP peers in the peer group. Default is None.Select a Timer Profile or create a new BGP Timer Profile to control various BGP timers that affect keepalive and update messages that advertise routes. Default is None.Set Multi Hop—the time-to-live (TTL) value in the IP header (range is 0 to 255; default is 0). The default value of 0 means 1 for eBGP. The default value of 0 means 255 for iBGP.Select a Dampening Profile or create a new Dampening Profile to determine how to penalize a flapping route to suppress it from being used until it stabilizes. Default is None.Add a BGP peer to the peer group.- Add a peer by Name (maximum of 63 characters). The name must start with an alphanumeric character, underscore (_), hyphen (-), or dot (.) and can contain alphanumeric characters, underscores, hyphens and dots. A space is not allowed. The name must be unique within the logical router and across all logical routers.Enable the peer; default is enabled.Select Passive to prevent the peer from initiating a session with its neighbors; default is disabled.Enter the Peer AS to which the peer belongs; range is 1 to 4,294,967,295.Select Addressing and select whether the peer will Inherit IPv4 and IPv6 AFI and filtering profiles from the peer group: Yes (default) or No.If you chose Yes, specify the following for the peer:
- For Local Address, select the Interface for which you are configuring BGP. If the interface has more than one IP address, select the IP Address for that interface to be the BGP peer.
- For Peer Address, select either IP and select the IP address or select or create an address object, or select FQDN and enter the FQDN or address object that is type FQDN.
The firewall uses only one IP address (from each IPv4 or IPv6 address type) from the DNS resolution of the FQDN. If the DNS resolution returns more than one address, the firewall uses the preferred IP address that matches the IP family type (IPv4 or IPv6) configured for the BGP peer. The preferred IP address is the first address the DNS server returns in its initial response. The firewall retains this address as preferred as long as the address appears in subsequent responses regardless of its order.![]() If you chose No for Inherit addressing from the peer group, specify the following for the peer:
If you chose No for Inherit addressing from the peer group, specify the following for the peer:- To specify many IPv4 Address Family options for the peer, select an
AFI Profile that you created, select the
default profile, select inherit (Inherit from
Peer-Group), or create a new BGP Address Family profile; the default is
none (Disable IPv4 AFI).The AFI Profile allows you to specify that the peer is a Route Reflector client. The Route Reflector reflects all the advertisements from all its peers to all the other peers, thus avoiding the need for the iBGP to be fully meshed. If you declare the peer a Route Reflector client, the BGP process reflects all of the updates to that peer.
- To specify many IPv6 Address Family options for the peer, select an
AFI Profile that you created, select inherit (Inherit
from Peer-Group), or create a new BGP Address Family profile; the default is
none (Disable IPv6 AFI).The AFI Profile allows you to specify that the peer is a Route Reflector client. The Route Reflector reflects all the advertisements from all its peers to all the other peers, thus avoiding the need for the iBGP to be fully meshed. If you declare the peer a Route Reflector client, the BGP process reflects all of the updates to that peer.
- To apply IPv4 Filtering Profile options to the peer, select a BGP Filtering Profile that you created, select inherit (Inherit from Peer-Group), or create a new BGP Filtering profile; the default is none (Disable IPv4 Filtering).
- To apply IPv6 Filtering Profile options to the peer, select a BGP Filtering Profile that you created, select inherit (Inherit from Peer-Group), or create a new BGP Filtering profile; the default is none (Disable IPv6 Filtering).
- For Local Address, select the Interface for which you are configuring BGP. If the interface has more than one IP Address, select the IP address for that interface to be the BGP peer.
- For Peer Address, select either IP and select the IP address or select or create an address object, or select FQDN and enter the FQDN or address object that is type FQDN.
![]() A BGP peer group (or a peer) can have both an IPv4 Address Family profile and an IPv6 Address Family profile applied to it. All peers belonging to that peer group will automatically have Addressing set to Inherit No. All peers in the peer group will also have IPv4 Address Family profile, IPv6 Address Family profile, IPv4 Filtering Profile, and IPv6 Filtering Profile set to none by default. In order for routing to function properly, the peering interface must have both an IPv4 address and IPv6 address assigned. You can select inherit (Inherit from Peer-Group) or override the peer group by selecting a specific profile for the peer. For example, you can configure a peer to inherit the IPv4 Address Family profile and inherit the IPv4 Filtering Profile, and select an IPv6 Address Family profile and IPv6 Filtering Profile to override those profiles from the peer group.Select Connection Options for the peer in order to apply settings that differ from those of the peer group.
A BGP peer group (or a peer) can have both an IPv4 Address Family profile and an IPv6 Address Family profile applied to it. All peers belonging to that peer group will automatically have Addressing set to Inherit No. All peers in the peer group will also have IPv4 Address Family profile, IPv6 Address Family profile, IPv4 Filtering Profile, and IPv6 Filtering Profile set to none by default. In order for routing to function properly, the peering interface must have both an IPv4 address and IPv6 address assigned. You can select inherit (Inherit from Peer-Group) or override the peer group by selecting a specific profile for the peer. For example, you can configure a peer to inherit the IPv4 Address Family profile and inherit the IPv4 Filtering Profile, and select an IPv6 Address Family profile and IPv6 Filtering Profile to override those profiles from the peer group.Select Connection Options for the peer in order to apply settings that differ from those of the peer group.![]() Select an Auth Profile, inherit (Inherit from Peer-Group) (the default), or create a new BGP Authentication profile to control MD5 authentication between BGP peers.Select a Timer Profile, inherit (Inherit from Peer-Group) (the default), create a new BGP Timer Profile, or select the default profile to control various BGP timers that affect keepalive and update messages that advertise routes.Set Multi Hop, which is the time-to-live (TTL) value in the IP header (range is 0 to 255). The default setting is inherit (Inherit from Peer-Group).Select a Dampening Profile, inherit (Inherit from Peer-Group) (the default), or create a new Dampening Profile to determine how to penalize a flapping route to suppress it from being used until it stabilizes.Select Advanced and Enable Sender Side Loop Detection to have the firewall check the AS_PATH attribute of a route in the BGP RIB before it sends the route in an Update, to ensure that the peer AS number isn't on the AS_PATH list. The firewall doesn't advertise the route if the peer AS number is in the AS_PATH list. Usually, the receiver detects loops, but this optimization feature has the sender perform loop detection. Disable this feature to have the receiver perform loop detection.To apply a BFD Profile to the peer (which overrides the BFD setting for BGP, as long as BFD is not disabled for BGP at the logical router level), select one of the following:
Select an Auth Profile, inherit (Inherit from Peer-Group) (the default), or create a new BGP Authentication profile to control MD5 authentication between BGP peers.Select a Timer Profile, inherit (Inherit from Peer-Group) (the default), create a new BGP Timer Profile, or select the default profile to control various BGP timers that affect keepalive and update messages that advertise routes.Set Multi Hop, which is the time-to-live (TTL) value in the IP header (range is 0 to 255). The default setting is inherit (Inherit from Peer-Group).Select a Dampening Profile, inherit (Inherit from Peer-Group) (the default), or create a new Dampening Profile to determine how to penalize a flapping route to suppress it from being used until it stabilizes.Select Advanced and Enable Sender Side Loop Detection to have the firewall check the AS_PATH attribute of a route in the BGP RIB before it sends the route in an Update, to ensure that the peer AS number isn't on the AS_PATH list. The firewall doesn't advertise the route if the peer AS number is in the AS_PATH list. Usually, the receiver detects loops, but this optimization feature has the sender perform loop detection. Disable this feature to have the receiver perform loop detection.To apply a BFD Profile to the peer (which overrides the BFD setting for BGP, as long as BFD is not disabled for BGP at the logical router level), select one of the following:- The default profile.
- An existing BFD profile.
- Inherit-lr-global-setting (Inherit Protocol’s Global BFD Profile) (default)—Peer inherits the BFD profile that you selected globally for BGP for the logical router.
- None (Disable BFD) for the peer.
- Create a new BFD profile.
![]() Click OK.Specify network prefixes to advertise to neighbors.The Network functionality is especially helpful after moving a firewall to a different subnet or after a temporary change in a network.
Click OK.Specify network prefixes to advertise to neighbors.The Network functionality is especially helpful after moving a firewall to a different subnet or after a temporary change in a network.- Select Network.Always Advertise Network Route (default is enabled) to always advertise the configured network routes to BGP peers, regardless of whether they are reachable or not. If this is unchecked, the firewall advertises the network routes only if they are resolved using the local route table.Select IPv4 or IPv6 to select type of prefix.Add a Network prefix to advertise to neighbors.Select Unicast to advertise this network route in the Unicast Address Family; default is enabled. If unchecked, the firewall does not advertise the route in the Unicast SAFI.(IPv4 only) Select Multicast to advertise this network route into the Multicast Address Family. Default is disabled; the firewall does not advertise this network route in the Multicast SAFI.(IPv4 only) Select Backdoor to prevent BGP from advertising the prefix outside of the AS and instead to keep the route within the AS. A backdoor is a BGP route that has a higher administrative distance than an IGP route. Internally, the administrative distance for the prefix is increased so that the prefix isn’t preferred, but is still available if needed, in the event of a link failure elsewhere. Default is disabled.
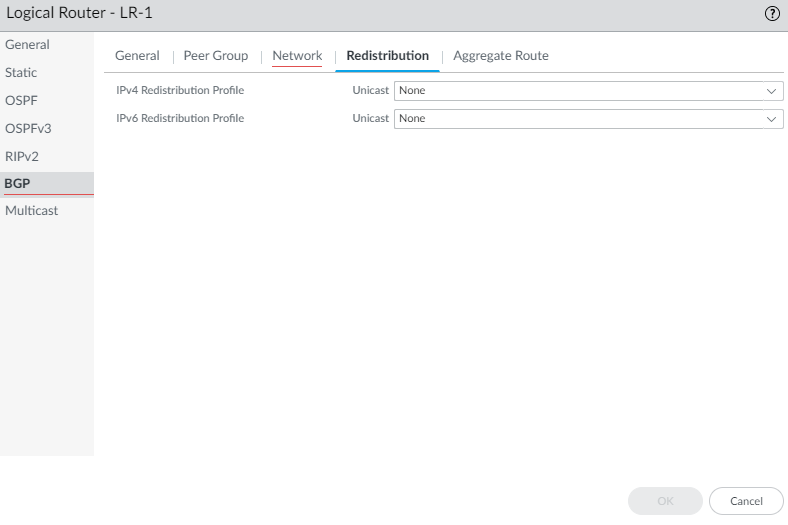
![]() Redistribute static, connected, OSPF, OSPFv3, or RIPv2 routes into BGP.Within a BGP Redistribution Profile, use the flexibility of route maps to specify conditions that determine which routes to redistribute and to specify which attributes to set.
Redistribute static, connected, OSPF, OSPFv3, or RIPv2 routes into BGP.Within a BGP Redistribution Profile, use the flexibility of route maps to specify conditions that determine which routes to redistribute and to specify which attributes to set.- Select Redistribution.To redistribute IPv4 routes, for IPv4 Redistribution Profile -- Unicast, select a BGP Redistribution profile or create a new Redistribution profile; default is None.To redistribute IPv6 routes, for IPv6 Redistribution Profile -- Unicast, select a BGP Redistribution profile or create a new Redistribution profile; default is None.
![]() Create an aggregate route policy to summarize routes that BGP learns and then advertises to peers.
Create an aggregate route policy to summarize routes that BGP learns and then advertises to peers.- Select Aggregate Route and Add an aggregate route policy by Name (maximum of 63 characters). The name must start with an alphanumeric character, underscore (_), hyphen (-), or dot (.) and can contain alphanumeric characters, underscores, hyphens and dots. A space is not allowed.Enter a helpful Description of the policy.Enable the policy.
![]() Select Summary Only to advertise to neighbors only the Summary Prefix and not the routes that were summarized; this reduces traffic and avoids increasing the size of the neighbors’ routing tables unnecessarily (default is disabled). If you want to advertise both the aggregate route and the individual routes that make up the aggregate route, leave Summary Only unchecked.Summary Only and Suppress Map are mutually exclusive; you cannot specify both.If you want to use Summary Only, but you also want to advertise an individual route, then you create a BGP Filtering Profile that includes an Unsuppress Map route map that matches on the individual route.Select AS Set to advertise the prefix with the list of AS numbers that make up the aggregate route; default is disabled.Select Aggregate Same MED Only to cause route aggregation only if routes have the same Multi-Exit Discriminator (MED) values; default is enabled.Select the Type of aggregate route: IPv4 or IPv6.Calculate the routes you want to summarize and then enter the Summary Prefix that spans those routes, by specifying an IP address/netmask or address object.To prevent individual routes from being aggregated (suppress the aggregation), select a Suppress Map route map or create a new BGP route map whose match criterion specifies an IPv4 or IPv6 address Access List or Prefix List that includes those routes; default is None.Remember that the purpose of the Suppress route map is to prevent certain routes from being aggregated in an advertisement. Therefore, in the route map you permit the routes that you want to suppress from being aggregated (you don’t deny the routes that you want to suppress from being aggregated).Summary Only and Suppress Map are mutually exclusive; you cannot specify both.To set attribute information for the Summary Prefix (which has no attributes because you just created that combination of routes), select an Attribute Map route map or create a new BGP route map and set the attributes for the Summary Prefix (no match criteria). If there is no route map (None), the Summary Prefix will have the default attributes. Default is None.Click OK.(Optional) Control BGP routes that are placed in the global RIB.You might learn routes and redistribute them, but not want them in the protocol’s local route table or global RIB. You might want to add only specific routes to the global RIB.
Select Summary Only to advertise to neighbors only the Summary Prefix and not the routes that were summarized; this reduces traffic and avoids increasing the size of the neighbors’ routing tables unnecessarily (default is disabled). If you want to advertise both the aggregate route and the individual routes that make up the aggregate route, leave Summary Only unchecked.Summary Only and Suppress Map are mutually exclusive; you cannot specify both.If you want to use Summary Only, but you also want to advertise an individual route, then you create a BGP Filtering Profile that includes an Unsuppress Map route map that matches on the individual route.Select AS Set to advertise the prefix with the list of AS numbers that make up the aggregate route; default is disabled.Select Aggregate Same MED Only to cause route aggregation only if routes have the same Multi-Exit Discriminator (MED) values; default is enabled.Select the Type of aggregate route: IPv4 or IPv6.Calculate the routes you want to summarize and then enter the Summary Prefix that spans those routes, by specifying an IP address/netmask or address object.To prevent individual routes from being aggregated (suppress the aggregation), select a Suppress Map route map or create a new BGP route map whose match criterion specifies an IPv4 or IPv6 address Access List or Prefix List that includes those routes; default is None.Remember that the purpose of the Suppress route map is to prevent certain routes from being aggregated in an advertisement. Therefore, in the route map you permit the routes that you want to suppress from being aggregated (you don’t deny the routes that you want to suppress from being aggregated).Summary Only and Suppress Map are mutually exclusive; you cannot specify both.To set attribute information for the Summary Prefix (which has no attributes because you just created that combination of routes), select an Attribute Map route map or create a new BGP route map and set the attributes for the Summary Prefix (no match criteria). If there is no route map (None), the Summary Prefix will have the default attributes. Default is None.Click OK.(Optional) Control BGP routes that are placed in the global RIB.You might learn routes and redistribute them, but not want them in the protocol’s local route table or global RIB. You might want to add only specific routes to the global RIB.- Select and select a logical router.Select RIB Filter to allow routes into or prevent routes from being added to the global RIB.
![]() To filter IPv4 BGP routes, in the IPv4 area, for BGP Route-Map, select a Redistribution Route Map or create a new one.To filter IPv6 BGP routes, in the IPv6 area, for BGP Route-Map, select a Redistribution Route Map or create a new one.Click OK.
To filter IPv4 BGP routes, in the IPv4 area, for BGP Route-Map, select a Redistribution Route Map or create a new one.To filter IPv6 BGP routes, in the IPv6 area, for BGP Route-Map, select a Redistribution Route Map or create a new one.Click OK.