Next-Generation Firewall
Create BFD Profiles
Table of Contents
Create BFD Profiles
Create a BFD profile to apply to static routes or a routing
protocol on the Advanced Routing Engine.
| Where Can I Use This? | What Do I Need? |
|---|---|
|
On an Advanced Routing Engine, you can use
Bidirectional Forwarding Detection (BFD) profiles to easily apply
BFD settings to a static route or routing protocol. You can use
the default profile (which is read-only) or create new BFD profiles.
Perform
the following before creating a BFD profile:
- configure-a-logical-router.html#tabs-id83b76f3d-1148-43e8-b784-502628a974ab_id83b76f3d-1148-43e8-b784-502628a974ab.
- Configure one or more static routes if you are applying BFD to a static route.
- Configure a routing protocol (BGP, OSPF, OSPFv3, or RIPv2) if you are applying BFD to a routing protocol. For example, you can apply a BFD profile when configuring general BGP settings.
The effectiveness of your
BFD implementation depends on various factors, such as traffic loads, network
conditions, how aggressive your BFD settings are, and how busy the
dataplane is.
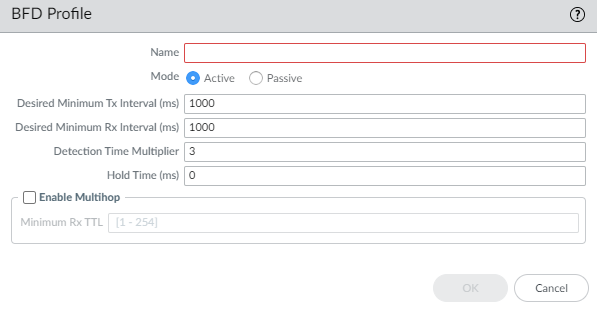
- Select .Add a BFD profile by Name (maximum of 63 characters). The name is case-sensitive and must be unique on the firewall. Use only letters, numbers, hyphens, and underscores. No dot (.) or space is allowed.
![]() Select the Mode in which BFD operates:
Select the Mode in which BFD operates:- Active—BFD initiates sending control packets to peer (default). At least one of the BFD peers must be Active; both can be Active.
- Passive—BFD waits for peer to send control packets and responds as required.
Enter the Desired Minimum Tx Interval (ms), the minimum interval, in milliseconds, at which you want the BFD protocol to send BFD control packets; you are thus negotiating the transmit interval with the peer. Range for PA-7000 Series, PA-5200 Series, and PA-5450 firewall is 50 to 10,000; range for PA-3200 Series is 100 to 10,000; range for VM-Series is 200 to 10,000. Default is 1,000.If you have multiple routing protocols that use different BFD profiles on the same interface, configure the BFD profiles with the same Desired Minimum Tx Interval.On a PA-7000 Series firewall, set the Desired Minimum Tx Interval to 100 or greater; a value less than 100 is at risk of causing BFD flaps.Enter the Required Minimum Rx Interval (ms). This is the minimum interval, in milliseconds, at which BFD can receive BFD control packets. Range for PA-7000 Series, PA-5200 Series, and PA-5450 firewall is 50 to 10,000; range for PA-3200 Series is 100 to 10,000; range for VM-Series is 200 to 10,000. Default is 1,000.On a PA-7000 Series firewall, set the Desired Minimum Rx Interval to 100 or greater; a value less than 100 is at risk of causing BFD flaps.Enter the Detection Time Multiplier. Range is 2 to 255, default is 3.The local system calculates the detection time as the Detection Time Multiplier received from the remote system multiplied by the agreed transmit interval of the remote system (the greater of the Required Minimum Rx Interval and the last received Desired Minimum Tx Interval). If BFD does not receive a BFD control packet from its peer before the detection time expires, a failure has occurred.When creating a BFD profile, take into consideration that the firewall is a session-based device typically at the edge of a network or data center and may have slower links than a dedicated router. Therefore, the firewall likely needs a longer interval and a higher multiplier than the fastest settings allowed. A detection time that is too short can cause false failure detections when the issue is really just traffic congestion.Enter the Hold Time (ms), the delay, in milliseconds, after a link comes up before BFD transmits BFD control packets. Hold Time applies to BFD Active mode only. If BFD receives BFD control packets during the Hold Time, it ignores them. Range is 0 to 120,000; default is 0, which means no transmit Hold Time is used; BFD sends and receives BFD control packets immediately after the link is established.Enter the Minimum Rx TTL, the minimum Time-to-Live (number of hops) BFD will accept (receive) in a BFD control packet when BGP supports multihop BFD. Range is 1 to 254; there is no default.The firewall drops the packet if it receives a smaller TTL than its configured Minimum Rx TTL. For example, if the peer is 5 hops away and the peer transmits a BFD packet with a TTL of 100 to the firewall, and if the Minimum Rx TTL for the firewall is set to 96 or higher, the firewall drops the packet.Click OK.