Next-Generation Firewall
Create RIPv2 Routing Profiles
Table of Contents
Create RIPv2 Routing Profiles
Create routing profiles for RIPv2 global timers, authentication,
and route redistribution on an Advanced Routing Engine.
| Where Can I Use This? | What Do I Need? |
|---|---|
|
The Advanced Routing Engine supports RIPv2;
create the following profiles to apply to the protocol. The profiles
can be used across multiple logical routers and virtual systems.
This topic describes the profiles and how to configure them.
- RIPv2 Global Timer Profiles—Specify RIPv2 update, expire, and delete intervals. Apply the profile in the RIPv2 general configuration.
- RIPv2 Interface Authentication Profiles—Specify RIPv2 authentication using a password or MD5; apply the profile in the RIPv2 general configuration.
- RIPv2 Redistribution Profiles—Specify how to redistribute IPv4 static routes, connected routes, BGP IPv4 routes, and OSPFv2 routes to RIPv2. Apply the profile in the RIPv2 general configuration.
- Create a RIPv2 Global Timer Profile.
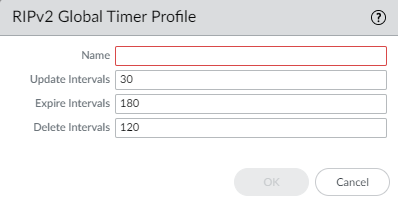
- Select .Add a RIPv2 Global Timer Profile by Name (a maximum of 63 characters). The name must start with an alphanumeric character, underscore (_), or hyphen (-), and can contain a combination of alphanumeric characters, underscore, or hyphen. No dot (.) or space is allowed.
![]() Specify Update Interval in seconds, which is the length of time between regularly scheduled Update messages; range is 5 to 2,147,483,647; default is 30.Specify Expire Interval in seconds, which is the length of time that a route can be in the routing table without being updated; range is 5 to 2,147,483,647; default is 180. After the Expire Interval is reached, the route is still included in Update messages until the Delete Interval is reached.Specify Delete Interval in seconds; range is 5 to 2,147,483,647; default is 120. When an expired route in the routing table reaches the Delete Interval, it is deleted from the routing table.Click OK.Create a RIPv2 Authentication Profile.
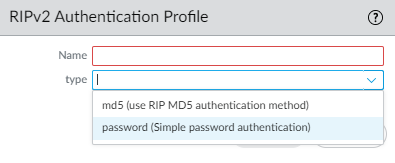
Specify Update Interval in seconds, which is the length of time between regularly scheduled Update messages; range is 5 to 2,147,483,647; default is 30.Specify Expire Interval in seconds, which is the length of time that a route can be in the routing table without being updated; range is 5 to 2,147,483,647; default is 180. After the Expire Interval is reached, the route is still included in Update messages until the Delete Interval is reached.Specify Delete Interval in seconds; range is 5 to 2,147,483,647; default is 120. When an expired route in the routing table reaches the Delete Interval, it is deleted from the routing table.Click OK.Create a RIPv2 Authentication Profile.- Select .Add a RIPv2 Authentication Profile by Name (a maximum of 63 characters). The name must start with an alphanumeric character, underscore (_), or hyphen (-), and can contain a combination of alphanumeric characters, underscore, or hyphen. No dot (.) or space is allowed.
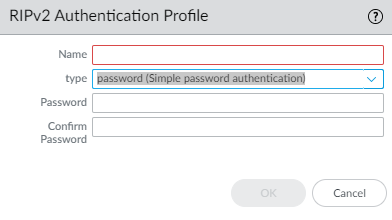
![]() Specify the type of authentication: md5 (use RIP MD5 authentication method) or password (Simple password authentication).For Simple password authentication, enter the Password (a maximum of 16 characters) and Confirm Password.
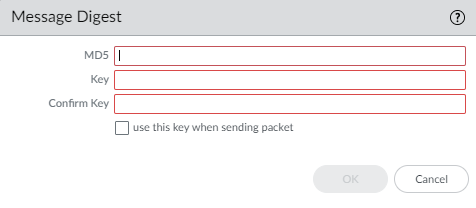
Specify the type of authentication: md5 (use RIP MD5 authentication method) or password (Simple password authentication).For Simple password authentication, enter the Password (a maximum of 16 characters) and Confirm Password.![]() For RIP MD5 authentication:
For RIP MD5 authentication:- Add an MD5 Key-ID; range is 0 to 255.
- Enter the Key (a maximum of 16 alphanumeric characters) and Confirm Key.
- Select use this key when sending packet to make this key the Preferred key.
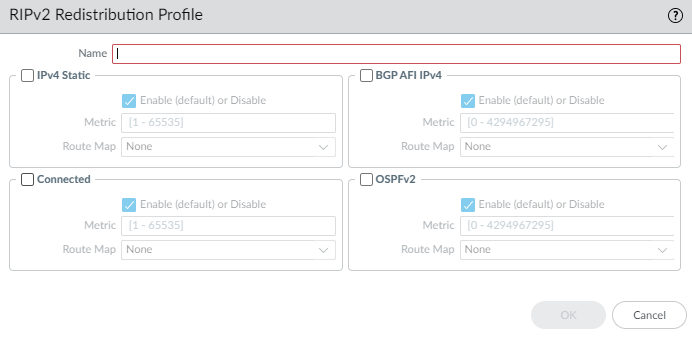
![]() Click OK.Create a RIPv2 Redistribution Profile to specify any combination of IPv4 static routes, connected routes, BGP IPv4 routes, and OSPFv2 routes to redistribute to RIPv2.
Click OK.Create a RIPv2 Redistribution Profile to specify any combination of IPv4 static routes, connected routes, BGP IPv4 routes, and OSPFv2 routes to redistribute to RIPv2.- Select .Add a RIPv2 Redistribution Profile by Name (a maximum of 63 characters). The name must start with an alphanumeric character, underscore (_), or hyphen (-), and can contain a combination of alphanumeric characters, underscore, or hyphen. No dot (.) or space is allowed.
![]() Select IPv4 Static to allow configuration of this portion of the profile.
Select IPv4 Static to allow configuration of this portion of the profile.- Enable the IPv4 static redistribution portion of the profile.
- Specify the Metric to apply to the static routes being redistributed into RIPv2 (range is 1 to 65,535).
- Select a Redistribute Route-Map or create a new Redistribute Route Map whose match criteria control which IPv4 static routes to redistribute into RIPv2. Default is None. If the route map Set configuration includes a Metric Action and Metric Value, they are applied to the redistributed route. Otherwise, the Metric configured on this redistribution profile is applied to the redistributed route.
Select Connected to allow configuration of this portion of the profile.- Enable the connected route redistribution portion of the profile.
- Specify the Metric to apply to the connected routes being redistributed into RIPv2 (range is 1 to 65,535).
- Select a Redistribute Route-Map or create a new Redistribute Route Map. Default is None. If the route map Set configuration includes a Metric Action and Metric Value, they are applied to the redistributed route. Otherwise, the Metric configured on this redistribution profile is applied to the redistributed route.
Select BGP AFI IPv4 to allow configuration of this portion of the profile.- Enable the BGP IPv4 route redistribution portion of the profile.
- Specify the Metric to apply to the BGP routes being redistributed into RIPv2 (range is 0 to 4,294,967,295).
- Select a Redistribute Route-Map or create a new Redistribute Route Map. Default is None. If the route map Set configuration includes a Metric Action and Metric Value, they are applied to the redistributed route. Otherwise, the Metric configured on this redistribution profile is applied to the redistributed route.
Select OSPFv2 to allow configuration of this portion of the profile.- Enable the OSPFv2 route redistribution portion of the profile.
- Enable the IPv4 default route redistribution portion of the profile.
- Specify the Metric to apply to the default route being redistributed into RIPv2 (range is 0 to 4,294,967,295).
- Select a Redistribute Route-Map or create a new Redistribute Route Map. Default is None.If the route map Set configuration includes a Metric Action and Metric Value, they are applied to the redistributed route. Otherwise, the Metric configured on this redistribution profile is applied to the redistributed route.
Click OK.