Next-Generation Firewall
Cloud Management
Table of Contents
Cloud Management
Explicit Web Proxy for Strata Cloud Manager is supported
only with the legacy router stack. If you'd like this enabled, please reach out to
your account team.
You can configure an explicit web proxy on cloud-managed firewalls using Strata Cloud Manager.
- (VM Series only) If you have not already done so, activate the license for web proxy.You must activate the web proxy license for the PA-1400 Series, PA-3400 Series, PA-5400 Series, and VM-Series. Learn how to activate your subscription licenses for the PA-Series firewalls or activate the web proxy license for the VM-Series in the following step.
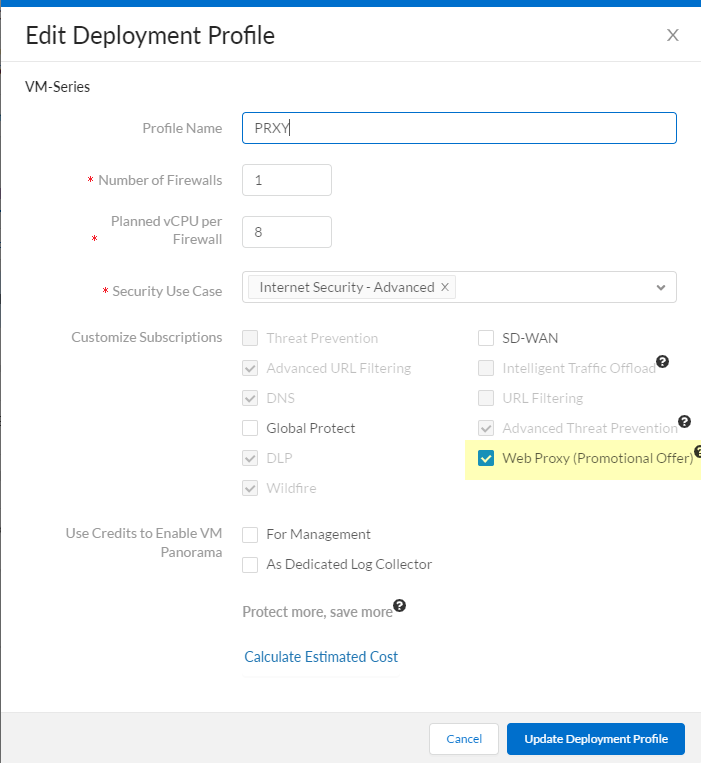
- Log in to the Customer Service Portal (CSP).Edit the deployment profile.Select Web Proxy (Promotional Offer).
![]() Click Update Deployment Profile.On the firewall, retrieve the license keys from the server.If the license key retrieval is not successful, restart the firewall and repeat this step before proceeding.Set up the necessary interfaces and zones.Do not edit the proxy zone.As a best practice, use Layer 3 (L3) for the three interfaces the web proxy uses and configure a separate zone for each interface within the same virtual routers and the same virtual systems.
Click Update Deployment Profile.On the firewall, retrieve the license keys from the server.If the license key retrieval is not successful, restart the firewall and repeat this step before proceeding.Set up the necessary interfaces and zones.Do not edit the proxy zone.As a best practice, use Layer 3 (L3) for the three interfaces the web proxy uses and configure a separate zone for each interface within the same virtual routers and the same virtual systems.- Configure an interface for the client traffic.Be sure to carefully copy the IP address for this interface and save it in a secure location because you must enter it as the Proxy IP address when you configure the web proxy.Configure an interface for the outgoing traffic to the internet.(Optional) Configure a loopback interface for the proxy.Strata Cloud Manager automatically creates a loopback interface. Only configure one if you would like to use a different loopback interface.All incoming traffic is routed through this interface to the proxy.To enable decryption for MITM detection, create a self-signed root CA certificate or import a certificate signed by your enterprise certificate authority (CA). For more information, refer to the best practices for administrative access.Ensure you have completed the pre-deployment steps for the authentication method you want to configure.
- If you are using SAML, you must have configured Explicit Proxy for Mobile Users.
- If you are using Kerberos, you must have completed pre-deployment requirements for Kerberos.
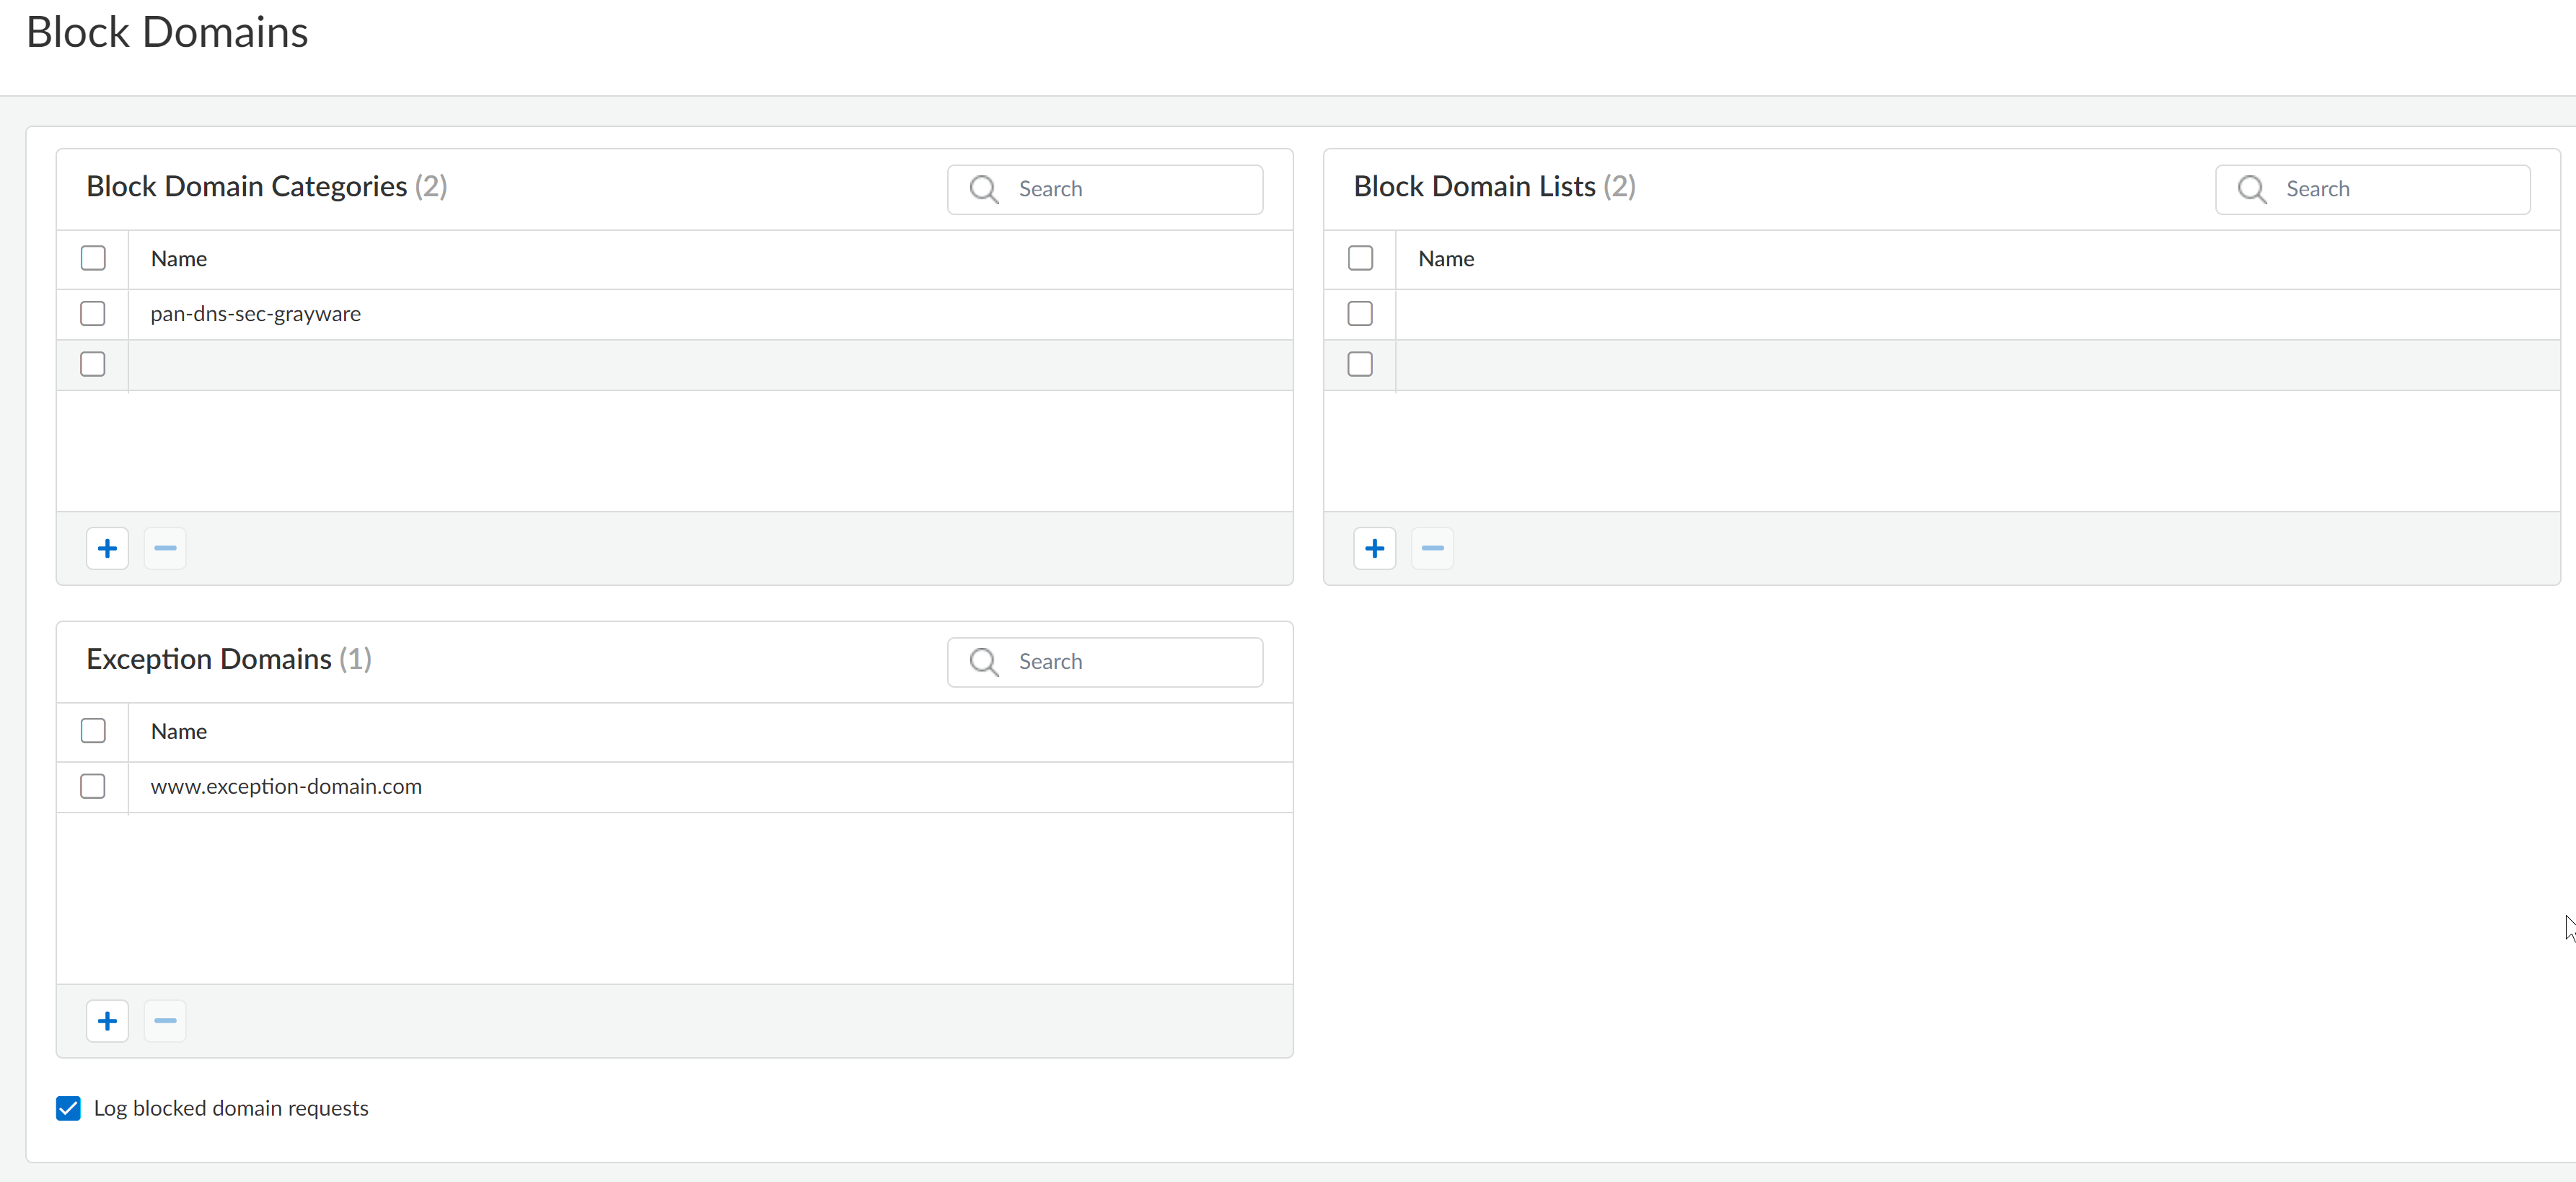
If you have a DNS security subscription, integrate the web proxy firewall with Explicit Proxy to sinkhole any requests that match the DNS security categories that you specify.- In Strata Cloud Manager, select ManageConfigurationNGFW and Prisma AccessDevice SettingsProxyBlock DomainsCustomize.
![]() (Optional)Add Block Domain Categories, Block Domain Lists, or any domains that are Exception Domains because they are sinkholed due to matching one or more of the DNS Security categories.
(Optional)Add Block Domain Categories, Block Domain Lists, or any domains that are Exception Domains because they are sinkholed due to matching one or more of the DNS Security categories.![]() (Optional) Select whether you want to Log blocked domain requests.Save your selections.Set up the Explicit Proxy.
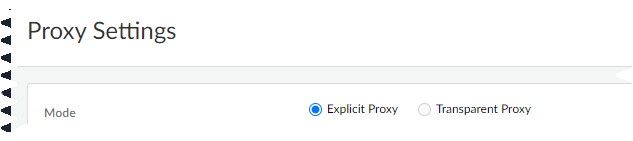
(Optional) Select whether you want to Log blocked domain requests.Save your selections.Set up the Explicit Proxy.- In Strata Cloud Manager, select .Select the folder or snippet for which you want to configure Explicit Proxy.Select Device SettingsProxyProxy SettingsCustomize.
![]() Select Explicit Proxy as the Mode.
Select Explicit Proxy as the Mode.![]() Select the Authentication Method you want to use (either Kerberos Single Sign On or SAML/CAS).Be sure to complete all necessary pre-deployment and configuration steps for the authentication method you select.If you selected Kerberos Single Sign On, specify the Authentication Profile that you created when configuring Kerberos.
Select the Authentication Method you want to use (either Kerberos Single Sign On or SAML/CAS).Be sure to complete all necessary pre-deployment and configuration steps for the authentication method you select.If you selected Kerberos Single Sign On, specify the Authentication Profile that you created when configuring Kerberos.![]() Specify the Client Facing Interface.This is the interface for client traffic that you configured in an earlier step.Specify an Outbound Zone for outgoing traffic to the internet.You can Create New if you don't already have an outbound zone configured.Specify the IP addresses for the primary and secondary DNS servers that you want to connect to.Specify the interface for the DNS proxy connection.(Optional) Specify the Connect Timeout to define (in seconds) how long the proxy waits for a response from the web server. If there is no response after the specified amount of time has elapsed, the proxy closes the connection. The default is 5 seconds.(Optional) Specify the Web Traffic Service Port if you'd like web traffic to use special ports. The default ports are 80 and 443.(Optional) Specify the loopback interface for the proxy that you configured in an earlier step.(Optional) In case of legitimate business need, deselect Reset if SNI does not match HTTP CONNECT.It's recommended to leave this enabled to prevent domain fronting attacks by specifying different domains between the CONNECT request and the Server Name Indication (SNI) field in the HTTP header.Select Save to confirm the changes.If it applies to your deployment, create a Source NAT policy rule.Customize web access policies for any exceptions to the default policies you may need.If this is your initial explicit web proxy configuration, make a change to your proxy auto-configuration (PAC) file.
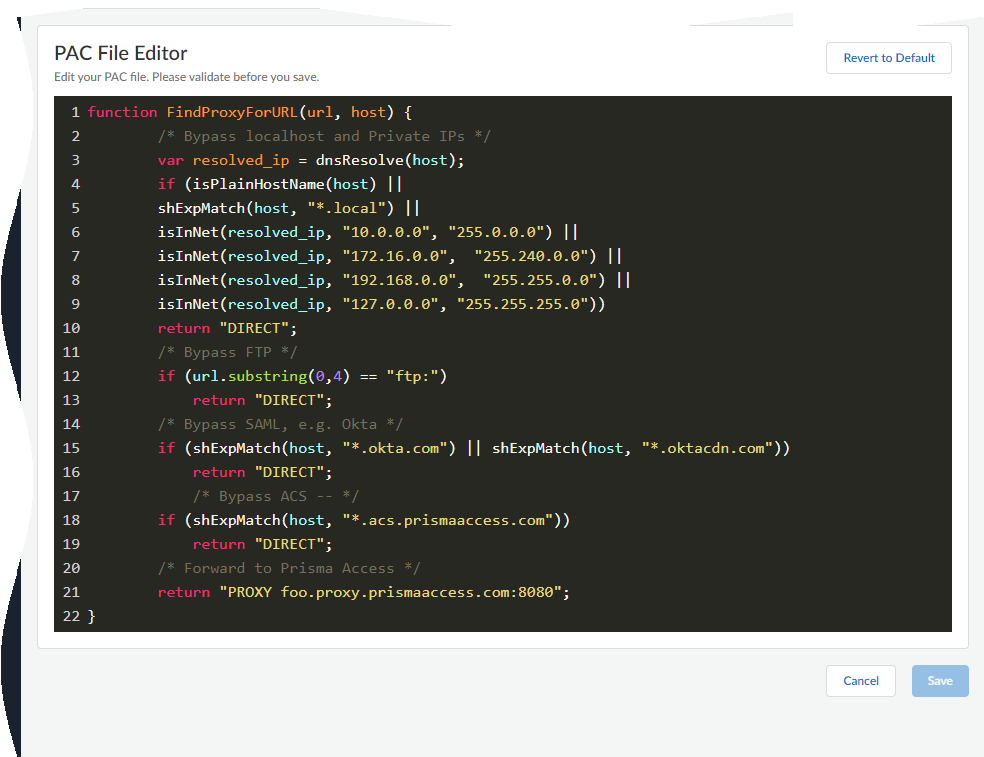
Specify the Client Facing Interface.This is the interface for client traffic that you configured in an earlier step.Specify an Outbound Zone for outgoing traffic to the internet.You can Create New if you don't already have an outbound zone configured.Specify the IP addresses for the primary and secondary DNS servers that you want to connect to.Specify the interface for the DNS proxy connection.(Optional) Specify the Connect Timeout to define (in seconds) how long the proxy waits for a response from the web server. If there is no response after the specified amount of time has elapsed, the proxy closes the connection. The default is 5 seconds.(Optional) Specify the Web Traffic Service Port if you'd like web traffic to use special ports. The default ports are 80 and 443.(Optional) Specify the loopback interface for the proxy that you configured in an earlier step.(Optional) In case of legitimate business need, deselect Reset if SNI does not match HTTP CONNECT.It's recommended to leave this enabled to prevent domain fronting attacks by specifying different domains between the CONNECT request and the Server Name Indication (SNI) field in the HTTP header.Select Save to confirm the changes.If it applies to your deployment, create a Source NAT policy rule.Customize web access policies for any exceptions to the default policies you may need.If this is your initial explicit web proxy configuration, make a change to your proxy auto-configuration (PAC) file.- Select ManageConfigurationNGFW and Prisma AccessDevice SettingsProxyProxy Auto Configuration
![]()
![]() Follow the PAC file guidelines to make the necessary changes to the PAC file.
Follow the PAC file guidelines to make the necessary changes to the PAC file.![]() When you're finished making changes, Save the file.The PAC file applies to all firewalls associated with your Strata Cloud Manager tenant. If you need different PAC files for different firewalls, you'll have to manually upload a different PAC file to those firewalls.
When you're finished making changes, Save the file.The PAC file applies to all firewalls associated with your Strata Cloud Manager tenant. If you need different PAC files for different firewalls, you'll have to manually upload a different PAC file to those firewalls.