Prisma SD-WAN
Configure a BGP Peer
Table of Contents
Configure a BGP Peer
Lets learn on configuring the BGP Peer in Prisma SD-WAN. A branch or a
data center ION device can exchange routing information via BGP.
| Where Can I Use This? | What Do I Need? |
|---|---|
|
|
A branch or a data center ION device can exchange
routing information via BGP. A branch ION device supports only classic
peers, whereas a data center ION device supports core, edge, and
classic peers. Irrespective of the type of peers configured, the
ION device installs the learned routes.
- Configure the remote AS number and type of BGP peer.
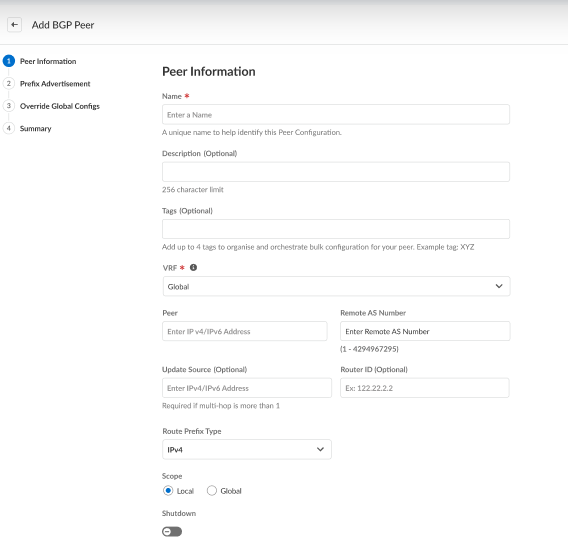
- Select .On the Peer Information tab, enter a name and optionally description and tags.
![]() The VRF will be enabled only when the associated device supports VRF. By default, its Global.Specify the Peer IP Address (IPv4 or IPv6) to show the Address Family section displaying the route prefix type selected while creating a peer.Enter the Remote AS Number.Prisma SD-WAN supports BGP 4-byte ASN in the AS plain format, you can enter AS numbers in the range 1— 4294967295.(Optional) Specify the Update Source IP Address.You need to specify the Update Source IP Address (IPv4 or IPv6) only if there is more than one multi-hop.(Optional)For Router ID, enter the IP address of the ION device.The router ID is an IPv4 address and is the BGP ID of the ION device. NOTE: The router ID must be the same for BGP peers within the same VRF. However, it can differ if the BGP peers are in separate VRFs. Configuring different router IDs for BGP peers within the same VRF can lead to issues such as BGP session flapping.From the Peer Type drop-down, select Classic.The Peer Type option is available only for data center ION devices.When you configure a core or edge peer, the device automatically generates a route map for the peer. You can leave the route map as is or clone and modify it for your peer.Toggle Scope to Local or Global.Local indicates that prefixes will not be advertised.Select the Shutdown check box if you do not need to use the created peer.The Shutdown check box is deselected by default.Select Route Prefix Type, IPv4, or IPv6, or IPv4 & IPv6. By default, IPv4 is selected.On the Prefix Advertisement tab,
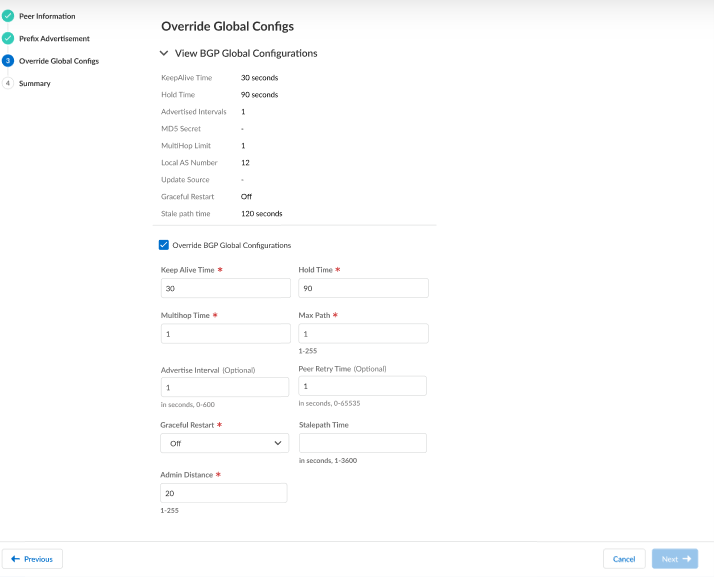
The VRF will be enabled only when the associated device supports VRF. By default, its Global.Specify the Peer IP Address (IPv4 or IPv6) to show the Address Family section displaying the route prefix type selected while creating a peer.Enter the Remote AS Number.Prisma SD-WAN supports BGP 4-byte ASN in the AS plain format, you can enter AS numbers in the range 1— 4294967295.(Optional) Specify the Update Source IP Address.You need to specify the Update Source IP Address (IPv4 or IPv6) only if there is more than one multi-hop.(Optional)For Router ID, enter the IP address of the ION device.The router ID is an IPv4 address and is the BGP ID of the ION device. NOTE: The router ID must be the same for BGP peers within the same VRF. However, it can differ if the BGP peers are in separate VRFs. Configuring different router IDs for BGP peers within the same VRF can lead to issues such as BGP session flapping.From the Peer Type drop-down, select Classic.The Peer Type option is available only for data center ION devices.When you configure a core or edge peer, the device automatically generates a route map for the peer. You can leave the route map as is or clone and modify it for your peer.Toggle Scope to Local or Global.Local indicates that prefixes will not be advertised.Select the Shutdown check box if you do not need to use the created peer.The Shutdown check box is deselected by default.Select Route Prefix Type, IPv4, or IPv6, or IPv4 & IPv6. By default, IPv4 is selected.On the Prefix Advertisement tab,- Select (Optional) Route Aggregation from the drop-dwon, Manual-Aggregated (you can configure individual aggregate ranges) or Auto-Aggregated (advertise only summarised prefixes).For, Manual-Aggregated, (Optional)add IPv4 Prefix List, (Optional)IPv6 Prefix List, and IP Prefix to Advertise.Select a route map from the (Optional)Route Map In and (Optional)Route Map Out drop-downs to filter incoming or outgoing routes. You can also enable the Advertise default to Peer.Different branch prefixes can be aggregated to the same range when the same aggregation ranges are configured on DC IONs. To avoid this, you will set the Tunnel peer address as part of the Interface configuration to send this traffic to the peer DC-ION so it can be forwarded appropriately..On the Override Global Configs tab, you can View BGP Global Configurations. Click Next if you do not want to override the global configs; otherwise, proceed to the next step.
- Select Override BGP Global Configurations to inherit the device's global configuration or select No to configure global configuration overrides.
- (Optional) Keepalive Time—Enter a keep-alive time between 3 - 60 seconds. If you have configured a BGP peer, the device uses the value specified in the BGP peer configuration. If you do not configure a BGP peer or do not specify a value in the BGP global configuration, the keep-alive time defaults to 30 seconds.
- (Optional) Hold Time—Enter a hold time between 3 - 600 seconds. The hold time needs to be three times greater than the keep-alive time. If you have configured a BGP peer, the device uses the value specified in the BGP peer configuration. If you have not configured a BGP peer, the device uses the value from the BGP global configuration. If you do not configure a BGP peer or do not specify a value in the BGP global configuration, the Hold Time defaults to 90 seconds.
- (Optional) Advertise Interval— Enter an advertisement interval between 0 - 600 seconds. The default is 1 second.
- (Optional) Peer Retry Time—Enter a peer retry time between 0 - 65535 seconds. The default is 120 seconds.
- (Optional) Multihop Limit—Enter a multi-hop limit between 1 - 255 hops. The default is 1 hop.
- (Optional) MD5 Secret—Enter a password of 1 - 32 characters. The default is 0. MD5 password specified shall be applied to the messages exchanged with the peer.
- (Optional) Local AS Number—Enter a number between 1 and 4294967295.
![]() Click Next.Review the BGP peer configuration.The Summary tab displays the BGP peer configuration. Make changes if needed and Save & Exit.
Click Next.Review the BGP peer configuration.The Summary tab displays the BGP peer configuration. Make changes if needed and Save & Exit.