Prisma SD-WAN
Configure a DHCP Server
Table of Contents
Expand All
|
Collapse All
Prisma SD-WAN Docs
-
-
-
- CloudBlade Integrations
- CloudBlades Integration with Prisma Access
-
-
-
-
- 5.6
- 6.1
- 6.2
- 6.3
- 6.4
- 6.5
- New Features Guide
- On-Premises Controller
- Prisma SD-WAN CloudBlades
- Prisma Access CloudBlade Cloud Managed
- Prisma Access CloudBlade Panorama Managed
Configure a DHCP Server
The DHCP server listens on all interfaces and leases persist over reboots. It responds to
remote unicast DHCP relay agents, with one of the routers or switches in the LAN
network.
| Where Can I Use This? | What Do I Need? |
|---|---|
|
|
The ION device at a branch site can act as
a DHCP server to support full router-replacement deployments. The
DHCP server will respond to both DHCP broadcast requests and DHCP
unicast requests in case of DHCP relay downstream. The DHCP server
will listen for requests on all interfaces and serve up IPs, if
available in the pool. Leases granted will persist over reboots.
The
DHCP server on Prisma SD-WAN supports responding to remote unicast
DHCP relay agents. These agents will send unicast DHCP packets to
the interface IP addresses for clients in the remote network (L3
hop away). One of the routers or switches in the LAN network will
act as the DHCP relay agent. There can be multiple such remote networks.
- For IPv4, only one DHCP server configuration will be allowed for any given subnet.
- DHCP server configuration can include up to 256 different subnets.
- DHCP leases granted before disabling a configuration shall be persistent when the service is eventually enabled. DHCP leases that are persistent will expire as per the granted lease expiry time.
- Starting from release 6.2.1, DHCPv6 server support is added. Currently LAN connected DHCPv6 clients alone are supported.
- DHCP server is not supported for secondary IP addresses on interfaces.
- Select WorkflowsSites. Select a site for which you want to configure a DHCP server.On the site Configuration tab, select Configure DHCP Scopes.Click Add DHCP Server to add server details.
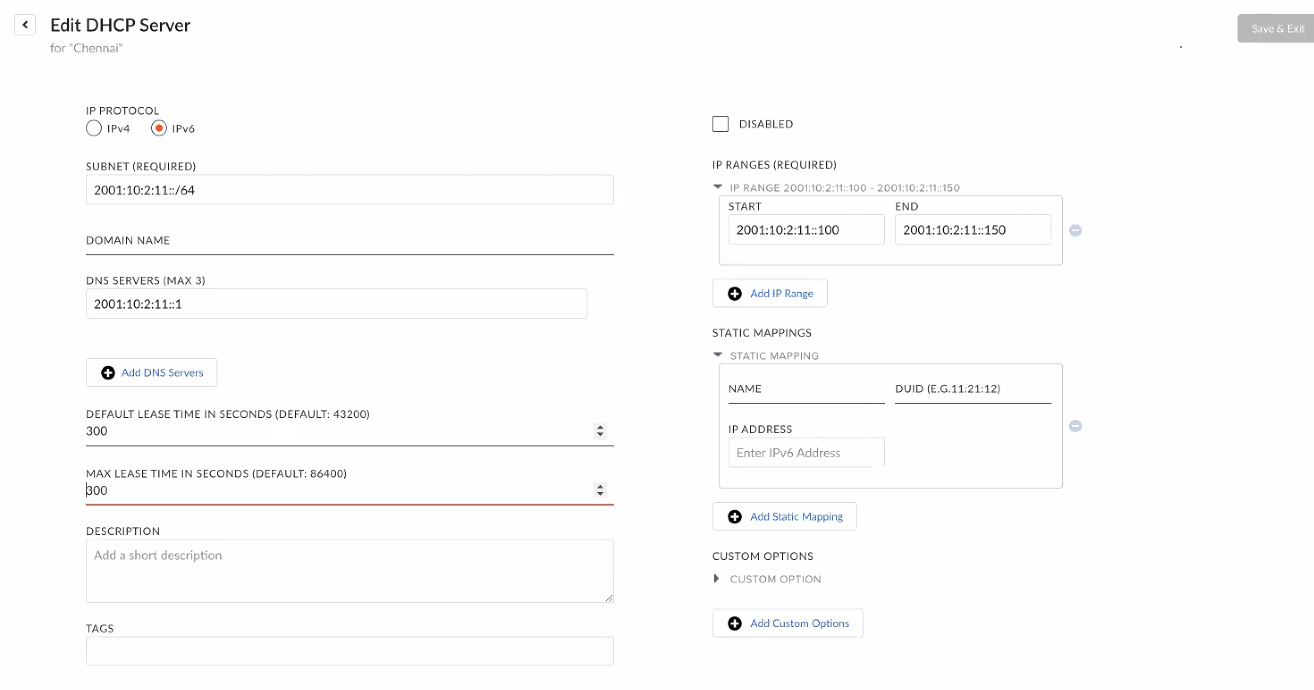
![]() On the Create DHCP Server screen, configure the DHCP Server and its attributes. You can either choose IPv4 or IPv6 for the IP Protocol.IPv4
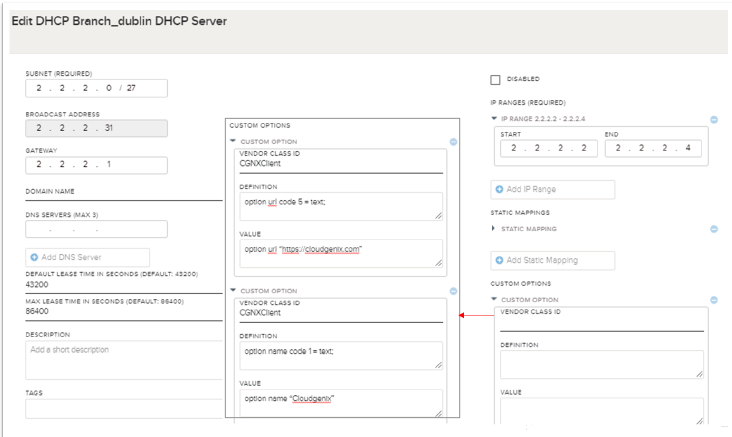
On the Create DHCP Server screen, configure the DHCP Server and its attributes. You can either choose IPv4 or IPv6 for the IP Protocol.IPv4- Select IPv4.For Subnet, enter the subnet for which the DHCP server is being configured.For Broadcast Address, the address is auto populated based on the prefix provided in the Subnet field.For Gateway, enter the default gateway for clients.For Domain Name, enter the domain name for clients.For DNS Servers, enter the domain name servers for clients to resolve DNS requests.For Default Lease Time, enter a lease time each client will get if a user does not request a particular lease time.A user sets the default lease time to the lease time they would like all clients to use.For Max lease time, enter a value.Max lease time is the maximum lease time each client can request. The default lease time can be the same as max lease time.For Description, enter a description for each instance of the DHCP server, per subnet.Check the Disabled box to disable and uncheck it to enable the configuration.Disabled provides the ability to temporarily disable the DHCP server instead of deleting it.For IP Ranges, define multiple start/stop ranges from which allocation will be done when a broadcast DHCP request from clients or unicast DHCP relay request from a Layer 3 switch are received.For Static Mappings, Add Static Mapping details.IP addresses can be assigned to clients by statically mapping IPs to MAC addresses of the clients.For Custom Options, Add Custom Options like Vendor Class ID, Definition, and Value.The following data types are supported:
Data Type Data Sub Type Example Boolean option use-zephyr code 180 = boolean option use-zephyr onoption use code 18 = boolean option use TRUEoption use code 18 = boolean option use falseIP Addresses option sql-server-address code 193 = ip-address option sql-server-address sql.example.com option sql-server-address code 193 = ip-address option sql-server-address 10.10.10.2 option sql-server-address code 193 = ip-address option sql-server-address purpleflombles option sql-server-address code 193 = ip-address option sql-server-address 10.10.10.0IP6 Addresses option sql-server-address code 193 = ip6-address option sql-server-address1200:0000:AB00:1234:0000:2552:7777:1313 option sql-server-address code 193 = ip6-address option sql-server-address 21DA:D3:0:2F3B:2AA:FF:FE28:9C5A option sql-server-address code 193 = ip6-address option sql-server-address 3ffe:bbbb:aaaa:aaaa::1Integer Unsigned Integer 8 option sql-connection-max code 12 = unsigned integer 8 option sqlconnection-max 0 option sql-connection-max code 12 = unsigned integer 8 option sqlconnection-max 256Signed Integer 8/Integer 8 option sql-connection-max code 12 = signed integer 8 option sql-connection-max -128 option sql-connection-max code 12 = integer 8option sql-connection-max 127Unsigned Integer 16 option sql-connection-max code 12 = unsigned integer 16 option sql-connection-max 0 option sql-connection-max code 12 = unsigned integer 16 option sql-connection-max 65535Signed Integer 16/Integer 16 option sql-connection-max code 12 = signed integer 16 option sql-connection-max -32768 option sql-connection-max code 12 = integer 16 option sql-connection-max 32767Unsigned Integer 32 option sql-connection-max code 12 = unsigned integer 32 option sql-connection-max 0 option sql-connection-max code 12 = unsigned integer 32 option sql-connection-max 4294967295Signed Integer 32/Integer 32 option sql-connection-max code 12 = signed integer 32 option sql-connection-max - 2147483648 option sql-connection-max code 12 = integer 32 option sql-connection-max 2147483647Text option sql-server-address code 193 = text option sql-server-address "!" option sql-server-address code 193 = text option sql-server-address cloudoption sql-server-address code 193 = text option sql-server-address "cloud product" option sql-server-address code 193 = text option sql-server-address "\""String option sql-server-address code 193 = string option sql-server-address"\\\"" option sql-server-address code 193 = string option sql-server-address "cloud" option sql-server-address code 193 = string option sql-server-address 17:23:19:a6:42:ea:99:7c:2cDomain-list option sql-connection-max code 12 = domain-list option sql-connection-max "example.com", "foo.example.com","google.com", "h1.gslab.com"Array of option kerberos-servers code 200 = array of booleanoption kerberos-servers true, false, on, offRecord of option kerberos-servers code 200 = { boolean, integer 32, string } option kerberos-servers on 23 a option kerberos-servers code 200 = { signed integer 8, boolean, ipaddress,text } option kerberos-servers-128 on 10.10.10.1 "cloud service"Array of Record option new-static-routes code 201 = array of {ip-address, ip-address,ip-address, integer 8 } option new-static-routes 10.0.0.0 255.255.255.0 net-0-rtr.example.com 2, 10.0.1.0 255.255.255.0 net-1-rtr.example.com 1Custom Options can be defined in each configuration instance. These options are for client consumption.The ION devices on version 5.2.1 and later support Vendor Class Identifier (VCI) or option 60 for a DHCP Server. A DHCP client sends an option code 60 (VCI) in its communication with the DHCP server. On receiving option 60 or VCI, the DHCP server matches the received VCI with a VCI from its own table. It then returns a value corresponding to the VCI to the DHCP client.IPv6- Select IPv6. The ION devices on version 6.2.1 and later support IPv6 servers.For Domain Name, enter the domain name for clients.For DNS Servers, enter the domain name servers for clients to resolve DNS requests.For Default Lease Time, enter a lease time each client will get if a user does not request a particular lease time.A user sets the default lease time to the lease time they would like all clients to use.For Max lease time, enter a value.Max lease time is the maximum lease time each client can request. The default lease time can be the same as max lease time.For Description, enter a description for each instance of the DHCP server, per subnet.Check the Disabled box to disable and uncheck it to enable the configuration.Disabled provides the ability to temporarily disable the DHCP server instead of deleting it.For IP ranges, define multiple start/stop ranges from which allocation will be done when a broadcast DHCP request from clients.For Static mappings, Add Static Mapping details.IP addresses can be assigned to clients by statically mapping IPs to DUID of the clients.
![]() For release 6.2.1, custom options are not supported.Create & Exit to complete the DHCP Server configuration.
For release 6.2.1, custom options are not supported.Create & Exit to complete the DHCP Server configuration.![]() Click Restart DHCP Servers to restart the DHCP service whenever required.
Click Restart DHCP Servers to restart the DHCP service whenever required.


