Enterprise DLP
Install the Plugin
Table of Contents
Install the Plugin
Install the Enterprise Data Loss Prevention (E-DLP) plugin on your Panorama™ management server.
- Review the Compatibility Matrix to verify the Enterprise DLP plugin version is supported on the PAN-OS version running on Panorama.(Best Practices) Before you install the plugin and activate your Enterprise DLP license, select to locate Panorama and your managed firewalls to verify that they all belong to the same CSP account.Panorama and any managed firewalls on which you want to use Enterprise DLP must belong to the same CSP account, which enables you to share data profiles and maintain consistent Security policy rule enforcement.Install the Panorama Device Certificate.Install the Device Certificate for Managed Firewalls.The device certificate is required for all managed firewalls using Enterprise DLP.Install the plugin on Panorama.
- Log in to the Panorama web interface.Select and search for the latest version of the Enterprise DLP plugin.Download and Install the Enterprise DLP plugin on Panorama.Commit and push the new configuration to your managed firewalls to complete the Enterprise DLP plugin installation.This step is required for Enterprise DLP data filtering profile names to appear in Data Filtering logs.The Commit and Push command isn’t recommended for Enterprise DLP configuration changes. Using the Commit and Push command requires the additional and unnecessary overheard of manually selecting the impacted templates and managed firewalls in the Push Scope Selection.
- Full configuration push from Panorama
- Select and Commit.
- Select and Edit Selections.
- Select Device Groups and Include Device and Network Templates.
- Click OK.
- Push your configuration changes to your managed firewalls that are using Enterprise DLP.
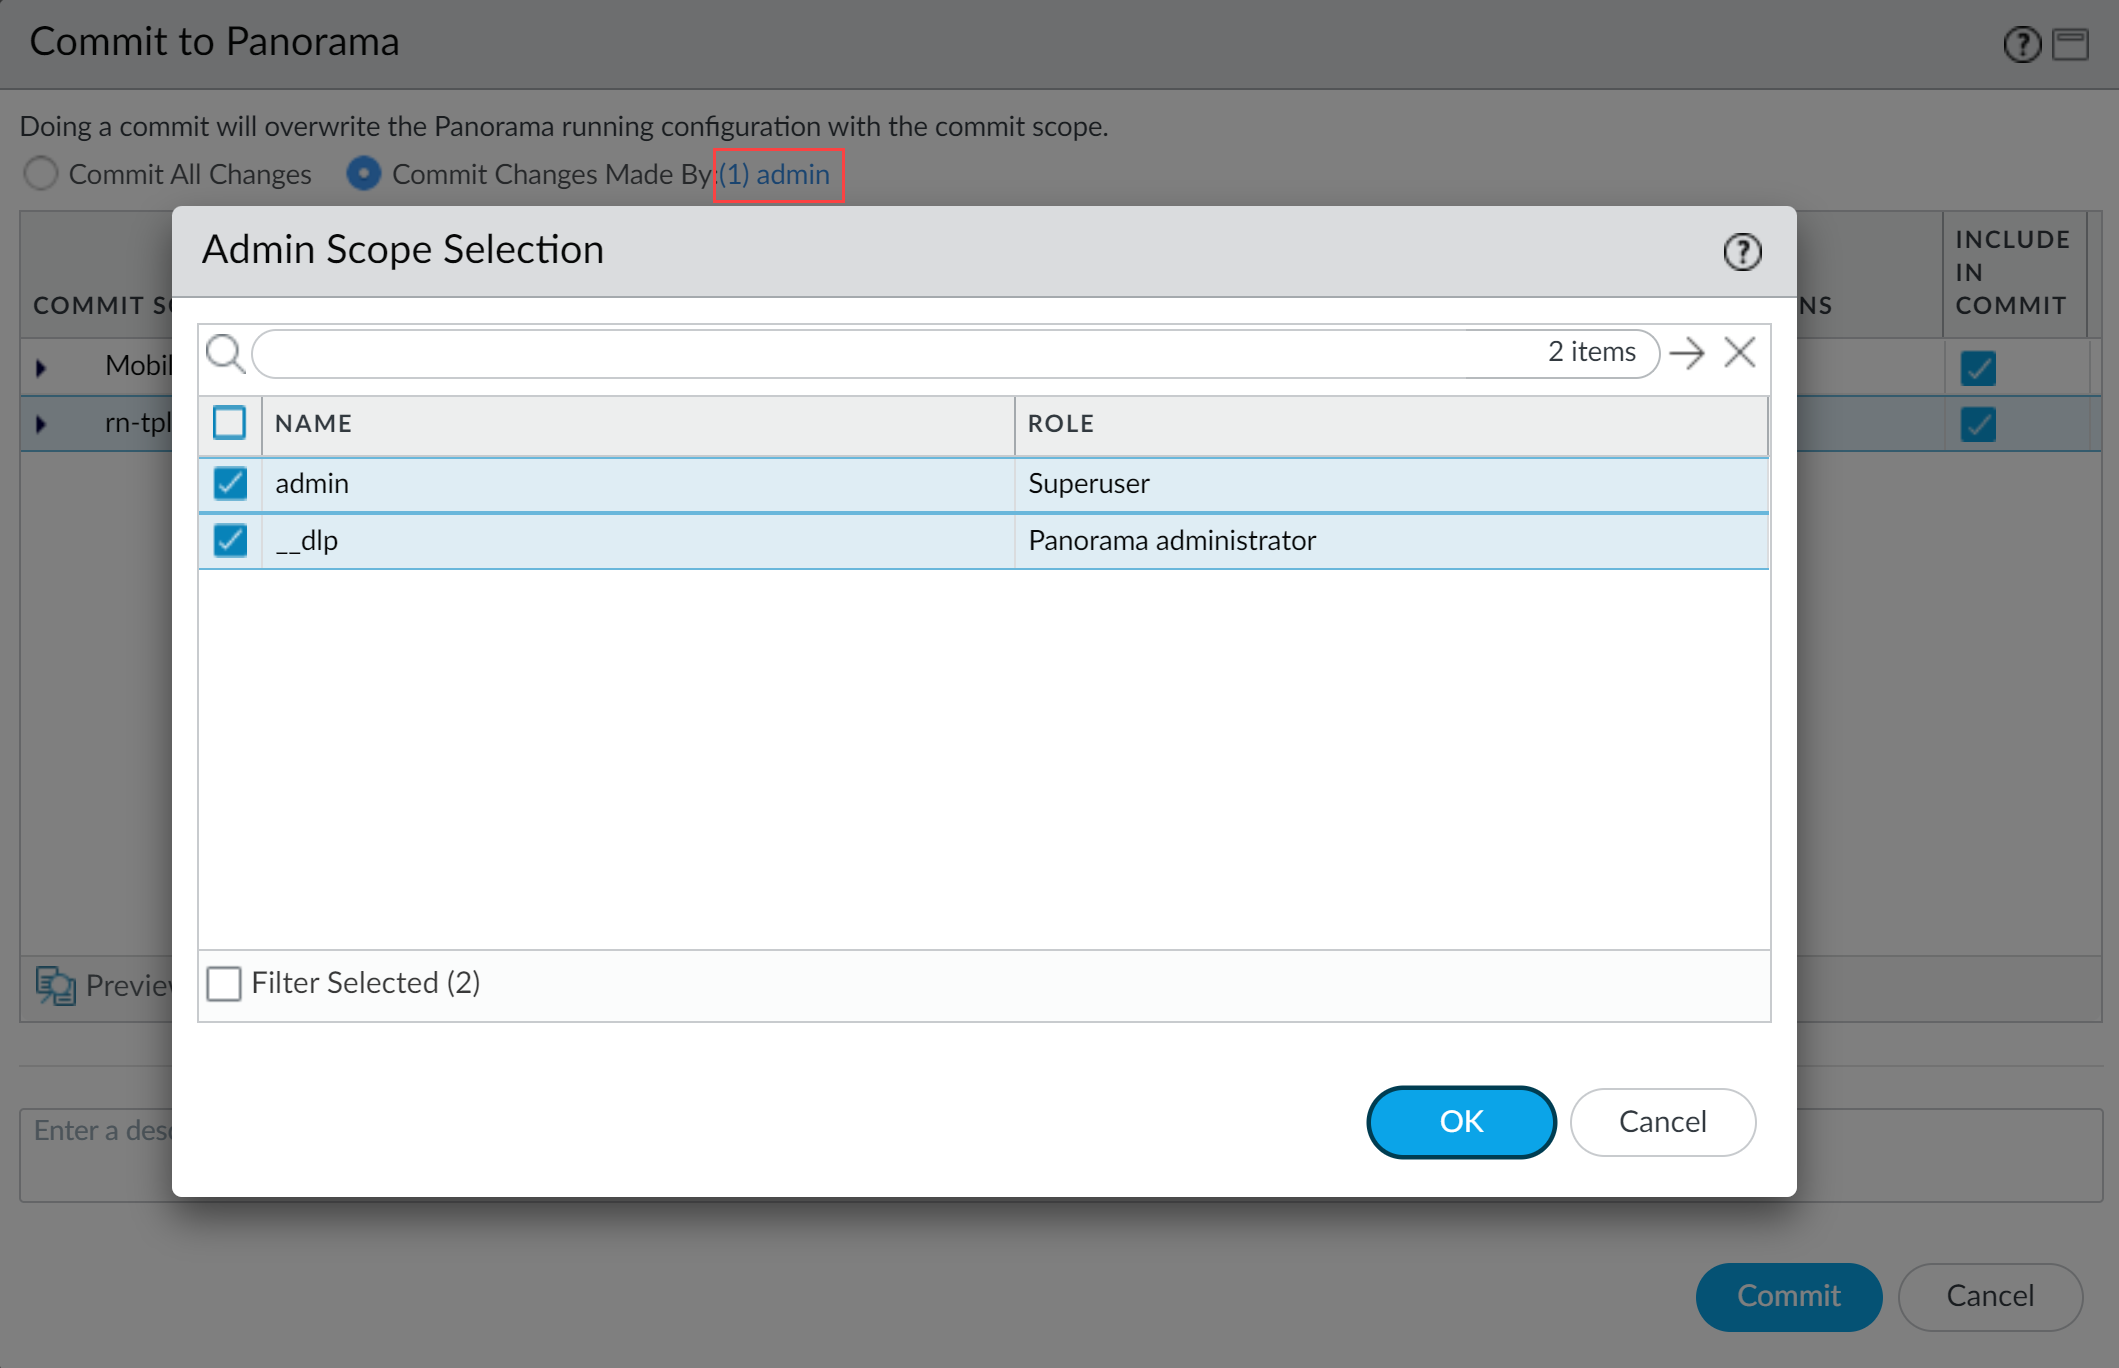
- Partial configuration push from PanoramaYou must always include the temporary __dlp administrator when performing a partial configuration push. This is required to keep Panorama and the DLP cloud service in sync.For example, you have an admin Panorama admin user who is allowed to commit and push configuration changes. The admin user made changes to the Enterprise DLP configuration and only wants to commit and push these changes to managed firewalls. In this case, the admin user is required to also select the __dlp user in the partial commit and push operations.
- Select .
- Select Commit Changes Made By and then click the current Panorama admin user to select additional admins to include in the partial commit.In this example, the admin user is currently logged in and performing the commit operation. The admin user must click admin and then select the __dlp user. If there are additional configuration changes made by other Panorama admins they can be selected here as well.Click OK to continue.
![]()
- Commit.
- Select .
- Select Push Changes Made By and then click the current Panorama admin user to select additional admins to include in the partial push.In this example, the admin user is currently logged in and performing the push operation. The admin user must click admin and then select the __dlp user. If there are additional configuration changes made by other Panorama admins they can be selected here as well.Click OK to continue.
![]()
- Select Device Groups and Include Device and Network Templates.
- Click OK.
- Push your configuration changes to your managed firewalls that are using Enterprise DLP.
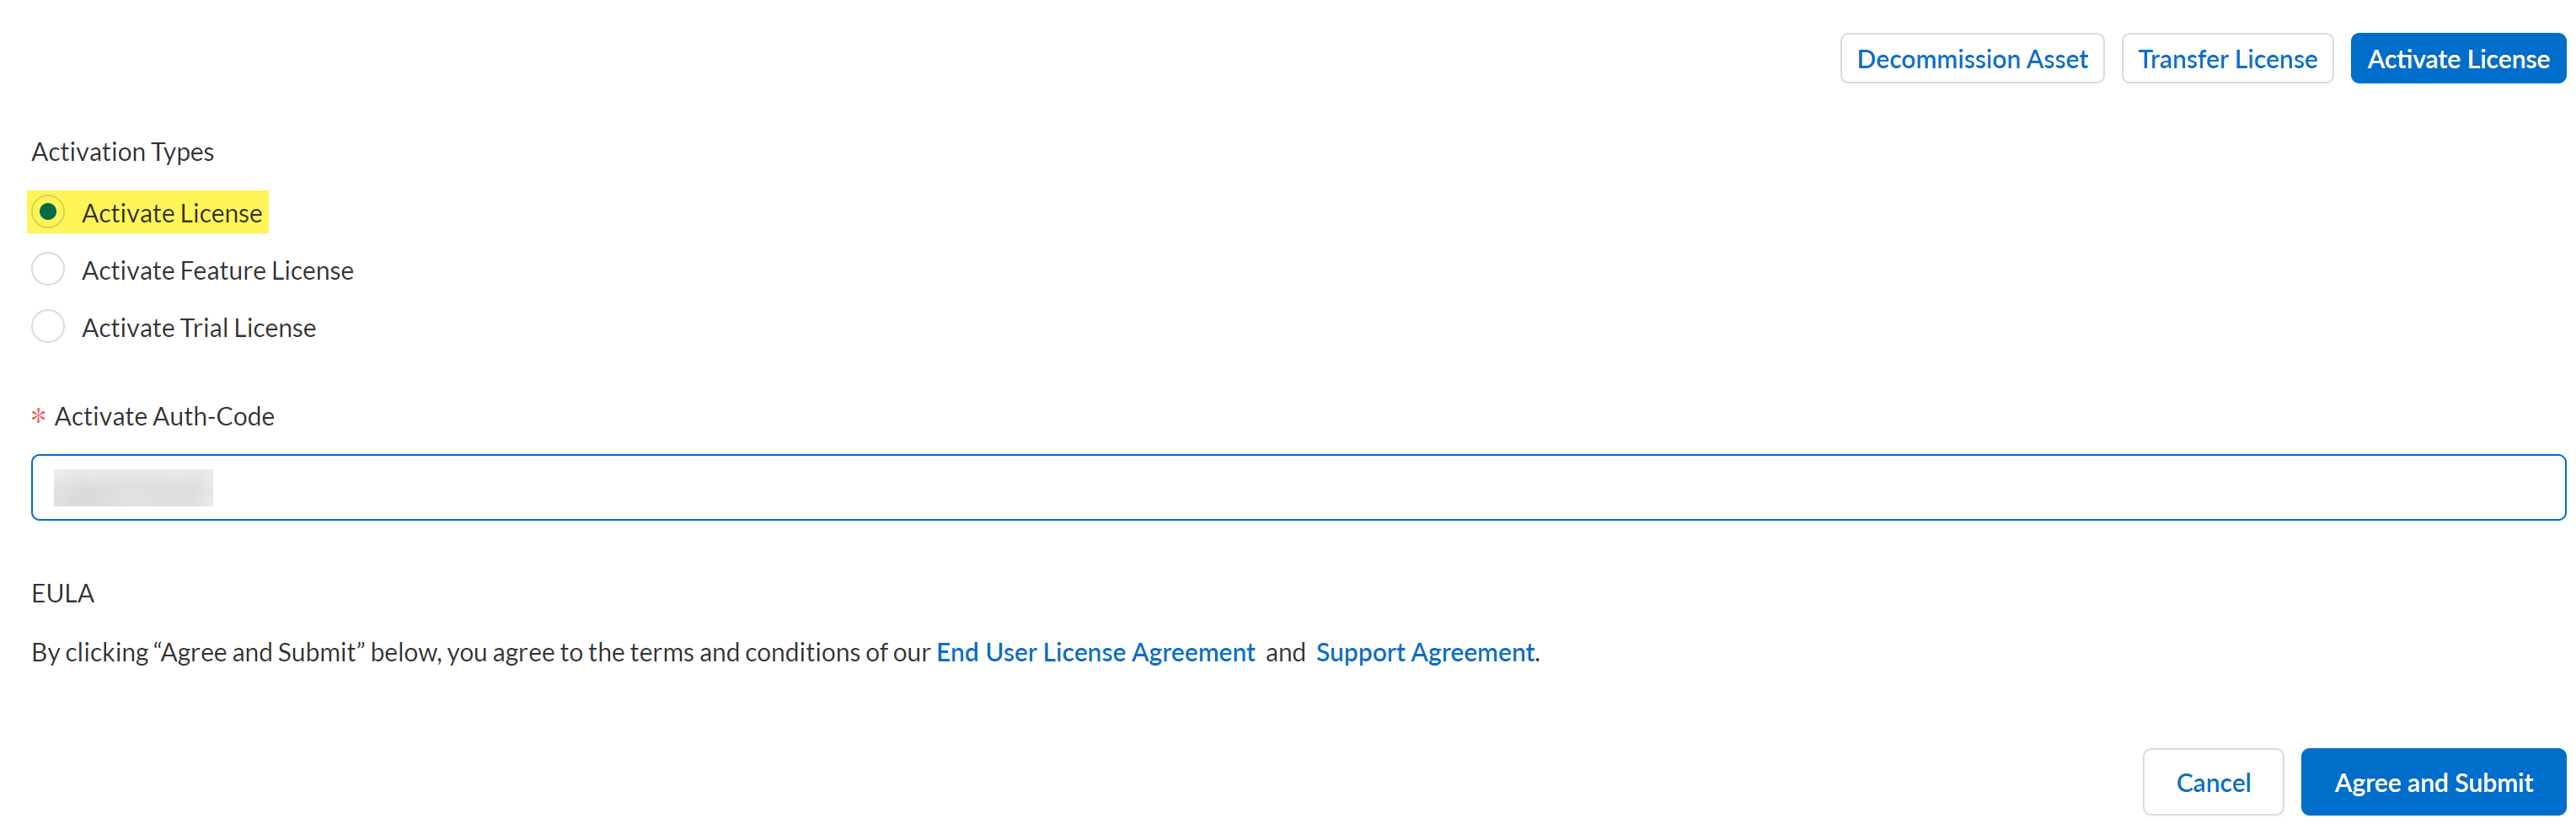
Activate your Enterprise DLP license for your managed firewalls.Repeat this step for all managed firewalls using Enterprise DLP.- Log in to the Palo Alto Networks Customer Support Portal.Select and locate the managed firewall for which you want to activate Enterprise DLPIn the Actions column, click Licenses & Subscriptions.
![]() Click Activate License at the bottom of the page.Select Activate License from the list of Activation Types.In the Activate Auth-Code field, enter the auth code provided by Palo Alto Networks.Agree and Submit.
Click Activate License at the bottom of the page.Select Activate License from the list of Activation Types.In the Activate Auth-Code field, enter the auth code provided by Palo Alto Networks.Agree and Submit.![]() Activate the Enterprise DLP tenant for your Customer Support (CSP) tenant.This is required to connect Panorama and managed firewalls to the DLP cloud service to forward traffic for verdict rendering and to allow synchronization between Panorama and the DLP cloud service.
Activate the Enterprise DLP tenant for your Customer Support (CSP) tenant.This is required to connect Panorama and managed firewalls to the DLP cloud service to forward traffic for verdict rendering and to allow synchronization between Panorama and the DLP cloud service.- Select .Locate Enterprise DLP from the list of applications ready for activation.Activate Now.(Optional) Create a Palo Alto Networks Support ticket to enable your Enterprise DLP license to transfer between firewalls.Requesting that the Enterprise DLP license is transferable enables you to transfer your DLP license to other managed firewalls.In the support ticket, include the following information:
- The request for a firewall transfer for the Enterprise DLP license.
- Your CSP account ID and the email associated with your CSP account.
- The managed firewall serial number. If you activated the Enterprise DLP license on multiple managed firewalls, include the serial numbers for all the managed firewalls in a single support ticket.
- The auth codes used to activate the Enterprise DLP license on your managed firewalls.
- Also provide the CSP account ID with which additional managed firewalls are associated if you have managed firewalls that belong to a different CSP account.
Activate the Enterprise DLP plugin on your managed firewalls.- Select and Activate the Enterprise DLP plugin.Enter the Auth Code for the target managed firewalls.The auth code is automatically provided to you by Palo Alto Networks in an email after you complete your purchase of the Enterprise DLP plugin license.Activate the Enterprise DLP plugin license on your managed firewalls.Select and verify that the predefined data filtering profiles are displayed.Panorama is automatically populated with predefined data filtering profiles when Panorama successfully connects to the DLP cloud service.Verify that the Enterprise DLP license is successfully activated on your managed firewalls.
- Launch the firewall web interface.Select and verify that the license is successfully activated.
![]() After you successfully install the Enterprise DLP plugin on Panorama, you must create Security policy rules to enable your managed firewalls to leverage Enterprise DLP.
After you successfully install the Enterprise DLP plugin on Panorama, you must create Security policy rules to enable your managed firewalls to leverage Enterprise DLP.