GlobalProtect
Deploy Server Certificates to the GlobalProtect Components
Table of Contents
Deploy Server Certificates to the GlobalProtect Components
Best practices for deploying server certificates to the GlobalProtect components
include importing certificates from a well-known CA, creating a root CA certificate
for self-signed certificates, using SCEP for certificate requests, and assigning
certificates to SSL/TLS service profiles.
The GlobalProtect components must have valid certificates to
establish connection using SSL/TLS. The connection fails if you have
invalid or expired certificates.
The following are the best practice steps for deploying SSL/TLS
certificates to the GlobalProtect components:
Import a Server Certificate from a Well-known, Third-party CA
Use a server certificate from a well-known,
third-party CA for the GlobalProtect portal. This
practice ensures that the end users are able to
establish an HTTPS connection without seeing
warnings about untrusted certificates.
The CN and, if applicable, the SAN fields of the
certificate must match the FQDN or IP address of
the interface where you plan to configure the
portal or the device check-in interface on a
third-party mobile endpoint management system.
Wildcard matches are supported.
Before you import a certificate, make sure the certificate and
key files are accessible from your management system and
that you have the passphrase to decrypt the private key.
- Select and Import a new certificate.Use the Local certificate type (default).Enter a Certificate Name.Enter the path and name to the Certificate File received from the CA, or Browse to find the file.Set the File Format to Encrypted Private Key and Certificate (PKCS12).Enter the path and name to the PKCS#12 file in the Key File field or Browse to find it.Enter and reenter the Passphrase that was used to encrypt the private key.Click OK to import the certificate and key.
Create Root CA Certificate for Issuing Self-signed Certificates for GlobalProtect Components
Create the root CA certificate on the portal and use it to issue server certificates for the gateways and, optionally, for clients.Before deploying self-signed certificates, you must create the root CA certificate that signs the certificates for the GlobalProtect components:- Select and Generate a new certificate.Use the Local certificate type (default).Enter a Certificate Name, such as GlobalProtect_CA. The certificate name can't contain spaces.Don't select a value in the Signed By field. Without a selection for Signed By, the certificate is self-signed.Enable the Certificate Authority option.Click OK to generate the certificate.
Use Root CA on the Portal to Generate a Self-signed Server Certificate
Generate server certificates for each gateway you plan to deploy and optionally for the management interface of the third-party mobile endpoint management system (if this interface is where the gateways retrieve HIP reports).In the gateway server certificates, the values in the CN and SAN fields must be identical. If the values differ, the GlobalProtect agent detects the mismatch and does not trust the certificate. Self-signed certificates contain a SAN field only if you add a Host Name attribute.Alternatively, you can use the Simple Certificate Enrollment Protocol (SCEP) to request a server certificate from your enterprise CA.- Select and Generate a new certificate.Use the Local certificate type (default).Enter a Certificate Name. This name can't contain spaces.In the Common Name field, enter the FQDN (recommended) or IP address of the interface where you plan to configure the gateway.In the Signed By field, select the GlobalProtect_CA you created.In the Certificate Attributes area, Add and define the attributes that uniquely identify the gateway. Keep in mind that if you add a Host Name attribute (which populates the SAN field of the certificate), it must be the same as the value you defined for the Common Name.Configure cryptographic settings for the server certificate, including the encryption Algorithm, key length (Number of Bits), Digest algorithm, and Expiration (days).Click OK to generate the certificate.
Use Simple Certificate Enrollment Protocol (SCEP) to Request a Server Certificate from Your Enterprise CA
Configure separate SCEP profiles for each portal and gateway you plan to deploy. Then use the specific SCEP profile to generate the server certificate for each GlobalProtect component.In portal and gateway server certificates, the value of the CN field must include the FQDN (recommended) or IP address of the interface where you plan to configure the portal or gateway and must be identical to the SAN field.To comply with the U.S. Federal Information Processing Standard (FIPS), you must also enable mutual SSL authentication between the SCEP server and the GlobalProtect portal. (FIPS-CC operation is indicated on the firewall login page and in its status bar.)After you commit the configuration, the portal attempts to request a CA certificate using the settings in the SCEP profile. If successful, the firewall hosting the portal saves the CA certificate and displays it in the list of Device Certificates.- Configure a SCEP Profile for each GlobalProtect portal or gateway:
- Enter a Name that identifies the SCEP profile and the component to which you deploy the server certificate. If this profile is for a firewall with multiple virtual systems capability, select a virtual system or Shared as the Location where the profile is available.(Optional) Configure a SCEP Challenge, which is a response mechanism between the PKI and portal for each certificate request. Use either a Fixed challenge password that you obtain from the SCEP server or a Dynamic password where the portal-client submits a username and OTP of your choice to the SCEP Server. For a Dynamic SCEP challenge, this can be the credentials of the PKI administrator.Configure the Server URL that the portal uses to reach the SCEP server in the PKI (for example, http://10.200.101.1/certsrv/mscep/).Enter a string (up to 255 characters in length) in the CA-IDENT Name field to identify the SCEP server.Enter the Subject name to use in the certificates generated by the SCEP server. The subject must include a common name (CN) key in the format CN=<value> where <value> is the FQDN or IP address of the portal or gateway.Select the Subject Alternative Name Type. To enter the email name in a certificate’s subject or Subject Alternative Name extension, select RFC 822 Name. You can also enter the DNS Name to use to evaluate certificates, or the Uniform Resource Identifier to identify the resource from which the client will obtain the certificate.Configure additional cryptographic settings, including the key length (Number of Bits), and the Digest algorithm for the certificate signing request.Configure the permitted uses of the certificate, either for signing (Use as digital signature) or encryption (Use for key encipherment).To ensure that the portal is connecting to the correct SCEP server, enter the CA Certificate Fingerprint. Obtain this fingerprint from the SCEP server interface in the Thumbprint field.Enable mutual SSL authentication between the SCEP server and the GlobalProtect portal.Click OK and then Commit the configuration.Select and then click Generate.Enter a Certificate Name. This name can't contain spaces.Select the SCEP Profile to use to automate the process of issuing a server certificate that is signed by the enterprise CA to a portal or gateway, and then click OK to generate the certificate. The GlobalProtect portal uses the settings in the SCEP profile to submit a CSR to your enterprise PKI.
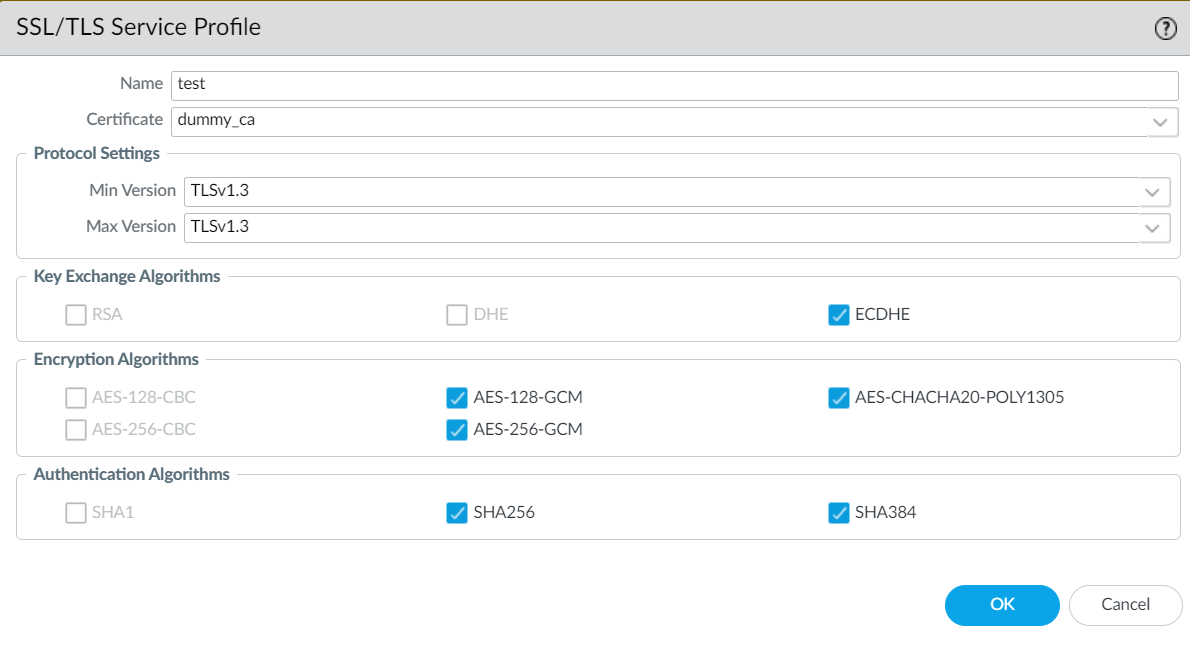
Assign Server Certificate You Imported or Generated to a SSL/TLS Service Profile
Where Can I Use This? What Do I Need? GlobalProtect™ SubscriptionFor TLSv1.3:- PAN-OS 11.1 (or a later PAN-OS version).
- GlobalProtect app 6.0.8, GlobalProtect app 6.1.3, GlobalProtect app 6.2.1, or later GlobalProtect app versions.
- GlobalProtect endpoints running a minimum of Windows 11, macOS, Android, iOS, or Linux (Ubuntu 20) version. Supported browsers are Chrome, Firefox, or Safari.
- TLSv1.3 isn't supported in FIPS-CC mode.
GlobalProtect supports SSL/TLS service profiles with a maximum TLS version as TLSv1.3. You can create SSL/TLS service profiles on the firewall that is hosting the portal or gateway by specifying the range of supported SSL/TLS versions (from minimum supported version to maximum supported version) for communication between GlobalProtect components.Configure SSL/TLS service profiles with TLSv1.3 to provide enhanced security and faster TLS handshake while establishing connection between GlobalProtect components. TLSv1.3 is the maximum version supported and, when used, delivers increased security by removing the weak ciphers supported in the earlier TLS versions and adding more secure cipher suites.- To enable SSL connection between GlobalProtect components, you need to generate or import a certificate.On the firewall that is hosting the GlobalProtect portal and gateway, select and Add a new SSL/TLS service profile.Specify a Name for the new profile.Select the Certificate you imported.In Protocol Settings, define the range of SSL/TLS versions (Min Version to Max Version) for communication between GlobalProtect components. The maximum supported TLS version is TLSv1.3.To provide the strongest security, set both the Min Version and the Max Version as TLSv1.3.The Encryption Algorithms and Authentication Algorithms are populated automatically from the available ciphers based on your TLS protocol settings.The TLSv1.3 aes-chacha20-poly1305 cipher isn't enabled by default on devices running Windows 11. You must manually enable the cipher on GlobalProtect endpoints running Windows 11.(Optional) Modify the ciphers in the Encryption Algorithms and Authentication Algorithms section as needed.
![]() Click OK and Commit your changes.
Click OK and Commit your changes.Deploy the Self-Signed Server Certificates
- Export the self-signed server certificates issued by the root CA on the portal and import them onto the gateways.
- Be sure to issue a unique server certificate for each gateway.
- If specifying self-signed certificates, you must distribute the root CA certificate to the end clients in the portal client configurations.
- Export the certificate from the portal:
- Select .Select the gateway certificate you want to deploy, and then click Export Certificate.Set the File Format to Encrypted Private Key and Certificate (PKCS12).Enter and confirm a Passphrase to encrypt the private key.Click OK to download the PKCS12 file to a location of your choice.Import the certificate on the gateway:
- Select and Import the certificate.Enter a Certificate Name.Browse to find and select the Certificate File you downloaded in the previous step.Set the File Format to Encrypted Private Key and Certificate (PKCS12).Enter and confirm the Passphrase you used to encrypt the private key when you exported it from the portal.Click OK to import the certificate and key.Commit the changes for the gateway.