Prisma Access
SAML Authentication Using Okta as IdP for Mobile Users
Table of Contents
Expand All
|
Collapse All
Prisma Access Docs
-
- 6.1 Preferred and Innovation
- 6.0 Preferred and Innovation
- 5.2 Preferred and Innovation
- 5.1 Preferred and Innovation
- 5.0 Preferred and Innovation
- 4.2 Preferred
- 4.1 Preferred
- 4.0 Preferred
- 3.2 Preferred and Innovation
- 3.1 Preferred and Innovation
- 3.0 Preferred and Innovation
- 2.2 Preferred
-
-
- 4.0 & Later
- Prisma Access China
-
-
SAML Authentication Using Okta as IdP for Mobile Users
| Where Can I Use This? | What Do I Need? |
|---|---|
|
|
If your users access services and applications that are external to your network, you
can use SAML to integrate Prisma Access with an identity provider (IdP) that
controls access to both external and internal services and applications. SAML single
sign-on (SSO) enables one login to access multiple applications and is helpful in
environments where each user accesses many applications and authenticating for each
one would impede user productivity.
Prisma Access for Users provides enterprise authentication via Security Assertion
Markup Language (SAML). You can use SAML 2.0 to
authenticate Prisma Access mobile users. The Prisma Access portal and gateways act
as SAML Service Provider (SP). When a mobile user attempts to connect, Prisma Access
returns an authentication request to the client browser, which in turn sends it to
your SAML IdP to authenticate the user. You can use any third-party software that
supports SAML 2.0 as SAML identity provider (IdP).
The following workflows use Okta as the SAML IdP.
SAML Authentication Using Okta as IdP for Mobile Users (Strata Cloud Manager)
Configure Prisma Access to establish a trust relationship with your Okta IdP for SAML
2.0 authentication of your mobile users.
Configure SAML Authentication Using the Palo Alto Networks—Prisma Access app in Okta
If you are able to access the Palo Alto Networks—Prisma Access app in Okta, use
the steps in this procedure to configure SAML authentication using Prisma
Access.
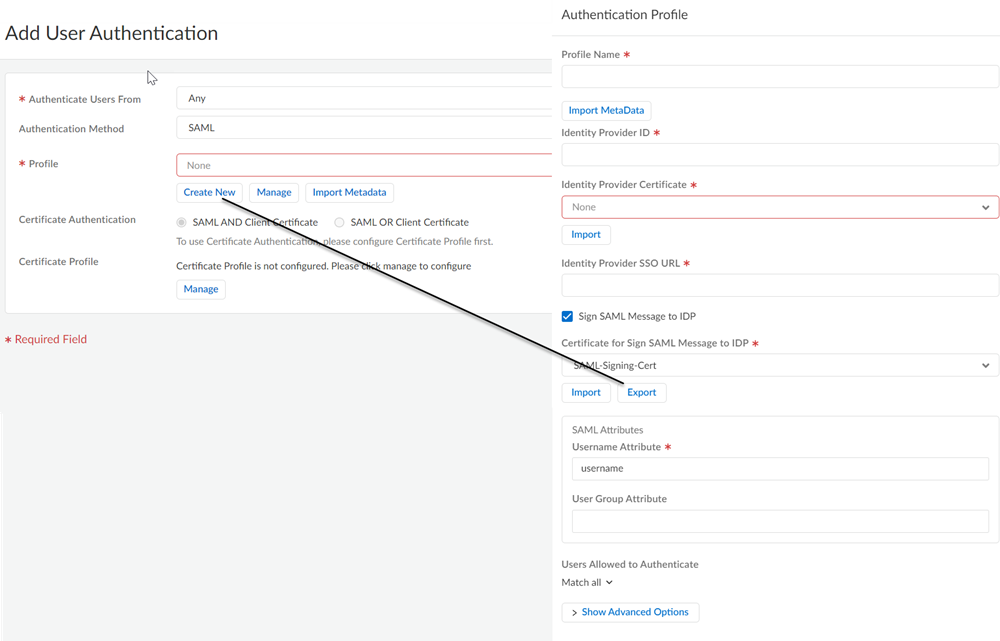
- Enable Mobile Users to Authenticate to Prisma Access.Complete the steps for defining the Service Provider (SP) settings, including generating or importing the certificate that Prisma Access uses to sign SAML messages that it sends to the identity provider (IdP).Export the Prisma Access signing certificate so that you can import it onto your IdP.
![]() Find the portal and gateway FQDNs to use as your Unique Gateway ID in Okta.
Find the portal and gateway FQDNs to use as your Unique Gateway ID in Okta.- To view the Portal Name, go to ConfigurationNGFW and Prisma Access, select the Configuration Scope as GlobalProtect, then click the gear to select Infrastructure Settings.
![]() In the Gateways area, take the gateway name and make a note of the data between the last dash in the gateway name and .gw.gpcloudservice.com.For example:
In the Gateways area, take the gateway name and make a note of the data between the last dash in the gateway name and .gw.gpcloudservice.com.For example:- Given a gateway name of india-west-acme.gp123abc.gw.gpcloudservice.com, make a note of the truncated FQDN acme.gp123abc.
- Given a gateway name of uzbekistan-acme.gp123abc.gw.gpcloudservice.com, make a note of the truncated FQDN acme.gp123abc.
- Given a gateway name of us-northwest-g-acme.gp123abc.gw.gpcloudservice.com, make a note of the truncated FQDN acme.gp123abc.
![]() Use the Palo Alto Networks—Prisma Access app to configure SAML login settings.This app is part of the Okta Integration Network (OIN) and simplifies the Prisma Access SAML authentication process.If you cannot access the Palo Alto Networks—Prisma Access app, you must configure each gateway manually in Okta by completing the procedure in Configure SAML Authentication Without Using the Palo Alto Networks—Prisma Access app in Okta.
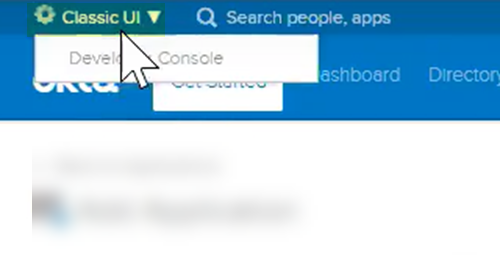
Use the Palo Alto Networks—Prisma Access app to configure SAML login settings.This app is part of the Okta Integration Network (OIN) and simplifies the Prisma Access SAML authentication process.If you cannot access the Palo Alto Networks—Prisma Access app, you must configure each gateway manually in Okta by completing the procedure in Configure SAML Authentication Without Using the Palo Alto Networks—Prisma Access app in Okta.- Log in to Okta.Make sure that you are logged in to the Classic UI and not the Developer Console.
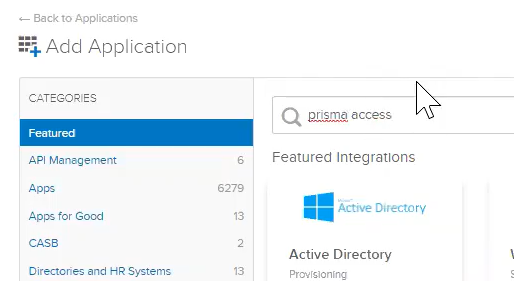
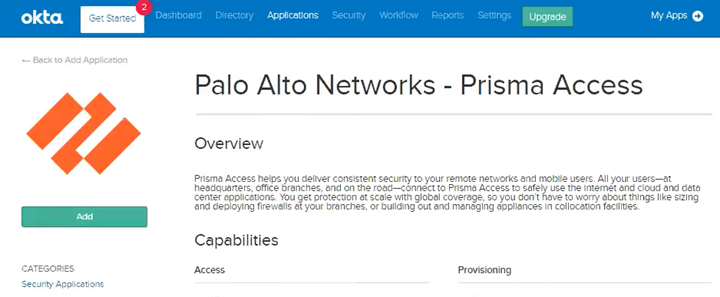
![]() Select Applications; then, Add Application and search for Prisma Access.
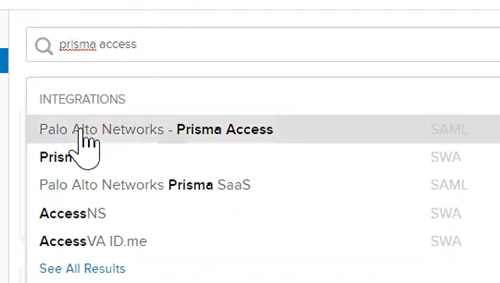
Select Applications; then, Add Application and search for Prisma Access.![]() Select Palo Alto Networks—Prisma Access.
Select Palo Alto Networks—Prisma Access.![]() Add the app.
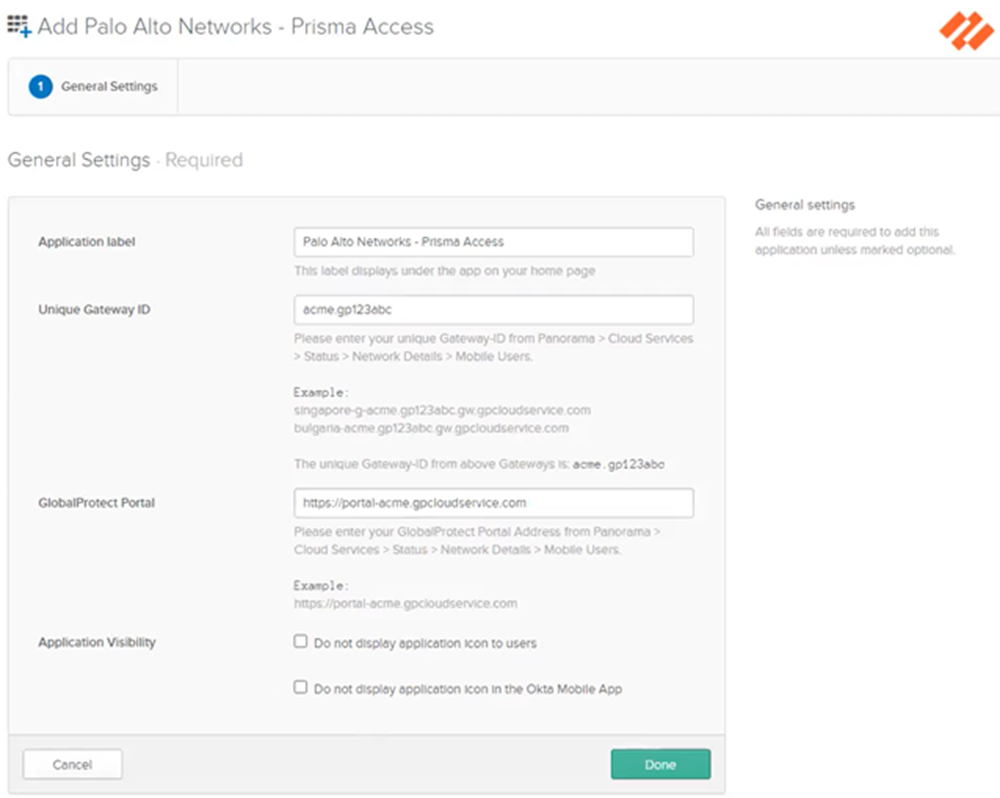
Add the app.![]() Click the General tab and, in the General Settings area, enter the following information, then click Done:
Click the General tab and, in the General Settings area, enter the following information, then click Done:- Application Label—Leave as Palo Alto Networks—Prisma Access app.
- Unique Gateway ID—Enter the truncated gateway FQDN you copied from a previous step.
- GlobalProtect Portal—Enter the portal FQDN you copied from a previous step.
- Application Visibility—Leave this field blank.
You do not need to enter any information in the Mobile, Import, or Assignments tabs; you configure sign on values in the Sign On tab in a later step.![]() Complete the configuration of the SAML 2.0 web application in Okta and enable the users to use the application. Use the link on the Okta site https://saml-doc.okta.com/SAML_Docs/How-to-Configure-SAML-2.0-for-Palo-Alto-Networks-Prisma-Access.html for details.(Optional) If you use a certificate issued by a Certificate Authority (CA), configure it as the IdP certificate.See the link on the Okta site https://developer.okta.com/docs/guides/sign-your-own-saml-csr/overview/ for details.To download the metadata files for the portal and gateways, click the Sign On tab, then select Identity Provider metadata and copy that information.
Complete the configuration of the SAML 2.0 web application in Okta and enable the users to use the application. Use the link on the Okta site https://saml-doc.okta.com/SAML_Docs/How-to-Configure-SAML-2.0-for-Palo-Alto-Networks-Prisma-Access.html for details.(Optional) If you use a certificate issued by a Certificate Authority (CA), configure it as the IdP certificate.See the link on the Okta site https://developer.okta.com/docs/guides/sign-your-own-saml-csr/overview/ for details.To download the metadata files for the portal and gateways, click the Sign On tab, then select Identity Provider metadata and copy that information.![]() Import the metadata file and the CA certificate from Okta into Prisma Access.
Import the metadata file and the CA certificate from Okta into Prisma Access.- Log in to Strata Cloud Manager and go to ConfigurationNGFW and Prisma AccessConfiguration ScopePrisma AccessMobile Users. Select GlobalProtect Setup or Explicit Proxy Setup and edit the User Authentication configuration.In SAML IdP Profile click Add SAML IdP Profile and Import the metadata file you exported from the Okta server.Save the IdP profile.
Configure SAML Authentication Without Using the Palo Alto Networks—Prisma Access app in Okta
If you are not able to use the Palo Alto Networks—Prisma Access app in Okta, use the following steps to configure SAML authentication using Okta. This procedure requires you enter the gateway names manually in Okta.- Enable Mobile Users to Authenticate to Prisma Access.Complete the steps for defining the Service Provider (SP) settings, including generating or importing the certificate that Prisma Access uses to sign SAML messages that it sends to the identity provider (IdP).Export the Prisma Access signing certificate so that you can import it onto your IdP.
![]() Find the portal and gateway FQDNs to use as your Unique Gateway ID in Okta.
Find the portal and gateway FQDNs to use as your Unique Gateway ID in Okta.- To view the Portal Name, go to ConfigurationNGFW and Prisma Access, select the Configuration Scope as GlobalProtect, then click the gear to select Infrastructure Settings.
![]() To find the gateway names, go to the Gateway FQDNs section and select Copy FQDN List to get a copy of the list of gateways.
To find the gateway names, go to the Gateway FQDNs section and select Copy FQDN List to get a copy of the list of gateways.![]() Log into Okta as an administrator and create and create SAML 2.0 applications for Prisma Access.
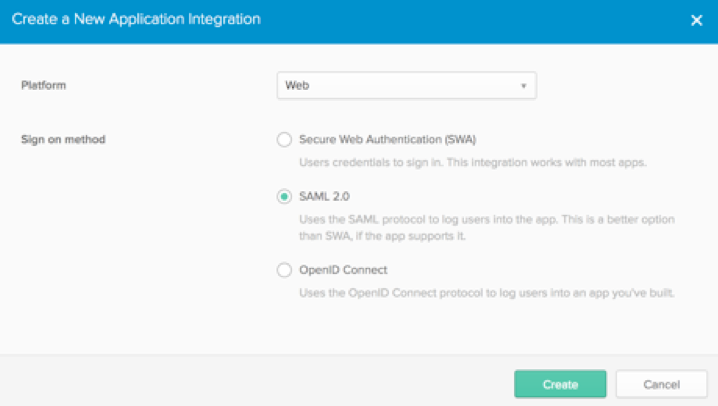
Log into Okta as an administrator and create and create SAML 2.0 applications for Prisma Access.- Create a new application integration for Prisma Access. Specify the Platform Type as Web and the sign-on method as SAML 2.0 and click Create.
![]() Configure the following application integration options:
Configure the following application integration options:- Single sign on URL—Enter the URL for the portal (i.e. https://portal114.gpcloudservice.com:443/SAML20/SP/ACS)
- Use this for Recipient URL and Destination URL—Select this check box.
- Allow this app to request other SSO URLs—Select this check box and add the URLs for all Prisma Access gateways on the list you copied in the Requestable SSO URLs field.
- Audience URI (SP Entity ID)—Enter the URL for the portal (i.e. https://portal114.gpcloudservice.com:443/SAML20/SP).
- Default RelayState—Leave blank.
- Name ID format—Select EmailAddress.
- Application username—Select Okta Username.
![]() Select Show Advanced Settings and configure these settings:
Select Show Advanced Settings and configure these settings:- Allow application to initiate Single Logout—Select this check box.
- Single Logout URL—Enter https://<Prisma Access-FQDN>:443/SAML20/SP/SLOWhere <Prisma-Access-FQDN> is the FQDN you defined for Prisma Access when you set up the environment.
- SP Issuer—Enter the issuer for the service provider.
- Signature Certificate—Browse to and then select the SAML signing certificate that you exported from Prisma Access, then click Upload Certificate.
![]() In the ATTRIBUTE STATEMENTS (OPTIONAL) area, specify users, Name formats, and values in Okta Expression Language.These fields reference, transform and combine attributes to define the Username attribute format to match what you set up on Prisma Access. For example, specify a name format of Basic and a Value of user.firstName.
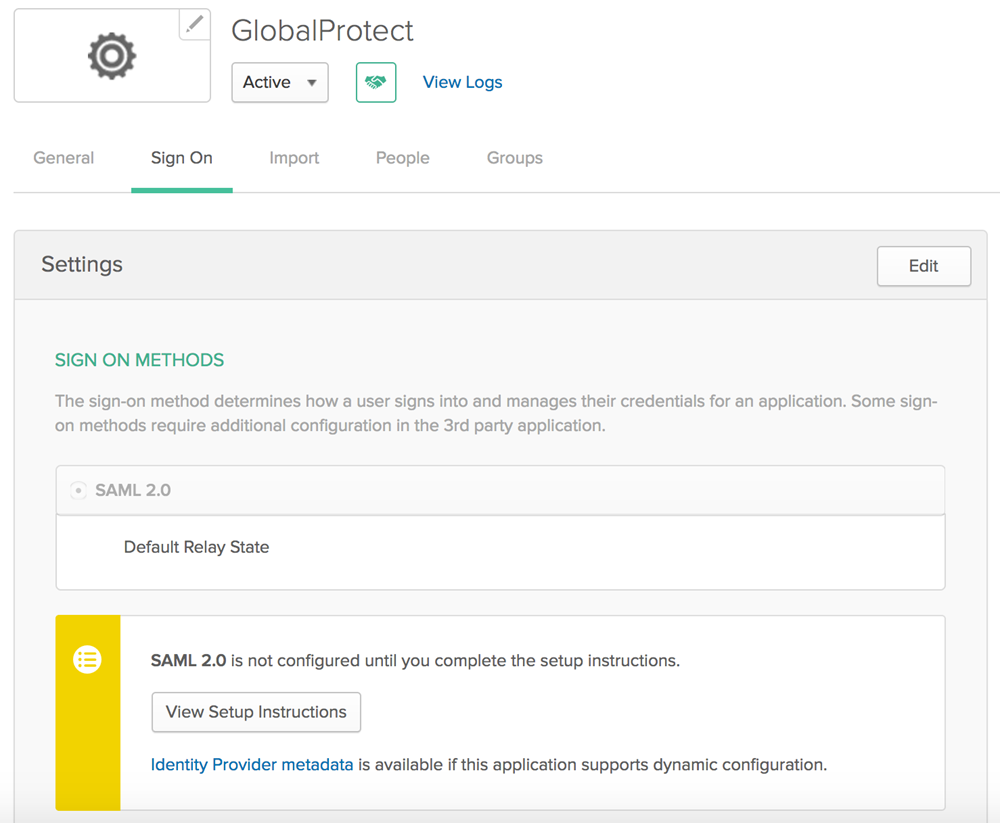
In the ATTRIBUTE STATEMENTS (OPTIONAL) area, specify users, Name formats, and values in Okta Expression Language.These fields reference, transform and combine attributes to define the Username attribute format to match what you set up on Prisma Access. For example, specify a name format of Basic and a Value of user.firstName.![]() Optionally, in the Group Attribute Statements (Optional) area, create group attribute options.You can’t use group information that’s retrieved from the SAML assertion in either security policy rules or the GlobalProtect app configuration.Save the configuration.Complete the configuration of the SAML 2.0 web application in Okta and enable the users to use the application. Click View Setup Instructions for details.To download the metadata files for the portal and gateways, click Identity Provider metadata and copy that information.
Optionally, in the Group Attribute Statements (Optional) area, create group attribute options.You can’t use group information that’s retrieved from the SAML assertion in either security policy rules or the GlobalProtect app configuration.Save the configuration.Complete the configuration of the SAML 2.0 web application in Okta and enable the users to use the application. Click View Setup Instructions for details.To download the metadata files for the portal and gateways, click Identity Provider metadata and copy that information.![]() Import the metadata file and the CA certificate from Okta into Prisma Access.
Import the metadata file and the CA certificate from Okta into Prisma Access.- From Strata Cloud Manager, go to ConfigurationNGFW and Prisma AccessConfiguration ScopePrisma AccessMobile Users. Select GlobalProtect Setup or Explicit Proxy Setup and edit the User Authentication configuration.In SAML IdP Profile click Add SAML IdP Profile and Import the metadata file you exported from the Okta server.Save the IdP profile.
SAML Authentication Using Okta as IdP for Mobile Users (Panorama)
There are two different procedures you can take to use SAML authentication with Okta in Prisma Access.- If you are able to access the Palo Alto Networks—Prisma Access app in Okta, use the steps in Configure SAML Authentication Using the Palo Alto Networks—Prisma Access app in Okta to configure Okta authentication with Prisma Access. This procedure simplifies the SAML authentication process because you do not have to enter each gateway name manually in Okta.
- If you cannot access the Palo Alto Networks—Prisma Access app in Okta, you must configure each gateway manually in Okta. See Configure SAML Authentication Without Using the Palo Alto Networks—Prisma Access app in Okta for details.
Complete this task to configure SAML 2.0 in Prisma Access by using Okta as the IdP.Configure SAML Authentication Using the Palo Alto Networks—Prisma Access app in Okta
If you are able to access the Palo Alto Networks—Prisma Access app in Okta, use the steps in this procedure to configure SAML authentication using Prisma Access.- Log in to the Panorama that manages Prisma Access and configure the SAML signing certificate that you want to use with SAML 2.0.Prisma Access requires a SAML certificate to sign SAML responses and assertions. You can either generate the signing SAML signing certificate used by the portal and gateways, or you can import it. Only a Panorama administrator or Superuser can generate or import this certificate.
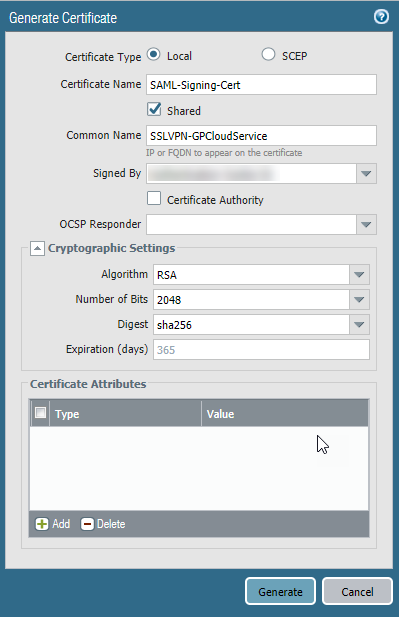
- To Generate a Certificate and export it:
- Select DeviceMobile_User_TemplateCertificate ManagementCertificatesDevice Certificates.You can also create this certificate in another template, but you must include this certificate as part of the Mobile_User_Template_Stack to use it with the Prisma Access portal and gateways.
- Click Generate.
![]()
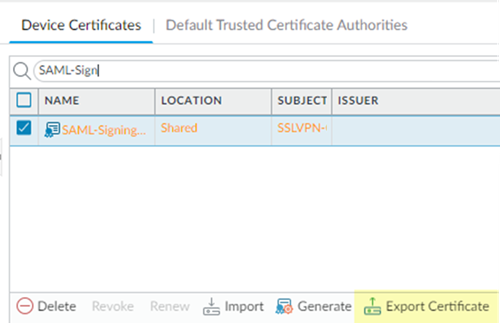
- Select the certificate, then click Export Certificate.
![]()
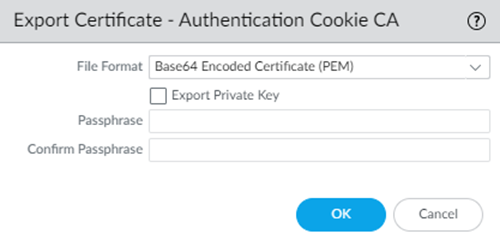
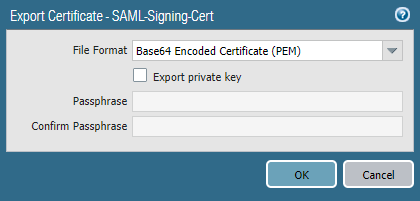
- Export the certificate in PEM format.Do not select the Export private key check box.
![]()
- Select DeviceMobile_User_TemplateCertificate ManagementCertificatesDevice Certificates.Be sure to include this certificate as part of the Mobile_User_Template_Stack.
- Click Import and enter a Certificate Name.
- Select the Shared check box.
- Enter the path and name of the Certificate File received from the CA, or Browse to find the file.
- Click OK.
Find the portal and gateway FQDNs to use as your Unique Gateway ID in Okta.For gateways, you a truncated FQDN that you take from the gateway FQDNs. For portals, you use the entire FQDN. You use the portal and gateway FQDNs when you configure Okta in a later step.- Select PanoramaCloud ServicesStatusNetwork Details and click either the Mobile Users or Mobile Users - GlobalProtect radio button, depending on your deployment.In the Portals area, make a note of the full Portal hostname.In the Gateways area, take the gateway name and make a note of the data between the last dash in the gateway name and .gw.gpcloudservice.com.For example:
- Given a gateway name of india-west-acme.gp123abc.gw.gpcloudservice.com, make a note of the truncated FQDN acme.gp123abc.
- Given a gateway name of uzbekistan-acme.gp123abc.gw.gpcloudservice.com, make a note of the truncated FQDN acme.gp123abc.
- Given a gateway name of us-northwest-g-acme.gp123abc.gw.gpcloudservice.com, make a note of the truncated FQDN acme.gp123abc.
![]() Use the Palo Alto Networks—Prisma Access app to configure SAML login settings.This app is part of the Okta Integration Network (OIN) and simplifies the Prisma Access SAML authentication process.If you cannot access the Palo Alto Networks—Prisma Access app, you must configure each gateway manually in Okta by completing the procedure in Configure SAML Authentication Without Using the Palo Alto Networks—Prisma Access app in Okta.
Use the Palo Alto Networks—Prisma Access app to configure SAML login settings.This app is part of the Okta Integration Network (OIN) and simplifies the Prisma Access SAML authentication process.If you cannot access the Palo Alto Networks—Prisma Access app, you must configure each gateway manually in Okta by completing the procedure in Configure SAML Authentication Without Using the Palo Alto Networks—Prisma Access app in Okta.- Log in to Okta.Make sure that you are logged in to the Classic UI and not the Developer Console.
![]() Select Applications; then, Add Application and search for Prisma Access.
Select Applications; then, Add Application and search for Prisma Access.![]() Select Palo Alto Networks—Prisma Access.
Select Palo Alto Networks—Prisma Access.![]() Add the app.
Add the app.![]() Click the General tab and, in the General Settings area, enter the following information, then click Done:
Click the General tab and, in the General Settings area, enter the following information, then click Done:- Application Label—Leave as Palo Alto Networks—Prisma Access app.
- Unique Gateway ID—Enter the truncated gateway FQDN you copied from Step 2.
- GlobalProtect Portal—Enter the portal FQDN you copied from Step 2.
- Application Visibility—Leave this field blank.
You do not need to enter any information in the Mobile, Import, or Assignments tabs; you configure sign on values in the Sign On tab in a later step.![]() Complete the configuration of the SAML 2.0 web application in Okta and enable the users to use the application. Use the link on the Okta site https://saml-doc.okta.com/SAML_Docs/How-to-Configure-SAML-2.0-for-Palo-Alto-Networks-Prisma-Access.html for details.(Optional) If you use a certificate issued by a Certificate Authority (CA), configure it as the IdP certificate.See the link on the Okta site https://developer.okta.com/docs/guides/sign-your-own-saml-csr/overview/ for details.To download the metadata files for the portal and gateways, click the Sign On tab, then select Identity Provider metadata and copy that information.
Complete the configuration of the SAML 2.0 web application in Okta and enable the users to use the application. Use the link on the Okta site https://saml-doc.okta.com/SAML_Docs/How-to-Configure-SAML-2.0-for-Palo-Alto-Networks-Prisma-Access.html for details.(Optional) If you use a certificate issued by a Certificate Authority (CA), configure it as the IdP certificate.See the link on the Okta site https://developer.okta.com/docs/guides/sign-your-own-saml-csr/overview/ for details.To download the metadata files for the portal and gateways, click the Sign On tab, then select Identity Provider metadata and copy that information.![]() Import the metadata files for the portal and gateway to Panorama.
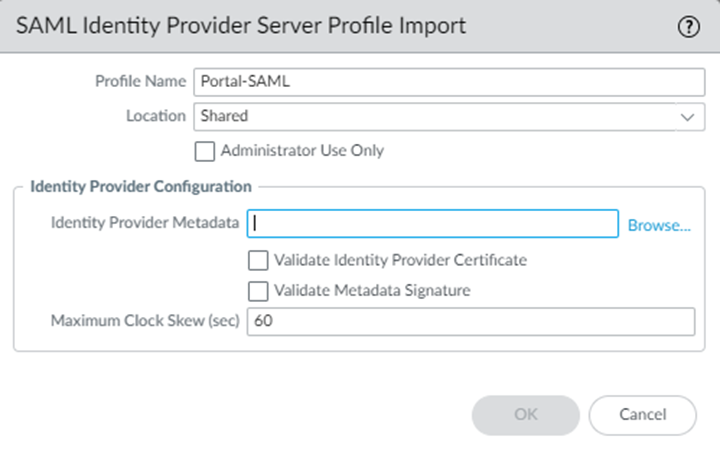
Import the metadata files for the portal and gateway to Panorama.- In Panorama, select DeviceMobile_User_TemplateServer ProfilesSAML Identity ProviderImport the metadata file for the portal.If you configured a CA-issued certificate, select Validate Identity Provider Certificate; otherwise, deselect this choice.To validate the IdP certificate, you must specify a Certificate Profile in any Authentication Profile that references the IdP server profile.
![]() Enter the path and name of the Identity Provider Metadata received from the CA, or Browse to find the file.Click OK.Import the metadata file for the gateways by repeating Step 7.b to Step 7.d.The SAML profiles display in the SAML Identity Provider window.
Enter the path and name of the Identity Provider Metadata received from the CA, or Browse to find the file.Click OK.Import the metadata file for the gateways by repeating Step 7.b to Step 7.d.The SAML profiles display in the SAML Identity Provider window.![]() Create new authentication profiles for the portal and gateways.
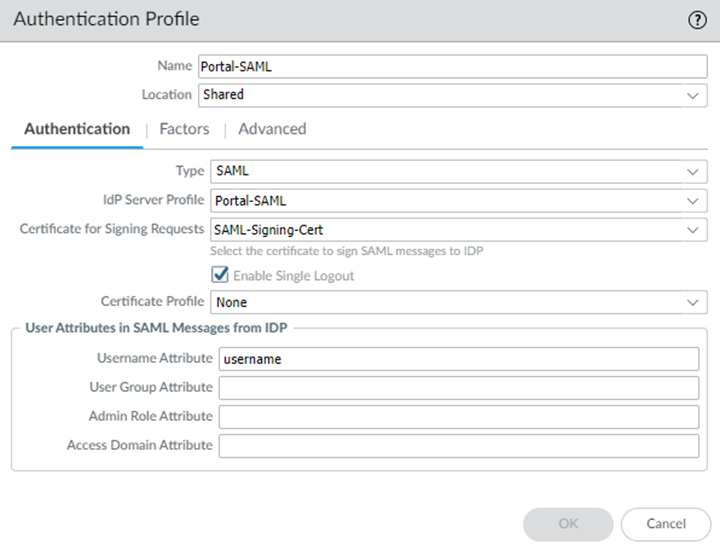
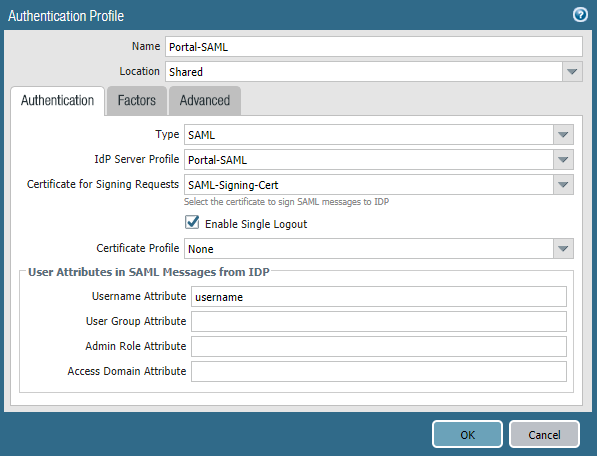
Create new authentication profiles for the portal and gateways.- Select DeviceMobile_User_Template-Authentication Profile and Add an authentication profile for the portal, specifying the following options:
- Specify a Type of SAML.
- Specify the portal server profile you created in Step 7 as the IdP Server Profile.
- Specify the certificate you created in Step 1 as the Certificate for Signing Requests.
- (Optional) If you configured a CA-issued certificate in Step 5, add a New certificate profile or specify an existing one; otherwise, leave the default of None.If you use a certificate profile, be sure that the name of the CA certificate in the CA Certificates area. You must set up the certificate profile with the CA that has issued the IdP certificate.
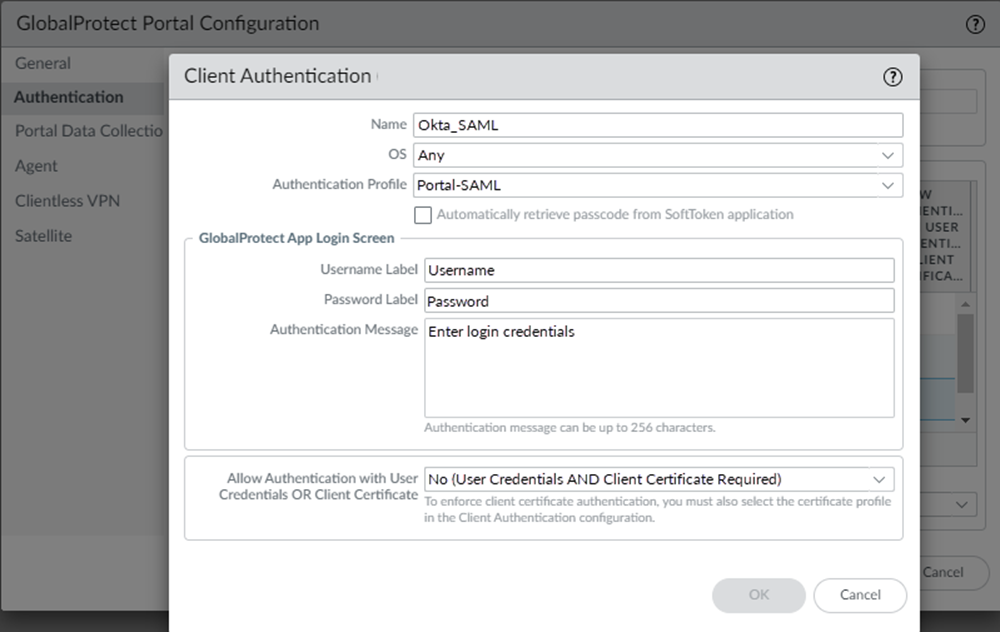
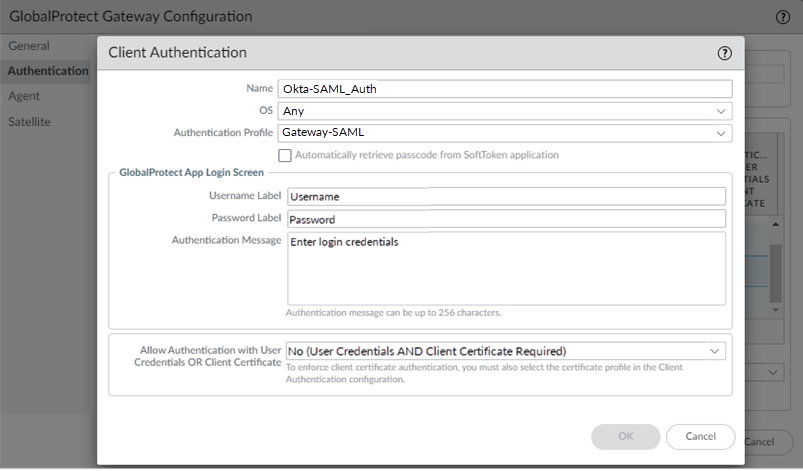
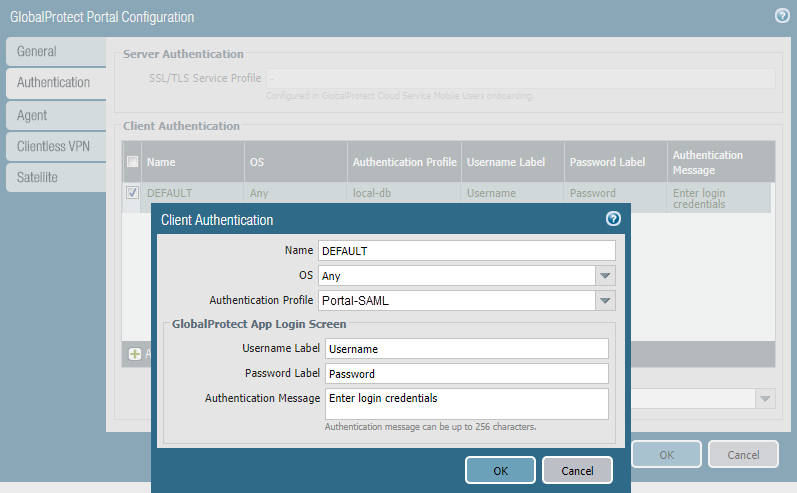
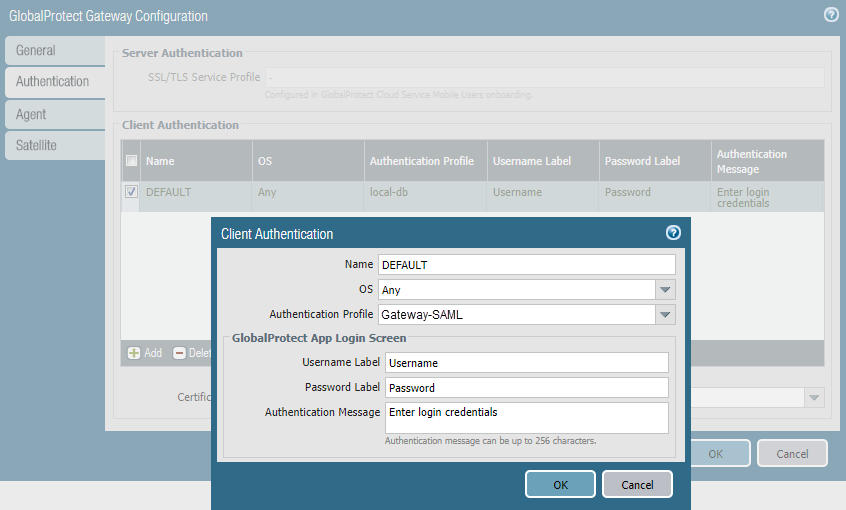
![]() Click OK.Create an authentication profile for the gateways, using Step 8.a to Step 8.b.Update the Prisma Access portal and gateway to use the SAML authentication profile you just created.
Click OK.Create an authentication profile for the gateways, using Step 8.a to Step 8.b.Update the Prisma Access portal and gateway to use the SAML authentication profile you just created.![]()
![]() Click OK twice to close the configuration.
Click OK twice to close the configuration.Configure SAML Authentication Without Using the Palo Alto Networks—Prisma Access app in Okta
If you are not able to use the Palo Alto Networks—Prisma Access app in Okta, use the following steps to configure SAML authentication using Okta. This procedure requires you enter the gateway names manually in Okta.- Log in to Panorama and configure the SAML signing certificate that you want to use with SAML 2.0.Prisma Access requires a SAML certificate to sign SAML responses and assertions. You can either generate the signing SAML signing certificate used by the portal and gateways, or you can import it. Only a Panorama administrator or Superuser can generate or import this certificate.
- To Generate a Certificate and export it:
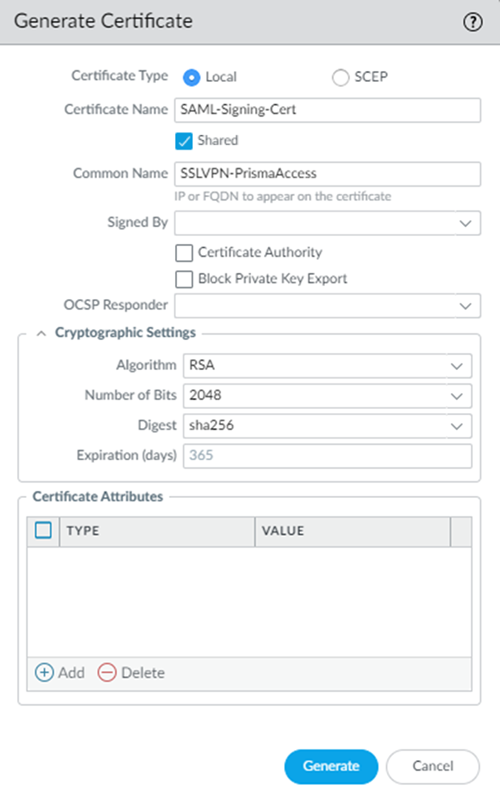
- Select DeviceMobile_User_TemplateCertificate ManagementCertificatesDevice Certificates.You can also create this certificate in another template, but you must include this certificate as part of the Mobile_User_Template_Stack to use it with the Prisma Access portal and gateways.
- Click Generate.
![]()
- Select the certificate, then click Export Certificate.
![]()
- Export the certificate in PEM format.Do not select the Export private key check box.
![]()
- Select DeviceMobile_User_TemplateCertificate ManagementCertificatesDevice Certificates.Be sure to include this certificate as part of the Mobile_User_Template_Stack.
- Click Import and enter a Certificate Name.
- Select the Shared check box.
- Enter the path and name of the Certificate File received from the CA, or Browse to find the file.
- Click OK.
Log into Okta as an administrator and create SAML 2.0 applications for the portal and gateways.To complete this step, you need to know the FQDNs of the portal and gateways. You can obtain the FQDNs in Panorama by selecting PanoramaCloud ServicesStatusNetwork Details and clicking the Mobile Users radio button. The FQDNs display in the Gateways area. Click More to see all gateways.![]() Create a new application integration for the Prisma Access portal. Specify the Platform Type as Web and the sign-on method as SAML 2.0 and click Create.
Create a new application integration for the Prisma Access portal. Specify the Platform Type as Web and the sign-on method as SAML 2.0 and click Create.![]()
- Configure the following application integration options:
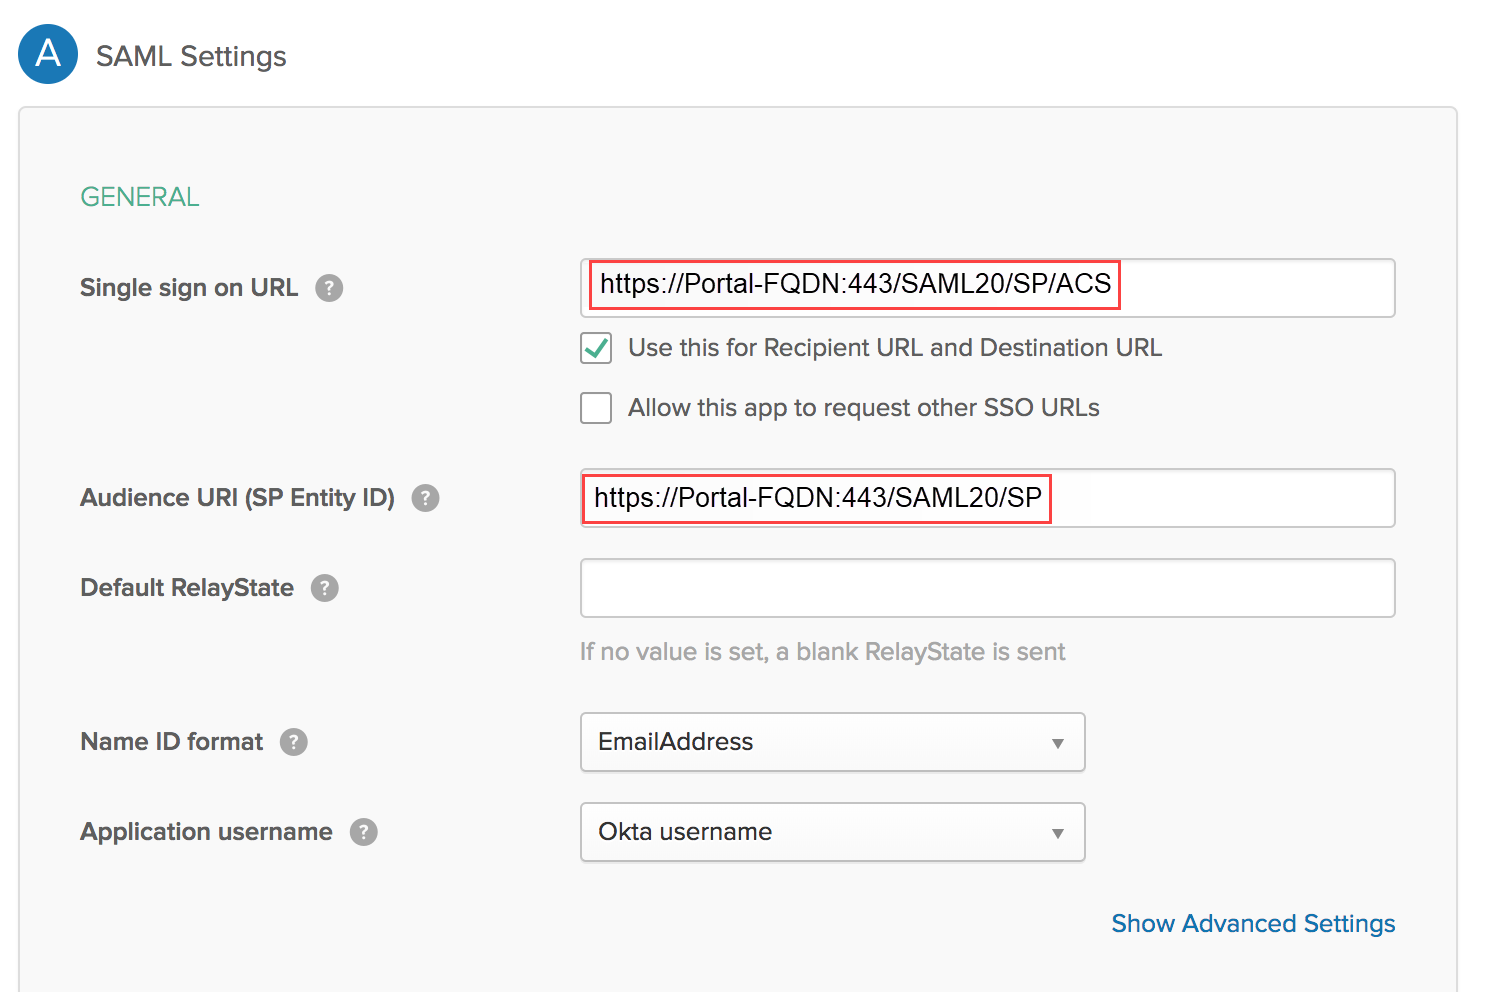
- Single sign on URL—Enter https://<Portal-FQDN>:443/SAML20/SP/ACSWhere <Portal-FQDN> is the FQDN for the Prisma Access portal.
- Use this for Recipient URL and Destination URL—Select this check box.
- Allow this app to request other SSO URLs—Clear this check box.
- Audience URI (SP Entity ID)—Enter https://<Portal-FQDN>:443/SAML20/SP.
- Default RelayState—Leave blank.
- Name ID format—Select EmailAddress.
- Application username—Select Okta Username.
![]() Select Show Advanced Settings and configure these settings:
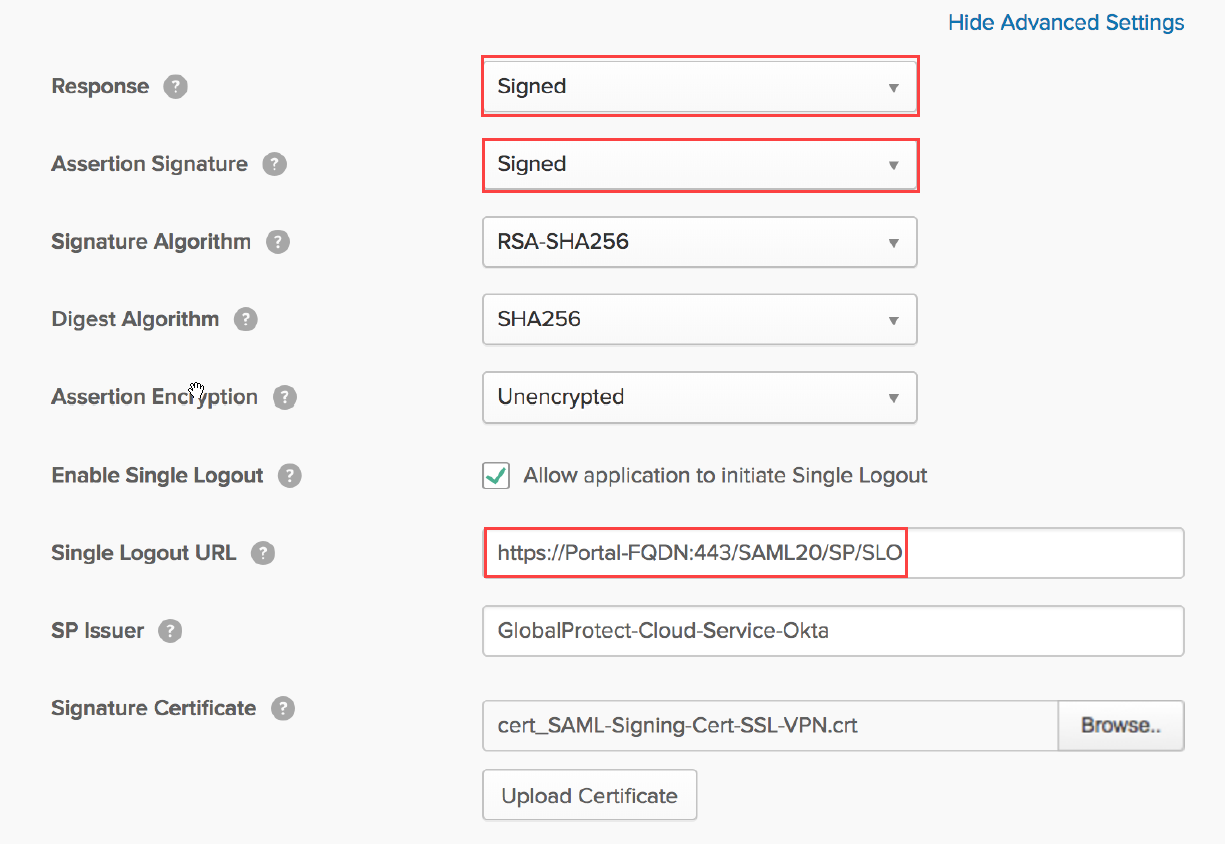
Select Show Advanced Settings and configure these settings:- Response and Assertion Signature—Select Signed (the default).You must configure Okta to sign SAML responses and assertions.
- Allow application to initiate Single Logout—Select this check box.
- Single Logout URL—Enter https://<Portal-FQDN>:443/SAML20/SP/SLOWhere <Portal-FQDN> is the FQDN for the Prisma Access portal.
- SP Issuer—Enter the issuer for the service provider.
- Signature Certificate—Browse to and then select the SAML signing certificate that you configured in Step 1, then click Upload Certificate.
![]()
In the ATTRIBUTE STATEMENTS (OPTIONAL) area, specify users, Name formats, and values in Okta Expression Language.These fields reference, transform and combine attributes to define the User-ID format when the format is created in the Palo Alto Networks next-generation firewall. For example, specify a name format of Basic and a Value of user.firstName.![]() (Optional) In the Group Attribute Statements (Optional) area, create group attribute options.You can’t use group information that’s retrieved from the SAML assertion in either security policies or the agent client configuration in the portal and gateways. If you have a requirement to configure user group-based policies and configuration selections, you must Enable Group Mapping and retrieve the user group information from the LDAP server using Group Mapping Settings.Save the configuration.Create a new application integration for the Prisma Access gateways.Specify the Platform Type as Web and the sign-on method as SAML 2.0 and click Create.
(Optional) In the Group Attribute Statements (Optional) area, create group attribute options.You can’t use group information that’s retrieved from the SAML assertion in either security policies or the agent client configuration in the portal and gateways. If you have a requirement to configure user group-based policies and configuration selections, you must Enable Group Mapping and retrieve the user group information from the LDAP server using Group Mapping Settings.Save the configuration.Create a new application integration for the Prisma Access gateways.Specify the Platform Type as Web and the sign-on method as SAML 2.0 and click Create.- Configure the following application options:
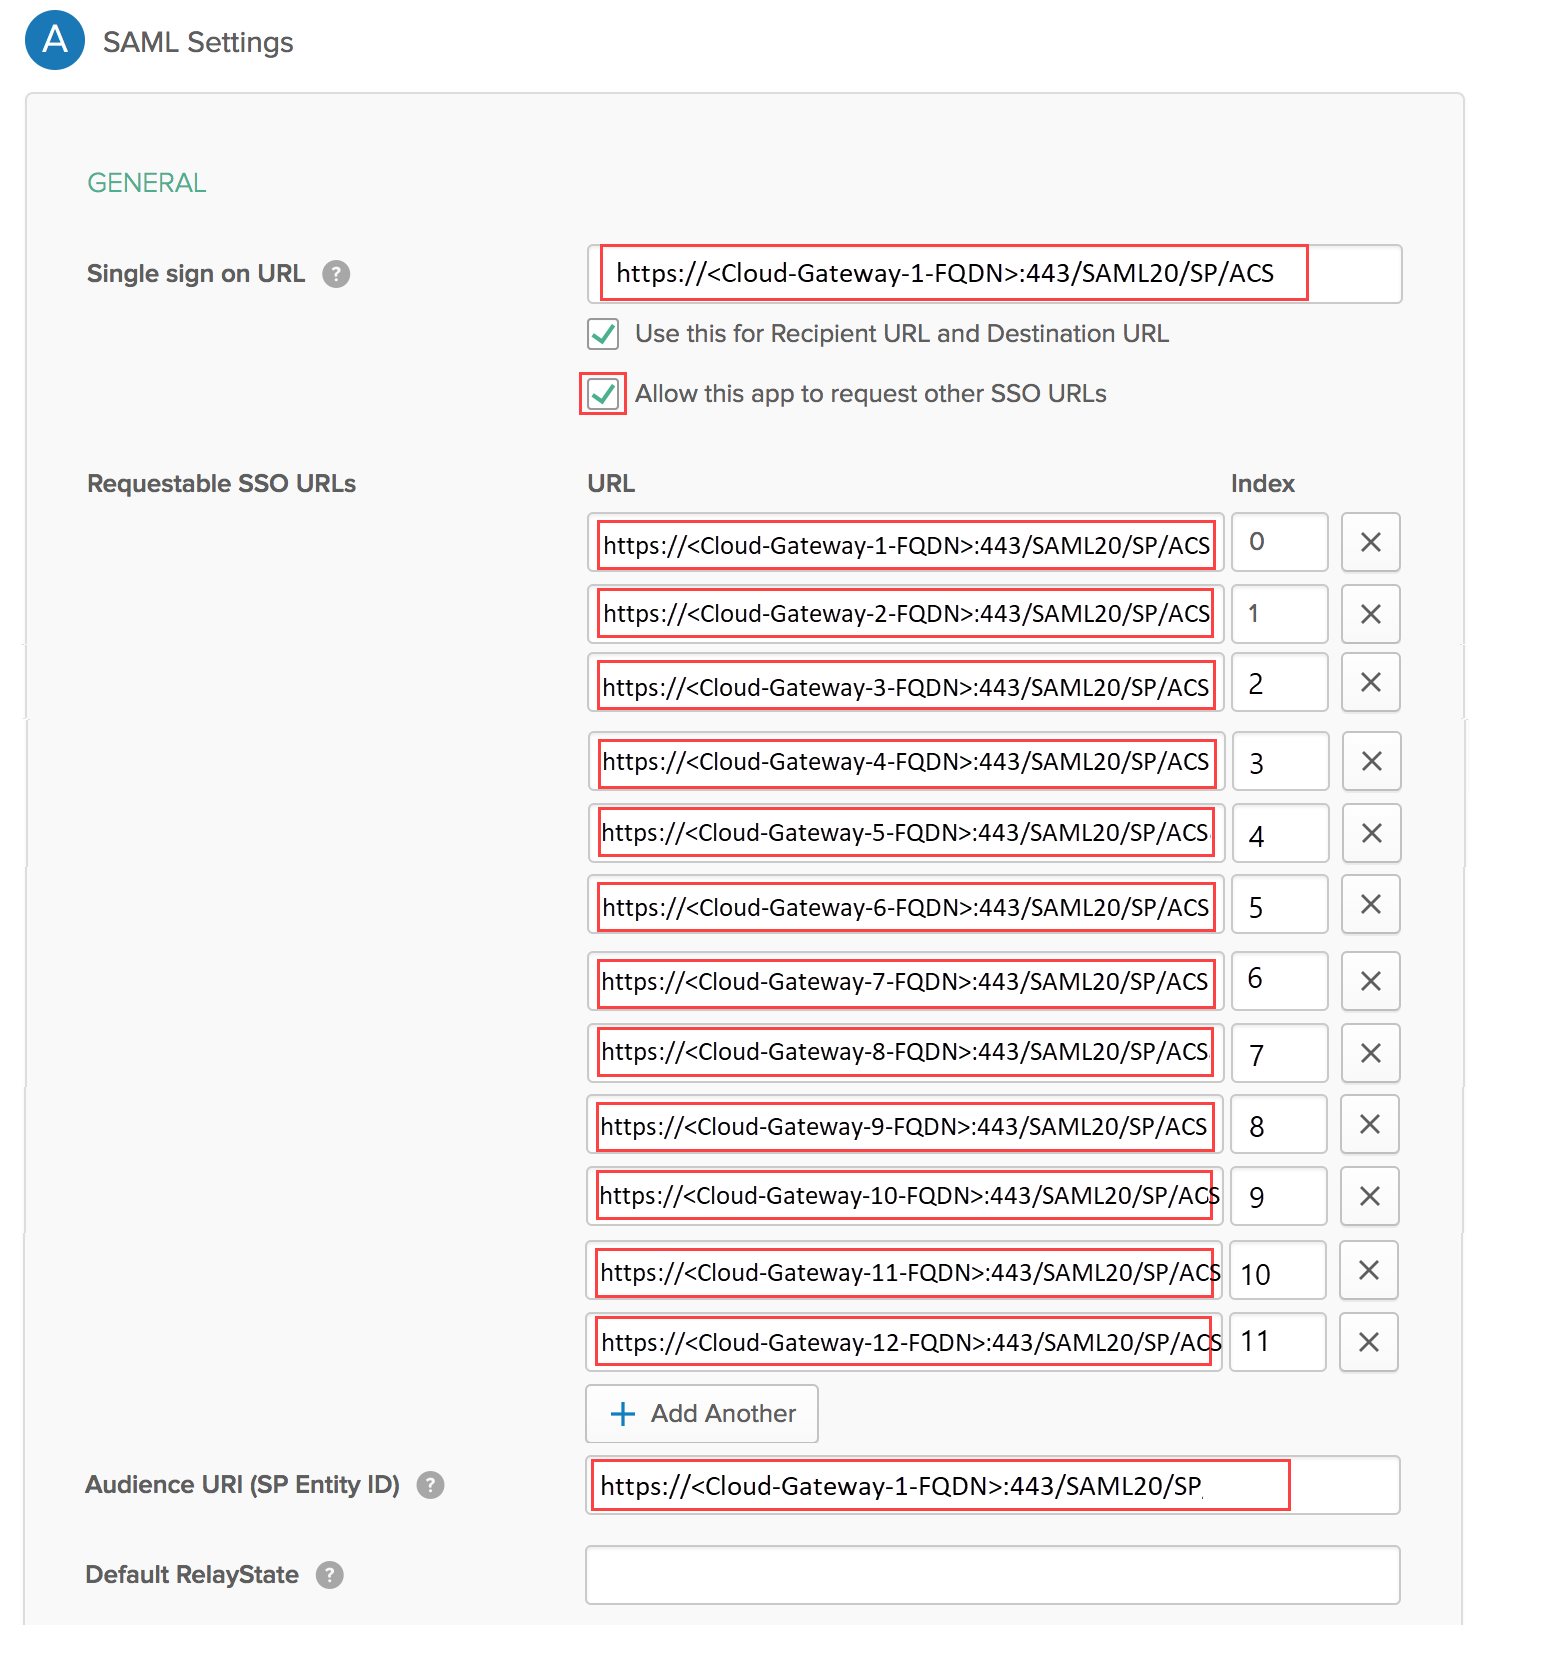
- Single sign on URL—Enter https://<Cloud-Gateway-1-FQDN>:443/SAML20/SP/ACSWhere <Cloud-Gateway-1-FQDN> is the FQDN for the Prisma Access gateway that is closest to the majority of your mobile users.
- Use this for Recipient URL and Destination URL—Select this check box.
- Allow this app to request other SSO URLs—Select this check box and add the hostnames for all Prisma Access gateways you have deployed in the Requestable SSO URL fields (https://<Cloud-Gateway-1-FQDN>:443/SAML20/SP/ACS, https://<Cloud-Gateway-2-FQDN>:443/SAML20/SP/ACS, and so on).
- Audience URI (SP Entity ID)—Enter the same gateway you specified for Single sign on URL (https://<Cloud-Gateway-1-FQDN>:443/SAML20/SP).
- Default RelayState—Leave blank.
- Name ID format—Select EmailAddress.
- Application username—Select Okta Username.
![]() Select Show Advanced Settings and configure these settings:
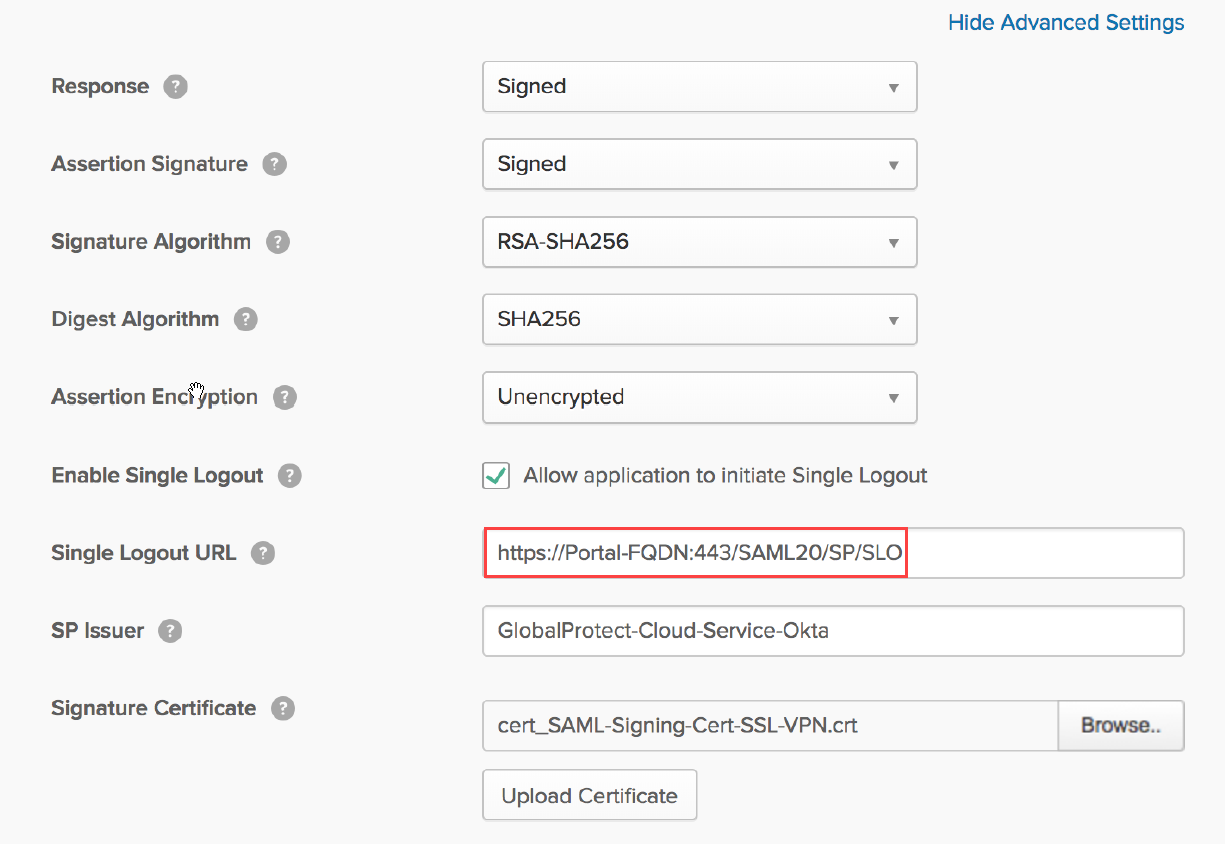
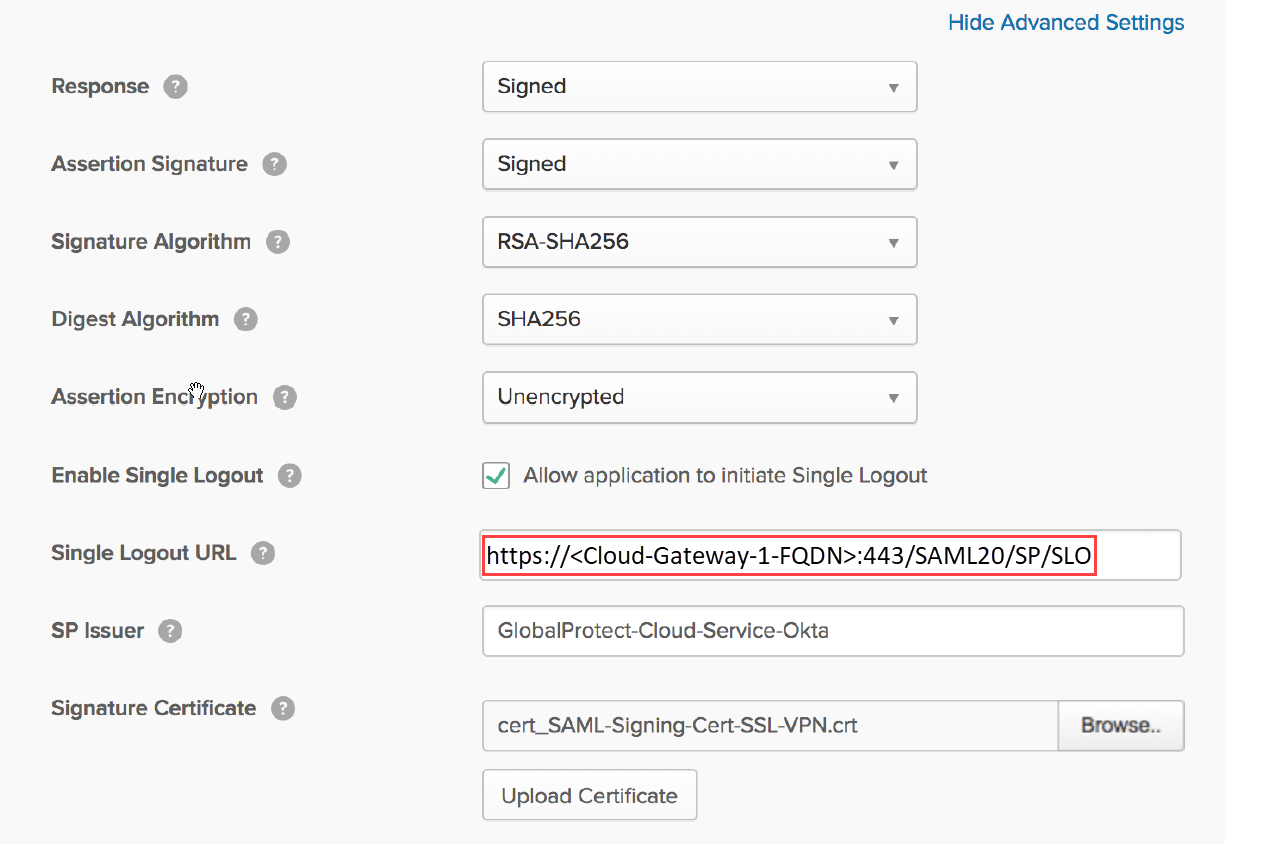
Select Show Advanced Settings and configure these settings:- Allow application to initiate Single Logout—Select this check box.
- Single Logout URL—Enter https://<Cloud-Gateway-1-FQDN>:443/SAML20/SP/SLOWhere <Cloud-Gateway-1-FQDN> is the FQDN for the Prisma Access gateway that is the closest to the majority of your mobile users.
- SP Issuer—Enter the issuer for the service provider.
- Signature Certificate— Browse to and select the SAML signing certificate that you configured in Step 1, then click Upload Certificate.
![]()
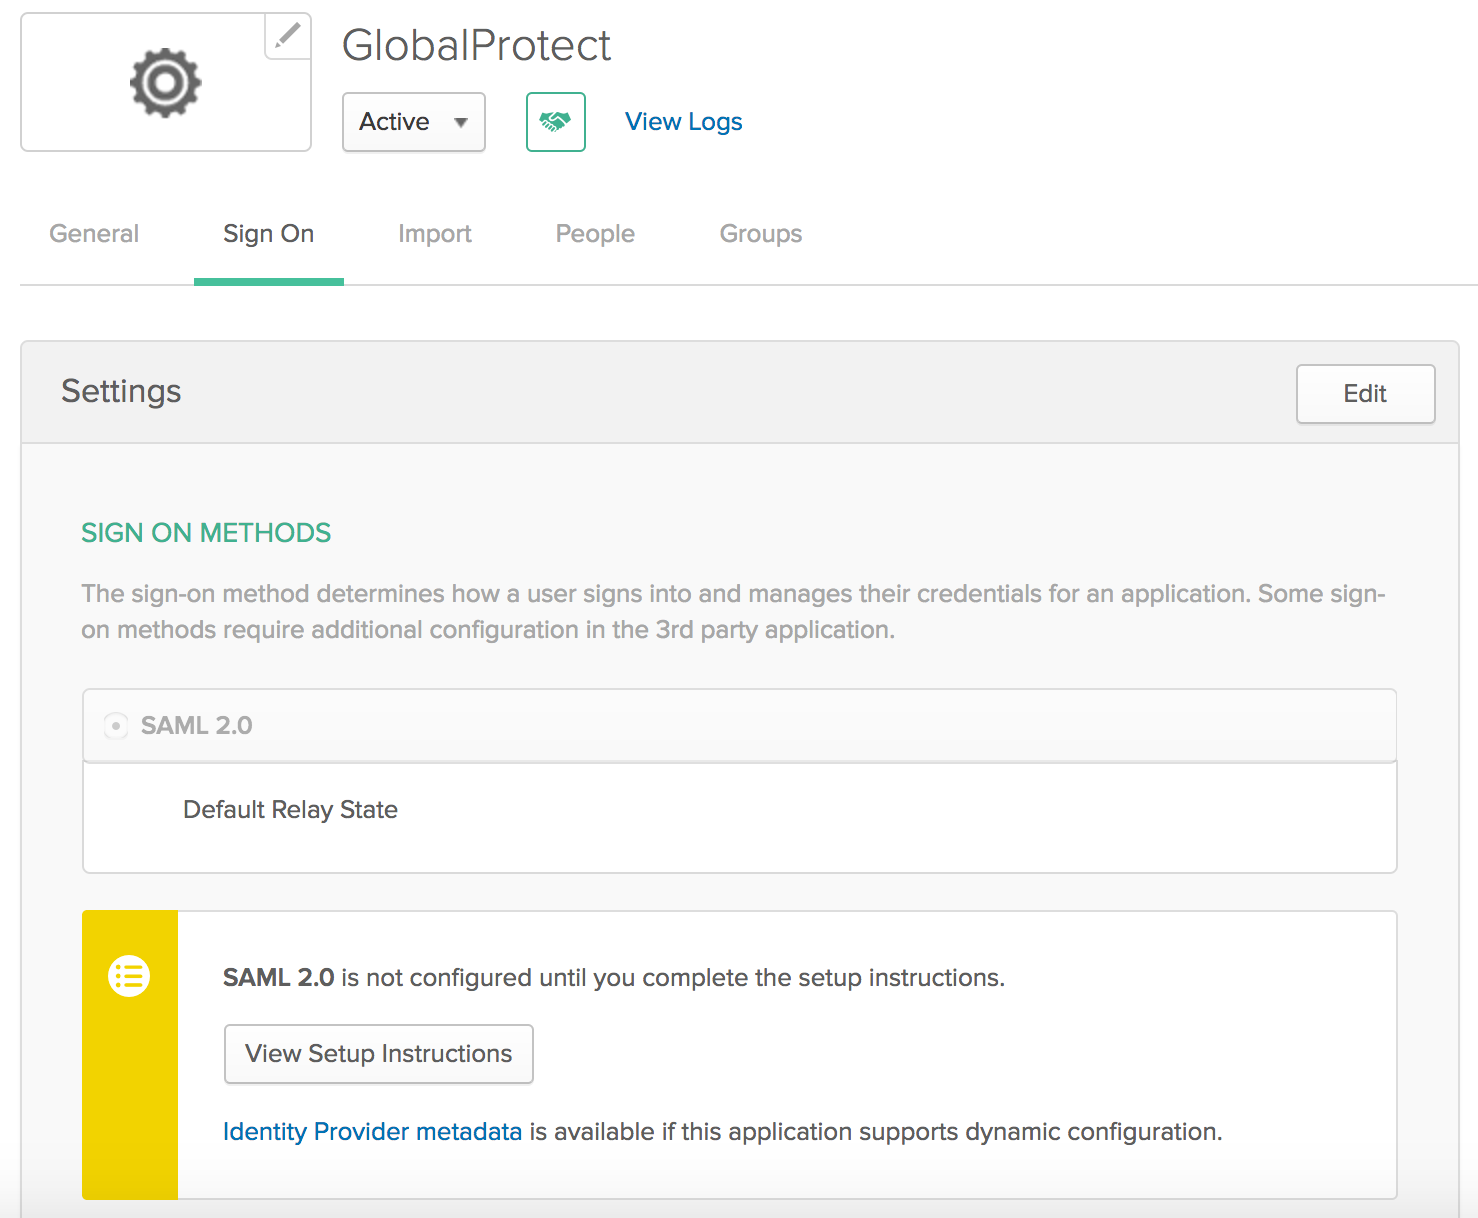
In the ATTRIBUTE STATEMENTS (OPTIONAL) area, specify users, Name formats, and values in Okta Expression Language.For example, specify a name format of Basic and a Value of user.firstName.![]() (Optional) In the Group Attribute Statements (Optional) area, create group attribute options.You can’t use group information that’s retrieved from the SAML assertion in either security policies or the agent client configuration in the portal and gateways. If you have a requirement to configure user group-based policies and configuration selections, you must Enable Group Mapping and retrieve the user group information from the LDAP server using Group Mapping Settings.Save the configuration.Complete the configuration of the SAML 2.0 web application in Okta and enable the users to use the application. Click View Setup Instructions for details.(Optional) If you use a certificate issued by a Certificate Authority (CA), configure it as the IdP certificate.See the documentation on the Okta site for details.To download the metadata files for the portal and gateways, click Identity Provider metadata and copy that information.
(Optional) In the Group Attribute Statements (Optional) area, create group attribute options.You can’t use group information that’s retrieved from the SAML assertion in either security policies or the agent client configuration in the portal and gateways. If you have a requirement to configure user group-based policies and configuration selections, you must Enable Group Mapping and retrieve the user group information from the LDAP server using Group Mapping Settings.Save the configuration.Complete the configuration of the SAML 2.0 web application in Okta and enable the users to use the application. Click View Setup Instructions for details.(Optional) If you use a certificate issued by a Certificate Authority (CA), configure it as the IdP certificate.See the documentation on the Okta site for details.To download the metadata files for the portal and gateways, click Identity Provider metadata and copy that information.![]() Import the metadata files for the portal and gateway to Panorama.
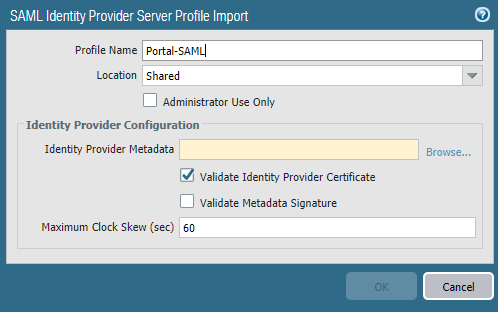
Import the metadata files for the portal and gateway to Panorama.- In Panorama, select DeviceMobile_User_TemplateServer ProfilesSAML Identity ProviderImport the metadata file for the portal.If you configured a CA-issued certificate in Step 6, select Validate Identity Provider Certificate.To validate the IdP certificate, you must specify a Certificate Profile in any Authentication Profile that references the IdP server profile.
![]() Enter the path and name of the Identity Provider Metadata received from the CA, or Browse to find the file.Click OK.Import the metadata file for the gateways by repeating Step 8.b to Step 8.d.The SAML profiles display in the SAML Identity Provider window.
Enter the path and name of the Identity Provider Metadata received from the CA, or Browse to find the file.Click OK.Import the metadata file for the gateways by repeating Step 8.b to Step 8.d.The SAML profiles display in the SAML Identity Provider window.![]() Create new authentication profiles for the portal and gateways.
Create new authentication profiles for the portal and gateways.- Select DeviceMobile_User_Template-Authentication Profile and Add an authentication profile for the portal, specifying the following options:
- Specify a Type of SAML.
- Specify the portal server profile you created in Step 8 as the IdP Server Profile.
- Specify the certificate you created in Step 1 as the Certificate for Signing Requests.
- (Optional) If you configured a CA-issued certificate in Step 6, add a New certificate profile or specify an existing one; otherwise, leave the default of None.If you use a certificate profile, be sure that the name of the CA certificate in the CA Certificates area. You must set up the certificate profile with the CA that has issued the IdP certificate.
![]() Click OK.Create an authentication profile for the gateways similarly.Update the Prisma Access portal and gateway to use the SAML authentication profile you just created.
Click OK.Create an authentication profile for the gateways similarly.Update the Prisma Access portal and gateway to use the SAML authentication profile you just created.![]()
![]() Click OK twice to close the configuration.
Click OK twice to close the configuration.

