Prisma Access
Onboard a Google Cloud Platform Virtual Private Cloud
Table of Contents
Expand All
|
Collapse All
Prisma Access Docs
-
- 6.1 Preferred and Innovation
- 6.0 Preferred and Innovation
- 5.2 Preferred and Innovation
- 5.1 Preferred and Innovation
- 5.0 Preferred and Innovation
- 4.2 Preferred
- 4.1 Preferred
- 4.0 Preferred
- 3.2 Preferred and Innovation
- 3.1 Preferred and Innovation
- 3.0 Preferred and Innovation
- 2.2 Preferred
-
-
- 4.0 & Later
- Prisma Access China
-
-
Onboard a Google Cloud Platform Virtual Private Cloud
Onboard an Google Cloud Platform VPC to Prisma Access
and secure access to it for mobile users and remote networks.
| Where Can I Use This? | What Do I Need? |
|---|---|
|
|
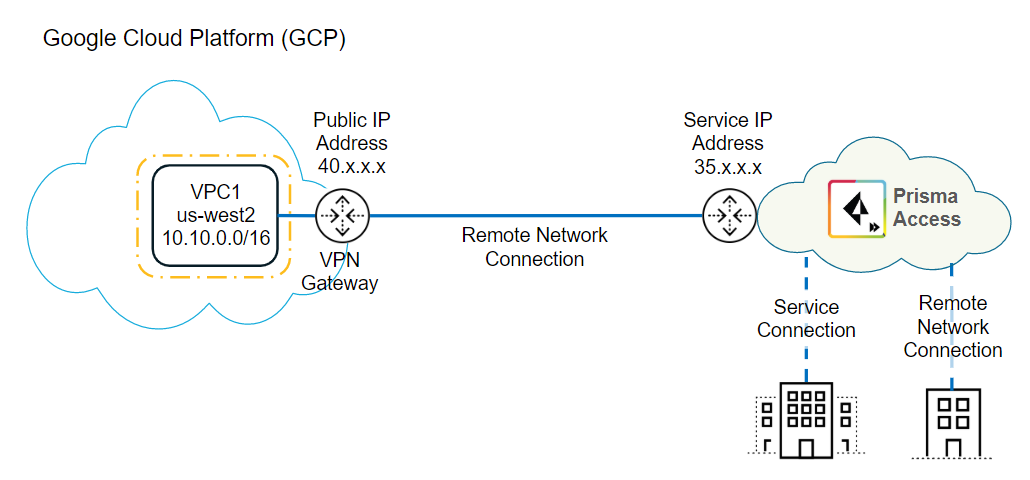
You can secure resources in a Google Cloud
Platform (GCP) virtual private cloud (VPC) seamlessly using Prisma
Access by onboarding the VPC as a remote network connection. Prisma Access
establishes an industry-standard IPSec tunnel between Prisma Access
and the GCP virtual network to provide connectivity to resources
in GCP. After you onboard the virtual network, you can define security
and access controls by configuring security policies for the remote
network, which provides consistent policy management and control
for all of your Prisma Access remote networks.
Currently,
GCP does not support creating two VPN tunnels within the same Cloud
VPN gateway to the same Prisma Access instance; therefore, high
availability using primary and secondary tunnels is not available
with GCP. However, the GCP incorporates high availability by providing
a service level agreement (SLA) of 99.9% cloud VPN service availability.
If the GCP cloud VPN goes down, it restarts automatically. If an
entire virtual VPN device fails, the cloud VPN automatically instantiates
a new one with the same configuration. The new gateway and tunnel
connect automatically. For more information about High Availability
and Classic VPNs, see the Google Cloud document Redundant and High-throughput
VPNs.

Use
the following workflow to secure a GCP VPC with Prisma Access.
- Create IKE and IPSec profiles and onboard the GCP VPC in Prisma Access.To begin the configuration of the GCP VPN connection, create IKE and IPSec security profiles and policies, then create a remote network connection in Prisma Access to onboard the GCP VPC.
- In Panorama, select Remote_Network_Template from the Template drop-down.Select NetworkNetwork ProfilesIKE Crypto and Add an IKE crypto profile for the gateway.Make a note of these settings; the IKE crypto settings you specify here must match the settings that you specify on GCP when you configure the IPSec tunnel in GPC. For a list of IKE cyphers that GCP supports, see the Google Cloud document Supported IKE Cyphers. For more information about configuring the IKE the IPSec settings on GCP, see the Google Cloud document Configuring the On-premises VPN Gateway.We recommend the following settings:
- DH Group: group14
- Encryption: aes-256-cbc
- Authentication: sha1
- Key Lifetime: 8 Hours
![]() Select NetworkNetwork ProfilesIPSec Crypto and Add an IPSec crypto profile for the IPSec tunnel.The IPSec crypto settings you specify here must match the settings you specify on GCP. The screenshot in the following figure uses the following settings:
Select NetworkNetwork ProfilesIPSec Crypto and Add an IPSec crypto profile for the IPSec tunnel.The IPSec crypto settings you specify here must match the settings you specify on GCP. The screenshot in the following figure uses the following settings:- IPSec Protocol: ESP
- DH Group: group14
- Lifetime: 3 Hours
- Encryption: aes-256-gcm
- Authentication: NoneIf you select an AES-GCM algorithm for encryption, you must select the Authentication setting none or the commit will fail. The hash is automatically selected based on the DH Group selected. DH Group 19 and below uses sha256; DH Group 20 uses sha384.
![]() Select NetworkNetwork ProfilesIKE Gateways and Add an IKE gateway.Use the following IKE gateway parameters:
Select NetworkNetwork ProfilesIKE Gateways and Add an IKE gateway.Use the following IKE gateway parameters:- For Peer IP Address Type, select IP.
- Enter any IP address (for example, 1.1.1.2) in the Peer Address field.This setting is temporary; you add an IP address in after you retrieve the peer address from GCP in a later step.
- Configure a Pre-shared key.
![]()
- Select Advanced Options and specify the IKE crypto profile that you created in a previous step.
![]()
Select NetworkIPSec Tunnels and Add an IPSec tunnel for the GCP VPC, specifying the IKE gateway and IPSec Crypto Profile that you created earlier in this task.![]() Create a remote network connection for the GCP VPC.
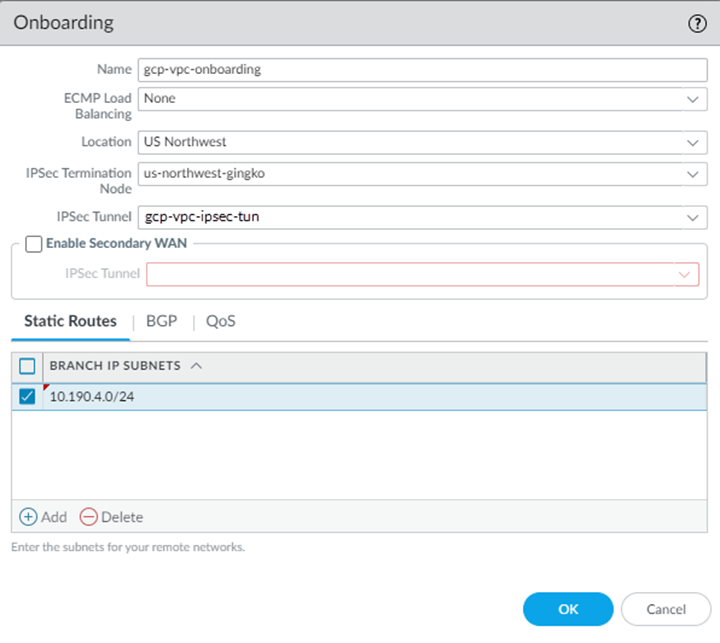
Create a remote network connection for the GCP VPC.- Select PanoramaCloud ServicesConfigurationRemote Networks and Add the GCP VPC as a remote network.Use the following choices:
- Select a Location that is closest to your GCP VPC.
- Select an IPSec Termination Node.An IPSec termination node can provide you with a maximum of 500 Mbps of bandwidth; however, total bandwidth would depend on how much bandwidth you allocated to the compute location to which the IPSec Termination Node belongs. Use a bandwidth based on the amount of traffic that Prisma Access can receive from the GCP VPC and the licensed bandwidth for Prisma Access.
- Specify the IPSec primary tunnel that you just created in the IPSec Tunnel field.
- Specify either static or dynamic (BGP) routing.
- (Deployments Using Static Routes Only) Select Static Routes, then enter Branch IP Subnets that will correspond to the specific or summary subnets of your VPC.This subnet is a placeholder; you specify the correct subnet when you configure the VPN connection on GCP.
![]()
- (Deployments Using BGP Routing Only) Select BGP, Enable BGP networking, and enter the Peer AS, which is the autonomous system number (ASN) to which the firewall, virtual router, or BGP router at your remote network belongs.Make a note of the ASN; you specify the same ASN when you configure dynamic (BGP) routing in GCP.For a description of the additional fields you can configure for BGP routing, see Configure Prisma Access for Networks in the Prisma Access Administrator’s Guide (Panorama Managed).
![]()
Commit and Push your configuration.After the onboarding process completes, select PanoramaCloud ServiceStatusNetwork DetailsRemote Networks and make a note of the value in the Service IP Address field.You use this address as the Remote peer IP address when you configure the VPN connection on GCP.![]() Create and configure the VPN Connection in GCP.GCP uses a VPN connection to let you securely connect to Prisma Access. For more information about GCP interoperability, refer to the Google Cloud list of VPN Interoperability Guides.
Create and configure the VPN Connection in GCP.GCP uses a VPN connection to let you securely connect to Prisma Access. For more information about GCP interoperability, refer to the Google Cloud list of VPN Interoperability Guides.- Log in to GCP.Begin the VPN connection and add an IP address to it by entering vpn into the search box; then selecting Hybrid Connectivity.The GCP screens in this document might not reflect the latest version of the GCP user interface (UI).
![]() Click Create VPN connection.
Click Create VPN connection.![]() In the Google Compute Engine VPN Gateway field, enter the following values:
In the Google Compute Engine VPN Gateway field, enter the following values:- Enter a Name for the connection.
- (Optional) Enter a Description of the connection.
- Enter the Network to use with the VPN connection.Specify the network you created on GCP that you want to secure with Prisma Access.
- Enter a Region for the VPN connection.
- In the IP address field, select Create IP address, provide a Name and Description for the static IP address; then, click Reserve.
![]() GCP reserves the public IP address for the VPN connection.
GCP reserves the public IP address for the VPN connection.![]() Make a note of the IP address that GCP assigned; you enter this in Prisma Access in the IKE gateway Peer Address field in a later step.In the Tunnels area, enter the following values:If you have an existing VPN Gateway, select Add VPN Tunnel in the VPN tunnels area.
Make a note of the IP address that GCP assigned; you enter this in Prisma Access in the IKE gateway Peer Address field in a later step.In the Tunnels area, enter the following values:If you have an existing VPN Gateway, select Add VPN Tunnel in the VPN tunnels area.- Enter a Name for the tunnel.
- (Optional) Enter a Description of the tunnel.
- Enter a Remote peer IP address, using the Service IP Address from the remote network in Prisma Access (PanoramaCloud ServiceStatusNetwork DetailsRemote Networks).
- Enter the IKE version of the tunnel.This value must match the IKE version you specified in Prisma Access.
- Enter a Shared secret that matches the Pre-shared Key that you configured for the IKE gateway in Prisma Access.
- In the Routing options field, select one of the following options:
- (Deployments Using Static Routes Only) To set up a static connection between GCP and Prisma Access, select Route-based
- (Deployments Using BGP Routing Only) To set up a dynamic (BGP) connection between GCP and Prisma Access, select Dynamic (BGP).
- (Deployments Using Static Routes Only) Enter one or more Remote network IP ranges.Use the Static Subnet IP addresses for the service connections and remote networks of Prisma Access (PanoramaCloud ServiceStatusNetwork DetailsService Connection and PanoramaCloud ServiceStatusNetwork DetailsRemote Networks).
![]()
- (Deployments Using BGP Routing Only) Create BGP Session.
- Enter a Name for the BGP session.
- Enter the Peer ASN.Specify the same ASN you gave for the Prisma Access ASN.
- Create a Cloud Router BGP IP address and BGP Peer IP address.You must use a link local IP address (the IP address taken from the address block 169.254.0.0/16), and the Cloud Router BGP address and the BGP peer address must be in the same /30 subnet.
- Save and Continue to save your changes and return to the BGP screen.
For more information about configuring BGP routing in GCP, refer to the GCP documentation.
(Deployments Using Static Routes Only) Complete the VPN connection in Prisma Access.If you are using static routes for your remote network connection, complete the GCP VPN connection by adding the Peer Address to the Prisma Access remote network configuration.- In Panorama, select NetworkNetwork ProfilesIKE Gateways.Select the IKE Gateway that you created in an earlier step.Enter the Peer Address.Find this address on GCP, in the IP address field for the VPN connection, in the Google Compute Engine VPN Gateway area.
![]() Commit and Push your configuration.Verify remote network connectivity from GCP and from Prisma Access.
Commit and Push your configuration.Verify remote network connectivity from GCP and from Prisma Access.- From the GCP console, find the tunnel and check its Status. It should show Established.Note that the Google IP address is the same as the Peer Address that is used in Prisma Access in the IKE gateway.
![]()
- To verify that there is connectivity between GCP and Prisma Access, complete the following steps.
- In Panorama, select PanoramaCloud ServicesStatusMonitorRemote NetworksStatus.The Config Status should be In Sync and the Tunnel Status should be OK.
![]()
- From the GCP console, select NetworkRoutes and verify that the static routes have been populated in the GCP routing table.
![]() Note that this route list includes an all-zeros (default) route. A default route is required to secure all traffic to and from the GCP VPC. You secure internet-bound traffic with Prisma Access by creating a default route on GCP as shown in the next step.
Note that this route list includes an all-zeros (default) route. A default route is required to secure all traffic to and from the GCP VPC. You secure internet-bound traffic with Prisma Access by creating a default route on GCP as shown in the next step.
Secure internet-bound traffic with Prisma Access.To secure all traffic to and from GCP, you must allow all traffic including internet traffic to pass through Prisma Access. Because there is no default route, GCP routes internet-bound traffic from virtual machines over the GCP backbone instead of the VPN tunnel, which means that internet-bound traffic is not secured with Prisma Access. To direct all traffic to Prisma Access, either configure all internet-bound routes with static routes to Prisma Access or create a default route on GCP with or without instance tags.Using the VPN tunnel as the default route may result in a loss of connectivity to virtual network instances over the internet. Make sure that you use another connection method (for example, a bastion host) to connect to instances over the internet.To configure a default route between GCP and Prisma Access, create a new route with or without instance tags to which the route will be applied. The following example adds a default route for the Prisma Access network which is applied to the private-network tag. After you add this default route, all instances with the private-network tag in the VPC will use the VPN connection between GCP and Prisma Access as the default route.![]()
Troubleshoot the IPSec Tunnel
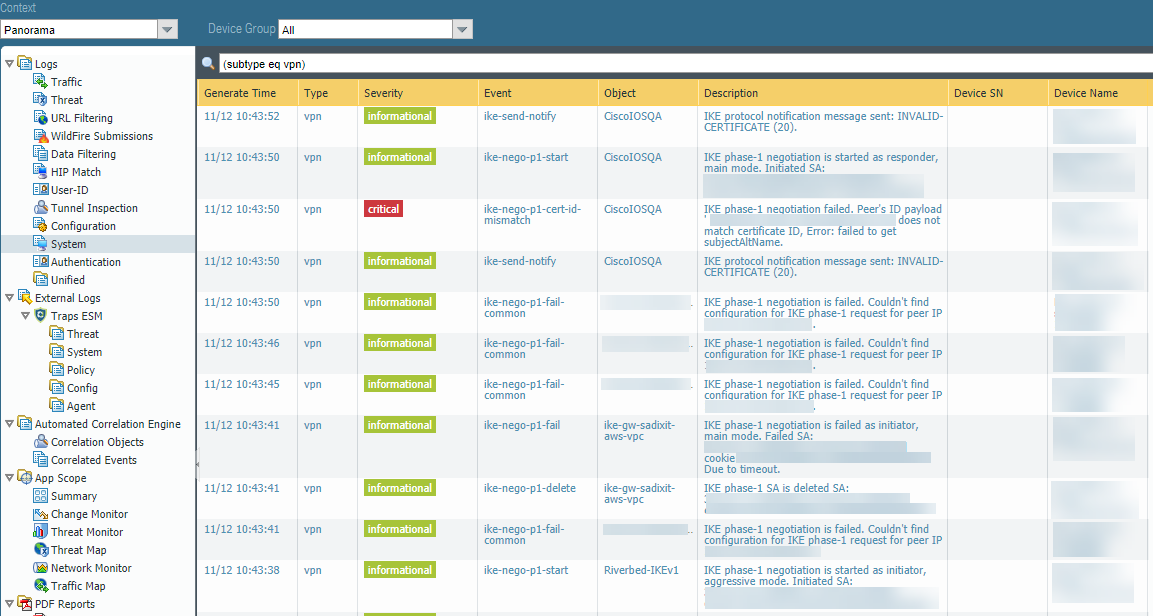
To troubleshoot the site-to-site connection in Prisma Access, log in to Panorama and select LogsSystem, then enter (subtype eq vpn) in the Filter field to view messages related to VPN tunnel creation.![]()


