GlobalProtect
Configure a User-Initiated Remote Access VPN Configuration for iOS Endpoints Using Jamf Pro
Table of Contents
Configure a User-Initiated Remote Access VPN Configuration for iOS Endpoints Using Jamf Pro
Create a secure, on-demand connection that routes traffic between an endpoint and the
tunnel based on filters set on the GlobalProtect gateway.
| Where Can I Use This? | What Do I Need? |
|---|---|
|
|
In a remote access (on-demand) VPN configuration, users must manually launch the
GlobalProtect app to establish a secure GlobalProtect connection. Traffic that
matches specific filters (such as port and IP address) configured on the
GlobalProtect gateway is routed through the tunnel only after users initiate and
establish the connection.
To set up an on-demand VPN configuration, use Jamf Pro to create a configuration
profile that you can deploy to managed iOS devices.
- (Optional) Set up smart or static device groups to batch the managed iOS devices that will receive the configuration profile.Create a configuration profile for the VPN configuration and specify General settings.
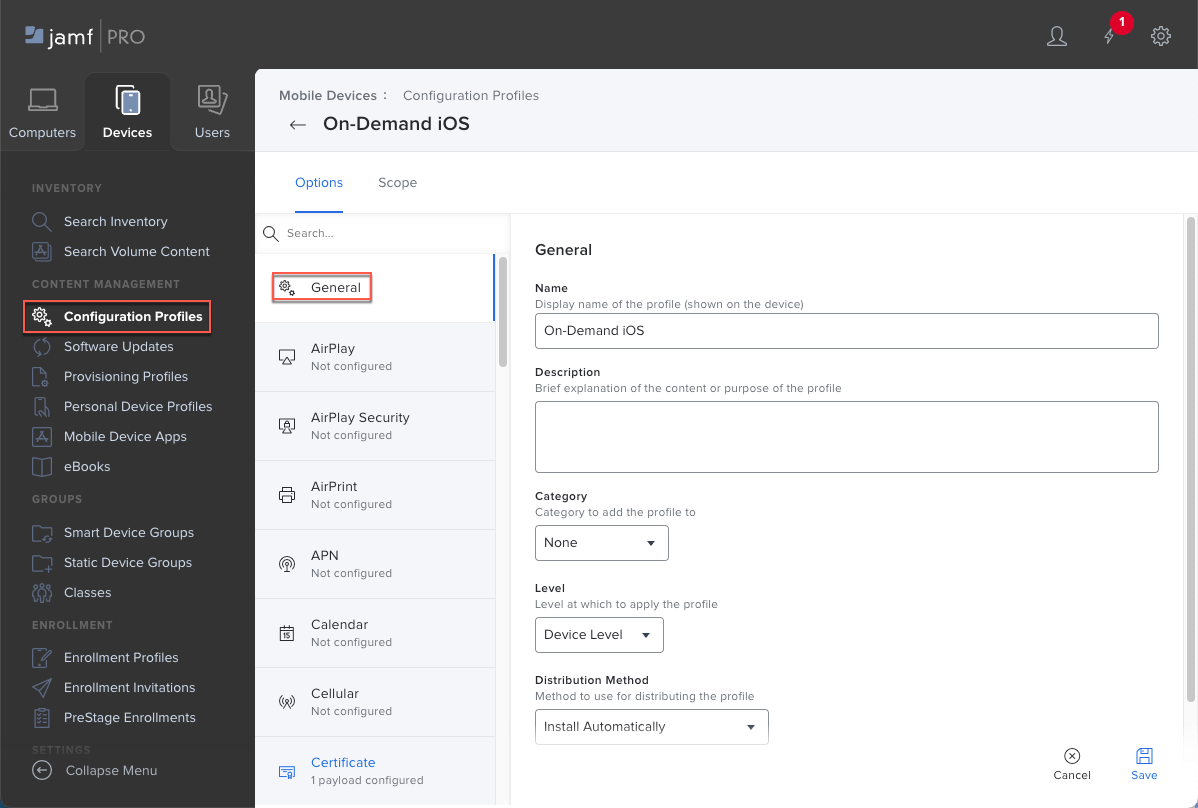
- In Jamf Pro, select .Enter a meaningful Display Name for the profile. This profile name will appear on the iOS device.(Optional) Enter a brief Description of the profile that indicates its purpose.(Optional) Select a Category to which you want to add the profile.For the Level at which to apply the configuration profile, select Device Level, which allows the profile to be distributed to a device, either automatically or user-installed from the Jamf Self Service app.Select a Distribution Method, either Make available in Self Service, which allows the end user to download the app from the Jamf Self Service app, or Install Automatically, which pushes the app to the end user's device automatically.
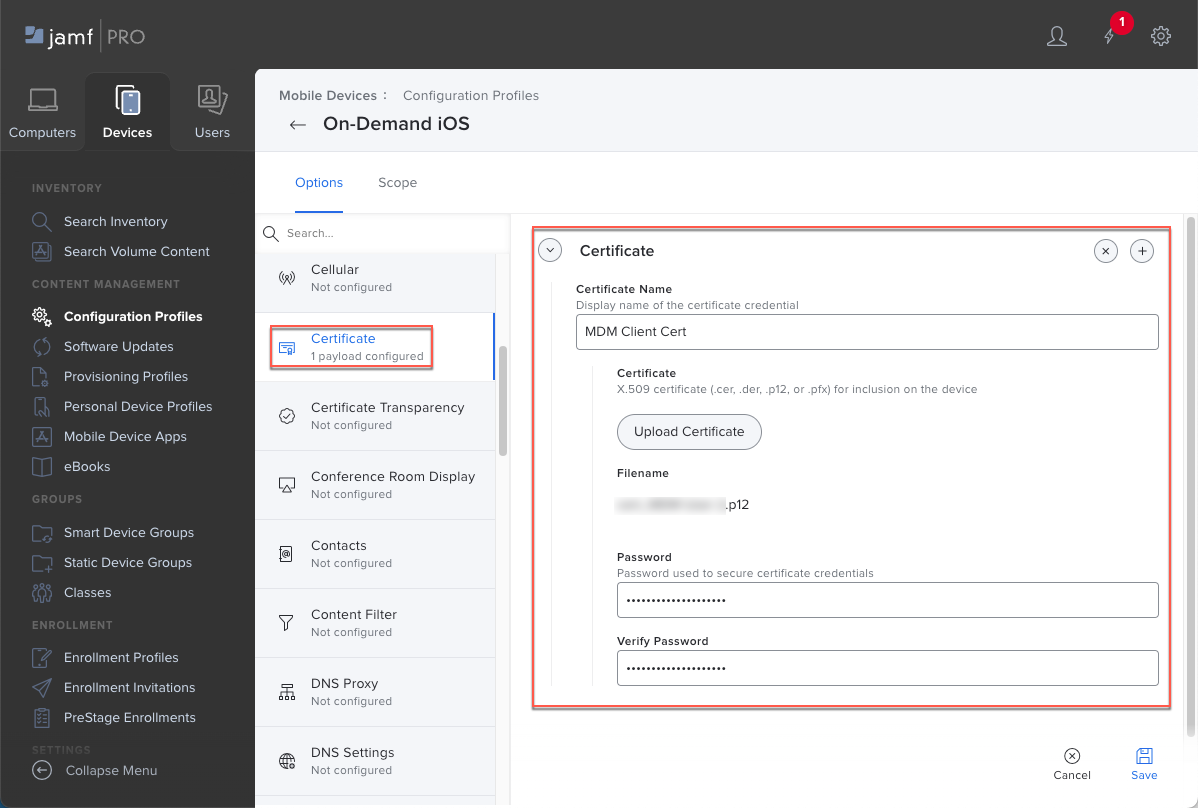
![]() Save your settings.(Optional) If your GlobalProtect deployment requires client certificate authentication, configure the Certificate payload.Starting with iOS 12, if you want to use client certificates for GlobalProtect client authentication, you must deploy the client certificates as part of the VPN profile that is pushed from Jamf Pro. If you deploy client certificates from Jamf Pro using any other method, the certificates cannot be used by the GlobalProtect app.
Save your settings.(Optional) If your GlobalProtect deployment requires client certificate authentication, configure the Certificate payload.Starting with iOS 12, if you want to use client certificates for GlobalProtect client authentication, you must deploy the client certificates as part of the VPN profile that is pushed from Jamf Pro. If you deploy client certificates from Jamf Pro using any other method, the certificates cannot be used by the GlobalProtect app.- If you saved your profile in the previous step, Edit it.Select .Enter the Certificate Name.Select the Upload certificate option.Click Upload Certificate to locate and select the certificate that you want to upload. If required, enter the Password for the certificate and Verify Password.
![]() (Optional) Click + to add more certificates.Save your settings.Configure the VPN settings.
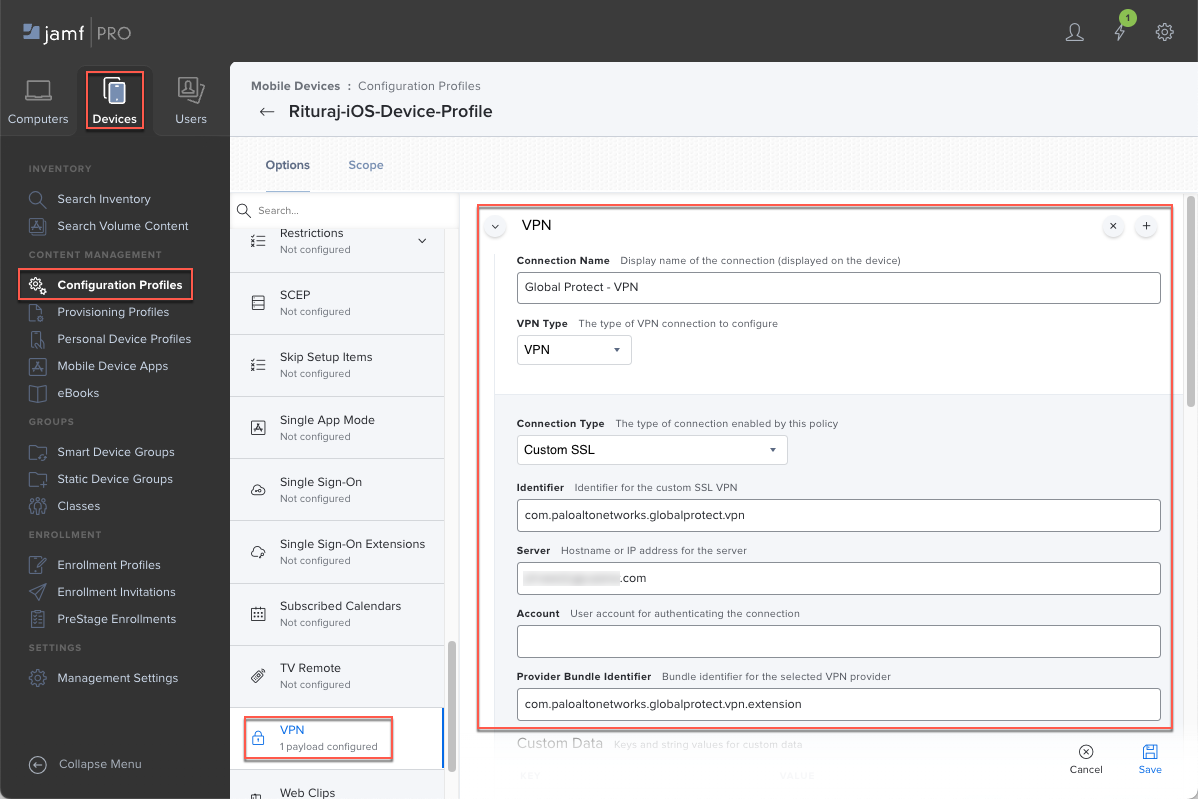
(Optional) Click + to add more certificates.Save your settings.Configure the VPN settings.- If you saved your profile in the previous step, Edit it.Select .Enter a meaningful Display Name for the connection, such as GlobalProtect VPN.For the VPN Type, select VPN to route all traffic through the GlobalProtect tunnel.For the Connection Type, select Custom SSL.For the Identifier, enter com.paloaltonetworks.globalprotect.vpn.If you downloaded the GlobalProtect app directly from the Apple App Store in China, enter the bundle ID (com.paloaltonetworks.globalprotect.vpncn) in the Identifier field.For the Server, enter the hostname or IP address of the GlobalProtect portal that users will connect to, such as gp.paloaltonetworks.com.For the Provider Bundle Identifier, enter com.paloaltonetworks.globalprotect.vpn.extension.
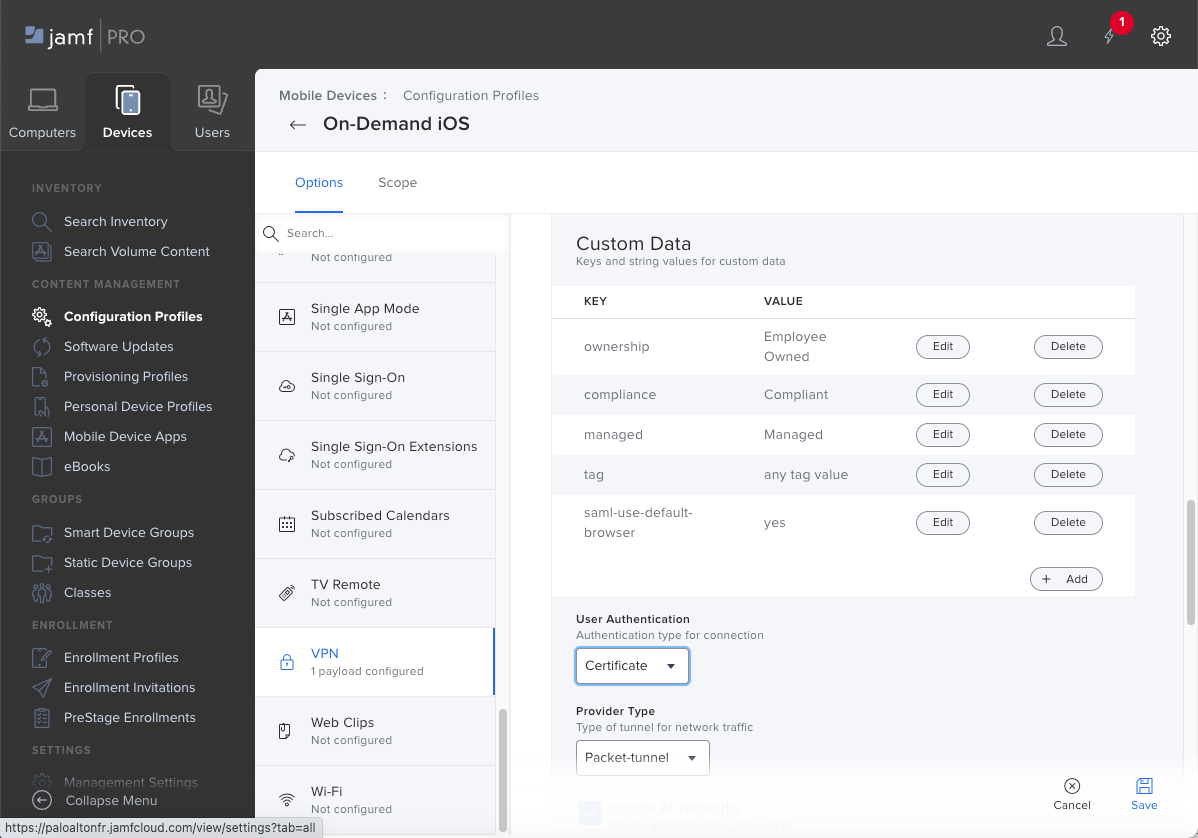
![]() (Optional) For the Custom Data, Add and Save custom keys and values to define additional GlobalProtect app configurations.The following table shows some of the keys and values that you can use:
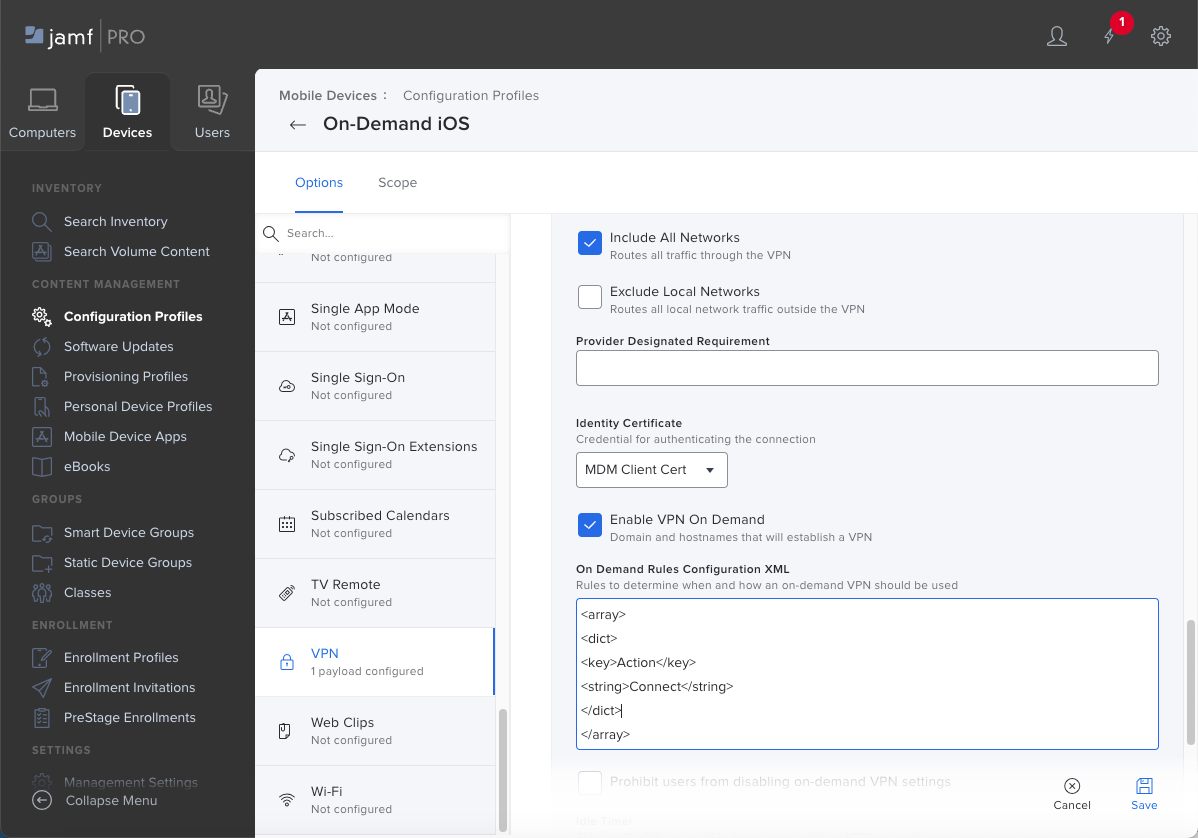
(Optional) For the Custom Data, Add and Save custom keys and values to define additional GlobalProtect app configurations.The following table shows some of the keys and values that you can use:Key Value Description compliance Compliant Status that indicates whether the endpoint is compliant with the mobile device management (MDM) compliance policies that you have defined (for example, Compliant). This value is appended to the Tag attribute in the HIP report. enable-fips-cc-mode no | yes Option that enables the FIPS-CC mode to incorporate requirements from the Common Criteria (CC) and Federal Information Processing Standard (FIPS 140-2). managed yes | no Value that indicates whether the endpoint is managed. ownership Employee Owned Ownership category of the endpoint (for example, Employee Owned). This value is appended to the Tag attribute in the HIP report. saml-use-default-browser true | false Option that enables an endpoint to use the default system browser for SAML authentication. If you configured the GlobalProtect portal to authenticate users through SAML authentication, end users can connect to the app or other SAML-enabled applications without having to reenter their credentials, providing a smooth single sign-on (SSO) experience.tag working Tags to enable you to match against other MDM-based attributes. This value is appended to the Tag attribute in the HIP report. ![]() For User Authentication, select Certificate if GlobalProtect uses certificates to authenticate users, or select Password to enter a password to authenticate users.(Password authentication only) Enter the Password and Verify Password.Set the Provider Type to indicate how traffic will be tunneled—either at the application layer or the IP layer. Select Packet-tunnel.Select Include All Networks to route all traffic through the VPN.(Certificate authentication only) For the Identity Certificate, select the certificate that you set up in the Certificate payload. GlobalProtect will use this certificate to authenticate users.Select Enable VPN On Demand and enter the following On Demand Rules Configuration XML:
For User Authentication, select Certificate if GlobalProtect uses certificates to authenticate users, or select Password to enter a password to authenticate users.(Password authentication only) Enter the Password and Verify Password.Set the Provider Type to indicate how traffic will be tunneled—either at the application layer or the IP layer. Select Packet-tunnel.Select Include All Networks to route all traffic through the VPN.(Certificate authentication only) For the Identity Certificate, select the certificate that you set up in the Certificate payload. GlobalProtect will use this certificate to authenticate users.Select Enable VPN On Demand and enter the following On Demand Rules Configuration XML:<array> <dict> <key>Action</key> <string>Connect</string> </dict> </array>
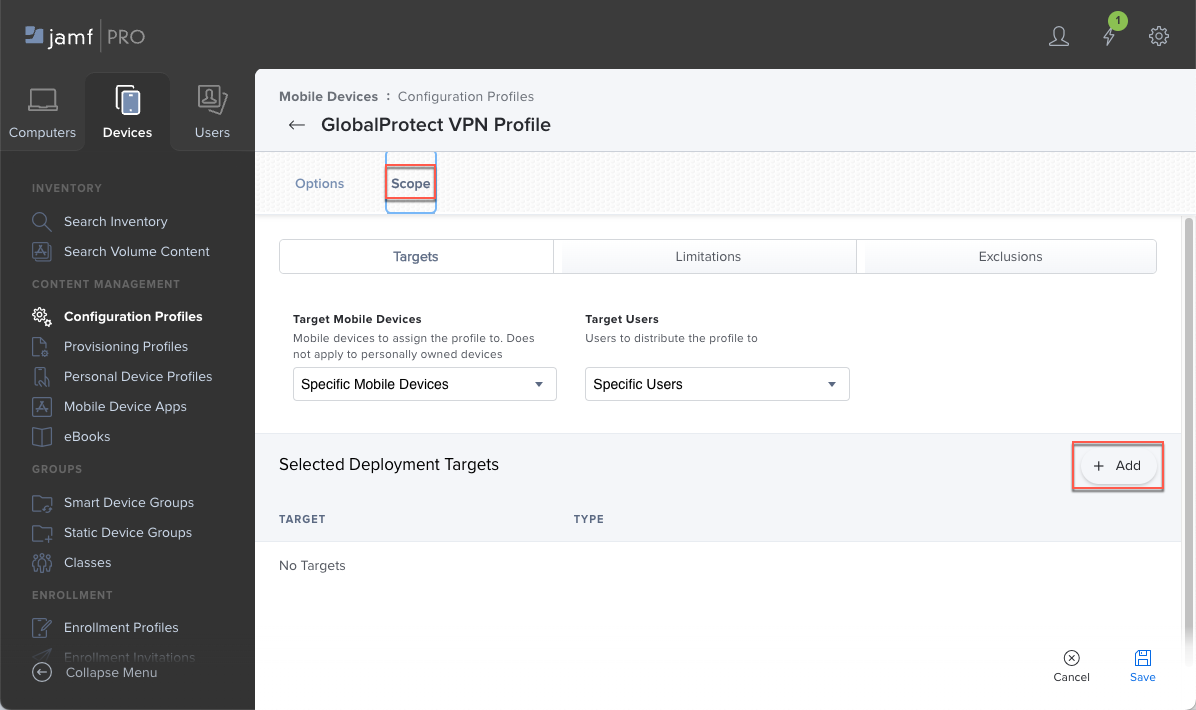
![]() Save your settings.Set the scope to define the devices that will receive the configuration profile.
Save your settings.Set the scope to define the devices that will receive the configuration profile.- Click Edit if you saved your settings in the previous step.Click Scope and Add a deployment target.
![]() Add individual devices from the table of Mobile Devices, or select Mobile Device Groups and Add the smart or static device groups that you set up previously.
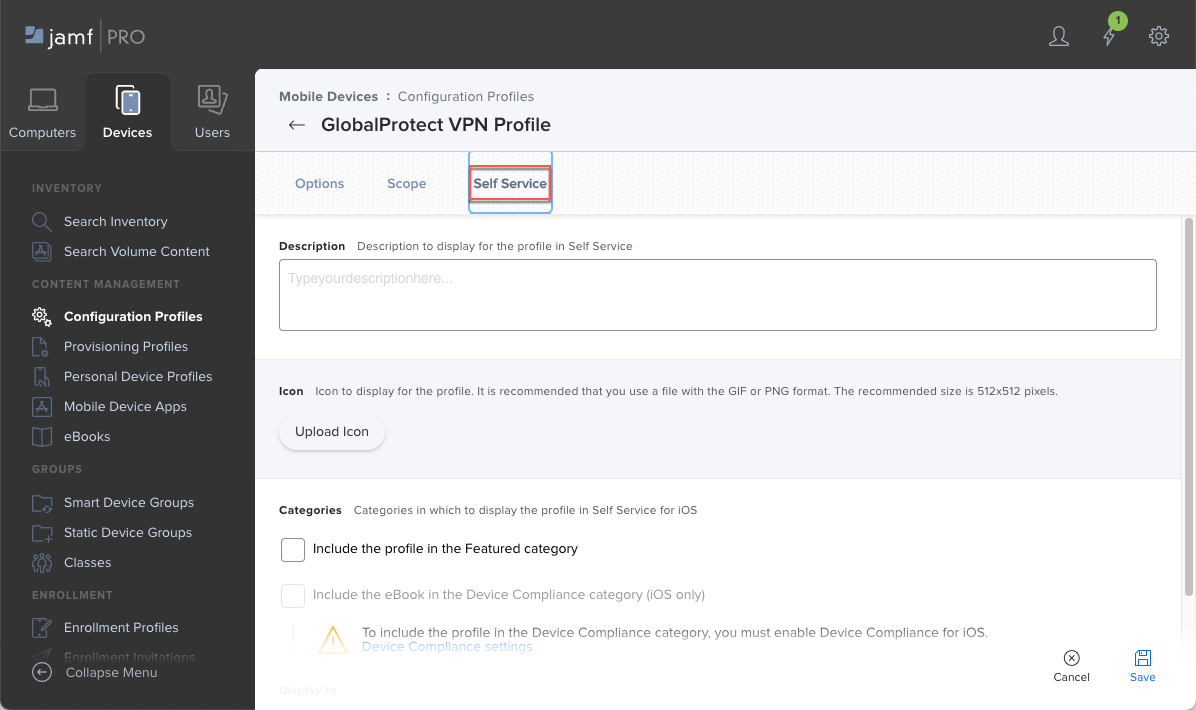
Add individual devices from the table of Mobile Devices, or select Mobile Device Groups and Add the smart or static device groups that you set up previously.![]() (Optional) If you chose to make the configuration profile available in the Self Service app, select Self Service and specify how you want the configuration profile to appear in the Self Service app, such as uploading an icon for the profile or including the profile in the Featured category in Jamf.
(Optional) If you chose to make the configuration profile available in the Self Service app, select Self Service and specify how you want the configuration profile to appear in the Self Service app, such as uploading an icon for the profile or including the profile in the Featured category in Jamf.![]() Save your settings.To verify whether Jamf Pro installed the configuration profile on an endpoint:
Save your settings.To verify whether Jamf Pro installed the configuration profile on an endpoint:- From Jamf Pro, select Devices.Search for a mobile device.Select a mobile device from the list.Select History and view the Completed Commands, Pending Commands, or Failed Commands. In the Completed Commands, look for the Install Configuration Profile <your_profile> command.If you do not see the Install Configuration Profile <your_profile> command in the list, or if the command appears in the Fail Commands list, select to push the configuration profile to the device.