IoT Security
Custom Attributes
Table of Contents
Expand All
|
Collapse All
IoT Security Docs
-
-
- Firewall Deployment Options for IoT Security
- Use a Tap Interface for DHCP Visibility
- Use a Virtual Wire Interface for DHCP Visibility
- Use SNMP Network Discovery to Learn about Devices from Switches
- Use Network Discovery Polling to Discover Devices
- Use ERSPAN to Send Mirrored Traffic through GRE Tunnels
- Use DHCP Server Logs to Increase Device Visibility
- Control Allowed Traffic for Onboarding Devices
- Support Isolated Network Segments
-
Custom Attributes
Create custom attributes and apply them to devices in
your inventory.
| Where Can I Use This? | What Do I Need? |
|---|---|
|
|
IoT Security provides a large number of attributes
for the devices it discovers and learns. A few of these are the
device model, vendor, OS, VLAN ID, risk level, and location. For
the full list, see the columns for the inventory table on the Devices
page. When viewing the devices in your inventory, you can sort and
filter by these device attributes, making it easier to find and
track those of interest. However, if these attributes don’t accommodate
all your needs, you can create custom attributes that better align with
the device attributes you use. IoT Security allows up to 50 custom
attributes per tenant.
Create a Custom Attribute and Apply It Automatically
You can configure a custom attribute with
a conditional statement, so that IoT Security automatically applies
a value when a condition is met.
Before you start, make sure you’ve already created and saved one or more data filters on the
Devices page (AssetsDevices). You will use a filter in the “IF” clause of each IF/THEN
statement, indicating the condition that’s required for IoT Security to
apply the value in the “THEN” clause to devices.
The automatic
assignment of custom attributes through the use of simple IF/THEN
statements provides an efficient approach to their application.
For example, when devices are managed by different departments in
an organization, custom attributes can indicate which department
manages which device. To do this, first create a data filter that
groups together all the device profiles that a particular department
manages. Then create another data filter for all the device profiles
that another department manages. Continue as necessary until all
the devices are divvied up by profile among the various departments
that manage them. Then create a custom attribute with conditional
statements that say IF a device matches <filter-1>, then apply
<name of department-1> to it; IF another device matches <filter-2>,
then apply <name of department-2> to it; and so on. After you're done,
you can then sort the devices in your inventory on the Devices page
by the departments that manage them.
- (Optional) Create a filter to use in the attribute.If you don’t already have a filter to use in the custom attribute, log in to the IoT Security portal and select Devices. Define a data filter at the top of the page and then save it.
- Create a custom attribute that IoT Security will apply to devices automatically.
- Select SettingsCustom Attributes+ (Create Custom Attribute).
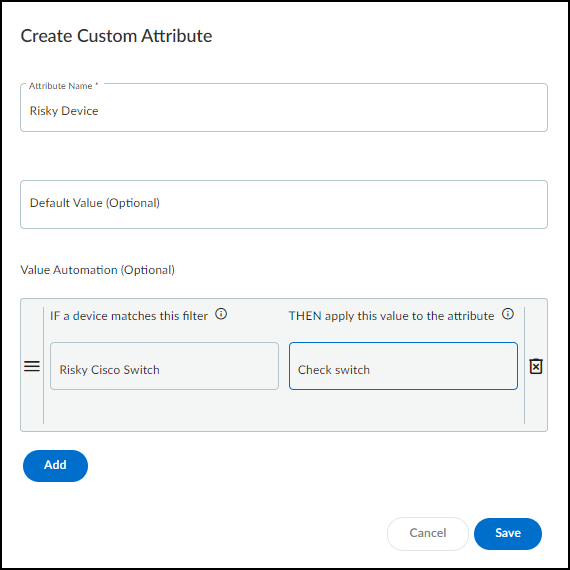
- Enter the following in the Create Custom Attribute pop-up panel that appears:Attribute Name: Enter a name for the custom attribute. It cannot contain special characters and it cannot be longer than 50 characters.Default Value (Optional): Enter a value for IoT Security to apply by default to all the devices in your inventory. If you don’t include a default value, IoT Security will enter N/A in the field for this attribute.Value Automation (Optional): Add an IF/THEN conditional statement to determine when a value is applied to the device attribute. Choose a previously defined filter for the IF a device matches this filter field and then enter a value in the THEN apply this value to the attribute field. You can add more IF/THEN statements (up to five). The logical relationship between them is “or” and their order is important because IoT Security checks the conditions from the top down and will apply the value of the first match it finds.

- Save the custom attribute configuration.IoT Security searches through its inventory for any devices that match the condition—or one of several possible conditions—in the Value Automation section and then applies the prescribed value. This search can take several minutes to complete. Going forward, IoT Security applies the value to any device whose condition matches that in the attribute configuration.
Manually Apply Custom Attribute Values to a Device
In addition to creating custom attributes
that IoT Security automatically applies to devices based on specified
conditions, you can create custom attributes and manually apply
values to them per device yourself.
- Create a custom attribute whose value you will manually apply to devices.
- Log in to the IoT Security portal and select SettingsCustom Attributes+ (Create Custom Attribute).
- Enter the following in the Create Custom Attribute pop-up panel that appears:Attribute Name: Enter a name for the custom attribute. It cannot contain special characters and it cannot be longer than 50 characters.Default Value (Optional): Enter a value for IoT Security to apply by default to all the devices in your inventory. If you don’t include a default value, IoT Security will enter N/A in the field for this attribute.Value Automation (Optional): Do not configure this section.
- Save the custom attribute configuration.
- Apply the custom attribute to a device.
- Select AssetsDevices and use the search, filter, and sort tools to display the devices in the inventory to which you want to apply the attribute you just created.
- Click the device name, which opens the Device Details page.
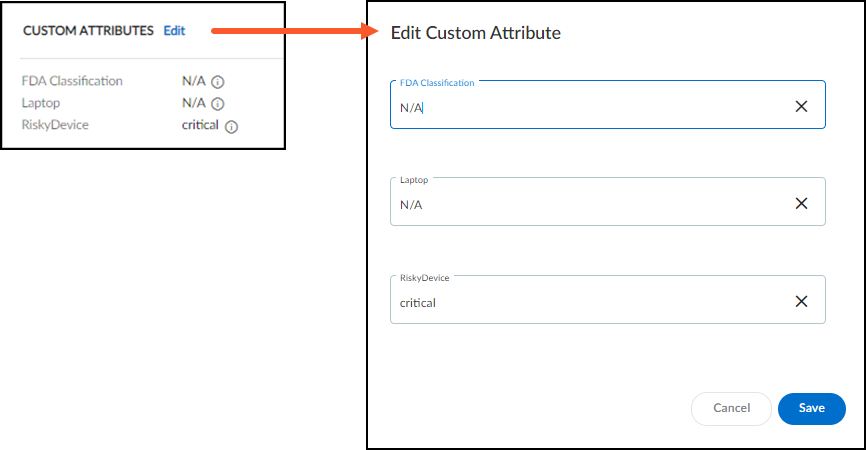
- Click Edit next to Custom Attributes.
- Remove any you don’t want to apply to the device and edit or add any you do.

- Save your configuration changes.
View Devices by Custom Attribute
After applying custom attributes to devices,
you can then show custom attribute columns on the Devices page.
Click the column icon (
 ) and select one
or more custom attributes whose columns you want to display on the
page.

The
selected columns appear in the inventory section of the Devices
page.

To
hide the column, click the column icon again and clear the check
boxes for custom attributes you no longer want to see.
Edit Custom Attributes and Delete Them from Devices
To edit or delete a custom attribute, select SettingsCustom Attributes, click the three vertical dots at the far right of the a custom
attribute, and then click either Delete or
Edit.


