Create a Custom Application
Table of Contents
End-of-Life (EoL)
Create a Custom Application
To safely enable applications you must classify
all traffic, across all ports, all the time. With App-ID, the only
applications that are typically classified as unknown traffic—tcp,
udp or non-syn-tcp—in the ACC and the Traffic logs are commercially
available applications that have not yet been added to App-ID, internal
or custom applications on your network, or potential threats.
If you are seeing unknown traffic for a commercial
application that does not yet have an App-ID, you can submit a request
for a new App-ID here: http://researchcenter.paloaltonetworks.com/submit-an-application/.
To
ensure that your internal custom applications do not show up as
unknown traffic, create a custom application. You can then exercise
granular policy control over these applications in order to minimize
the range of unidentified traffic on your network, thereby reducing
the attack surface. Creating a custom application also allows you
to correctly identify the application in the ACC and Traffic logs,
which enables you to audit/report on the applications on your network.
To
create a custom application, you must define the application attributes:
its characteristics, category and sub-category, risk, port, timeout.
In addition, you must define patterns or values that the firewall
can use to match to the traffic flows themselves (the signature).
Finally, you can attach the custom application to a security policy
that allows or denies the application (or add it to an application
group or match it to an application filter). You can also create
custom applications to identify ephemeral applications with topical
interest, such as ESPN3-Video for world cup soccer or March Madness.
In
order to collect the right data to create a custom application signature,
you'll need a good understanding of packet captures and how datagrams
are formed. If the signature is created too broadly, you might inadvertently
include other similar traffic; if it is defined too narrowly, the
traffic will evade detection if it does not strictly match the pattern.
Custom
applications are stored in a separate database on the firewall and
this database is not impacted by the weekly App-ID updates.
The
supported application protocol decoders that enable the firewall
to detect applications that may be tunneling inside of the protocol
include the following as of content release version 609: FTP, HTTP,
IMAP, POP3, SMB, and SMTP.
The following is a basic
example of how to create a custom application.
- Gather information about the application that you will be able to use to write custom signatures.To do this, you must have an understanding of the application and how you want to control access to it. For example, you may want to limit what operations users can perform within the application (such as uploading, downloading, or live streaming). Or you may want to allow the application, but enforce QoS policing.
- Capture application packets so that you can find unique characteristics about the application on which to base your custom application signature. One way to do this is to run a protocol analyzer, such as Wireshark, on the client system to capture the packets between the client and the server. Perform different actions in the application, such as uploading and downloading, so that you will be able to locate each type of session in the resulting packet captures (PCAPs).
- Because the firewall by default takes packet captures for all unknown traffic, if the firewall is between the client and the server you can view the packet capture for the unknown traffic directly from the Traffic log.
- Use the packet captures to find patterns or values in the packet contexts that you can use to create signatures that will uniquely match the application traffic. For example, look for string patterns in HTTP response or request headers, URI paths, or hostnames. For information on the different string contexts you can use to create application signatures and where you can find the corresponding values in the packet, refer to Creating Custom Threat Signatures.
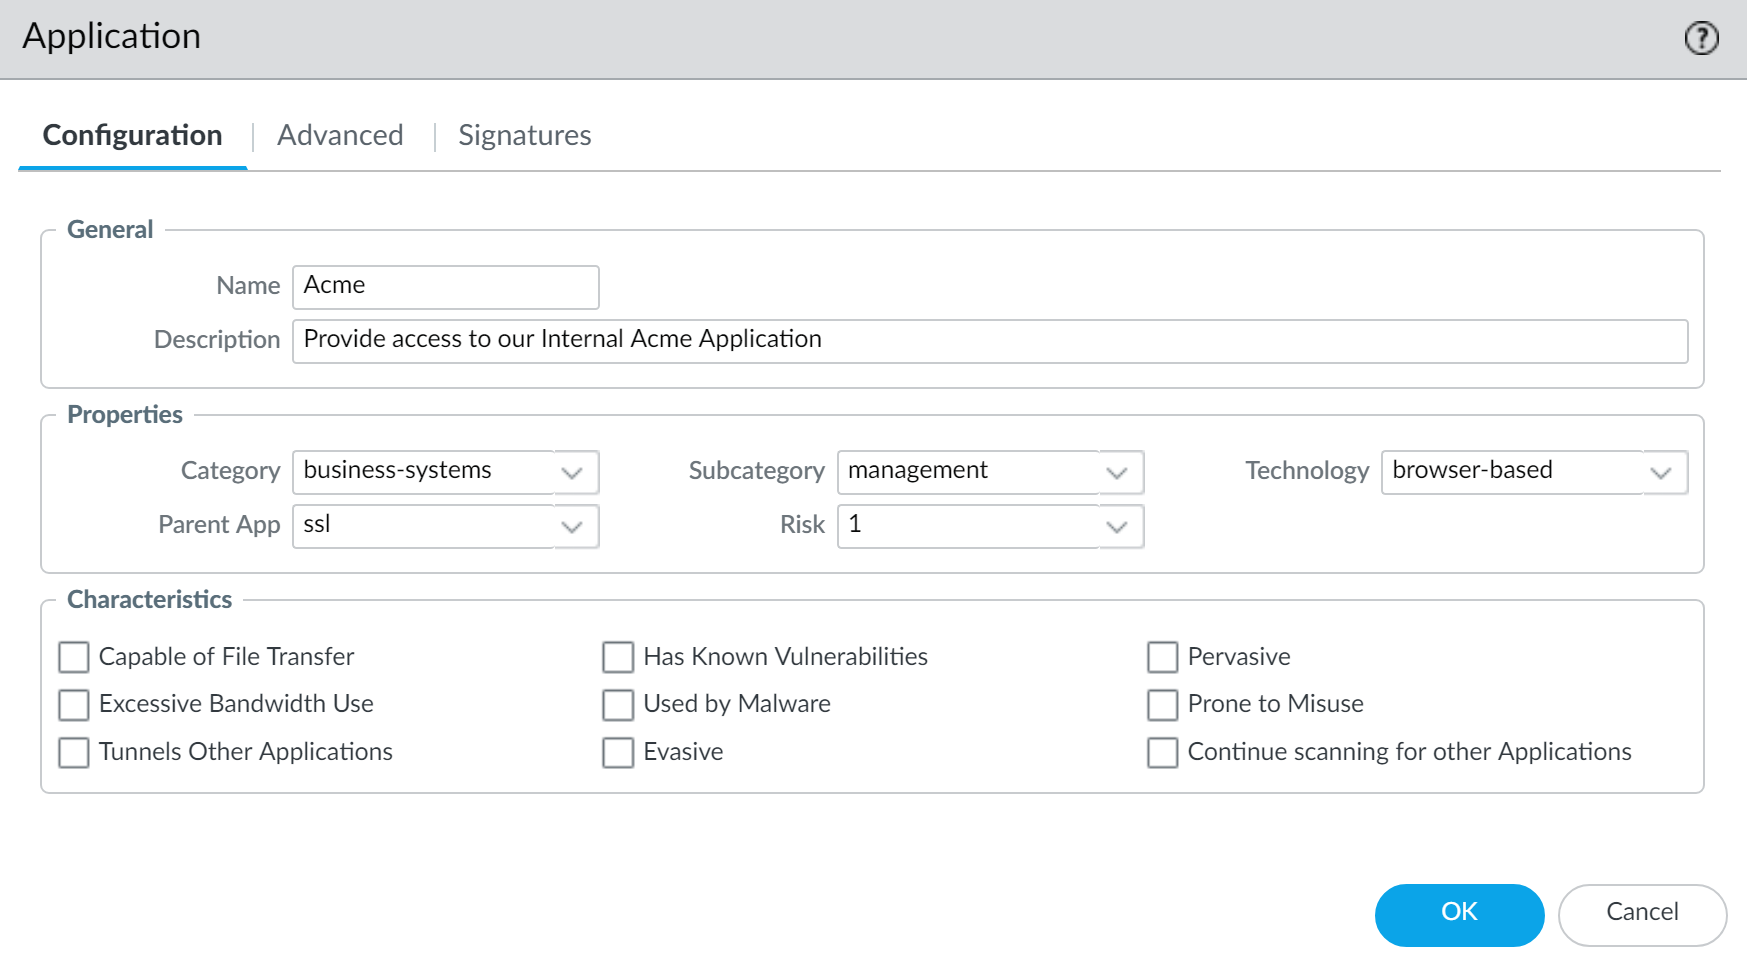
Add the custom application.- Select ObjectsApplications and click Add.On the Configuration tab, enter a Name and a Description for the custom application that will help other administrators understand why you created the application.(Optional) Select Shared to create the object in a shared location for access as a shared object in Panorama or for use across all virtual systems in a multiple virtual system firewall.Define the application Properties and Characteristics.
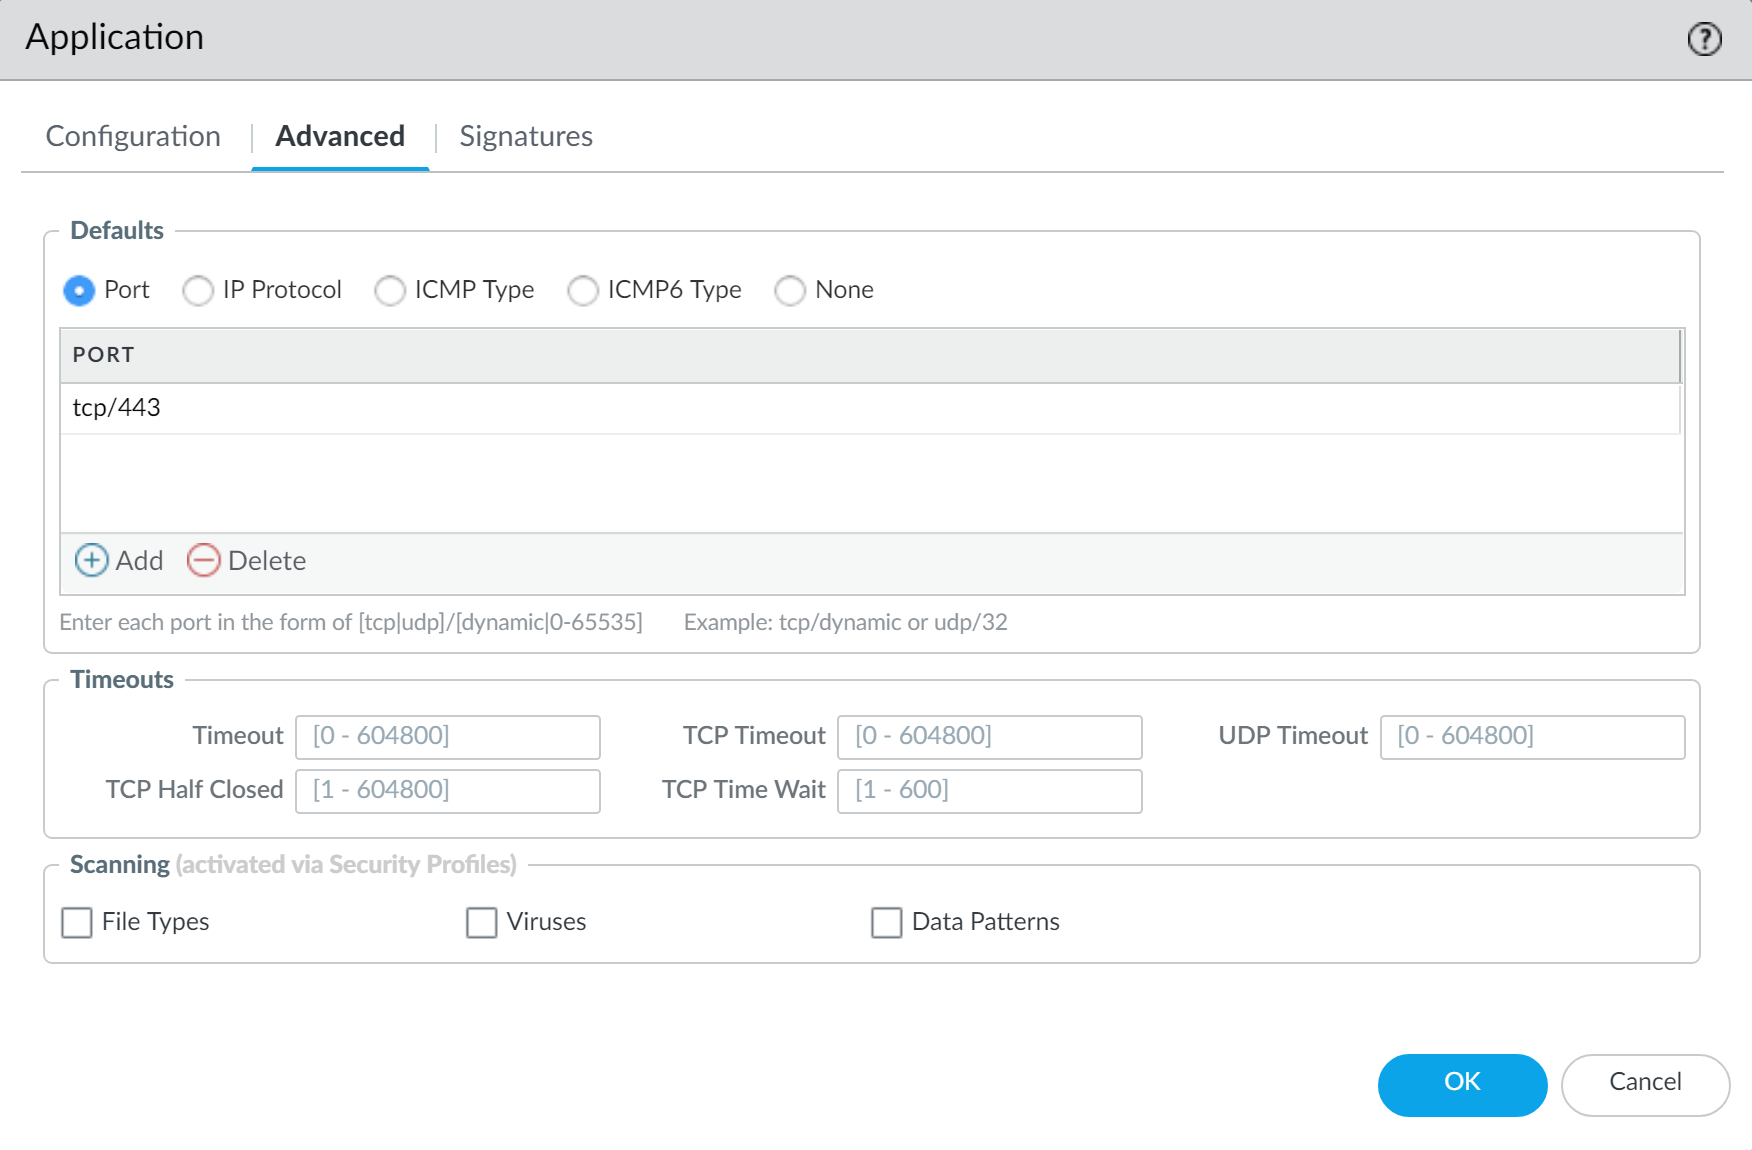
![]() Define details about the application, such as the underlying protocol, the port number the application runs on, the timeout values, and any types of scanning you want to be able to perform on the traffic.On the Advanced tab, define settings that will allow the firewall to identify the application protocol:
Define details about the application, such as the underlying protocol, the port number the application runs on, the timeout values, and any types of scanning you want to be able to perform on the traffic.On the Advanced tab, define settings that will allow the firewall to identify the application protocol:- Specify the default ports or protocol that the application uses.
- Specify the session timeout values. If you don’t specify timeout values, the default timeout values will be used.
- Indicate any type of additional scanning you plan to perform on the application traffic.
For example, to create a custom TCP-based application that runs over SSL, but uses port 4443 (instead of the default port for SSL, 443), you would specify the port number. By adding the port number for a custom application, you can create policy rules that use the default port for the application rather than opening up additional ports on the firewall. This improves your security posture.![]() Define the criteria that the firewall will use to match the traffic to the new application.You will use the information you gathered from the packet captures to specify unique string context values that the firewall can use to match patterns in the application traffic.
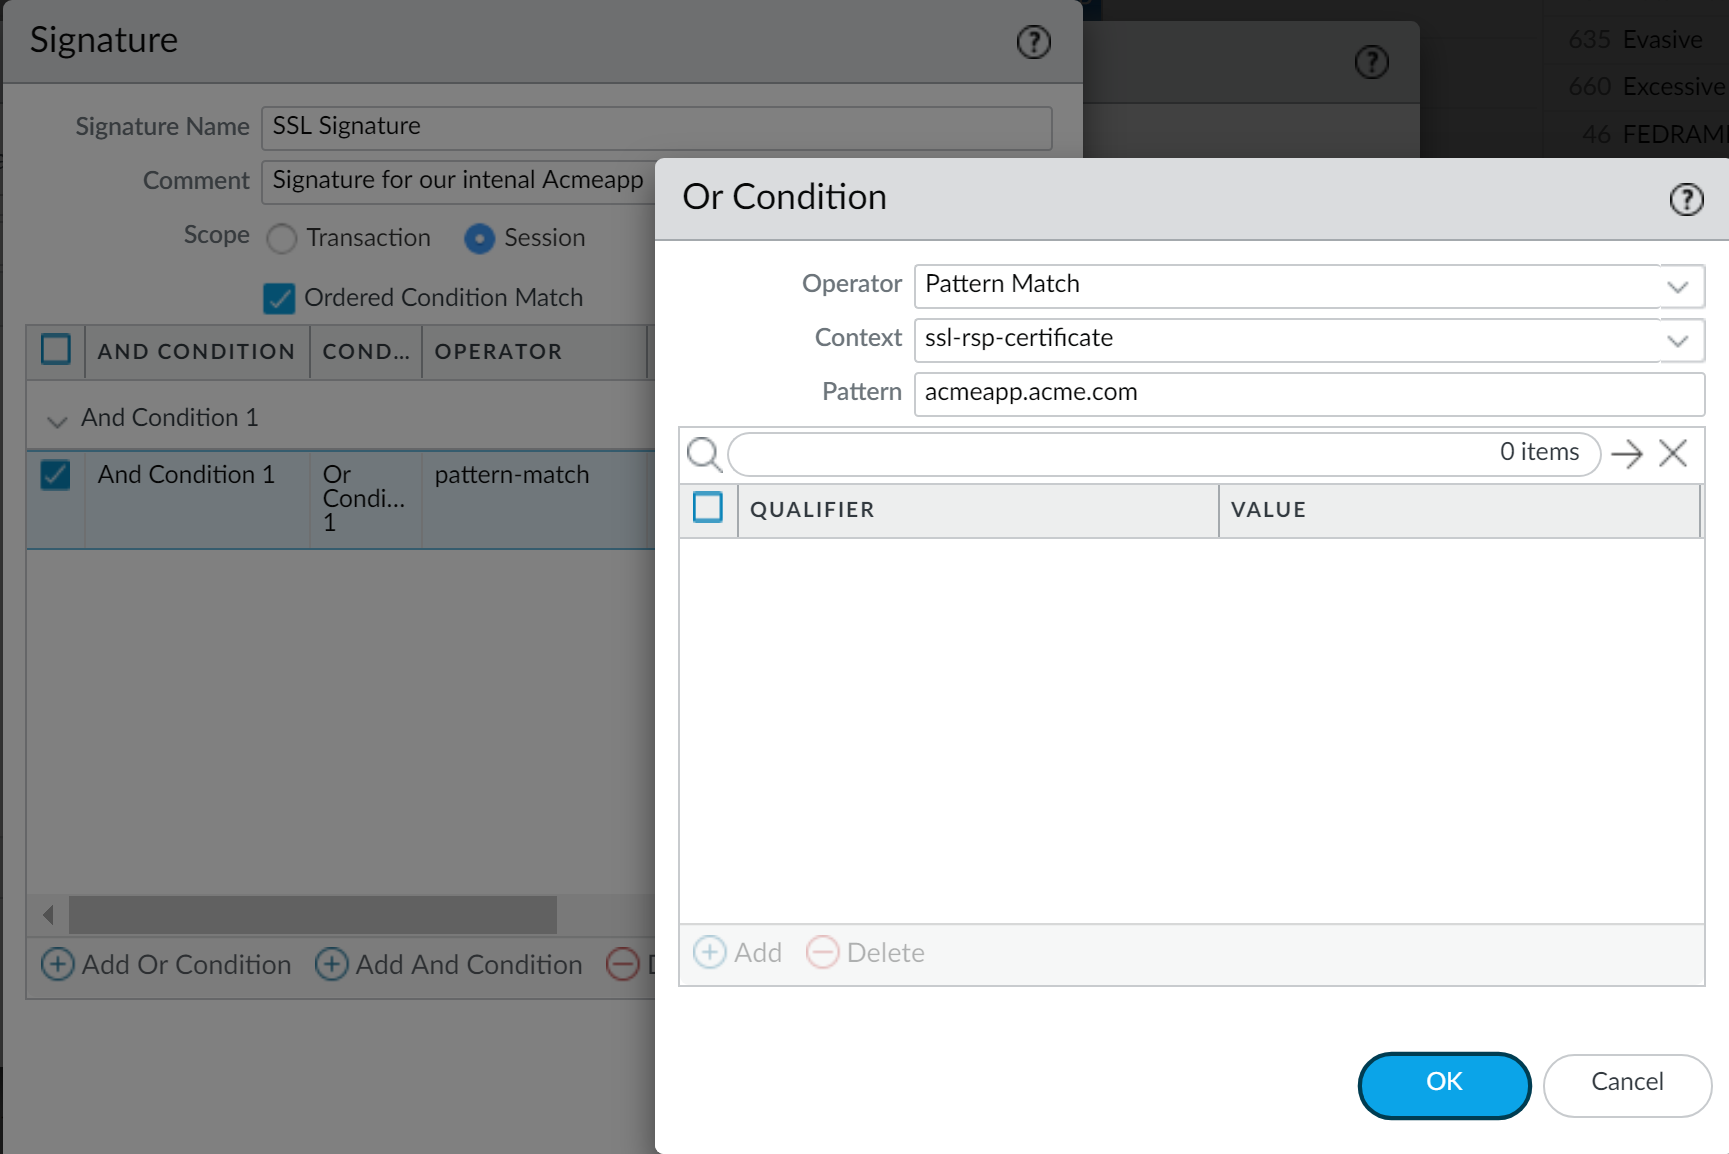
Define the criteria that the firewall will use to match the traffic to the new application.You will use the information you gathered from the packet captures to specify unique string context values that the firewall can use to match patterns in the application traffic.- On the Signatures tab, click Add and define a Signature Name and optionally a Comment to provide information about how you intend to use this signature.Specify the Scope of the signature: whether it matches to a full Session or a single Transaction.Specify conditions to define signatures by clicking Add And Condition or Add Or Condition.Select an Operator to define the type of match conditions you will use: Pattern Match or Equal To.
- If you selected Pattern Match, select the Context and then use a regular expression to define the Pattern to match the selected context. Optionally, click Add to define a qualifier/value pair. The Qualifier list is specific to the Context you chose.
- If you selected Equal To, select the Context and then use a regular expression to define the Position of the bytes in the packet header to use match the selected context. Choose from first-4bytes or second-4bytes. Define the 4-byte hex value for the Mask (for example, 0xffffff00) and Value (for example, 0xaabbccdd).
For example, if you are creating a custom application for one of your internal applications, you could use the ssl-rsp-certificate Context to define a pattern match for the certificate response message of a SSL negotiation from the server and create a Pattern to match the commonName of the server in the message as shown here:![]() Repeat steps 4.c and 4.d for each matching condition.If the order in which the firewall attempts to match the signature definitions is important, make sure the Ordered Condition Match check box is selected and then order the conditions so that they are evaluated in the appropriate order. Select a condition or a group and click Move Up or Move Down. You cannot move conditions from one group to another.Click OK to save the signature definition.Save the application.
Repeat steps 4.c and 4.d for each matching condition.If the order in which the firewall attempts to match the signature definitions is important, make sure the Ordered Condition Match check box is selected and then order the conditions so that they are evaluated in the appropriate order. Select a condition or a group and click Move Up or Move Down. You cannot move conditions from one group to another.Click OK to save the signature definition.Save the application.- Click OK to save the custom application definition.Click Commit.Validate that traffic matches the custom application as expected.
- Select PoliciesSecurity and Add a security policy rule to allow the new application.Run the application from a client system that is between the firewall and the application and then check the Traffic logs (MonitorTraffic) to make sure that you see traffic matching the new application (and that it is being handled per your policy rule).


