Enable NDP Monitoring
Table of Contents
Enable NDP Monitoring
Perform this task to enable NDP
Monitoring for an interface.
- Enable NDP monitoring.
- Select and Ethernet or VLAN.Select the interface you are configuring.Select IPv6.Select Address Resolution.Select Enable NDP Monitoring.After you enable or disable NDP monitoring, you must Commit before NDP monitoring can start or stop.Click OK.Commit your changes.Click Commit.Monitor NDP and DAD packets from clients and neighbors.
- Select and Ethernet or VLAN.For the interface where you enabled NDP monitoring, in the Features column, hover over the NDP Monitoringicon:
![]() The NDP Monitoring summary for the interface displays the list of IPv6 Prefixes that this interface will send in the Router Advertisement (RA) if RA is enabled (they are the IPv6 prefixes of the interface itself).The summary also indicates whether DAD, Router Advertisement, and DNS Support are enabled; IP addresses of any Recursive DNS Servers configured; and any DNS suffixes configured on the DNS Search List.Click on the NDP Monitoring icon to display detailed information.
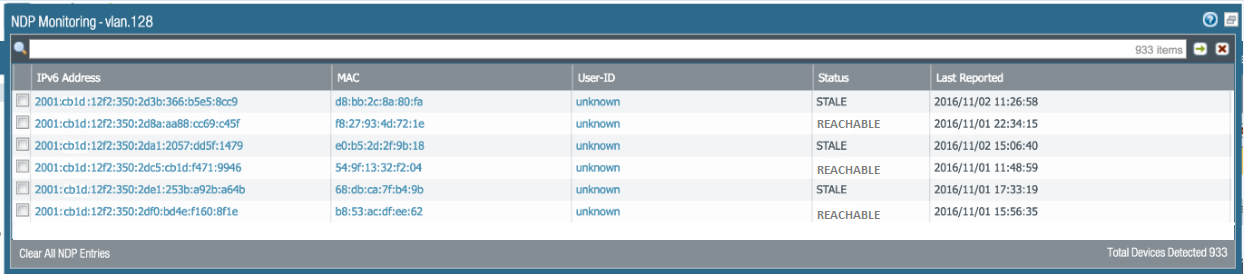
The NDP Monitoring summary for the interface displays the list of IPv6 Prefixes that this interface will send in the Router Advertisement (RA) if RA is enabled (they are the IPv6 prefixes of the interface itself).The summary also indicates whether DAD, Router Advertisement, and DNS Support are enabled; IP addresses of any Recursive DNS Servers configured; and any DNS suffixes configured on the DNS Search List.Click on the NDP Monitoring icon to display detailed information.![]() Each row of the detailed NDP Monitoring table for the interface displays the IPv6 address of a neighbor the firewall has discovered, the corresponding MAC address, corresponding User ID (on a best-case basis), reachability Status of the address, and Last Reported date and time this NDP Monitor received an RA from this IP address. A User ID will not display for printers or other non-user-based hosts. If the status of the IP address is Stale, the neighbor is not known to be reachable, per RFC 4861.At the bottom right is the count of Total Devices Detected on the link local network.
Each row of the detailed NDP Monitoring table for the interface displays the IPv6 address of a neighbor the firewall has discovered, the corresponding MAC address, corresponding User ID (on a best-case basis), reachability Status of the address, and Last Reported date and time this NDP Monitor received an RA from this IP address. A User ID will not display for printers or other non-user-based hosts. If the status of the IP address is Stale, the neighbor is not known to be reachable, per RFC 4861.At the bottom right is the count of Total Devices Detected on the link local network.- Enter an IPv6 address in the filter field to search for an address to display.
- Select the check boxes to display or not display IPv6 addresses.
- Click the numbers, the right or left arrow, or the vertical scroll bar to advance through many entries.
- Click Clear All NDP Entries to clear the entire table.
Monitor ND logs for reporting purposes.- Select .In the Type column, view ipv6nd logs and corresponding descriptions.For example, inconsistent router advertisement received indicates that the firewall received an RA different from the RA that it is going to send out.