Configure an Interface as a DHCP Client
Table of Contents
Configure an Interface as a DHCP Client
Configure a firewall interface as a DHCP client.
Before configuring a firewall interface as
a DHCP client, make sure you have configured a Layer 3 interface
(Ethernet, Ethernet subinterface, VLAN, VLAN subinterface, aggregate,
or aggregate subinterface) and the interface is assigned to a virtual
router and a zone. Configure an interface as a DHCP client if you
need to use DHCP to request an IPv4 address for the interface.
You
can also Configure
the Management Interface as a DHCP Client.
- Configure an interface as a DHCP client.
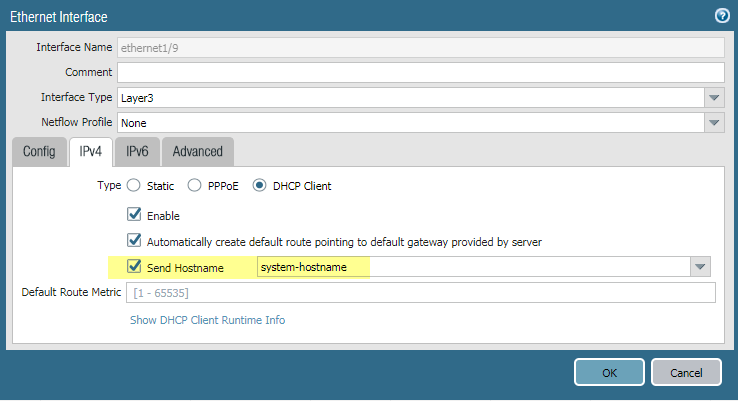
- Select .On the Ethernet tab or the VLAN tab, Add a Layer 3 interface or select a configured Layer 3 interface that you want to be a DHCP client.Select the IPv4 tab and, for Type, select DHCP Client.Select Enable.(Optional) Enable the option to Automatically create default route pointing to default gateway provided by server enabled by default). Enabling this option causes the firewall to create a static route to the default gateway, which is useful when clients try to access many destinations that do not need to have routes maintained in a route table on the firewall.(Optional) Enable the option to Send Hostname to assign a hostname to the DHCP client interface and send that hostname (Option 12) to a DHCP server, which can then register the hostname with the DNS server. The DNS server can then automatically manage hostname-to-dynamic IP address resolutions. External hosts can identify the interface by its hostname. The default value indicates system-hostname, which is the firewall hostname that you set in . Alternatively, enter a hostname for the interface, which can be a maximum of 64 characters, including uppercase and lowercase letters, numbers, period (.), hyphen (-), and underscore (_).
![]() (Optional) Enter a Default Route Metric (priority level) for the route between the firewall and the DHCP server (range is 1 to 65,535; default is 10). A route with a lower number has higher priority during route selection. For example, a route with a metric of 10 is used before a route with a metric of 100.The Default Route Metric for the route between the firewall and the DHCP server is 10 by default. If the static default route 0.0.0.0/0 uses the DHCP interface as its egress interface, that route’s default Metric is also 10. Therefore, there are two routes with a metric of 10 and the firewall can randomly choose one of the routes one time and the other route another time.Suppose you enable the option to Automatically create default route pointing to default gateway provided by server, select a virtual router, add a static route for a Layer 3 interface, change the Metric (which defaults to 10) to a value greater than 10 (for this example, 100) and Commit your changes. In the route table, the route’s metric will not indicate 100. Instead, it will indicate the default value of 10, as expected, because 10 takes precedence over the configured value of 100. However, if you change the static route’s Metric to a value less than 10 (such as 6), the route in the route table is updated to indicate the configured metric of 6.(Optional) Enable the option to Show DHCP Client Runtime Info to see all of the settings the client inherited from its DHCP server.Commit your changes.Click OK and Commit.The Ethernet interface should now indicate Dynamic-DHCP Client as its IP Address on the Ethernet tab.(Optional) See which interfaces on the firewall are configured as DHCP clients.
(Optional) Enter a Default Route Metric (priority level) for the route between the firewall and the DHCP server (range is 1 to 65,535; default is 10). A route with a lower number has higher priority during route selection. For example, a route with a metric of 10 is used before a route with a metric of 100.The Default Route Metric for the route between the firewall and the DHCP server is 10 by default. If the static default route 0.0.0.0/0 uses the DHCP interface as its egress interface, that route’s default Metric is also 10. Therefore, there are two routes with a metric of 10 and the firewall can randomly choose one of the routes one time and the other route another time.Suppose you enable the option to Automatically create default route pointing to default gateway provided by server, select a virtual router, add a static route for a Layer 3 interface, change the Metric (which defaults to 10) to a value greater than 10 (for this example, 100) and Commit your changes. In the route table, the route’s metric will not indicate 100. Instead, it will indicate the default value of 10, as expected, because 10 takes precedence over the configured value of 100. However, if you change the static route’s Metric to a value less than 10 (such as 6), the route in the route table is updated to indicate the configured metric of 6.(Optional) Enable the option to Show DHCP Client Runtime Info to see all of the settings the client inherited from its DHCP server.Commit your changes.Click OK and Commit.The Ethernet interface should now indicate Dynamic-DHCP Client as its IP Address on the Ethernet tab.(Optional) See which interfaces on the firewall are configured as DHCP clients.- Select and check the IP Address to see which interfaces indicate DHCP Client.Select and check the IP Address to see which interfaces indicate DHCP Client.