Prisma Access Browser
Configure Prisma Access Browser Device Posture Attributes
Table of Contents
Expand All
|
Collapse All
Prisma Access Browser Docs
Configure Prisma Access Browser Device Posture Attributes
Define the device posture attributes that determine device group
membership.
| Where Can I Use This? | What Do I Need? |
|---|---|
|
|
In Prisma Access Browser, you can add attributes as match criteria when you add or edit a device group.
Because Prisma Access Browser policy rules are enforced at the device group level, the
attributes provide granular security that ensures the devices that Prisma Access Browser allows to access your apps are adequately maintained and adhere with your
security standards before they are allowed access to your network resources. For
example, before allowing access to your most sensitive apps, you might want to
ensure that the devices accessing the apps have encryption enabled on their hard
drives. In this case, you would create a device group with an attribute that only
allows devices that have encryption enabled. The following sections detail the
attributes you can use to determine device group membership for Windows and macOS
devices. To learn about the attributes for controlling device group membership for
mobile devices, see Configure Prisma Access Browser Mobile Device Posture Attributes.
Windows and macOS OS Versions
Creating a device group that uses the device's operating system as a posture is a
good way to make sure that users have specific versions of the OS. If you add an
OS version attribute as match criteria for a device group, Prisma Access Browser
checks the device OS version matches the attribute you defined before allowing
membership in the device group.
Define the list of acceptable operating system versions for the Prisma Access Browser posture mechanism to check as follows.
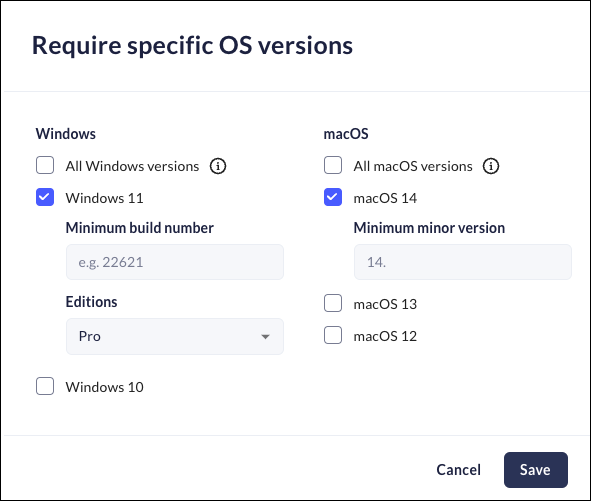
- When you add or edit a device group, add the OS version attribute.Select the Windows or macOS versions, editions, and build numbers to allow into the device group and then click Save.
![]() Click Save.What does the Prisma Access Browser check?Windows devices
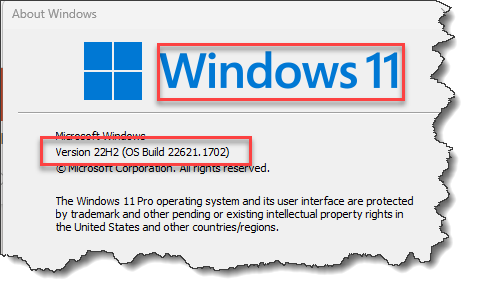
Click Save.What does the Prisma Access Browser check?Windows devices- Run the command WIINVER to open the About
Windows information.
![]()
- The command WMIC OS GET VERSION will also display the information, however if the version on the device was upgraded (for example, Windows 10 to Windows 11), the result may not be correct. In this case, use the WINVER command.
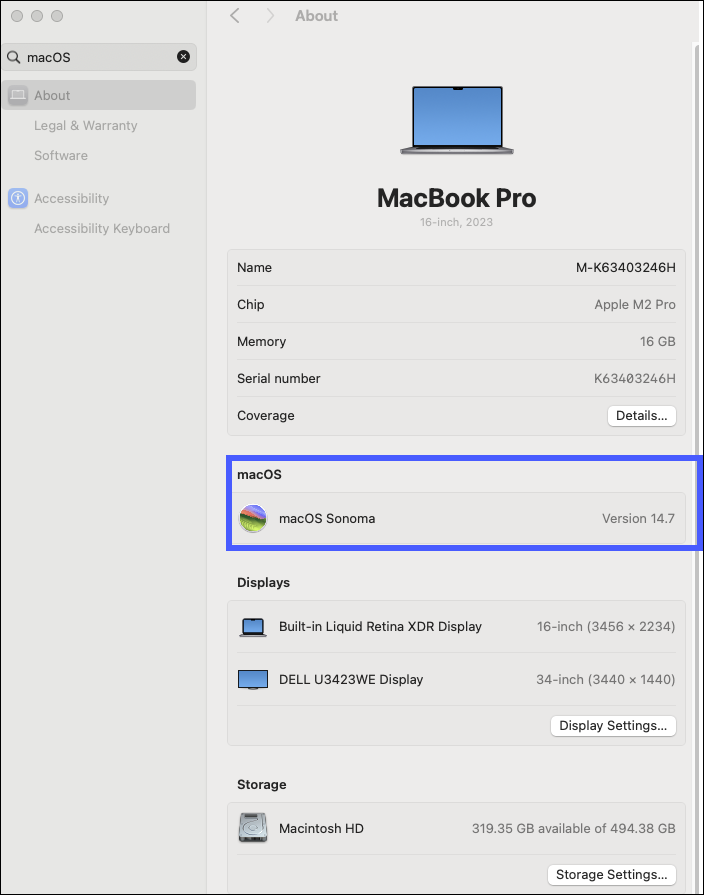
macOS devices- In the System Settings, search or select "macOS."
- Click About.
![]()
Serial Number
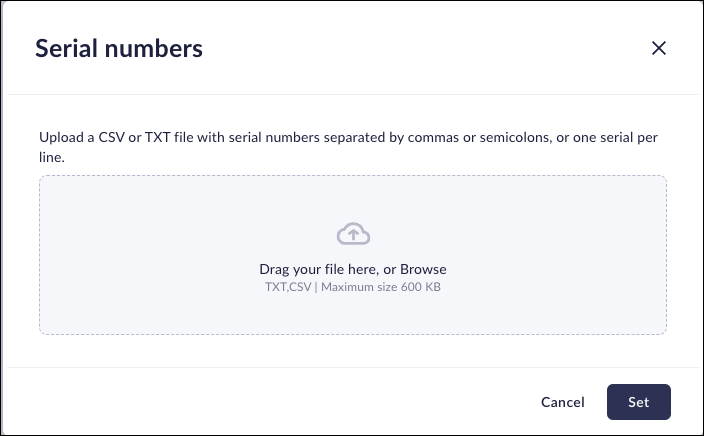
Creating a device group that uses device serial numbers as match criteria is a good way to ensure that only specific devices have access to the Prisma Access Browser. Before you can add a serial number attribute to a device group, you must create a .txt or .csv file containing the list of serial numbers. The file you create can't exceed 600 KB.- When you add or edit a device group, add the serial number attribute.Drag and drop or browse for the file containing the list of serial numbers.
![]() If necessary, remove any serial numbers that you do not want to include in the group.Click Set.What does the Prisma Access Browser check?While the serial number often appears on a sticker or label on the device, these numbers aren't always accurate. Use the following methods to get the correct serial number.Windows devices
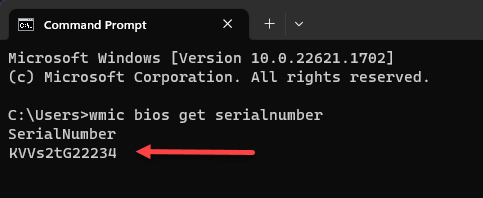
If necessary, remove any serial numbers that you do not want to include in the group.Click Set.What does the Prisma Access Browser check?While the serial number often appears on a sticker or label on the device, these numbers aren't always accurate. Use the following methods to get the correct serial number.Windows devices- Open a Command Prompt and enter the command wmic bios get
serialnumber
![]()
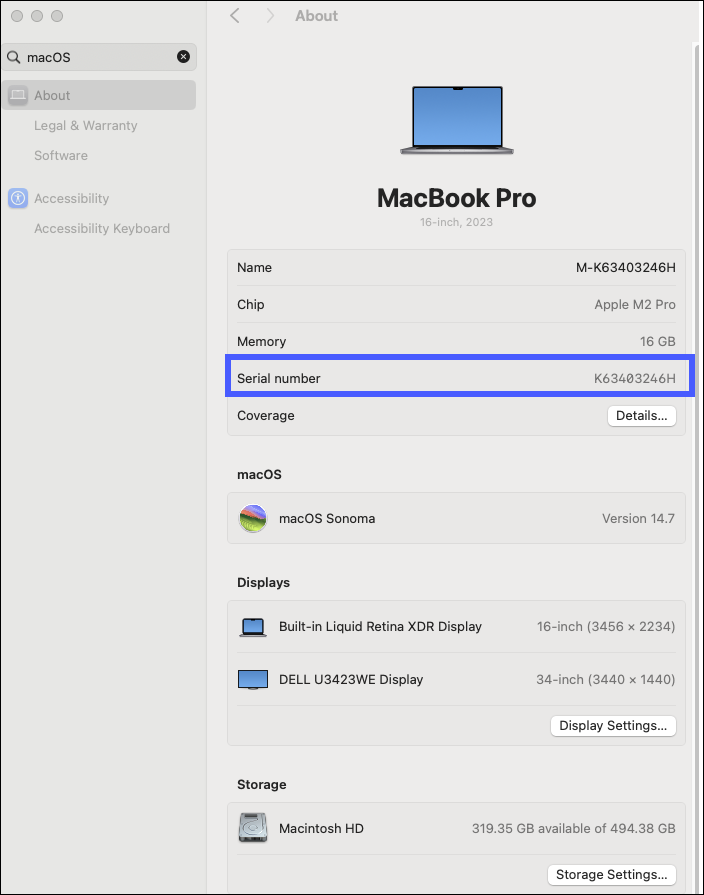
macOS devices- In the System Settings, search or select "macOS."
- Click About.
![]()
Client Certificate
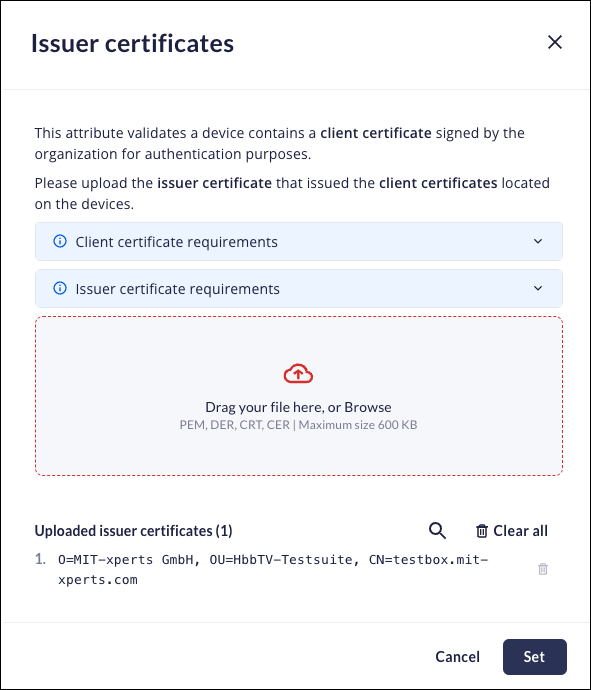
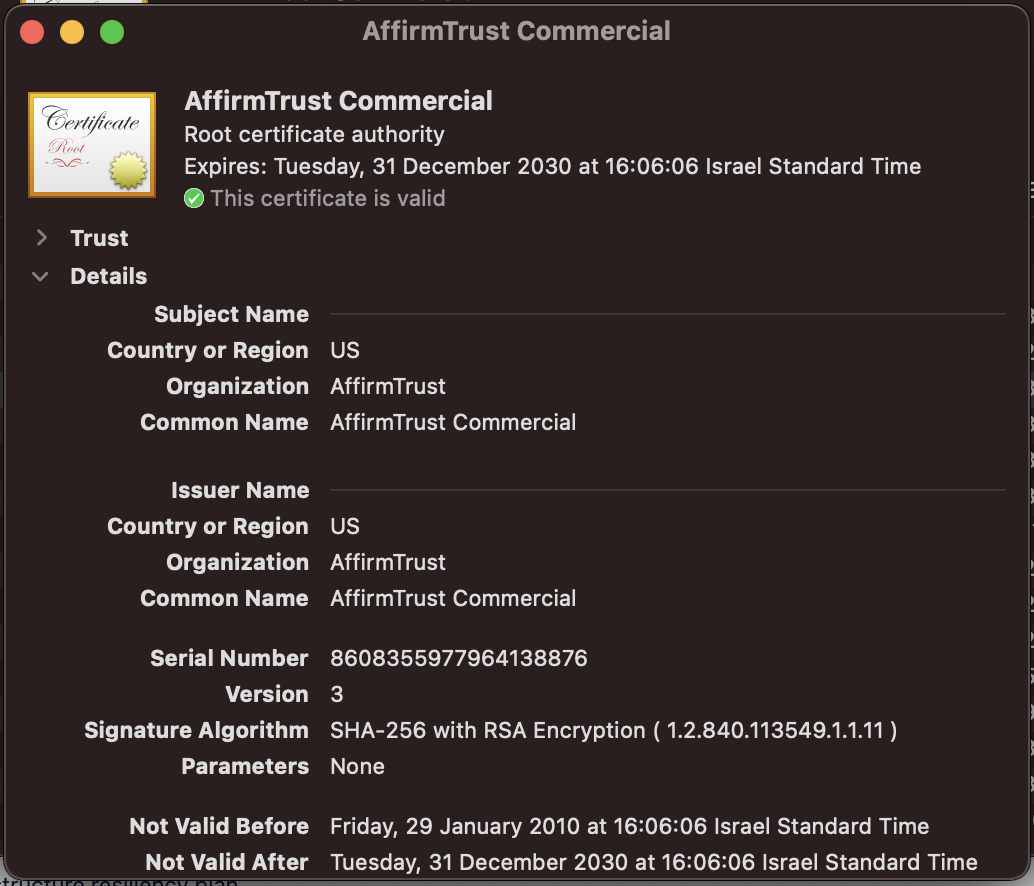
To ensure that only devices that use a client certificate signed by your organization for authentication, create a client certificate attribute as match criteria for your device groups so that you can distinguish between managed and unmanaged devices. To use a client certificate attribute, you must upload the intermediate certificate or intermediate or root certificate to create the attribute. When determining if a client certificate matches the issuer certificate in the attribute, Prisma Access Browser matches against the authorityKeyIdentifier. If you need to trust multiple CAs, you can upload multiple certificates.Device groups can match against multiple certificates. To add a new Issuer (root or intermediate) certificate:- When you add or edit a device group, add the client certificate attribute.Drag and drop one or more certificate .PEM files to the Issuer certificates dialog.
![]() Click Set.You need to upload issuer certificates that issued the client certificates located on the devices.Client Certificate Requirements:
Click Set.You need to upload issuer certificates that issued the client certificates located on the devices.Client Certificate Requirements:- Stored in the Current User → Personal stopr. [Windows only].
- Valid Client Certificate with a private key attached.
Issuer Certificate Requirements- Contains either the intermediate or both the intermediate and root chains that signed the client certificate.
- It must not be the actual client certificate and should not contain a private key.
- If you need to trust multiple CAs, then you can upload multiple certificates.
- Prisma Access Browser matches the certificates' authorityKeyIdentifier when matching an issuer certificate to a client certificate
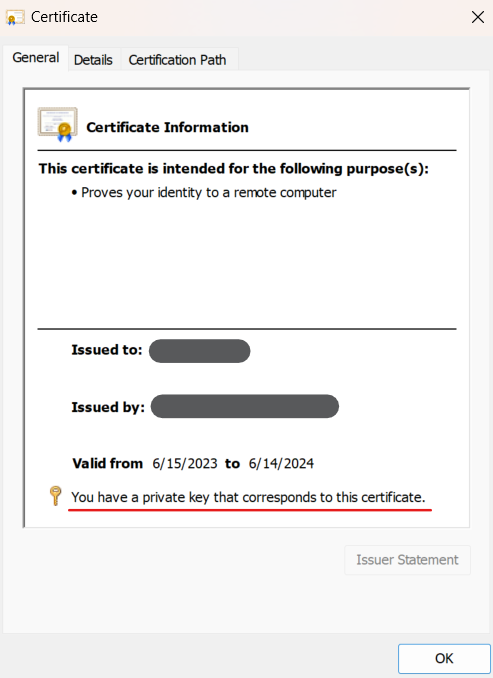
What does the Prisma Access Browser check?Windows devices- To manually verify a device meets the criteria, open the current user store, and select Start > Manage user certificates.
- Navigate to Personal → Certificates and validate:
- Yjhe client certificate exists here.
- The certificate contains a private key.
- The issuer matches the issuer f the certificate.
- You can compare the thumbprint of the certificates.
![]()
The authority key identifier matches the issuer certificate identifier.macOS devices- From the Launcher, search for Keychain Access.
- Click Certificates and search for the required certificate.
![]()
- Validate that the company client certificate exists.
- Validate that the authority key identifier matched the issuer certificate identifier.
![]()
System Encryption
File system encryption protects data-at-rest, protecting against a range of potential attacks and cybersecurity risks. When you enable the File system encryption attribute in a device group, Prisma Access Browser verifies that encryption is enabled on the device OS before allowing access to the device group. If you enable this attribute, Prisma Access Browser will only allow devices with BitLocker (Windows) or FileVault (macOS) enabled into the device group.What does the Prisma Access Browser check?Windows devicesWindows file system encryption is handled through BitLocker. Windows checks to see that the BitLocker status is:- On
- Locked
- Encryption in ProgressIf the status is not one of these, then the posture checker will assume that BitLocker is disabled.
![]()
Bitlocker displays the drives when it is enabled.![]() When Windows Update runs, BitLocker will be temporarily disabled. If this happens, Prisma Access Browser will consider the encryption as disabled until it is re-enabled.macOS devicesmacOS devices use FileVault for managing file encryption, You can enable it on the Security and Privacy screen.
When Windows Update runs, BitLocker will be temporarily disabled. If this happens, Prisma Access Browser will consider the encryption as disabled until it is re-enabled.macOS devicesmacOS devices use FileVault for managing file encryption, You can enable it on the Security and Privacy screen.- Click Turn On FIleVault to enable file encryption.
![]()
FileVault can also be toggled via sudo fdsetup status.Active Screen Lock
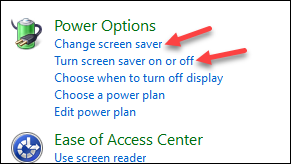
Active screen lock mechanisms limit device access to authorized users only, preventing malevolent players from gaining access to confidential information on the device in the event that the user steps away from the device. When you enable the Active screen lock attribute in a device group, Prisma Access Browser verifies that the device is enabled with an automatic screen lock, password, PIN, biometric, or similar lock feature before allowing access to the group. To pass this check, a device must meet the following requirements:Windows deviceThere are two locations where you can set the options for an active screen lock:- Screen saver settings - this setting can be left as None.
- Windows Power Settings
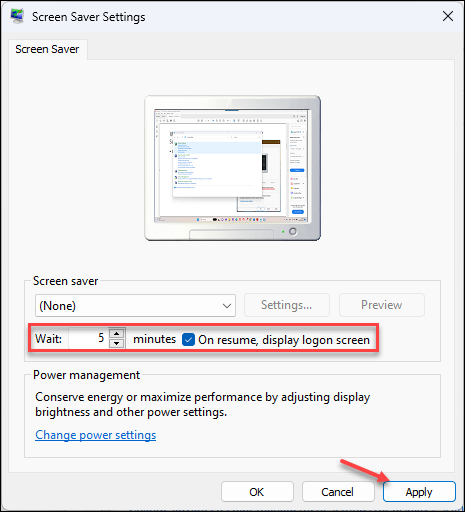
- Open the Screen Saver settings (either option can be
selected.
![]()
- Select On resume, display logon screen.
- Select a time in the Wait n minutes. This will be the time that the device will wait before activating the screen lock.
- Click Apply.
![]() The Active Screen Lock is now activated.
The Active Screen Lock is now activated. - Open the Screen Saver settings (either option can be
selected.
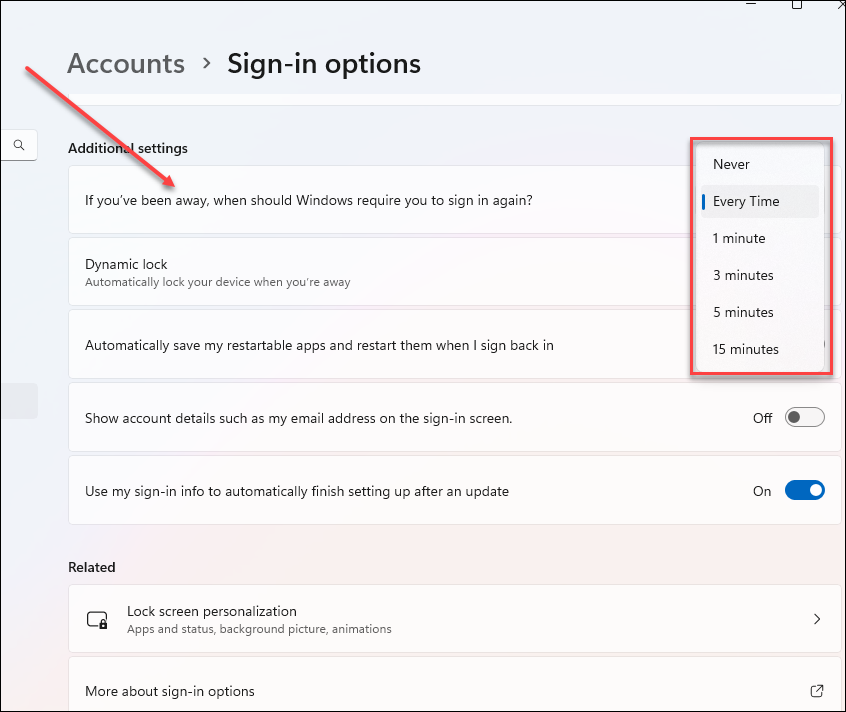
- Sign-in Options
- In the Accounts > Sign-in options, scroll to Additional settings.
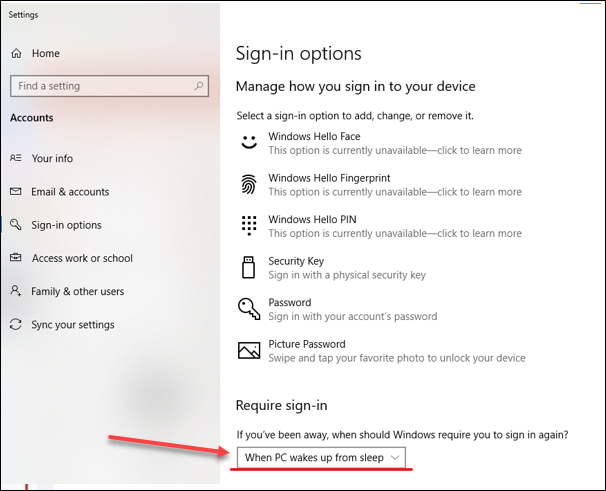
- In the field If you've been away, when should Windows require
you to sign in again?, select one of the options.
![]() Selecting Never does not activate the screen lock.The Active Screen Lock is now activated.In Windows 10 devices, this option is found under Require sign-in.
Selecting Never does not activate the screen lock.The Active Screen Lock is now activated.In Windows 10 devices, this option is found under Require sign-in.![]()
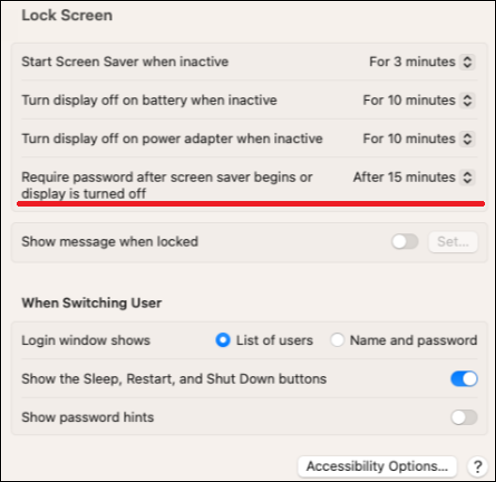
macOS devicesThe active screen lock for macOS devices is based on code that the Prisma Access Browser developers contributed to the Chromium project.- From the Apple menu select System Preferences > Security & Privacy.
- If the lock icon on the lower left is locked, click it and enter the password.
- In the General tab, in the Lock Screen section, select Require
password after screen saver begins or display is turned off, and
make sure there is a time value set.
![]()
Active Endpoint Protection
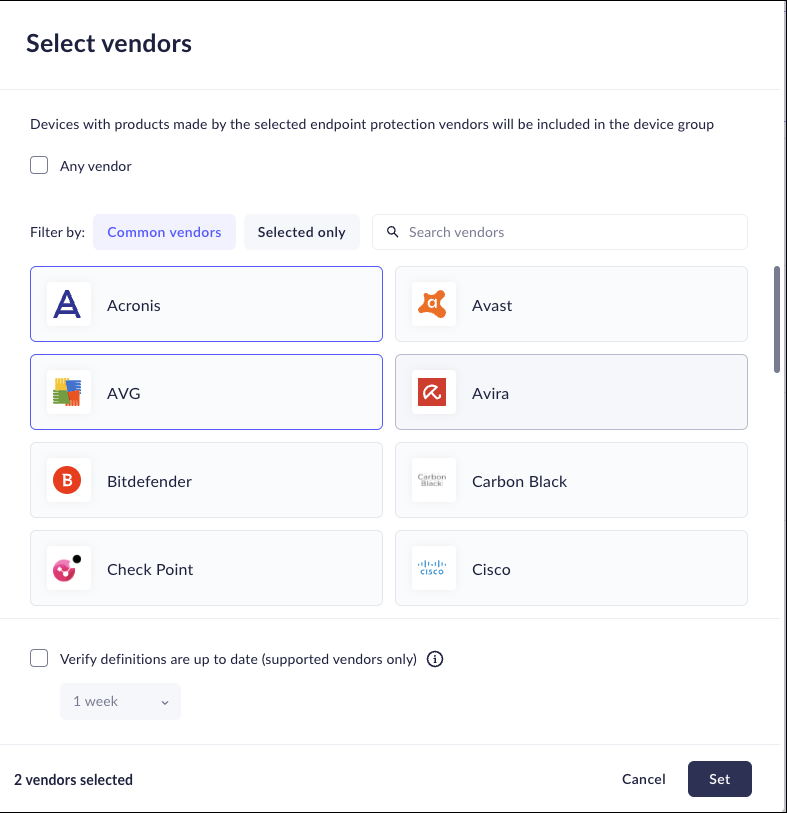
Devices secured with active endpoint protection have antivirus, anti-malware, firewall protection, and intrusion detection and prevention features, which work in concert to identify and block malicious activity. If you enable the endpoint protection attribute within the device group, Prisma Access Browser checks for active endpoint protection before allowing the device into the device group. A device must meet the following requirements to pass this check:When configuring attributes to check for endpoint protection, you can select specific endpoint protection vendors to check for on the device as follows:- When you add or edit a device group, enable the endpoint protection attribute.Select the endpoint protection vendors you require devices accessing your network to use.
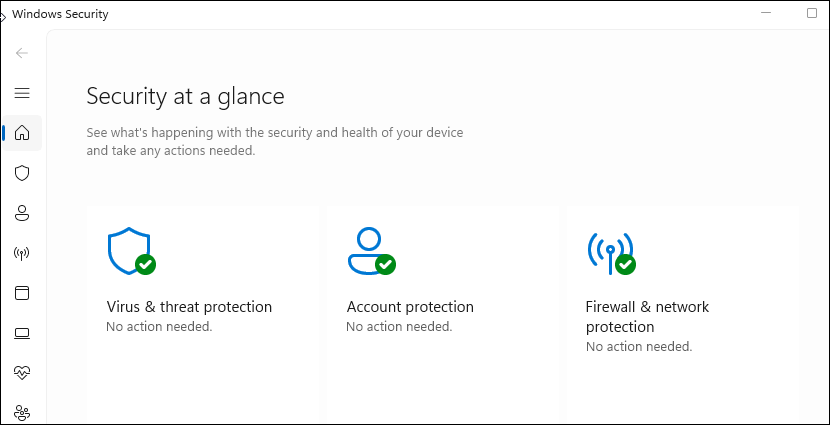
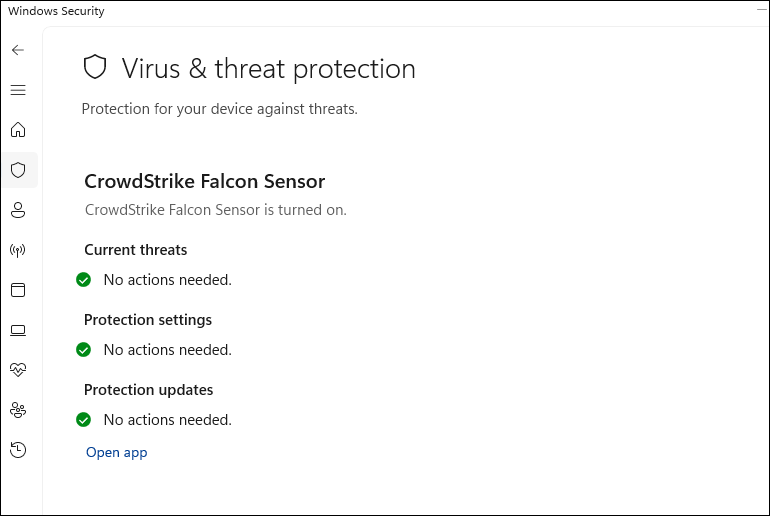
![]() (Optional) Enable Verify definitions are up to date (supported vendors only) to add an additional check to ensure that the endpoint protection software on the device is up-to-date.Click Set.What does the Prisma Access Browser check?Windows devicesPrisma Access Browser checks the Endpoint Protection in the Windows Security Center. The posture check is made by checking that the Virus & threat protection is turned on.The Security at a glance page displays the Endpoint protection status of the device.
(Optional) Enable Verify definitions are up to date (supported vendors only) to add an additional check to ensure that the endpoint protection software on the device is up-to-date.Click Set.What does the Prisma Access Browser check?Windows devicesPrisma Access Browser checks the Endpoint Protection in the Windows Security Center. The posture check is made by checking that the Virus & threat protection is turned on.The Security at a glance page displays the Endpoint protection status of the device.![]() Clicking on one of the icons above will display more detailed information regarding the installed EPP.
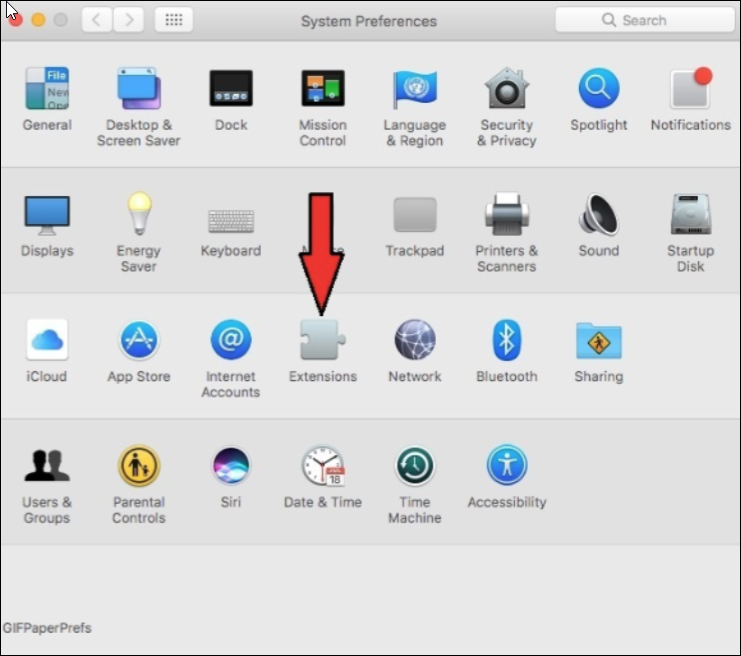
Clicking on one of the icons above will display more detailed information regarding the installed EPP.![]() macOS devicesFor macOS devices, Prisma Access Browser looks at the Extensions in the System Preferences.
macOS devicesFor macOS devices, Prisma Access Browser looks at the Extensions in the System Preferences.![]()
Device Type
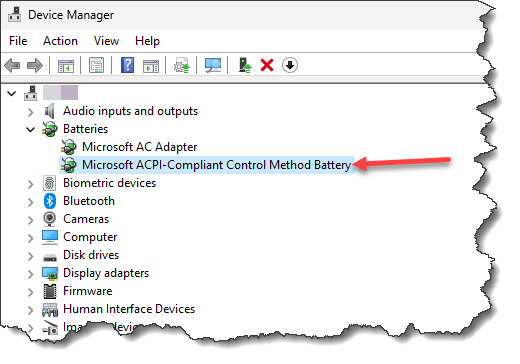
Use the device type attribute to ensure that the device group only contains specific types of devices—such as laptops or desktops—as follows:- Windows devices—Prisma Access Browser checks to see if the device is a
laptop or desktop based on whether or not it has a battery.
![]()
- macOS devices—Prisma Access Browser checks the hardware device machine type.
- VM Detection—Prisma Access Browser looks at the way the particular operating system views the CPU. The result is based on the CPU internal datasets.
- Unknown—This is an atypical result. It is only applicable if the posture mechanism cannot determine the hardware properties.
If Prisma Access Browser can not determine the device type it identifies it as unknown.CrowdStrike ZTA Scores
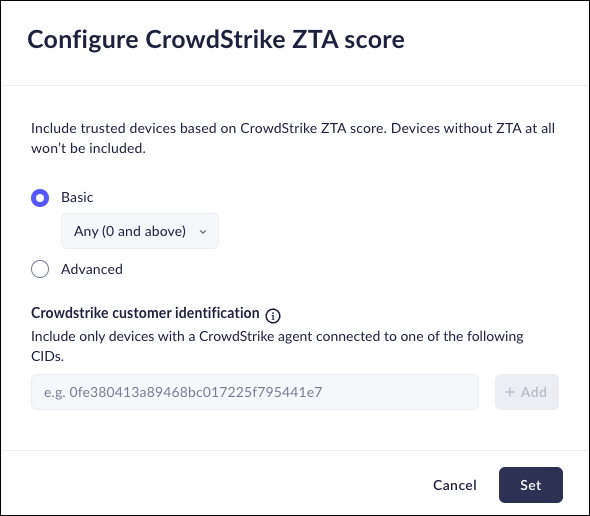
CrowdStrike Zero Trust Assessment (ZTA) delivers real-time security posture assessments across all endpoints regardless of location, network, or user. CrowdStrike ZTA enables enforcement of dynamic conditional access based on device health and compliance checks that mitigate the risk to users and the organization. Prisma Access Browser can use the ZTA assessment score as access criteria.To use the ZTA score as part of the device posture assessment for determining access to Prisma Access Browser you must:- Enable the ZTA score calculation for all devices (Host setup and managementZero trust assessmenthosts).Find your CrowdStrike Customer ID.You can find this inside your CrowdStrike user profile. Click on the account email to view this information.
![]() Open a support ticket with CrowdStrike to enable the ZTA feature flag.This allows Prisma Access Browser to access the CrowdStrike Agent ID. To open the support ticket, you will need the customer ID you just obtained.Integrate the ZTA score with Prisma Access Browser.After CrowdStrike enables the ZTA feature flag, you can integrate with as follows:
Open a support ticket with CrowdStrike to enable the ZTA feature flag.This allows Prisma Access Browser to access the CrowdStrike Agent ID. To open the support ticket, you will need the customer ID you just obtained.Integrate the ZTA score with Prisma Access Browser.After CrowdStrike enables the ZTA feature flag, you can integrate with as follows:- When you add or edit a device group, select CrowdStrike ZTA Score.Select the type of score you want to use:
- Basic—Use the overall score that CrowdStrike assigns to the device, based on a range of Low (at least 65), Medium (at least 70), Strict (at least 80), or Very Strict (at least 95).
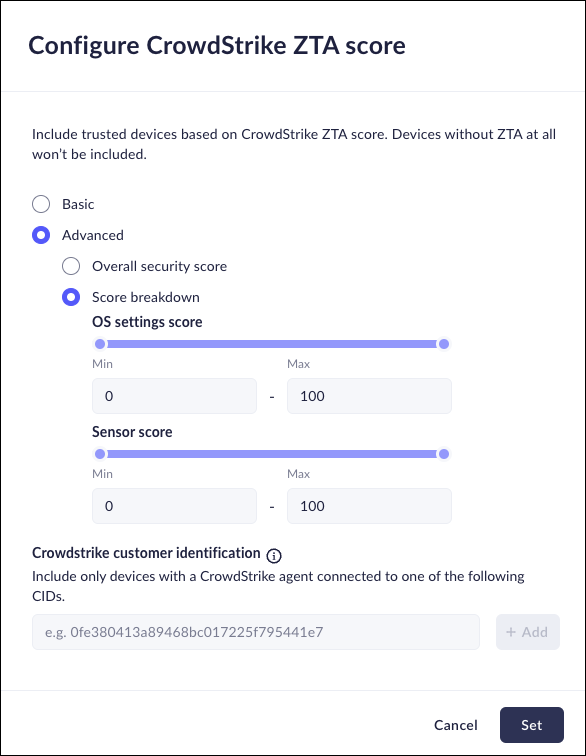
- Advanced—Fine-tune the configuration to select either a specific Overall security score, or a Score breakdown, based on the OS and sensor values. Use the sliders to select the required score.
![]() Enter the CrowdStrike customer identification number associated with the CrowdStrike agent.Add additional CrowdStrike IDs as needed to connect to all agents.
Enter the CrowdStrike customer identification number associated with the CrowdStrike agent.Add additional CrowdStrike IDs as needed to connect to all agents.![]() Click Set.
Click Set.OS Password Policy
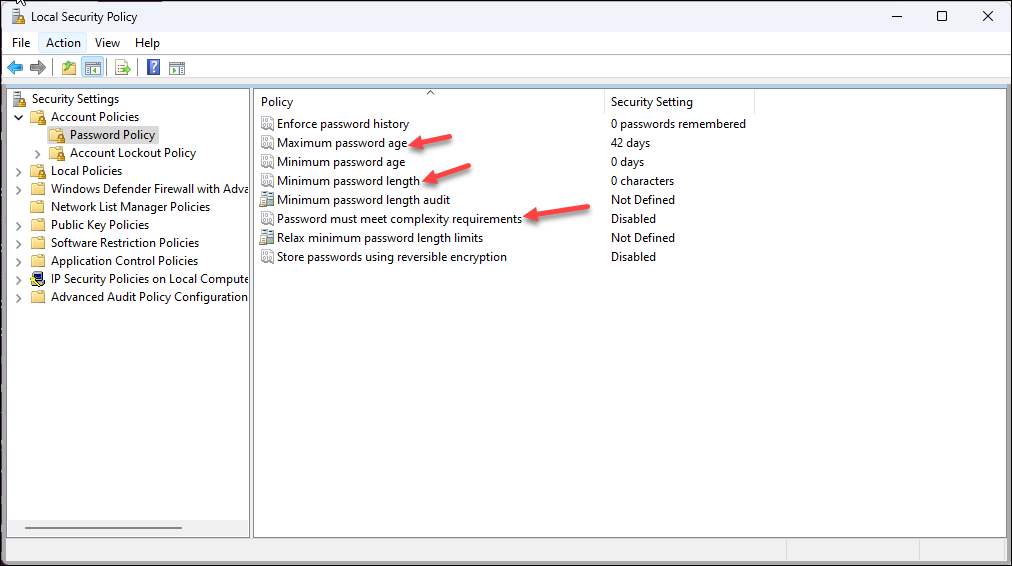
Use the OS password protection attribute to restrict device group membership to devices that are password protected. You can also specify that the device must have additional password policy enforced, such as password complexity, maximum age, or maximum length. To determine this, Prisma Access Browser looks for the following settings on the device:- Windows devices—Prisma Access Browser checks the following Password
Policy settings in the local Security Settings (Security SettingsAccount PolicyPassword Policy): Maximum password age,
Minimum password length, and Password
must meet complexity requirements.
![]()
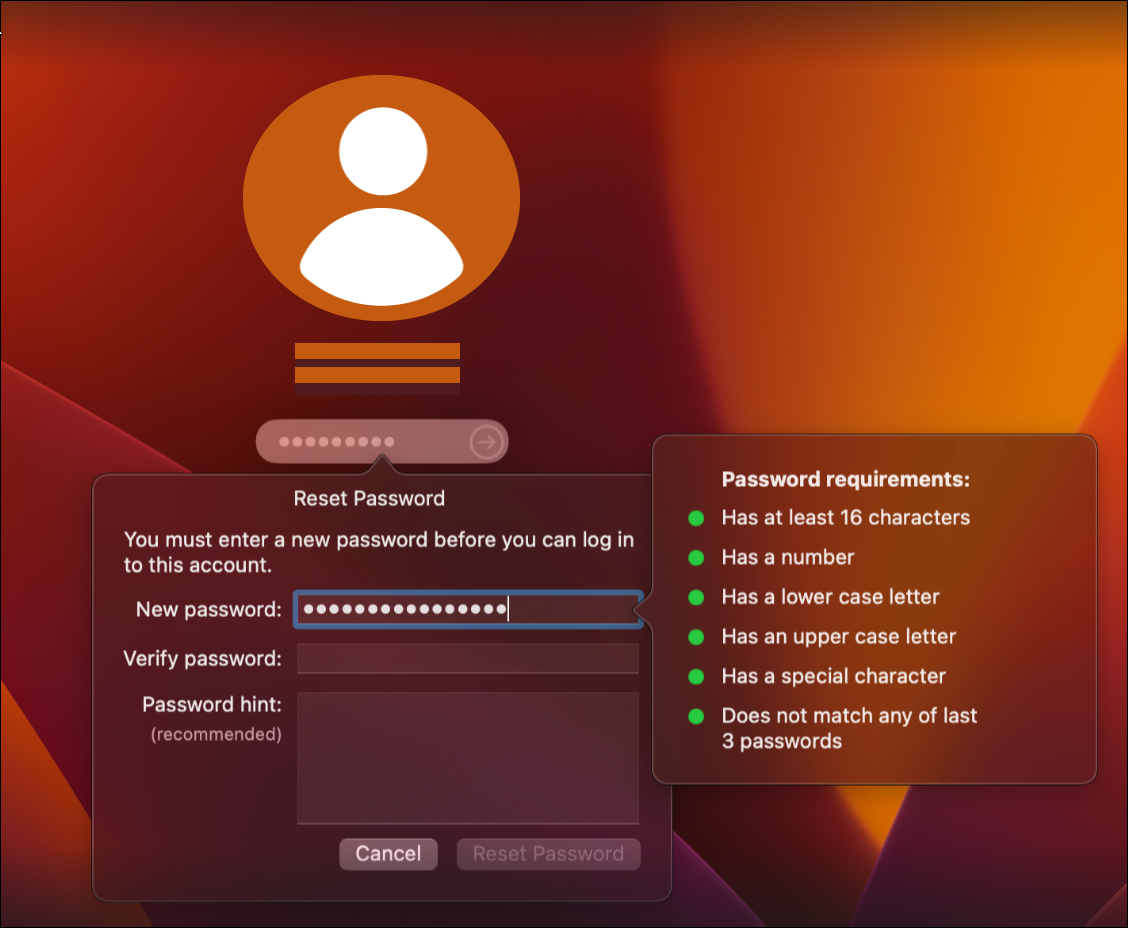
- macOS devices—Prisma Access Browser checks the local password
requirements in the management configuration profile (ManagementConfiguration profilesAddmacOSPassword): Allow simple value,
Require alphanumeric value, Minimum
length, Munimum number of complex
characters, Expiration age, or
History restriction.
![]()
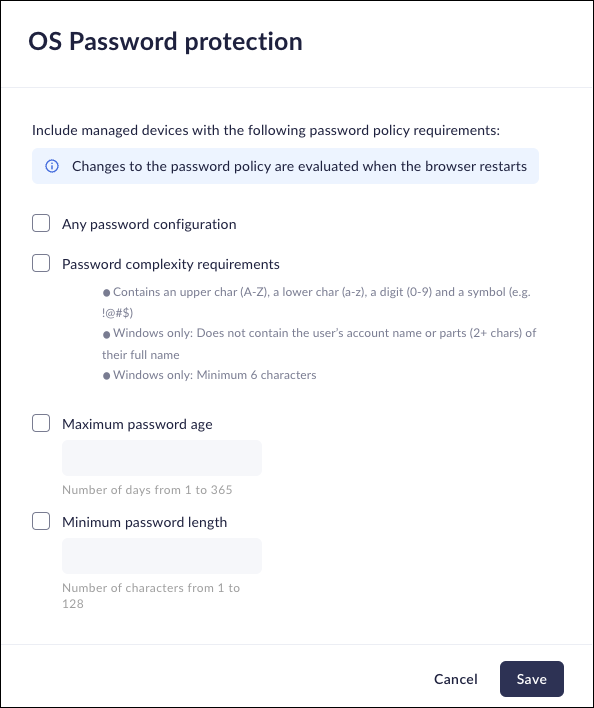
- When you add or edit a device group, enable the OS password policy attribute.Select the endpoint protection vendors you require devices accessing your network to use.
![]() Select the password policy settings that must be enforced on devices for inclusion in the device group.Click Save.
Select the password policy settings that must be enforced on devices for inclusion in the device group.Click Save.Device Manufacturer
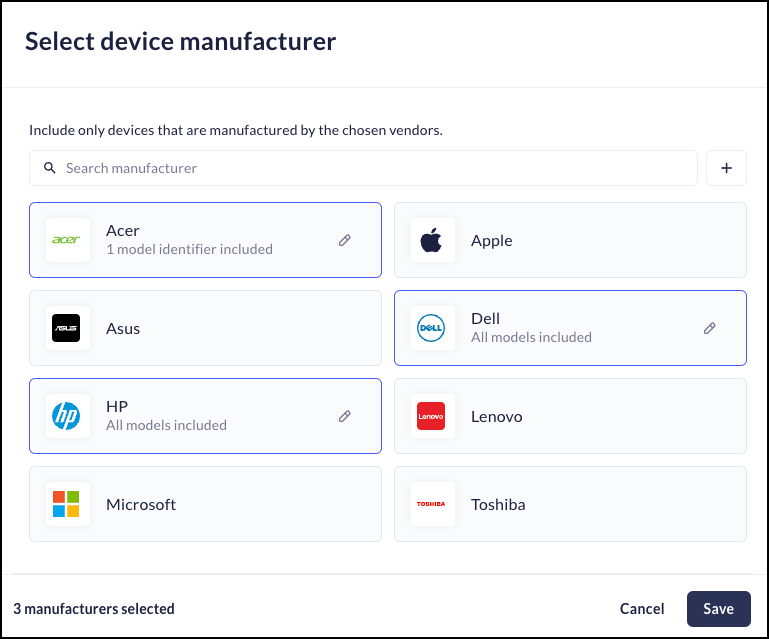
Use the device manufacturer attribute to restrict device group membership to Windows or macOS devices from selected manufacturers.- When you add or edit a device group, enable the device manufacturer attribute.Select the device manufacturers you want to support in the device group.
![]() Click Save.
Click Save.System Integrity
Use the system integrity attribute to ensure that the device group only allows devices that have advanced system integrity protection enabled. Prisma Access Browser determines if a device qualifies as follows:- Windows devices—Prisma Access Browser checks to ensure that driver test signing is off and no kernel debugger is present. Additionally, on UEFI computers, it verifies that secure boot is enabled.
- macOS devices—Prisma Access Browser checks to ensure that System Integrity Protection (SIP) and Gatekeeper are enabled.
Full OS Boot Mode
Enable this attribute to create a device group that requires the devices to run in full boot mode. This excludes devices that are running in safe mode, recovery mode, or devices running in a pre-installation environment.Unprivileged Process
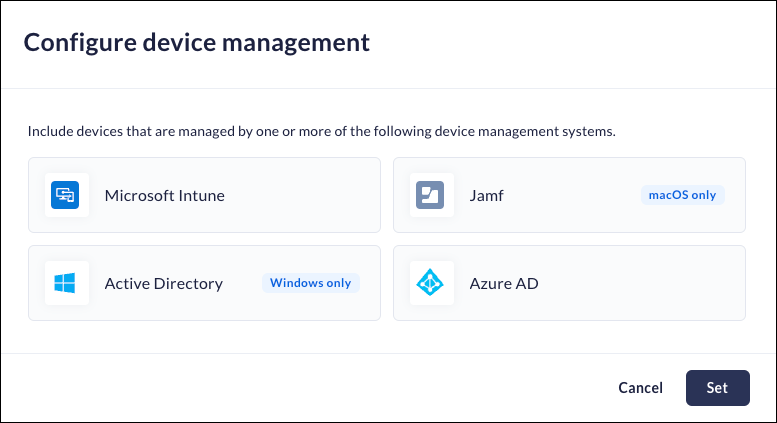
This attribute allows you to create device groups where the Prisma Access Browser runs without any elevated or root permissions.Device Management
This attribute allows you to create device groups that use approved device management systems. The Prisma Access Browser supports the following systems:- Microsoft Intune
- Azure AD
- Active Directory (Windows only)
- Jamf (macOS only)
- When you add or edit a device group, enable the device management attribute.Select the device management systems you want to allow in the device group.
![]() Click Set.
Click Set.

