- Home
- Prisma Access
- Prisma Access Administration
- Prisma Access Advanced Deployments
- Prisma Access Service Connection Advanced Deployments
- Use Traffic Steering to Forward Internet-Bound Traffic to Service Connections
- Configure Traffic Steering in Prisma Access
- Configure Traffic Steering in Prisma Access (Panorama)
Prisma Access
Configure Traffic Steering in Prisma Access (Panorama)
Table of Contents
Expand All
|
Collapse All
Prisma Access Docs
-
- 6.1 Preferred and Innovation
- 6.0 Preferred and Innovation
- 5.2 Preferred and Innovation
- 5.1 Preferred and Innovation
- 5.0 Preferred and Innovation
- 4.2 Preferred
- 4.1 Preferred
- 4.0 Preferred
- 3.2 Preferred and Innovation
- 3.1 Preferred and Innovation
- 3.0 Preferred and Innovation
- 2.2 Preferred
-
-
- 4.0 & Later
- Prisma Access China
-
-
Configure Traffic Steering in Prisma Access (Panorama)
Configure traffic steering in the Prisma Access deployment.
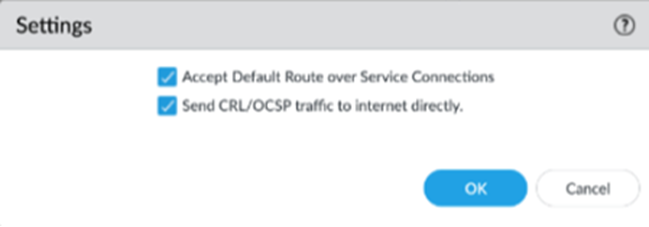
- Onboard your service connections, mobile users and remote networks, as applicable to your deployment.Select PanoramaCloud ServicesConfigurationTraffic Steering.(Optional, mobile user deployments only) Allow Prisma Access to accept and install the default route advertised over one or more service connections from the CPE by clicking the gear icon to open the Settings and selecting Accept Default Route over Service Connections.Default routes have guidelines that you must follow when using them; for example, default routes are supported for mobile user deployments only and have no effect on remote network deployments. Be sure to review these guidelines before implementing default routes with traffic steering.(Optional) Allow Prisma Access to send certificate revocation list (CRL) and Online Certificate Status Protocol (OCSP) traffic directly to the internet by selecting Send CRL/OCSP traffic to internet directly.Select this choice if you have an OCSP or CRP server in the public internet and you want to send that traffic directly to the internet using the untrust zone. If you do not select this choice, Prisma Access sends this traffic to the service connection.Be sure that you have upgraded your Prisma Access deployment to a minimum version of 5.1.1 before selecting Send CRL/OCSP traffic to internet directly.
![]() (Optional) Create a target group and assign a service connection to it.
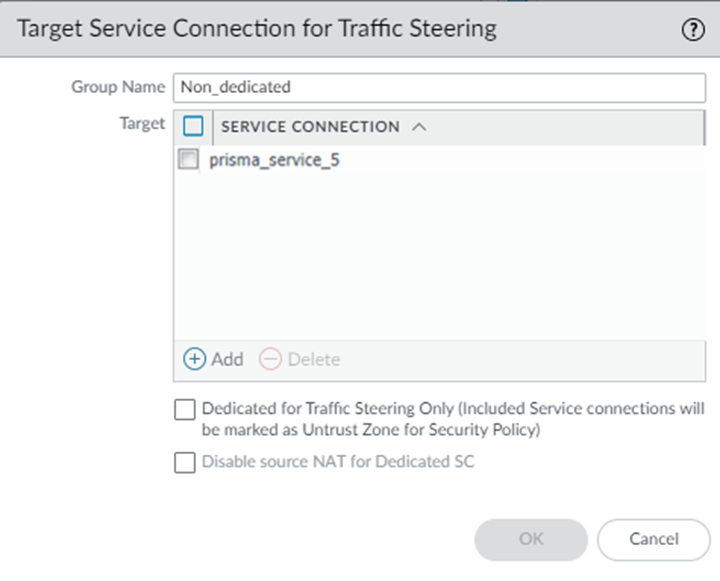
(Optional) Create a target group and assign a service connection to it.- In the Target Service Connections for Traffic Steering area, Add a group and give it a Group Name.Add a Target for the traffic, specifying the Service Connection to use with the target; then, click OK.Palo Alto Networks does not recommend using multiple service connections (whether dedicated or non-dedicated) in a target service connection group that is referenced in a traffic steering rule. In addition, a given service connection can only exist in one target and you cannot add a single service connection to two different targets.Choose whether to make the service connections associated with this target a dedicated service connection.
- You can use a dedicated service connection to steer traffic to a third-party security stack or cloud that is not on your premises and does not need to participate in routing. To set a service connection to be used as a dedicated service connection, select Dedicated for Traffic Steering Only.Dedicated service connections change their zones.
- Deselect Dedicated for Traffic Steering Only if you will send both normal service connection-related and traffic steering traffic through the service connection; with this choice, the zone for the service connection remains as Trust.
Choose whether to enable or disable source NAT.To disable source NAT for Dedicated service connections, select Disable Source NAT for Dedicated SC. Source NAT is enabled by default (the check box is deselected).If you disable source NAT, Prisma Access uses your organization’s source IP addresses for the dedicated service connection. If you enable source NAT, Prisma Access uses the EBGP Router address of the service connection (PanoramaCloud ServicesStatusNetwork DetailsService ConnectionEBGP Router) as the source IP address, even after the traffic egresses from the dedicated service connection.![]() Create rules for the target you created and apply them to the target.
Create rules for the target you created and apply them to the target.- In the Traffic Steering Rules area, Add a traffic steering rule.in the General tab, Name the traffic steering rule.In the Source tab, specify rules for source traffic.
- In the Source Address field, specify one or more of the following objects, or select Any to have traffic from any source go to this target:
- An IP address
- An address object that you created in Panorama (ObjectsAddresses)
- An External Dynamic List (EDL) using IP addresses or URLs
- In the Source User field, specify rules for source user traffic. You can specify the following user information:
- UsersEnter users in either the domain/user or the user@domain format.
- User groupsUse full distinguished names (DNs) when entering user groups.
- Users configured on Panorama (DeviceLocal User DatabaseUsers)
- User groups configured on Panorama (DeviceLocal User DatabaseUser Groups)
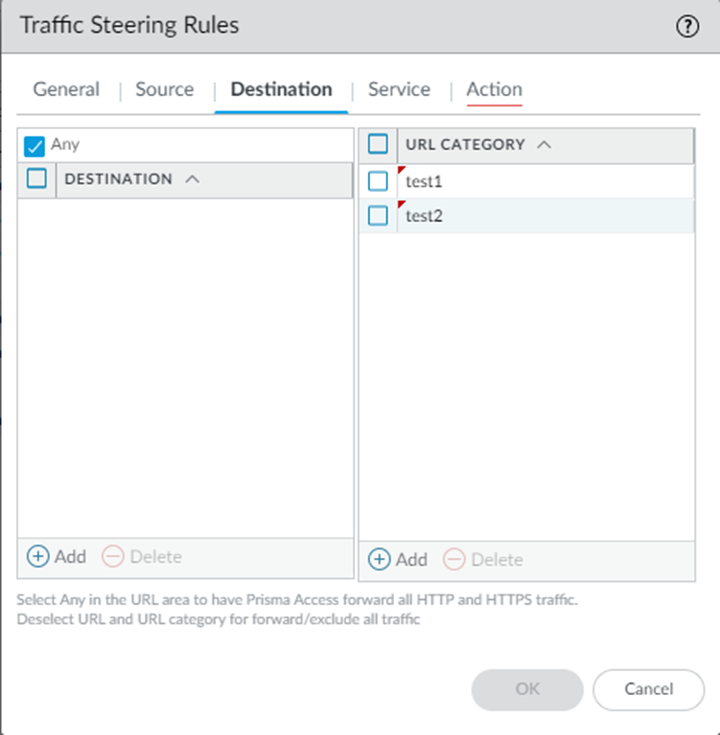
If you use address objects, DAGs, EDLs, users, or user groups, specify them as Shared to share them with all device groups in Prisma Access. In addition, do not enter 0.0.0.0/0 in address objects, DAGs, or EDLs; instead, enter 0.0.0.0/0 directly in the rule.Prisma Access automatically populates users from the mobile users device group only.In the Destination tab, specify the following values:- In the Destination area, specify one of the following criteria, or select Any to have traffic processed by the rules in the URL Category field:
- An IP address or prefix
- An address object that you created in Panorama (ObjectsAddresses)
- An IP address-based External Dynamic List (EDL)
Do not enter 0.0.0.0/0 in address objects, DAGs, or EDLs; instead, enter 0.0.0.0/0 directly in the rule.Leave Any selected to pass all traffic to be processed by the rules in the URL Category area. If you specify rules in the Destination, and URL Category areas, Prisma Access processes the rules in the Destination category first. - In the URL Category field, enter a custom URL category (ObjectsCustom ObjectsURL Category) When you create a custom URL category, enter URLs in all lower case. Traffic steering supports custom URL and predefined URL categories.You can use wildcards with the URLs in URL categories. The following wildcard formats are supported:
- *.example.com
- *.fqdn.example.com
The following formats are not supported:- *
- *.*
- *example.com
- example.com/ (trailing slashes in URLs are not supported in URL categories that are used with Traffic Steering)
- example.com/path (only domain names are supported)
- *fqdn.example.com
- fqdn.example.*
URLs in custom URL categories use the same URL pattern matching as that used by next-generation firewalls.
Use the following guidelines when configuring destination options:- If you specify a URL category, Prisma Access only matches HTTP and HTTPS traffic, even when service is set to Any.
- Do not create a custom URL category with a type of Category Match.
- Do not create a custom URL category with the name Custom_URL_Category_TFR because, for deployments that are migrated from Prisma Access 1.7 to 2.0, URLs entered in the URL area from 1.7 are moved to a custom URL category named Custom_URL_Category_TFRnumber, where number is a number appended to the custom URL category.
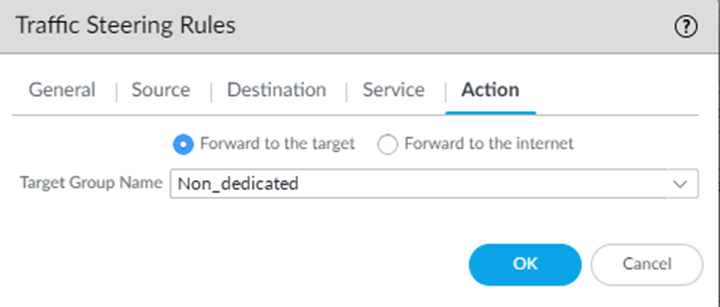
![]() In the Service tab, specify a service type.Specify service-http to forward HTTP traffic and specify service-https to specify HTTPS traffic. Select Any to forward traffic of any service type.In the Action tab, select the Target Group Name that you want to apply to the traffic steering rule.Forward traffic to the specified service connection target, or send the traffic directly to the internet without going through the service connection.
In the Service tab, specify a service type.Specify service-http to forward HTTP traffic and specify service-https to specify HTTPS traffic. Select Any to forward traffic of any service type.In the Action tab, select the Target Group Name that you want to apply to the traffic steering rule.Forward traffic to the specified service connection target, or send the traffic directly to the internet without going through the service connection.- To have Prisma Access forward traffic to a service connection target, select Forward to the target; then select the Target Group Name.
- To have Prisma Access forward traffic directly to the internet without first sending it to a service connection, select Forward to the internet.
![]() Click OK to save your changes.Optional Specify additional traffic steering rules.Prisma Access processes multiple rules in the order that you create them (from top to bottom).Commit and push your changes to make them active in Prisma Access.
Click OK to save your changes.Optional Specify additional traffic steering rules.Prisma Access processes multiple rules in the order that you create them (from top to bottom).Commit and push your changes to make them active in Prisma Access.- Select CommitCommit and Push and Edit Selections in the Push Scope.Select Prisma Access, then select Service Setup, Remote Networks, and Mobile Users.
![]() Click OK to save your changes to the Push Scope.Commit and Push your changes.
Click OK to save your changes to the Push Scope.Commit and Push your changes.


