Prisma Access
Allow Listing GlobalProtect Mobile Users (Panorama)
Table of Contents
Expand All
|
Collapse All
Prisma Access Docs
-
- 6.1 Preferred and Innovation
- 6.0 Preferred and Innovation
- 5.2 Preferred and Innovation
- 5.1 Preferred and Innovation
- 5.0 Preferred and Innovation
- 4.2 Preferred
- 4.1 Preferred
- 4.0 Preferred
- 3.2 Preferred and Innovation
- 3.1 Preferred and Innovation
- 3.0 Preferred and Innovation
- 2.2 Preferred
-
-
- 4.0 & Later
- Prisma Access China
-
-
Allow Listing GlobalProtect Mobile Users (Panorama)
Learn how to enable the egress IP allow lists for existing Panorama managed mobile
users.
To prevent Prisma Access from provisioning public (egress)
GlobalProtect IP addresses to your deployment until you have added them to your
allow lists, specify Yes in the Using IP Allow
List in SaaS Apps setting during Mobile Users—GlobalProtect
onboarding. Confirm that you have added them in the Prisma Access UI by
completing the following task.
Retrieving IP addresses for Mobile Users—GlobalProtect Deployments: If you
have a Mobile Users—GlobalProtect deployment:
- You can retrieve the public IP addresses using the Prisma Access UI instead of using the API.
- If you have IPv6 enabled for your deployment, Prisma Access allocates an IPv6 subnet and uses addresses in that subnet for autoscale events instead of specific IPv6 addresses.
- Select PanoramaCloud ServicesConfigurationMobile Users—GlobalProtect.Select your Hostname and Configure it (for an existing deployment), or Configure your deployment for the first time (for a new deployment).Specify Using IP Allow List in SaaS Apps as Yes.
![]() Continue your Prisma Access onboarding, including selecting the locations to use in your mobile users—GlobalProtect deployment, and Commit and Push your changes.It might take up to a minute for the changes to be reflected in the UI. If you view the Egress IP Allow List before committing and pushing your changes, it shows a status of 0/0 Egress IPs Confirmed Allow Listed, because Prisma Access has not assigned any egress IP addresses to your deployment.View the Egress IP Allow List table, and make a note of the egress IP addresses that need to be added to your allow lists.You can view the egress IP addresses in the Confirmed Allow Listed Egress IPs/Allocated field of the Egress IP Allow List table. The first number indicates whether or not the IP address has been confirmed as being added to your allow lists.The following example shows the IP addresses for the US Northeast location. The description of 0/2 Egress IPs Confirmed Allow Listed indicates that none of the two egress IP addresses have been marked as being added to your allow lists, and you need to add them.
Continue your Prisma Access onboarding, including selecting the locations to use in your mobile users—GlobalProtect deployment, and Commit and Push your changes.It might take up to a minute for the changes to be reflected in the UI. If you view the Egress IP Allow List before committing and pushing your changes, it shows a status of 0/0 Egress IPs Confirmed Allow Listed, because Prisma Access has not assigned any egress IP addresses to your deployment.View the Egress IP Allow List table, and make a note of the egress IP addresses that need to be added to your allow lists.You can view the egress IP addresses in the Confirmed Allow Listed Egress IPs/Allocated field of the Egress IP Allow List table. The first number indicates whether or not the IP address has been confirmed as being added to your allow lists.The following example shows the IP addresses for the US Northeast location. The description of 0/2 Egress IPs Confirmed Allow Listed indicates that none of the two egress IP addresses have been marked as being added to your allow lists, and you need to add them.![]() If you have a new Prisma Access deployment, or if you have added locations or had an autoscale event, the table shows that none of the egress IP addresses have been added to your organization’s allow list.
If you have a new Prisma Access deployment, or if you have added locations or had an autoscale event, the table shows that none of the egress IP addresses have been added to your organization’s allow list.![]() If you have an existing Prisma Access deployment, the table shows a Provisioning Status of Provisioned and an Autoscale Status of Allowed, which indicates that Prisma Access marked the egress IP addresses as added.
If you have an existing Prisma Access deployment, the table shows a Provisioning Status of Provisioned and an Autoscale Status of Allowed, which indicates that Prisma Access marked the egress IP addresses as added.![]() Prisma Access will allocate two addresses for each newly added location. If an existing location has previously had an autoscale event when a large number of mobile users logged in to a single location at the same time, Prisma Access allocates additional egress IP address in multiples of two, and an existing location could have four or more addresses.Find the new egress IP addresses that need to be added to your organization’s allow lists by selecting the Location name in the table.
Prisma Access will allocate two addresses for each newly added location. If an existing location has previously had an autoscale event when a large number of mobile users logged in to a single location at the same time, Prisma Access allocates additional egress IP address in multiples of two, and an existing location could have four or more addresses.Find the new egress IP addresses that need to be added to your organization’s allow lists by selecting the Location name in the table.![]() Prisma Access also provides you with the ingress IP addresses that are used in IP Optimization deployments. Internet or SaaS apps don’t see these IP addresses but you might have to add them to your allow lists in certain conditions.
Prisma Access also provides you with the ingress IP addresses that are used in IP Optimization deployments. Internet or SaaS apps don’t see these IP addresses but you might have to add them to your allow lists in certain conditions.![]() Add these egress IP addresses to your organization’s allow lists.After you have allow listed the egress IP address, return to the egress IP area and indicate that you have added them to your allow lists by selecting Added to My Allow List.
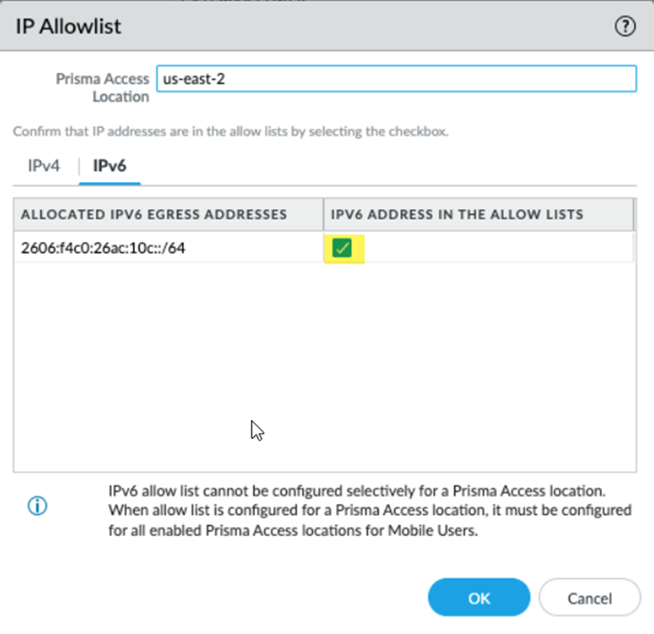
Add these egress IP addresses to your organization’s allow lists.After you have allow listed the egress IP address, return to the egress IP area and indicate that you have added them to your allow lists by selecting Added to My Allow List.![]() If you have IPv6 addresses, select IPv6 Address in the Allow Lists.Prisma Access provides you with an IPv6 subnet instead of specific addresses.
If you have IPv6 addresses, select IPv6 Address in the Allow Lists.Prisma Access provides you with an IPv6 subnet instead of specific addresses.![]() Commit and push your changes to make them active in Prisma Access.
Commit and push your changes to make them active in Prisma Access.- Select CommitCommit and Push and Edit Selections in the Push Scope.Select Prisma Access, then make sure that Mobile Users is selected.
![]() Click OK to save your changes to the Push Scope.Commit and Push your changes.If you view the Egress IP Allow List table before committing and pushing your changes, the Confirmed column shows a status of 0/0 Egress IPs Confirmed Allow Listed because Prisma Access has not assigned any IP addresses to your deployment until you Commit and Push.
Click OK to save your changes to the Push Scope.Commit and Push your changes.If you view the Egress IP Allow List table before committing and pushing your changes, the Confirmed column shows a status of 0/0 Egress IPs Confirmed Allow Listed because Prisma Access has not assigned any IP addresses to your deployment until you Commit and Push.![]() The Egress IP Allow List table contains the following additional fields:
The Egress IP Allow List table contains the following additional fields:Field Description Location The onboarded mobile user location.Confirmed Allow Listed Egress IPs/Allocated The number of egress IP addresses that have been confirmed as being allow listed, and the number of egress IP addresses that have been allocated.Provisioning Status The allow listing status of the egress IP addresses.- Provisioned—You have added the egress IP addresses to your organization’s allow lists, have confirmed them as having been added in the Prisma Access UI by checking Added to My Allow List, and have committed and pushed your changes to fully provision the IP addresses.
- Not Provisioned—Prisma Access has allocated IP addresses for the location, and you have added the egress IP addresses to your organization’s allow lists and confirmed them as having been added in the Prisma Access UI, but you have not yet onboarded this location.
- Can’t Be Provisioned—You have onboarded this location, but have not yet checked Add to My Allow List and committed and pushed your changes.Until you specify in Prisma Access that you have added these egress IPs to your organization’s allow lists and Commit and Push your changes, Prisma Access won’t provision these IP addresses to your deployment.
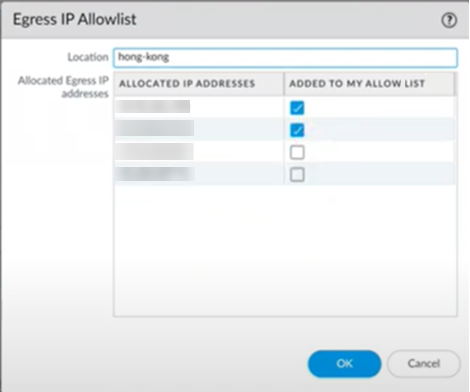
- Provisioned with partial capacity—You have added the first set of egress IP addresses, have confirmed them as having been added in the Prisma Access UI, and have Committed and Pushed your changes. However, Prisma Access has added another set of IP addresses as part of an autoscale event, and those IP addresses have not been specified as added to your allow lists in the Prisma Access UI.The following screenshot shows an example of a deployment that would be marked as Provisioned with partial capacity. Two IP addresses have been marked as Added to My Allow List; however, Prisma Access has added two more IP addresses to this location, and those locations have not been added in the UI.
![]()
Autoscale Status Shows the status of the autoscaling in Prisma Access.- Allowed—You have added IP addresses to the allow lists. If a large number of mobile users log in to a single location and trigger an autoscale event, Prisma Access will use the allow listed IP addresses for the autoscale event.
- Not Allowed—You have not specified all IP addresses as being added to your allow lists in the Prisma Access UI, or you have not committed and pushed your changes after marking them as added. If Prisma Access triggers an autoscale event, Prisma Access won’t provision more IP addresses to add more capacity for the location.Every time that you add a location, or every time that Prisma Access adds IP addresses as a result of an autoscale event, you need to refresh the page that contains the Egress IP Allow List table, specify Added to My Allow List to mark the IP addresses as being added to your organization’s allow lists, and Commit and Push your changes.
To keep informed of any IP addresses that Prisma Access adds as a result of an autoscale event, you should set up a URL where Prisma Access will notify you of IP address changes.Timestamp The last known time when an IP was allocated for this region in Coordinated Universal Time (UTC).After you Commit and Push, the Confirmed column will show a status of 0/2 Egress IPs Confirmed Allow Listed, because you have not yet confirmed the IP addresses as having been allow listed in the Prisma Access UI.When you onboard a mobile user location, Prisma Access provides you with two egress IP addresses - one active IP address and one address to use in case of an autoscale event. The following provides examples of how Prisma Access allocates and provisions egress IP addresses after an autoscale event.Autoscale Event—If a large number of mobile users log in to a mobile user location at the same time, that event might cause Prisma Access to allocate an additional set of two egress IP addresses to accommodate the large number of users. After you have allow listed the first two egress IP addresses, the status before an autoscale event shows the two egress IP addresses as being allow listed with a confirmed status of 2/2 Egress IPs Confirmed Allow Listed, a provisioning status of Provisioned, and an autoscale status of Allowed, as shown in the Hong Kong location in the following screenshot.![]() If a large number of mobile users log in to the Hong Kong location at the same time, Prisma Access makes the backup egress IP address active and allocates two more IP addresses and makes one of them active. When an autoscale event occurs, the egress IP addresses have been allocated but not provisioned, the confirmed status is 2/4 Egress IPs Confirmed Allow Listed, and the provisioning status shows Provisioned without enough capacity. In addition, the autoscale status shows Not Allowed, which means that Prisma Access won’t provision the extra egress IP address to your deployment if an autoscale event occurs.
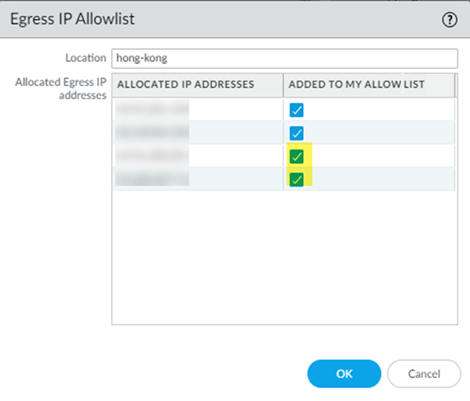
If a large number of mobile users log in to the Hong Kong location at the same time, Prisma Access makes the backup egress IP address active and allocates two more IP addresses and makes one of them active. When an autoscale event occurs, the egress IP addresses have been allocated but not provisioned, the confirmed status is 2/4 Egress IPs Confirmed Allow Listed, and the provisioning status shows Provisioned without enough capacity. In addition, the autoscale status shows Not Allowed, which means that Prisma Access won’t provision the extra egress IP address to your deployment if an autoscale event occurs.![]() After you have added the new egress IP addresses to your allow lists, select the location name; then, select Added to My Allow List for the two IP addresses that were added and Commit and Push your changes.
After you have added the new egress IP addresses to your allow lists, select the location name; then, select Added to My Allow List for the two IP addresses that were added and Commit and Push your changes.![]() When complete, the Hong Kong location shows that all four egress IP addresses are confirmed and provisioned, and autoscaling is active.
When complete, the Hong Kong location shows that all four egress IP addresses are confirmed and provisioned, and autoscaling is active.![]()


