Prisma Access
Identity Redistribution (Panorama)
Table of Contents
Expand All
|
Collapse All
Prisma Access Docs
-
- 6.1 Preferred and Innovation
- 6.0 Preferred and Innovation
- 5.2 Preferred and Innovation
- 5.1 Preferred and Innovation
- 5.0 Preferred and Innovation
- 4.2 Preferred
- 4.1 Preferred
- 4.0 Preferred
- 3.2 Preferred and Innovation
- 3.1 Preferred and Innovation
- 3.0 Preferred and Innovation
- 2.2 Preferred
-
-
- 4.0 & Later
- Prisma Access China
-
-
Identity Redistribution (Panorama)
Shows the steps you take to redistribute User-ID information from Prisma Access to an
on-premises firewall and from an on-premises firewall to Prisma Access.
After you configure User-ID, you consistently enforce user-based policy for all
mobile users and users at remote network locations by redistributing the IP
address-to-username mapping from Prisma Access to all next-generation firewalls
that secure access to network resources. Use one of the following methods to
redistribute IP address-to-username mapping to mobile users and users in remote
networks from an on-premises next-generation firewall and vice versa:
Redistribute User-ID Information From Prisma Access to an On-Premises Firewall
Redistribute User-ID Information From Prisma Access to an
on-premises Firewall.
In cases where mobile users need to access a resource on a remote network
location or HQ/data center and the resource is secured by an on-premises
next-generation firewall with user-based policies, you must redistribute IP
address-to-username mapping from the Prisma Access mobile users and users at
remote networks to the on-premises firewall. When the user connects to Prisma
Access, it collects this user-to-IP address mapping and stores it.
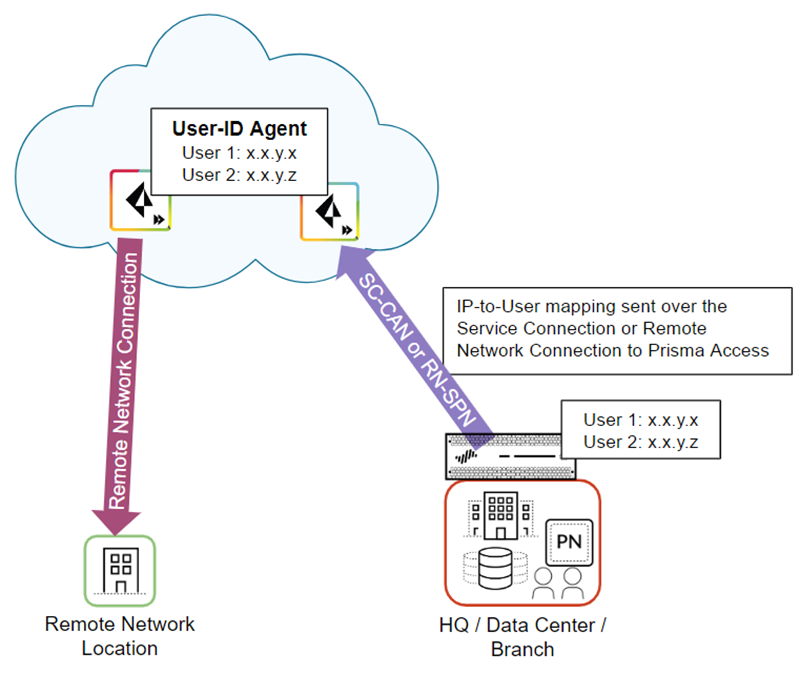
The following figure shows two mobile users who have an existing IP
address-to-username mapping in Prisma Access. Prisma Access then redistributes
this mapping by way of a either a service connection (SC-CAN) or remote network
connection (RN-SPN) to the on-premises firewall that secures the HQ/data
center.
Prisma Access uses the service connection or remote network connection as an
IPSec tunnel that serves as the underlay path to the Layer 3 network. You
can use any route path over an IPSec trusted tunnel for privately addressed
destinations to redistribute this mapping.
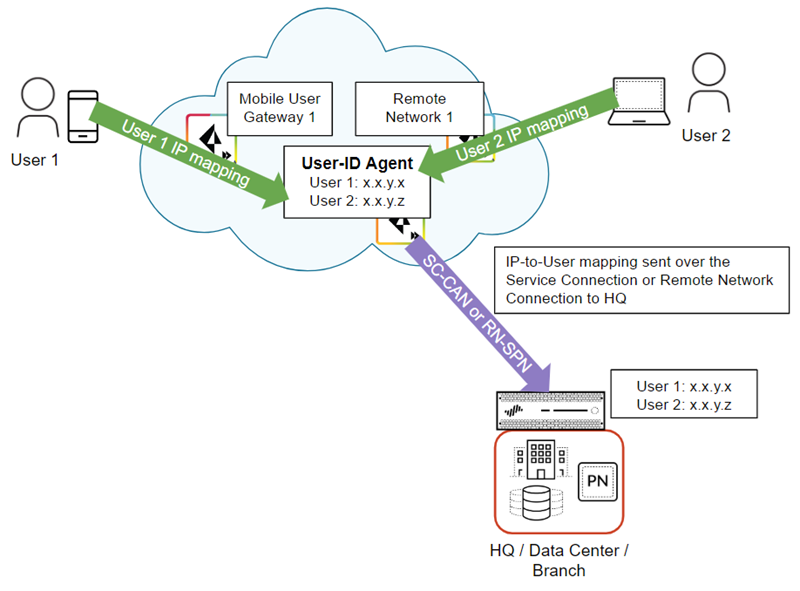
To redistribute User-ID mappings from Prisma Access to an on-premises firewall,
complete the following steps.
Make sure you don't apply any SSL decryption on any connection that
redistributes user identity to the on-premises firewall (the SC-CAN or
RN-SPN), including any firewalls that are in the redistribution path.
Alternatively, you can apply a decryption exclusion to the
redistribution traffic.
- Make a note of the IP address to use when you configure the data redistribution agent.
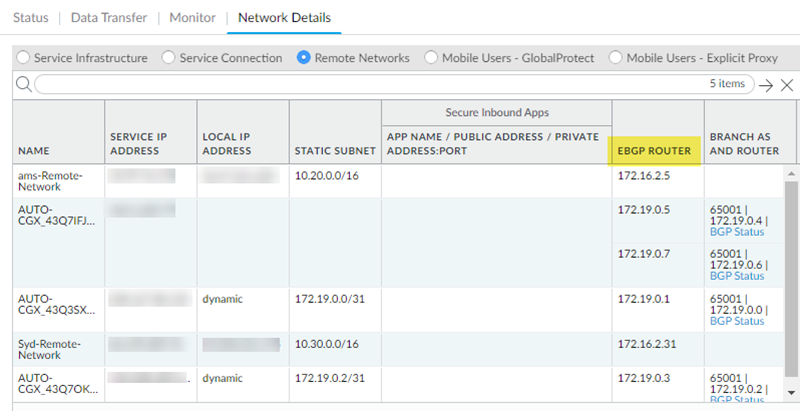
- For remote network connections, find the EBGP Router address (PanoramaCloud ServicesStatusNetwork DetailsRemote NetworksEBGP Router).
![]()
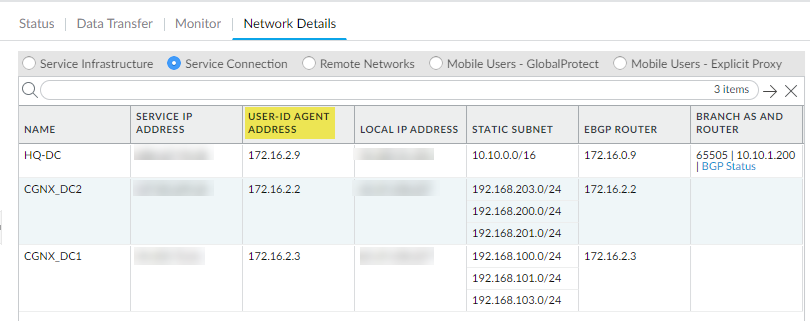
- For service connections, find the User-ID Agent Address (PanoramaCloud ServicesStatusNetwork DetailsService ConnectionUser-ID Agent Address).If you haven’t yet set up a service connection for your HQ or data centers, begin by configuring a service connection. Prisma Access uses service connections to share identity data across your environment; Prisma Access automatically enables service connections to work as redistribution agents. A newly created service connection site will be ready to be used as a redistribution agent when you see that it's been assigned a User-ID agent Address (Prisma Access does this automatically, and it'll just take a few minutes).User-ID Redistribution Management—Sometimes, granular controls are needed for user-ID redistribution in particularly large scale Prisma Access deployments. User-ID Redistribution Management lets you manually disable the default identity redistribution behavior for certain service connections by removing the check mark in the User ID column, and then select specific service connections to be used for identity redistribution. It's not necessary to do this for most configurations. Contact Palo Alto Networks support to activate this functionality.
![]()
Configure Prisma Access as a User-ID agent that redistributes user mapping information.- In the Panorama that manages Prisma Access, select DeviceData RedistributionCollector Settings.To configure the collector on a service connection, select the Service_Conn_Template; to configure the collector on a remote network connection, select the Remote_Network_Template.Click the gear icon to edit the settings.Provide a Collector Name and a Collector Pre-Shared Key to identify Prisma Access as a User-ID agent.Click OK to save your changes.
![]() Configure the on-premises firewall to collect the User-ID mapping from Prisma Access.
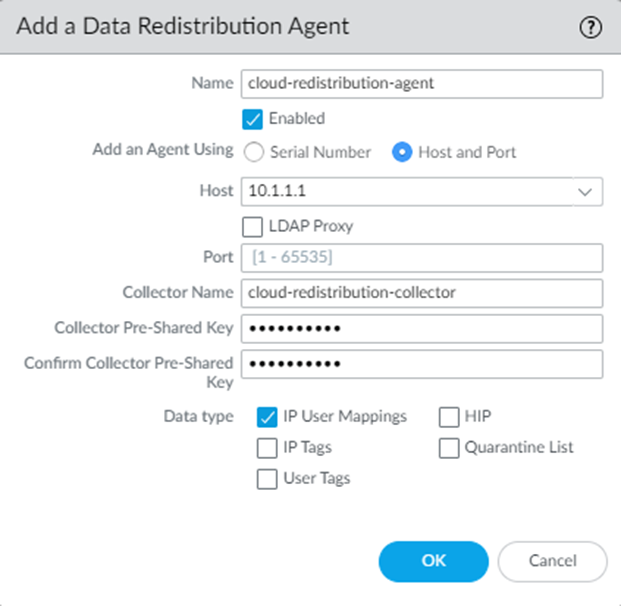
Configure the on-premises firewall to collect the User-ID mapping from Prisma Access.- From the on-premises firewall, select DeviceData RedistributionAgents.Add a User-ID agent and give it a Name.Select Host and Port.Enter the User-ID Agent Address (for a service connection) or EBGP Router Address (for a remote network connection) from Prisma Access in the Host field.Enter the Collector Name and Collector Pre-Shared Key for the Prisma Access collector you created earlier in the procedure.Select IP User Mappings.Click OK.Repeat these steps for each service connection or remote network connection for which you want to redistribute mappings.
![]()
Redistribute User-ID Information From an On-Premises Firewall to Prisma Access
Redistribute User-ID Information From an on-premises Firewall to Prisma Access.In cases where users are at a branch location or HQ that is secured by an on-premises next-generation firewall with user-based policies, and they need to access resources at another branch location that you have secured with Prisma Access, you must redistribute IP address-to-user name mappings from the on-premises firewall to Prisma Access.The following figure shows an HQ/Data center with an on-premises next-generation firewall with existing IP address-to-username mapping. Prisma Access connects to the firewall with either a service connection (SC-CAN) or remote network connection (RN-SPN), and the on-premises firewall redistributes the mapping to Prisma Access.The following figure shows a Prisma Access service connection or remote network connection being used to redistribute the mapping. You can use any route path over an IPSec trusted tunnel for privately addressed destinations to redistribute this mapping.![]() To redistribute User-ID mappings from an on-premises firewall to Prisma Access, complete the following steps.
To redistribute User-ID mappings from an on-premises firewall to Prisma Access, complete the following steps.- Configure the on-premises firewall to redistribute User-ID information to Prisma Access.
- From the on-premises firewall, select DeviceData RedistributionCollector Settings.Click the gear icon to edit the settings.Provide a Collector Name and a Collector Pre-Shared Key to identify the on-premises firewall as a User-ID agent.Click OK to save your changes.Configure Prisma Access to collect the User-ID mapping from the on-premises firewall.
- From the Panorama that manages Prisma Access, select DeviceData RedistributionAgents.Make sure that you have selected the Service_Conn_Template (for service connections) or the Remote_Network_Template (for remote network connections) in the Templates drop-down at the top of the page.Add a User-ID agent and give it a Name.Select Host and Port.Enter the IP address of the MGT interface or service route that the firewall uses to send user mappings in the Host field.For the MGT interface, you can enter a hostname instead of the IP address.Enter the Collector Name and Collector Pre-Shared Key, using the values for the collector you used for the on-premises firewall in Step 1.Select IP User Mappings.Click OK.

