Prisma Access
Configure ZTNA Connector
Table of Contents
Expand All
|
Collapse All
Prisma Access Docs
-
- 6.1 Preferred and Innovation
- 6.0 Preferred and Innovation
- 5.2 Preferred and Innovation
- 5.1 Preferred and Innovation
- 5.0 Preferred and Innovation
- 4.2 Preferred
- 4.1 Preferred
- 4.0 Preferred
- 3.2 Preferred and Innovation
- 3.1 Preferred and Innovation
- 3.0 Preferred and Innovation
- 2.2 Preferred
-
-
- 4.0 & Later
- Prisma Access China
-
-
Configure ZTNA Connector
Learn how to configure a ZTNA Connector in Prisma Access.
| Where Can I Use This? | What Do I Need? |
|---|---|
|
|
After you Enable ZTNA Connector you can begin setting up the ZTNA Connector components:
- Identify your Application IP and Connector IP address blocks and, add the IP address blocks in Prisma Access.Refer to the following recommendation for the IP address blocks:
- Assign a separate IP address for each application.
- Assign each Connector a minimum of a /27 IP address block (minimum of 32 IP addresses per connector).
- Assign a unique IP address to each Connector group.
You can add more Connectors or Application Blocks to accommodate as required.If you use RFC 6598 addresses within your network, you must reserve a separate RFC 6598 IP address pool to reserve for use within Prisma Access internally to route traffic to the connectors and private applications you’ll be onboarding.Create a Connector Group.Connector Groups are logical groupings of connectors and applications. There are many different ways to group applications and connectors. You can group connectors in different geographic locations for redundancy. Or, you can create multiple connectors in the same data center for increased throughput. For simplified policy management, you may want to group applications that are used by the same user groups. Create your Connector Groups first, and then add the connectors and applications to the groups.Repeat this step as needed to create all of the Connector Groups you need to group your connectors and applications.- Select ConfigurationZTNA Connector, select Overview or Connector Groups, and Create Connector Group.
![]() Give the Connector Group a Name and provide a Description for it.Enable Preserve User ID only if you have a Palo Alto Networks firewall between your ZTNA Connector and the data center application servers. If you enable this option, you need to configure the firewall. You can't do any modifications after you have created the Connector Group.
Give the Connector Group a Name and provide a Description for it.Enable Preserve User ID only if you have a Palo Alto Networks firewall between your ZTNA Connector and the data center application servers. If you enable this option, you need to configure the firewall. You can't do any modifications after you have created the Connector Group.![]() (Optional) If your data center is in Azure or AWS and you want to use the Auto Scale functionality, select Autoscale. If you have enabled this functionality, you don't have to create a Connector.Create the Connector group.Create a Connector and add them to a Connector Group only when you select a non auto-scale Connector Group.Create Connectors and add them to the Connector Group.Connectors represent the VMs running in your data centers that connect to Prisma Access. You must create the Connector within Prisma Access, and use the provided secret/key to onboard the corresponding Connector VM in your data center.Repeat this step as needed to create as many connectors as you need to connect your data center apps to Prisma Access.
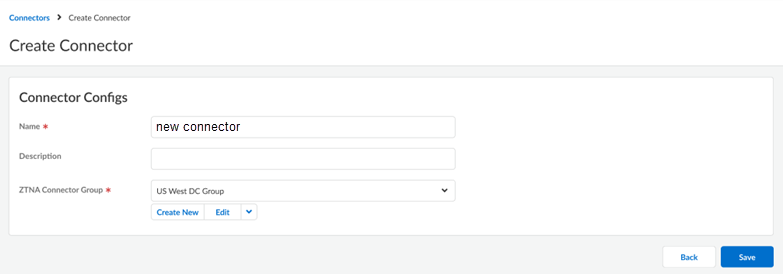
(Optional) If your data center is in Azure or AWS and you want to use the Auto Scale functionality, select Autoscale. If you have enabled this functionality, you don't have to create a Connector.Create the Connector group.Create a Connector and add them to a Connector Group only when you select a non auto-scale Connector Group.Create Connectors and add them to the Connector Group.Connectors represent the VMs running in your data centers that connect to Prisma Access. You must create the Connector within Prisma Access, and use the provided secret/key to onboard the corresponding Connector VM in your data center.Repeat this step as needed to create as many connectors as you need to connect your data center apps to Prisma Access.- Select ConfigurationZTNA Connector, select Overview or Connectors, and Create Connector.
- Enter a Name for the Connector.
![]()
- (Optional) Add a Description for the Connector.
- Select the Connector Group where the
Connector should be added.For routing simplicity and fastest access to data center servers, Palo Alto Networks recommends that the connectors and servers be in the same subnet.
- Create the Connector.
To keep the ZTNA Connectors up-to-date, you can update their software version Icons in the ZTNA ConnectorConnector Groups show you the status of the connectors and if an upgrade is available.Retrieve the key and secret that you will use to set up the Connector.You use the Key and Secret values when you set up the VMs in a later step.- You can't delete an Autoscale Connector. If you have created any ZTNA Connector objects such as connectors, applications, wildcards, and connector-groups and you attempt to delete an Autoscale Connector Group without first deleting the ZTNA Connector objects, commit and push fails.Autoscale Connector Group—Follow the steps listed below:
- Go to ConfigurationZTNA ConnectorConnector Groups.
- Select Copy Token in the
Actions area of your auto scale
Connector Group; then, copy the Key and
Secret values.You use the Key and Secret to associate the cloud instance or VM you create with the Connector.
Non-autoscale Connector Group—Follow the steps listed below:- Select ConfigurationZTNA ConnectorConnectors.
- Select the Connector that you want to deploy.
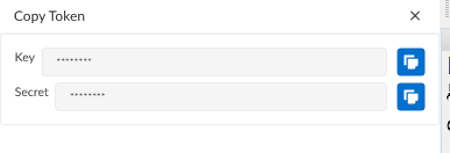
- Select Copy Token in the
Actions area; then, copy the
Key and Secret
values.You use the Key and Secret to associate the cloud instance or VM you create with the Connector.
![]()
Deploy your ZTNA Connector VMs in your data center.(Optional) Select ConfigurationZTNA ConnectorConnector Groups, make a note of the PA Service IP address of the Connector Group, and add this IP address to your organization's allow lists.You can see PA Service IP under Connector Groups only after you onboard your Connector.If required, add this IP address to your allow lists so that your network can transmit and receive ZTNA Connector traffic.![]() Add the targets to the Connector Groups.Set up targets to access the private apps in the data centers through your ZTNA Connector VMs. You can add targets based on FQDN wildcards, FQDNs, or IP subnets; ZTNA Connector does the work of setting up the networking and DNS settings required for your mobile users and users at branch offices to reach the apps securely through Prisma Access.
Add the targets to the Connector Groups.Set up targets to access the private apps in the data centers through your ZTNA Connector VMs. You can add targets based on FQDN wildcards, FQDNs, or IP subnets; ZTNA Connector does the work of setting up the networking and DNS settings required for your mobile users and users at branch offices to reach the apps securely through Prisma Access.- Select ConfigurationZTNA Connector Application Targets.Select the type of target you want to create.With the commitless app onboarding enhancement, onboarding applications now takes less than a minute, allowing a quick access to the applications. This feature also allows you to onboard a larger number of applications.Limitations:
- You can't add the same FQDN in multiple application targets (with different port/protocol).
- When you add or delete a wildcard target, a commit happens on MU or RN to add or delete DNS proxy forwarding rules. However, subsequent wildcard application discovery of FQDNs matching the wildcard does not require any additional commits, thereby onboarding apps quickly for you to have immediate access to them.
To enable the commitless app onboarding feature, update the Prisma Access dataplane to version 11.2.3 and later.-
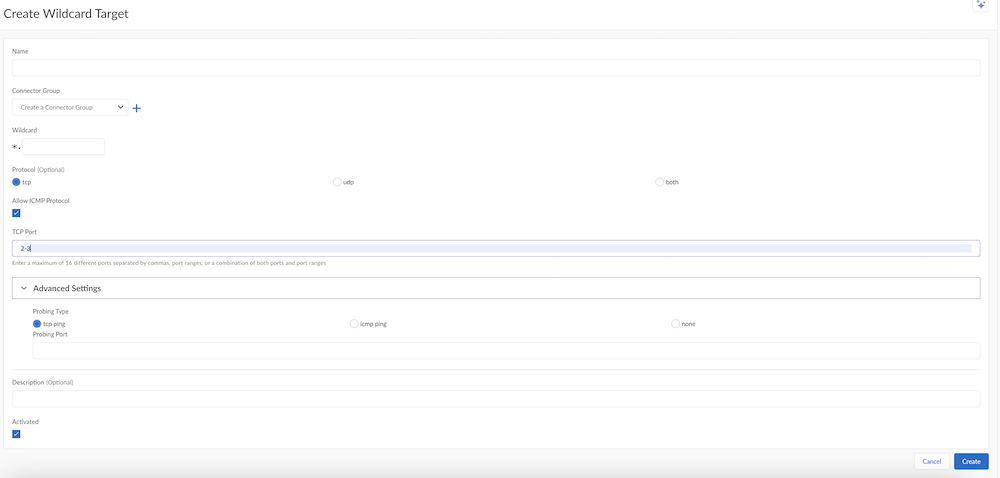
Wildcard Targets—Use a wildcard (for example, *.example.com) for the target. When users access sites that match the wildcard, those apps are automatically onboarded for access from ZTNA Connector for your mobile users and remote network users. For example, given a wildcard of *.example.com, when users access the app at app1.example.com, ZTNA Connector automatically creates the configuration to onboard that child app with its specific FQDN, protocol, and port.In addition, when users access an app based on a wildcard (for example, app1.example.com based on the *.example.com wildcard), the app is discovered and automatically onboarded as an FQDN Target.
- Go to Wildcard Targets and Create Wildcard Target.
- Enter a unique Name for the target.
- Enter the Connector Group to associate with
the target. The Group must be a type of FQDN/Wildcard.Starting with Prisma Access 5.0.1, you can select multiple connector groups for both wildcard and FQDN targets, up to a maximum of four connector groups per wildcard or FQDN target. Use the guidelines when selecting multiple connector groups per target.
- Enter the Wildcard to use with the
target.Enter it in the format of .example.com or .my.example.com (the UI implicitly adds the asterisk to the front of the wildcard). Do not allow all sites by specifying a wildcard of *.*, example.*.com, or *.com.
- Select the Protocol (tcp, udp or both).
- (Optional) To enable ICMP protocol from a GlobalProtect user to a ZTNA Connector data center, select Allow ICMP Protocol.
- Select the Port to use for the app.Enter a single port, multiple ports using commas between the ports, a range of ports using dashes, or both. Do not add spaces after the commas. Select Any port to match any ports you specify, or select Match and enter the port or ports to match.If you have selected both under Protocol, you have to add ports to TCP Port and UDP PortWhen you enter a range in TCP Port field, under Advanced Settings, icmp ping and none Probing Type gets activated.
- Enter a Probing Type of tcp
ping, icmp ping, or
none, depending on the protocol you
select.If you select tcp ping, select a probing port, and enter a single port. The port does not have to be in the range of ports you entered in the port and protocol area. ZTNA connector determines the reachability of the app by performing a tcp ping from the probing port to the FQDN's resolved IP address. If the ping is successful, the app is considered Up.You can also edit the probing port, which you have added during application onboarding. When the probe port is updated, ZTNA Connector starts tcp probing application on the updated port and the application status is updated accordingly.If you select icmp ping, ZTNA Connector performs an ICMP ping to the FQDN's resolved IP address. If a response is received to the ICMP ping, the app is considered Up.If you select none, no probing is performed and the application is always marked as Up.
- Select Activated and
Create the target.
![]()
-
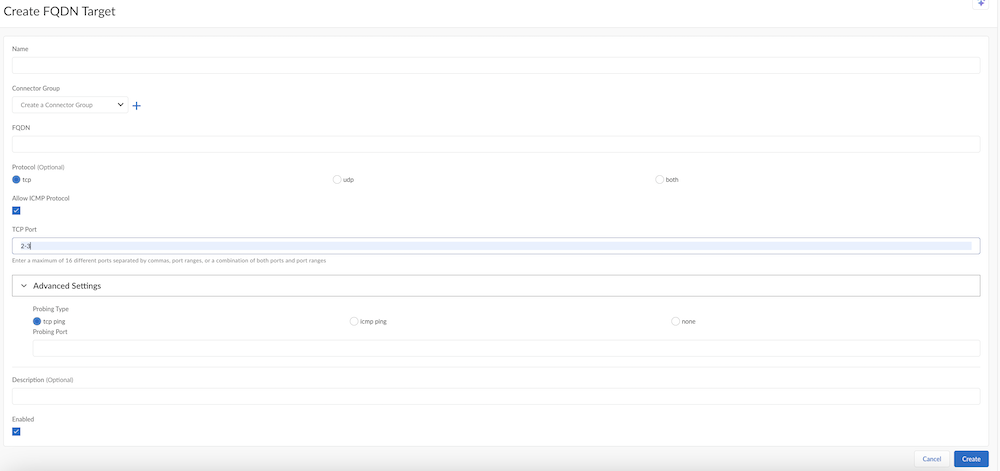
FQDN Targets—to create a target for a single FQDN, create an FQDN target.Starting with Prisma Access 5.0, for Connector groups having 5.0 or higher ZTNA Connector version, if an application FQDN resolves to multiple private IP addresses, the ZTNA connector performs an application probe to determine the status of all resolved IP addresses and load balances the FQDN access to multiple resolved IP addresses that have an application status of Up.To create an FQDN target, go to FQDN Targets and Create FQDN Target. You create an FQDN target the same as you create an FQDN wildcard, substituting the FQDN wildcard with a single FQDN.Starting with Prisma Access 5.0.1, you can select multiple connector groups per FQDN target as well as wildcard targets, up to a maximum of four connector groups per FQDN or wildcard targets. Use the guidelines when configuring multiple connector groups per target.Applications that are discovered as the result of a wildcard target also display here. When users access sites that match the wildcard, those apps are automatically onboarded for access from ZTNA Connector for your mobile users and remote network users. For example, given a wildcard of *.example.com, when users access the app at app1.example.com, ZTNA Connector automatically adds that app to the list of FQDN targets.After an FQDN application is discovered from a parent wildcard target, any changes to the wildcard target are not updated in the discovered application. In addition, the same discovered FQDN is not rediscovered. If the characteristics for the discovered FQDN application require updating, perform a manual update on the discovered application using these steps.
![]()
- IP Subnet—Create an IP subnet-based target to
find apps based on IP subnets instead of FQDNs.
- Go to IP Subnets and Create Subnet Rule.
- Enter a unique Name for the target.
- Enter the Connector Group to associate with
the target. The Group must be a type of IP Subnet.
- Specify the data center IP Subnets to which the connector in the group provides IP routing access.All connectors in the group provide routing access to the specified IP subnets. You can select a single IP address in the form of 10.1.1.1/32, a single subnet, or multiple subnets separated by commas. Enter a maximum of 16 subnets.The IP subnet must be routable within the tenant's IP Fabric and the IP subnets cannot overlap with any other IP subnets in the tenant, including:
- Other IP routable subnets, including static routes configured by user on Panorama, routes advertised from the branch to the remote network, or routes advertised from the data center to the service connection.
- ZTNA FQDN Application IP subnets
- ZTNA Connector IP subnets
- Infrastructure subnet IP addresses
- Mobile Users—GlobalProtect IP address pools
- Select Activated and
Create the target.
![]()
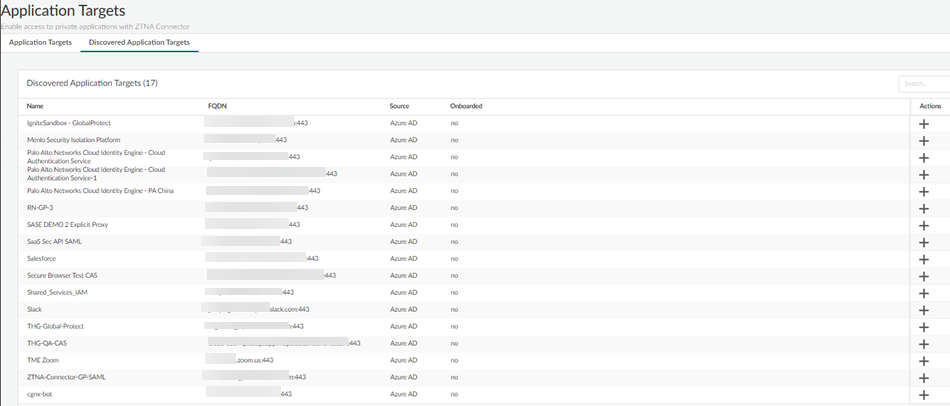
Add the applications that are auto-discovered by ZTNA Connector to the Connector Group.- Set Up Auto Discovery of Applications Using Cloud Identity EngineSelect ConfigurationZTNA ConnectorApplication TargetsDiscovered Application Targets.
![]() Click + under Actions to add the application to a Connector group.Give the application a unique Name.Select the ZTNA Connector Group to associate with the app.Enter the Probing Type (tcp ping, icmp ping, or none).
Click + under Actions to add the application to a Connector group.Give the application a unique Name.Select the ZTNA Connector Group to associate with the app.Enter the Probing Type (tcp ping, icmp ping, or none).- If you select tcp ping, you also select a
probing port. The port does not have
to be in the range of ports you entered in the
port and
protocol area. If you select
tcp ping for the probing type, Palo
Alto Networks recommends that you to use this same port for the
probing port. ZTNA connector determines the reachability of the app by performing a tcp ping from the probing port to the FQDN's resolved IP address. If the ping is successful, the app is considered Up.
- You can also edit the probing port, which you have added during application onboarding. When the probe port is updated, ZTNA Connector starts tcp probing application on the updated port and the application status is updated accordingly.
- If you select icmp ping, ZTNA Connector performs an ICMP ping to the FQDN. If a response is received to the ICMP ping, ZTNA Connector sets the status of the application as Up.
- If you select none, no probing is performed and the application is always marked as Up.
Select Enabled.Create the application target.Create security policy rules to allow users access to the apps in the connectors.(Optional) View Monitor: Data Centers ZTNA Connectors to see how your ZTNA connectors and connector groups are performing.(Optional) If you encounter issues with accessing private apps using ZTNA Connector, use the ping, traceroute, and nslookup diagnostic tools to check app reachability.


