Prisma Access
Integrate Prisma Access with Arista VeloCloud SD-WAN
Table of Contents
Expand All
|
Collapse All
Prisma Access Docs
-
- 6.1 Preferred and Innovation
- 6.0 Preferred and Innovation
- 5.2 Preferred and Innovation
- 5.1 Preferred and Innovation
- 5.0 Preferred and Innovation
- 4.2 Preferred
- 4.1 Preferred
- 4.0 Preferred
- 3.2 Preferred and Innovation
- 3.1 Preferred and Innovation
- 3.0 Preferred and Innovation
- 2.2 Preferred
-
-
- 4.0 & Later
- Prisma Access China
-
-
Integrate Prisma Access with Arista VeloCloud SD-WAN
Integrate Prisma Access with VMware VeloCloud SD-WAN.
| Where Can I Use This? | What Do I Need? |
|---|---|
|
|
To onboard a VeloCloud SD-WAN with Prisma Access, you configure a remote network tunnel
in Prisma Access. The VeloCloud SD-WAN device sends traffic through the remote network
to Prisma Access, which allows Prisma Access to protect your internet-directed traffic,
including resources such as SaaS applications or publicly accessible partner
applications.
You can secure VeloCloud SD-WAN deployments by onboarding the remote network using the
VeloCloud Edge device or VeloCloud Gateway.
VeloCloud edge devices are plug-and-play devices that you can install in remote sites.
You can connect one or more devices to an aggregation point, known as an SD-WAN
headend. Use a VeloCloud gateway as the SD-WAN headend.
In the VeloCloud SD-WAN fabric, you can configure multiple sites that connect to one
gateway, a single site to connect to one gateway, or multiple sites that connect to
multiple gateways, as shown in the following figure.
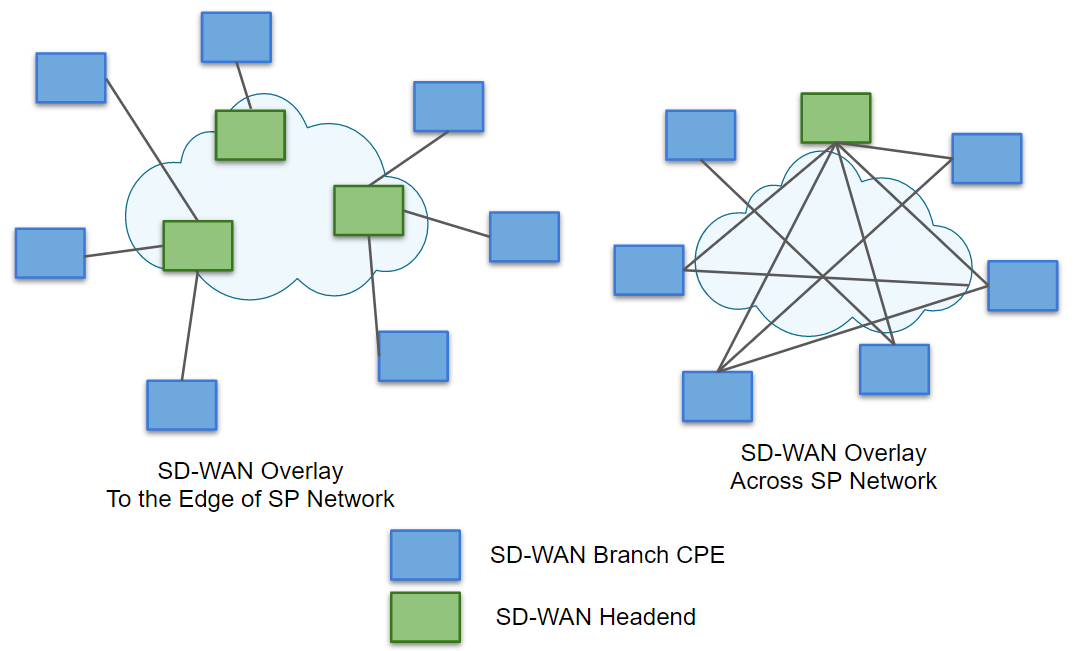
You can connect one or more remote network connections to a cloud headend. To simplify
setup, specify static routing and configure a separate subnet for each remote network
location you onboard.
Size the bandwidth of the remote network connection based on the traffic from the
branches that are connected to the cloud headend. You can scale the VeloCloud SD-WAN
with Prisma Access in multiple ways; for example, you can connect multiple gateways to
one remote network, or connect one gateway to multiple remote networks.
Prisma Access protects your internet-based resources, including SaaS applications and
content. The following figure shows a sample VeloCloud gateway-Prisma Access
deployment.
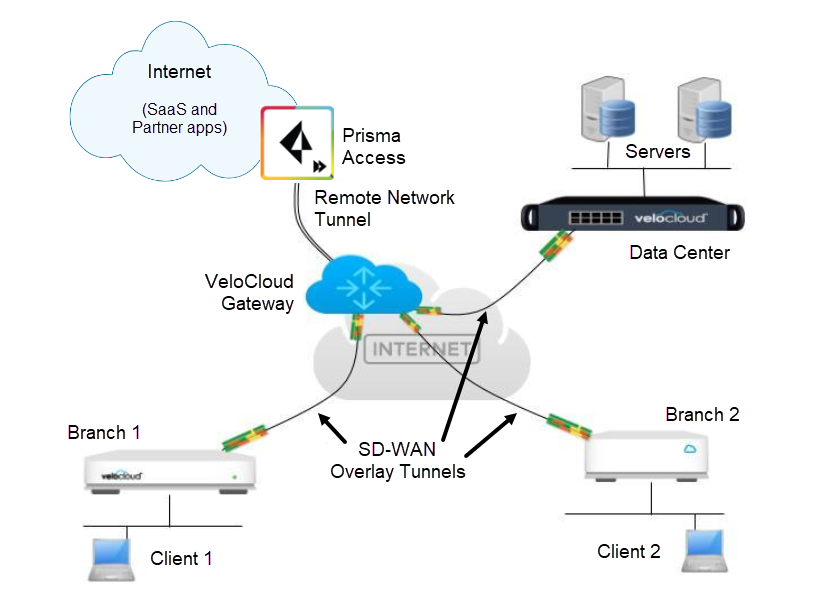
Integrate Prisma Access with Arista VeloCloud SD-WAN (Strata Cloud Manager)
Integrate Prisma Access with Arista VeloCloud SD-WAN in Strata Cloud
Manager.
To begin configuration of a VeloCloud-Prisma Access deployment, create the Prisma
Access remote network connection and configure IKE and IPSec parameters for the
IPSec tunnel between Prisma Access and VeloCloud.
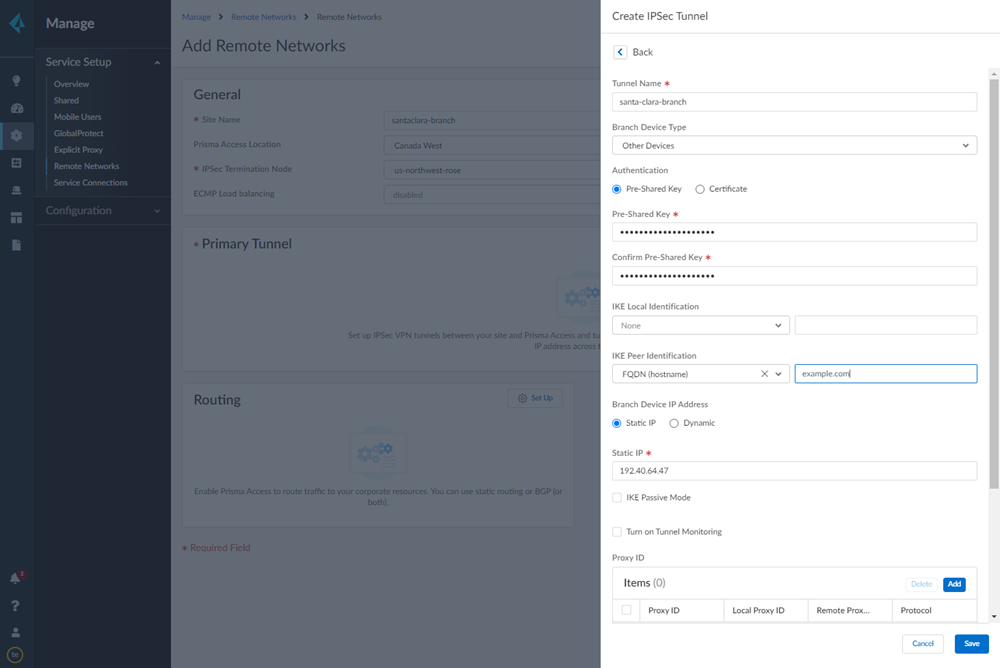
- Connect a remote network site to Prisma Access.
- Choose a Prisma Access Location that is close to the remote network location that you want to onboard.
- When creating the IPSec tunnel, use a Branch Device Type of Other Devices.
- Enter a Static IP address that matches the VeloCloud SD-WAN device’s IP address.You obtain this address from the VeloCloud SD-WAN Orchestrator.
- Enter a Pre-shared key for symmetric authentication across the tunnel.
- Choose a Local Identification of None and an IKE Peer Identification of FQDN (hostname); then, enter an FQDN.Make a note of the of the Pre-Shared key and FQDN that you use for the Peer Identification; you match these settings when you configure the VeloCloud cloud gateway.
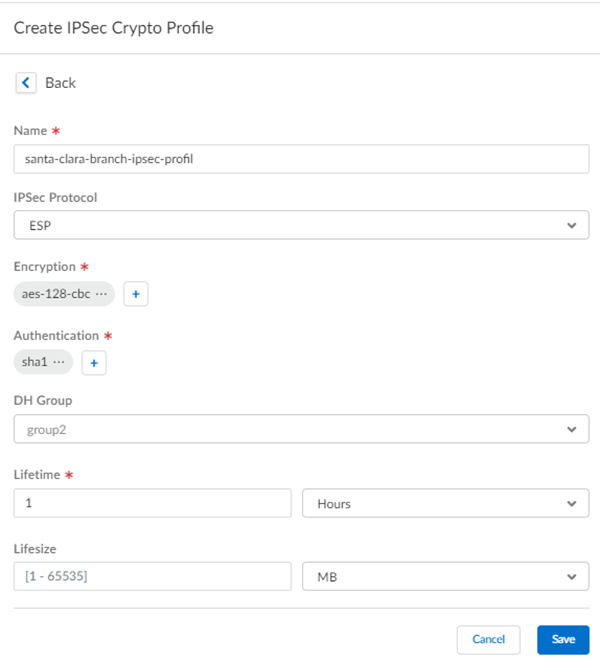
![]() Select IPSec Advanced Options and Create New to create a new IPSec crypto profile for the remote network tunnel using the recommended settings.
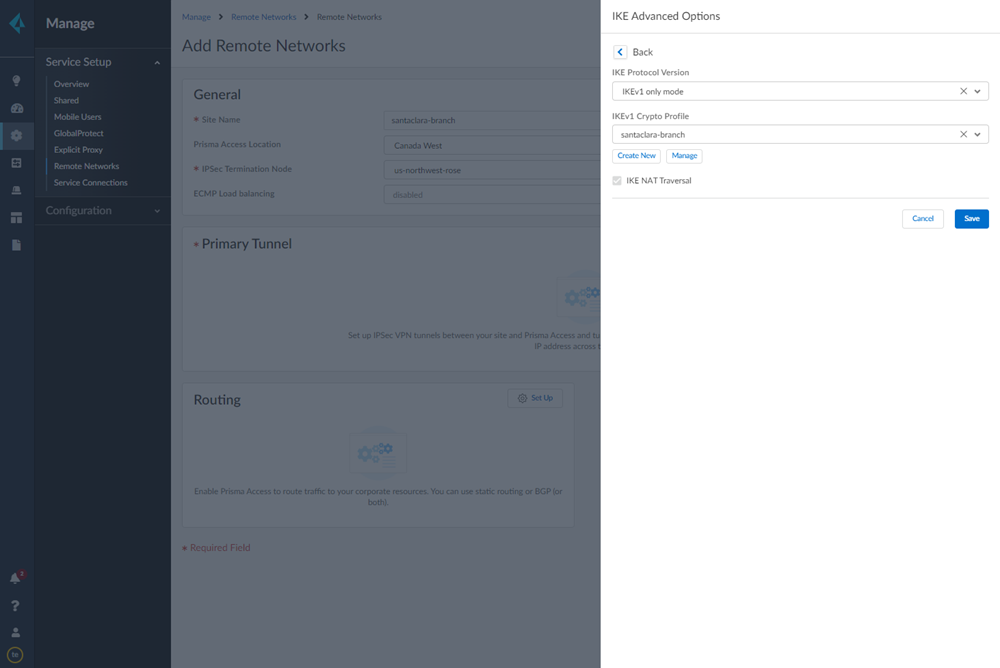
Select IPSec Advanced Options and Create New to create a new IPSec crypto profile for the remote network tunnel using the recommended settings.![]() Select IKE Advanced Options and Create New to create a new IKE cryptographic profile for the remote network tunnel.
Select IKE Advanced Options and Create New to create a new IKE cryptographic profile for the remote network tunnel.- Be sure to use crypto values that are supported with Velocloud and make a note of the values you use.
- Enable IKE NAT Traversal (Enabled by default).
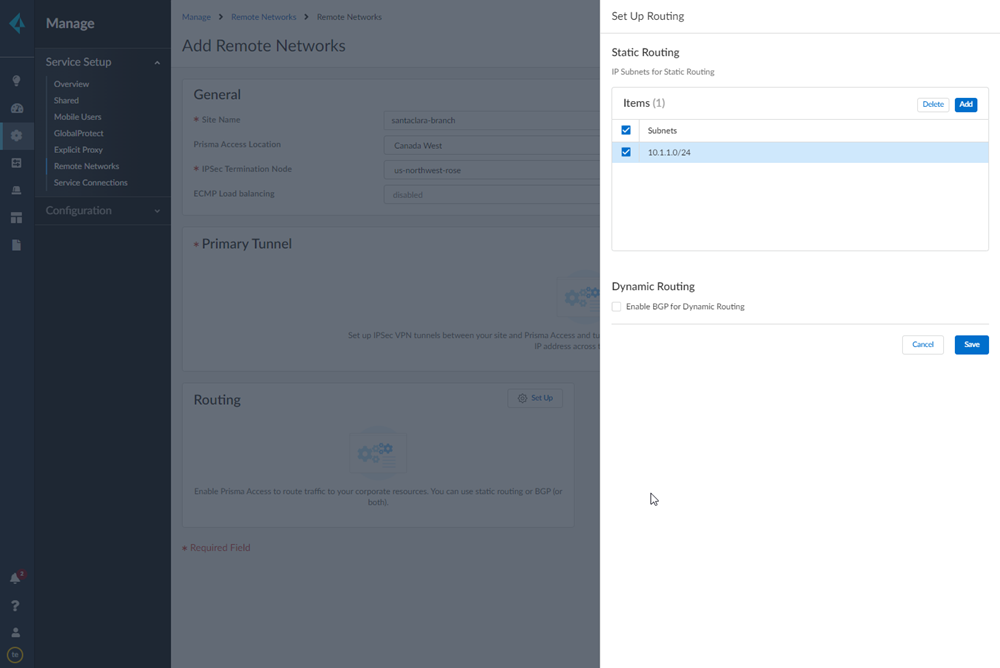
![]() Set up routing for the remote network.Set Up Routing and Add the IP subnets for Static Routing.Add a Branch IP SubnetChoose Static Routing and Add a subnet you have reserved for this remote network connection.
Set up routing for the remote network.Set Up Routing and Add the IP subnets for Static Routing.Add a Branch IP SubnetChoose Static Routing and Add a subnet you have reserved for this remote network connection.![]() Push your configuration changes.
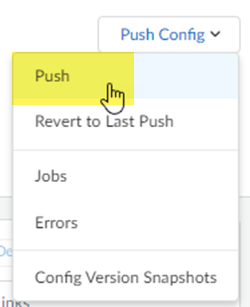
Push your configuration changes.- Return to ConfigurationNGFW and Prisma AccessConfiguration ScopePrisma AccessRemote Networks and select Push ConfigPush.
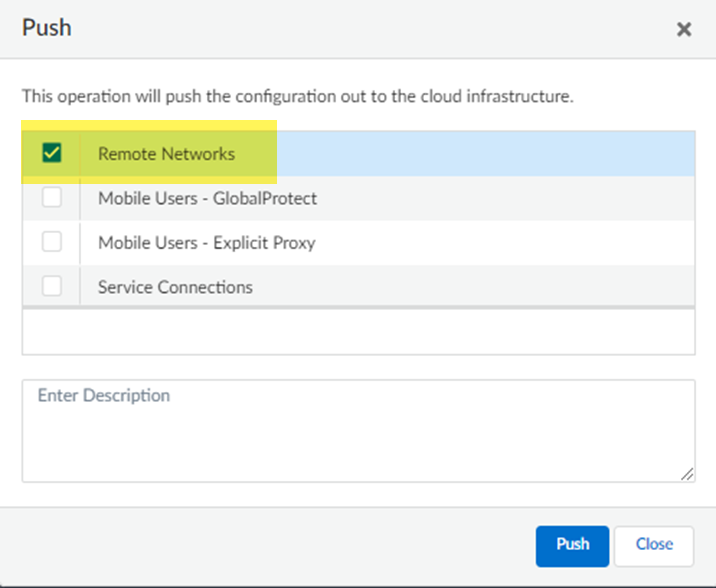
![]() Select Remote Networks.
Select Remote Networks.![]() Push your changes.Make a note of the Service IP of the Prisma Access side of the tunnel. To find this address in Prisma Access (Managed by Strata Cloud Manager), select ConfigurationNGFW and Prisma AccessConfiguration ScopePrisma AccessRemote Networks, click the Remote Networks. Look for the Service IP field corresponding to the remote network configuration you created.
Push your changes.Make a note of the Service IP of the Prisma Access side of the tunnel. To find this address in Prisma Access (Managed by Strata Cloud Manager), select ConfigurationNGFW and Prisma AccessConfiguration ScopePrisma AccessRemote Networks, click the Remote Networks. Look for the Service IP field corresponding to the remote network configuration you created.Configure the Remote Network Connection for VeloCloud Edge Devices
Use the following procedure to configure the IPSec tunnel on the VeloCloud edge device to complete the remote network connection.- Log in to the Enterprise customer account on the VeloCloud Orchestrator (VCO).Select ConfigureNetwork Services.In the Cloud Security Services area, click New to create a new service.
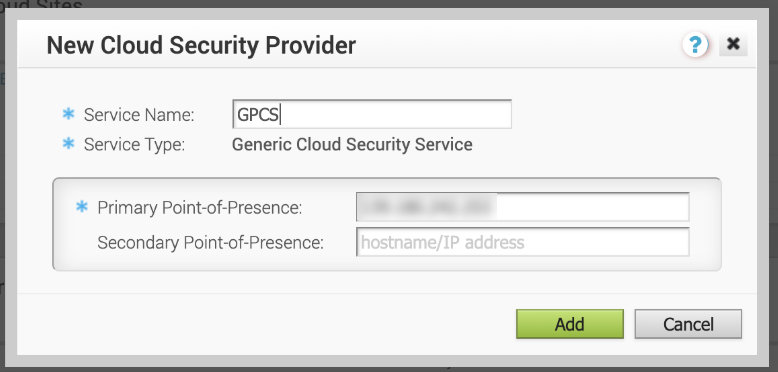
![]() Enter the following values in the New Cloud Security Provider window that displays:
Enter the following values in the New Cloud Security Provider window that displays:- Enter a Service Name to identify this configuration.
- Select a Service Type of Generic Cloud Security Service.
- For the Primary Point-of-Presence, enter the Service IP you retrieved from Prisma Access.
![]() Click Add to save and add the configuration.Select ConfigureProfile and set Cloud Security Service to On; then, select the Hash, Encryption, and Key Exchange Protocol to the settings you configured for the remote network tunnel in Prisma Access.
Click Add to save and add the configuration.Select ConfigureProfile and set Cloud Security Service to On; then, select the Hash, Encryption, and Key Exchange Protocol to the settings you configured for the remote network tunnel in Prisma Access.![]() Select ConfigureEdge and complete the following steps:
Select ConfigureEdge and complete the following steps:- Set Cloud Security Service to On.Select the radio button to Redirect all internet bound traffic to Cloud Security Service.Select the Hash, Encryption, and Key Exchange Protocol to match the settings you configured for the remote network tunnel in Prisma Access.Enter the FQDN and pre-shared key (PSK) to match the FQDN and PSK you entered in Prisma Access.
![]() Verify the status of the remote network tunnel.
Verify the status of the remote network tunnel.- To view tunnel status in the VeloCloud SD-WAN Orchestrator, select MonitorEdge in the VeloCloud SD-WAN Orchestrator and viewing the information in the fields that display.
![]()
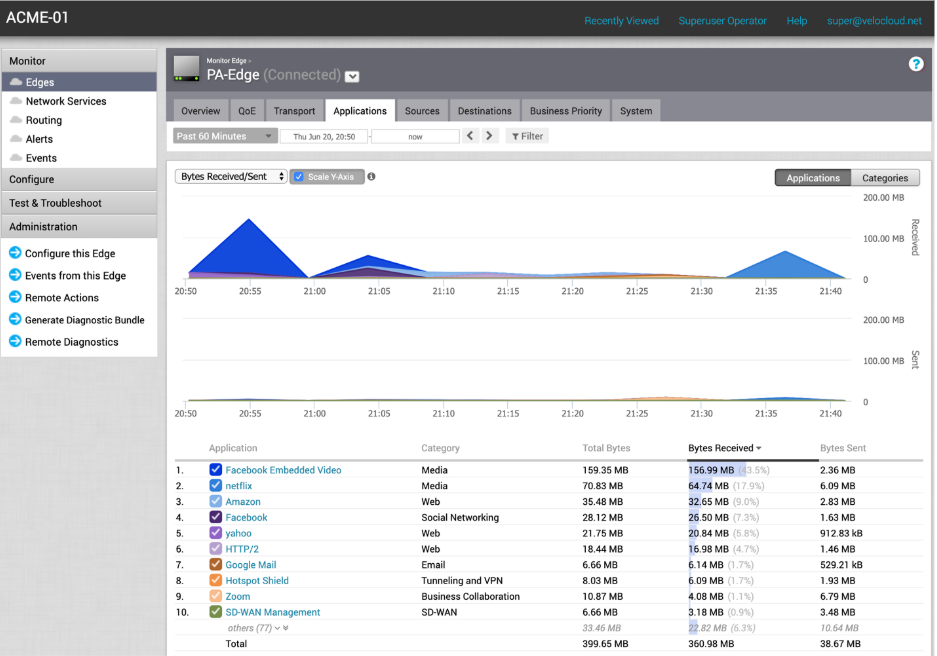
- To view traffic and application statistics, select the Transport and Applications tab, then select MonitorEdge.
![]()
Configure the Remote Network Connection for VeloCloud Gateways
Use the following procedure to configure the IPSec tunnel on the VeloCloud edge gateway to enable the remote network connection.- Establish connectivity from the VeloCloud gateway to Prisma Access.
- Log in to the Enterprise customer account on the VeloCloud Orchestrator (VCO).Select ConfigureNetwork Services.Select New in the Non-VeloCloud Sites to create a new site.
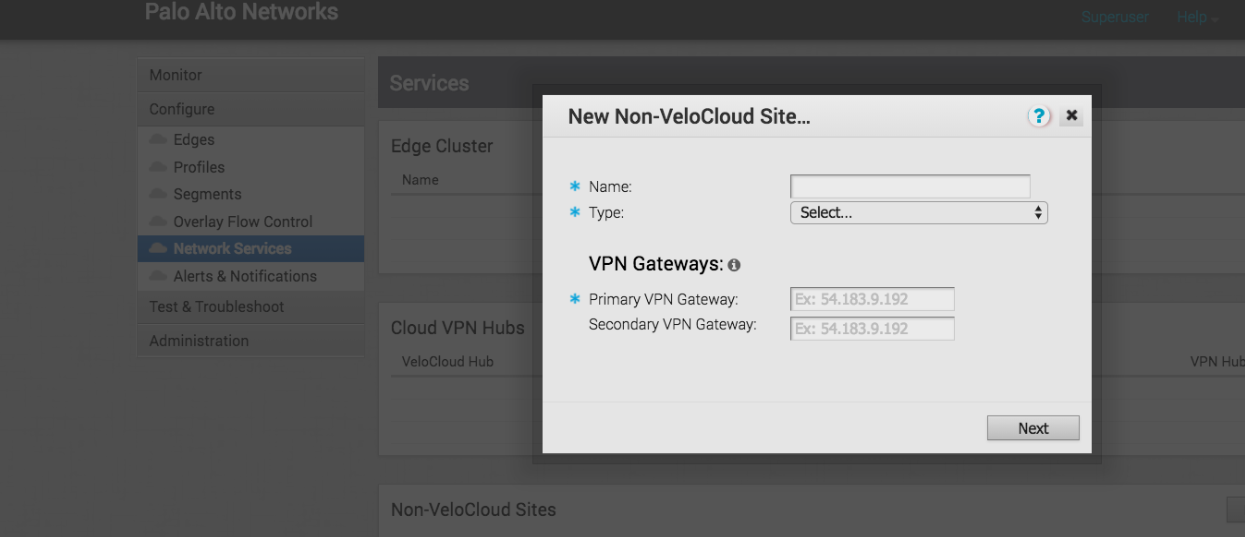
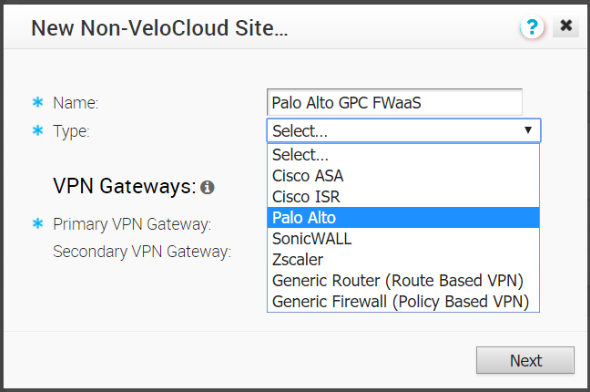
![]() Enter a Name for the site and select a Type of Palo Alto.
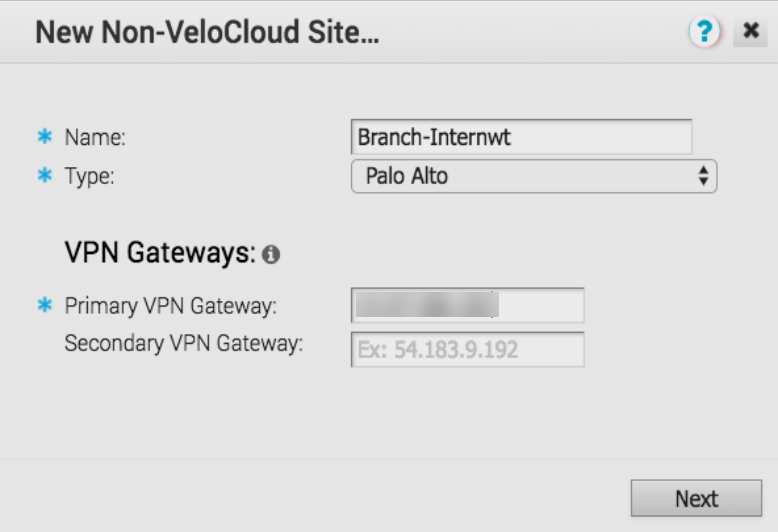
Enter a Name for the site and select a Type of Palo Alto.![]() For the Primary VPN Gateway, enter the Service IP you retrieved from Prisma Access.
For the Primary VPN Gateway, enter the Service IP you retrieved from Prisma Access.![]() Click Next.VeloCloud creates the site and generates the IKE and IPSec configuration (including pre-shared key) for the site.
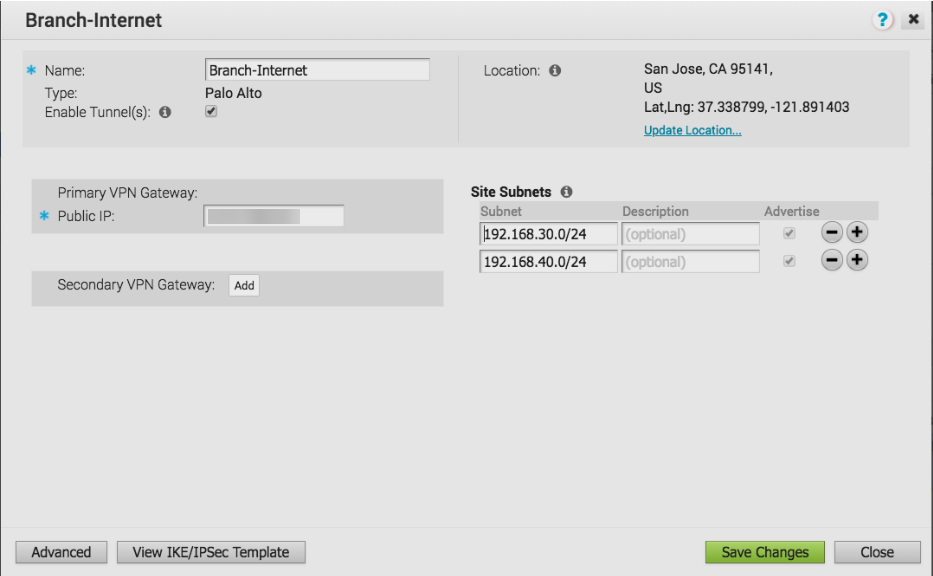
Click Next.VeloCloud creates the site and generates the IKE and IPSec configuration (including pre-shared key) for the site.![]() Click Advanced and update the IKE and IPSec parameters and add the Site Subnets that you will protect with Prisma Access.Make sure that you have selected Enable Tunnel(s); then, Save Changes.
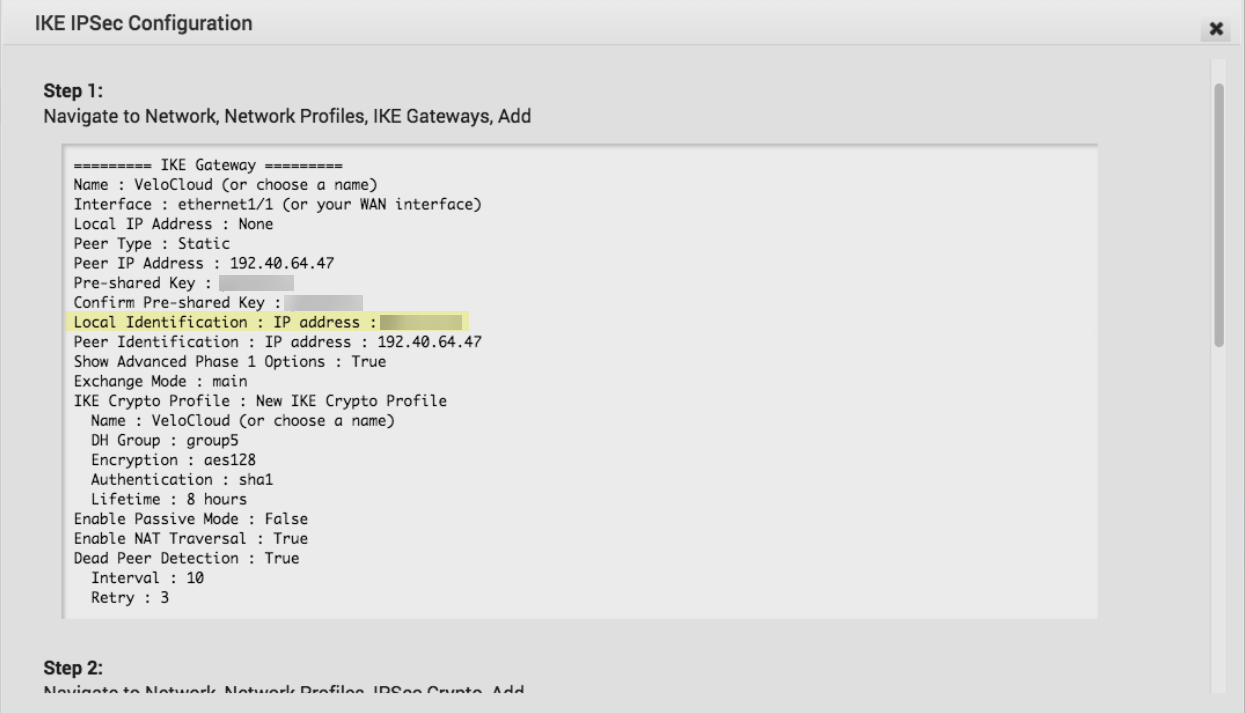
Click Advanced and update the IKE and IPSec parameters and add the Site Subnets that you will protect with Prisma Access.Make sure that you have selected Enable Tunnel(s); then, Save Changes.![]() To view the detailed IKE and IPSec parameters and the public IP address used by the VeloCloud gateway, click View IKE IPSec Template. The public IP address displays in the Local Identification : IP address : area.
To view the detailed IKE and IPSec parameters and the public IP address used by the VeloCloud gateway, click View IKE IPSec Template. The public IP address displays in the Local Identification : IP address : area.![]() Verify the status of the remote network connection between the VeloCloud gateway and Prisma Access by selecting MonitorNetwork Services. A Status in green indicates that the connection has been successfully established.
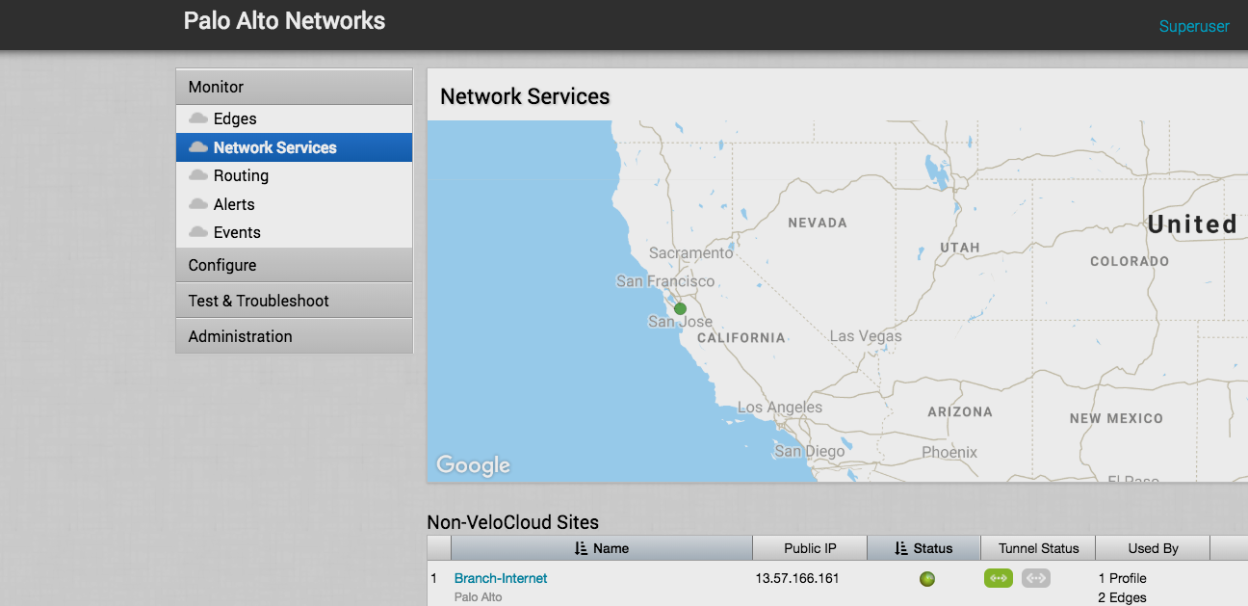
Verify the status of the remote network connection between the VeloCloud gateway and Prisma Access by selecting MonitorNetwork Services. A Status in green indicates that the connection has been successfully established.![]() Configure the customer profile to service-chain the Non-VeloCloud site to the customer’s SD-WAN.
Configure the customer profile to service-chain the Non-VeloCloud site to the customer’s SD-WAN.- Select ConfigureProfiles Profile-Name, where Profile-Name is the customer’s profile, then click the Device tab.Enable the Cloud VPN feature to turn on VPN connectivity from the Branch and Data Center sites.In the Branch to Non-VeloCloud Site section, select Enable; then, select the Prisma Access site you created in Step 1.
![]() Save your changes.
Save your changes.Troubleshoot the VeloCloud SD-WAN Remote Network
Use the following resources to troubleshoot issues with VeloCloud-Prisma Access deployments.- Prisma Access troubleshooting—Check the status and the logs in Prisma Access.
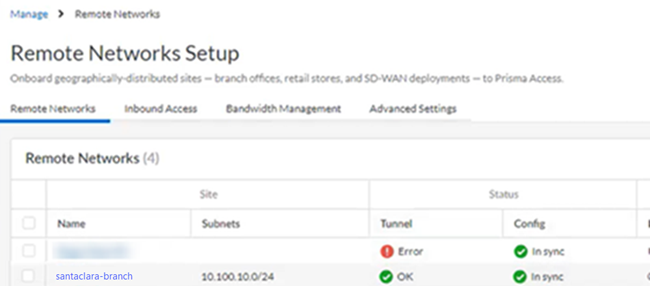
- Go to ConfigurationNGFW and Prisma AccessConfiguration ScopePrisma AccessRemote Networks and check the Status of the tunnel.
![]()
- Go to ActivityLog Viewer and check the Common/System logs for IPSec- and IKE-related messages.To view VPN-relates messages, set the filter to sub_type.value = vpn.The message ignoring unauthenticated notify payload indicates that the route has not been added in the crypto map on the other side of the IPSec tunnel after the IPSec negotiation has already occurred.
![]()
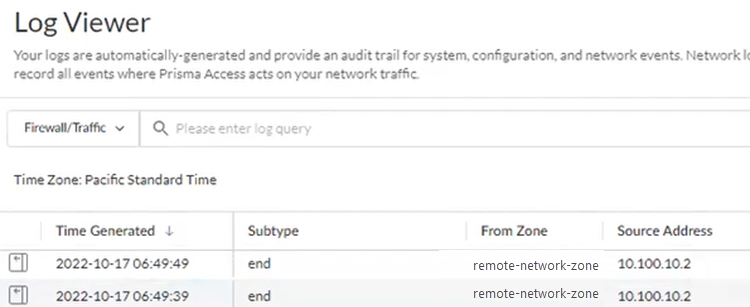
- Check the Firewall/Traffic logs and view the messages that are coming from the zone that has the same name as the remote network.In the logs, the remote network name is used as the source zone.
![]()
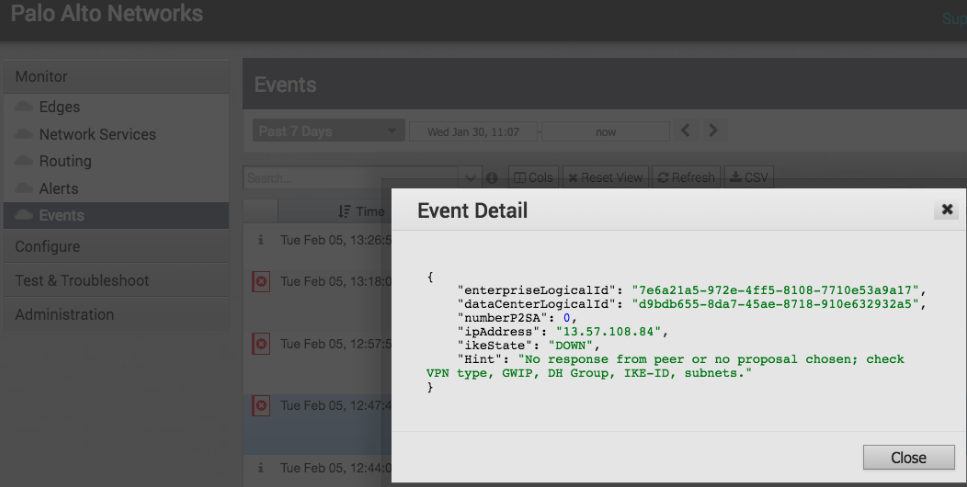
- VeloCloud troubleshooting—In the VeloCloud SD-WAN Orchestrator, select MonitorEvents. The following example shows a timeout error; this type of error can indicate mismatching proposals or a gateway connectivity error. The values to check are provided in the message text.
![]()
Integrate Prisma Access with Arista VeloCloud SD-WAN (Panorama)
Learn to integrate Prisma Access (Panorama Managed) with Arista VeloCloud SD-WAN.To begin the configuration of a VeloCloud-Prisma Access deployment, use Panorama to create IPSec, and IKE parameters and create the Prisma Access remote network connection.This procedure assumes that you have already completed the following prerequisites:- You have activated and installed Prisma Access.
- You have logged into Panorama and created an Infrastructure subnet for Prisma Access, using a subnet that does not overlap with your existing network subnets.
- You have created trusted and untrusted zones and used zone mapping to map those zones for your deployment.
- You have made a note of the subnets you will use for each remote network gateway.
- You have made a note of the IP address for the VeloCloud SD-WAN device. You obtain this information from the VeloCloud SD-WAN Orchestrator.You use the IP address of the gateway address to configure the IKE gateway.
- Create IKE and IPSec Crypto profiles and an IKE gateway for the remote network connection you will create.You will use these profiles to provide connectivity between Prisma Access and the VeloCloud SD-WAN device.
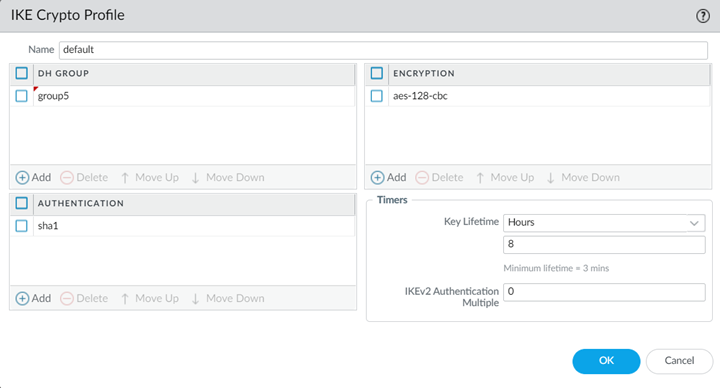
- Select NetworkNetwork ProfilesIKE Crypto and Add an IKE crypto profile for the IPSec tunnel.Make sure you have selected the Template of Remote_Network_Template before starting this task.Give the profile a name and specify IKE settings.Make a note of these settings; you specify the same settings. When you configure the setting on the VeloCloud SD-WAN device.
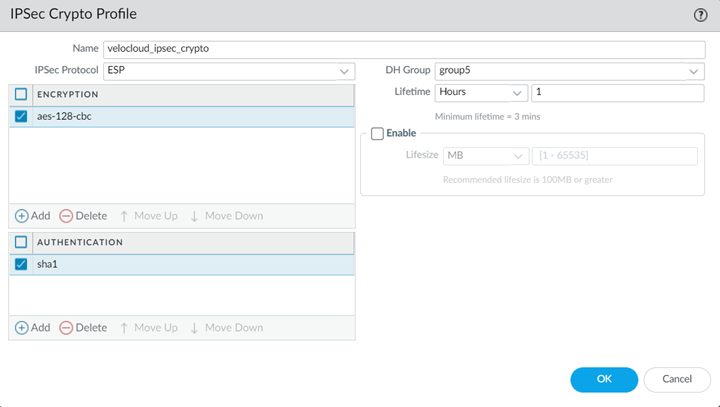
![]() Select NetworkNetwork ProfilesIPSec Crypto and Add a new IPSec crypto profile.Specify a name for the profile and specify IPSec crypto parameters.Make a note of these settings; you specify the same settings. When you configure the setting on the VeloCloud SD-WAN device.
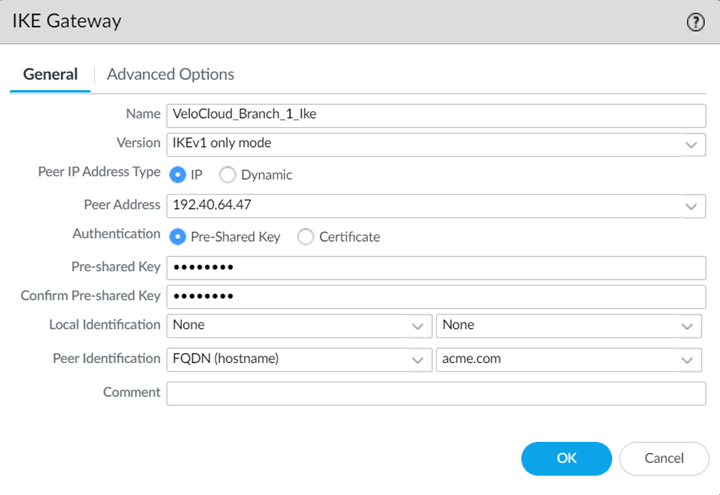
Select NetworkNetwork ProfilesIPSec Crypto and Add a new IPSec crypto profile.Specify a name for the profile and specify IPSec crypto parameters.Make a note of these settings; you specify the same settings. When you configure the setting on the VeloCloud SD-WAN device.![]() Select NetworkNetwork ProfilesIKE Gateways and Add a new IKE gateway.Specify a Name Version.Enter a Peer IP Address that matches the VeloCloud SD-WAN device’s IP address.You obtain this address from the VeloCloud SD-WAN Orchestrator.Enter a Pre-shared key for symmetric authentication across the tunnel.Choose a Local Identification of None and a Peer Identification of FQDN (hostname); then, enter an FQDN.Make a note of the Pre-Shared key and FQDN that you use for the Peer Identification; you match these settings when you configure the VeloCloud cloud gateway.
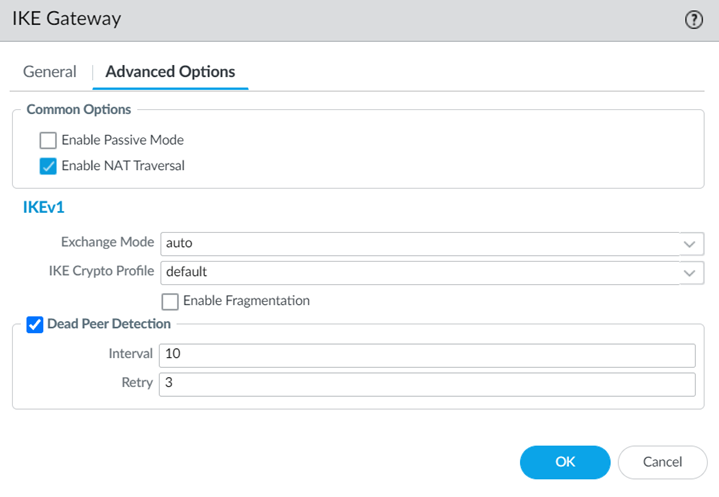
Select NetworkNetwork ProfilesIKE Gateways and Add a new IKE gateway.Specify a Name Version.Enter a Peer IP Address that matches the VeloCloud SD-WAN device’s IP address.You obtain this address from the VeloCloud SD-WAN Orchestrator.Enter a Pre-shared key for symmetric authentication across the tunnel.Choose a Local Identification of None and a Peer Identification of FQDN (hostname); then, enter an FQDN.Make a note of the Pre-Shared key and FQDN that you use for the Peer Identification; you match these settings when you configure the VeloCloud cloud gateway.![]() Configure Advanced Options:
Configure Advanced Options:- Enable NAT Traversal.
- Set the Exchange Mode to Auto so the gateway can accept both main mode and aggressive mode requests, or let the gateway initiate negotiation and allow exchanges in main mode.
- Select the IKE Crypto Profile you created in step 1.a.
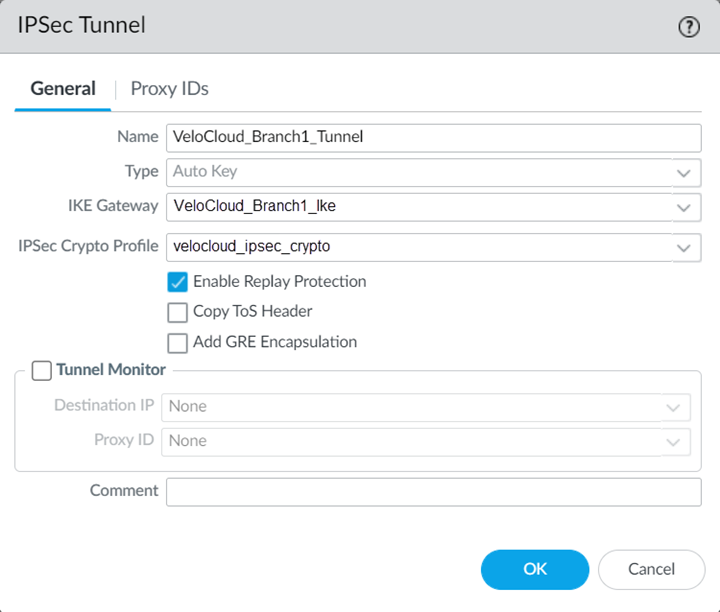
![]() Select NetworkIPSec Tunnels and Add an IPSec tunnel.Select the IKE Gateway and IPSec Crypto Profile you created earlier in this task.
Select NetworkIPSec Tunnels and Add an IPSec tunnel.Select the IKE Gateway and IPSec Crypto Profile you created earlier in this task.![]() Select PanoramaCloud ServicesConfigurationRemote Networks and Add a new remote network connection, specifying the following values:
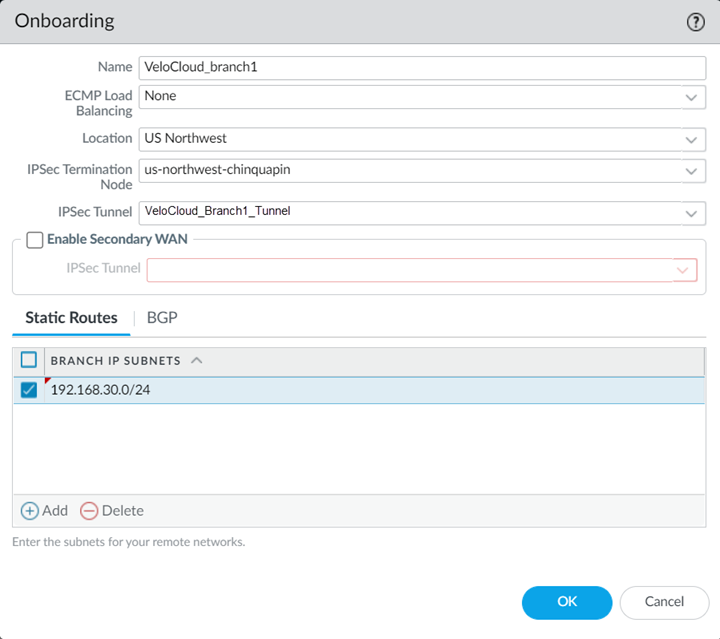
Select PanoramaCloud ServicesConfigurationRemote Networks and Add a new remote network connection, specifying the following values:- Give the remote network connection a unique Name.
- Specify a Location that is close to the VeloCloud SD-WAN device.
- Specify the IPSec Tunnel you created in step 1.k.
- In the Static Routes tab, Add the Branch IP Subnets you have reserved for this remote network connection.
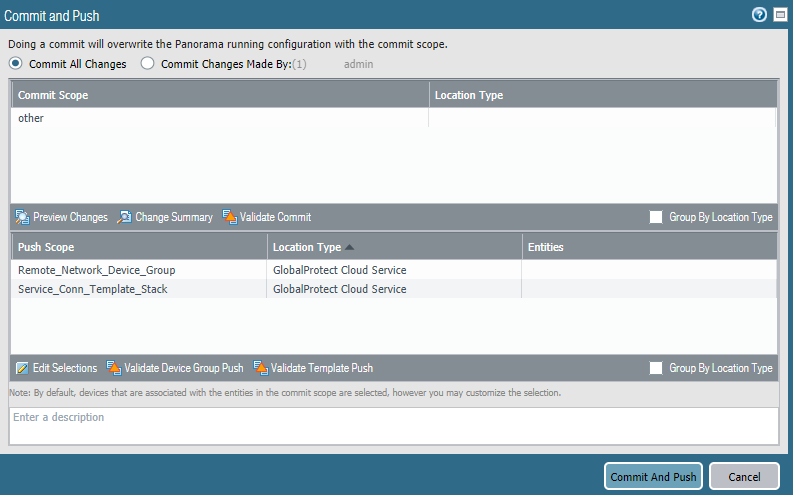
![]() Commit the configuration changes to Panorama and push the configuration out to Prisma Access for remote networks.
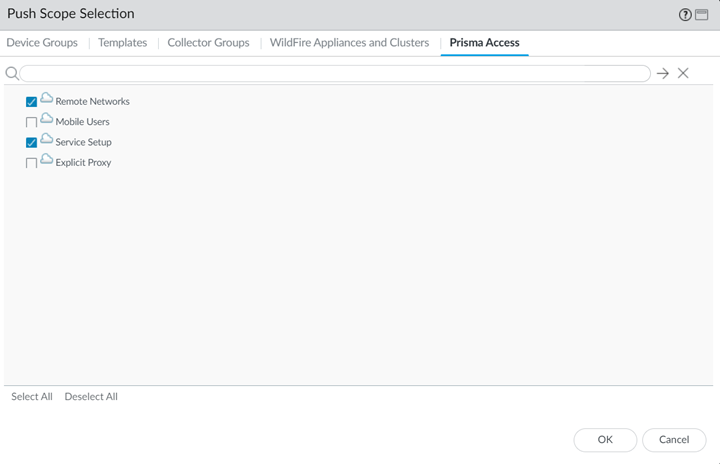
Commit the configuration changes to Panorama and push the configuration out to Prisma Access for remote networks.- Click CommitCommit and Push.Click Edit SelectionsPrisma Access, and select both Prisma Access for remote networks and Prisma Access for service setup to push the configuration out to the service.Pushing the GlobalProtect cloud service for service setup is only required if you made changes to the service setup (for example, you added the Infrastructure subnet).
![]() Click OK, then Commit and Push.
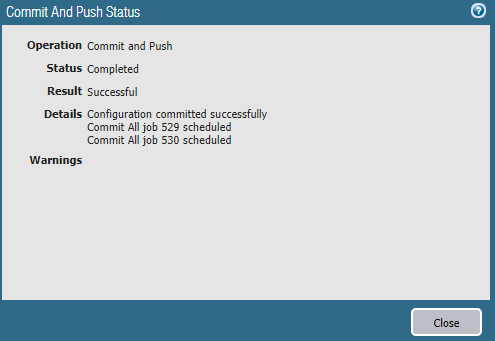
Click OK, then Commit and Push.![]() Prisma Access displays a success page after the commit succeeds.
Prisma Access displays a success page after the commit succeeds.![]() Make a note of the Service IP address of the Prisma Access side of the tunnel. To find this address in Panorama, select PanoramaCloud ServicesStatusNetwork Details, select Remote Networks, and find the Service IP Address.You use the Service IP Address as the Peer IP address when you configure the IPSec tunnel in the VeloCloud SD-WAN device.
Make a note of the Service IP address of the Prisma Access side of the tunnel. To find this address in Panorama, select PanoramaCloud ServicesStatusNetwork Details, select Remote Networks, and find the Service IP Address.You use the Service IP Address as the Peer IP address when you configure the IPSec tunnel in the VeloCloud SD-WAN device.![]()
Configure the Remote Network Connection for VeloCloud Edge Devices
Use the following procedure to configure the IPSec tunnel on the VeloCloud edge device to complete the remote network connection.- Log in to the Enterprise customer account on the VeloCloud Orchestrator (VCO).Select ConfigureNetwork Services.In the Cloud Security Services area, click New to create a new service.
![]() Enter the following values in the New Cloud Security Provider window that displays:
Enter the following values in the New Cloud Security Provider window that displays:- Enter a Service Name to identify this configuration.
- Select a Service Type of Generic Cloud Security Service.
- For the Primary Point-of-Presence, enter the Service IP Address you retrieved from Prisma Access.
![]() Click Add to save and add the configuration.Select ConfigureProfile and set Cloud Security Service to On; then, select the Hash, Encryption, and Key Exchange Protocol to the settings you configured for the remote network tunnel in Prisma Access.
Click Add to save and add the configuration.Select ConfigureProfile and set Cloud Security Service to On; then, select the Hash, Encryption, and Key Exchange Protocol to the settings you configured for the remote network tunnel in Prisma Access.![]() Select ConfigureEdge and complete the following steps:
Select ConfigureEdge and complete the following steps:- Set Cloud Security Service to On.Select the radio button to Redirect all internet bound traffic to Cloud Security Service.Select the Hash, Encryption, and Key Exchange Protocol to match the settings you configured for the remote network tunnel in Prisma Access.Enter the FQDN and pre-shared key (PSK) to match the FQDN and PSK you entered in Prisma Access.
![]() Verify the status of the remote network tunnel.
Verify the status of the remote network tunnel.- To view tunnel status in the VeloCloud SD-WAN Orchestrator, select MonitorEdge in the VeloCloud SD-WAN Orchestrator and viewing the information in the fields that display.
![]()
- To view traffic and application statistics, select the Transport and Applications tab, then select MonitorEdge.
![]()
Configure the Remote Network Connection for VeloCloud Gateways
Use the following procedure to configure the IPSec tunnel on the VeloCloud edge gateway to enable the remote network connection.- Establish connectivity from the VeloCloud gateway to Prisma Access.
- Log in to the Enterprise customer account on the VeloCloud Orchestrator (VCO).Select ConfigureNetwork Services.Select New in the Non-VeloCloud Sites to create a new site.
![]() Enter a Name for the site and select a Type of Palo Alto.
Enter a Name for the site and select a Type of Palo Alto.![]() For the Primary VPN Gateway, enter the Service IP Address you retrieved from Prisma Access.
For the Primary VPN Gateway, enter the Service IP Address you retrieved from Prisma Access.![]() Click Next.VeloCloud creates the site and generates the IKE and IPSec configuration (including pre-shared key) for the site.
Click Next.VeloCloud creates the site and generates the IKE and IPSec configuration (including pre-shared key) for the site.![]() Click Advanced and update the IKE and IPSec parameters and add the Site Subnets that you will protect with Prisma Access.Make sure that you have selected Enable Tunnel(s); then, Save Changes.
Click Advanced and update the IKE and IPSec parameters and add the Site Subnets that you will protect with Prisma Access.Make sure that you have selected Enable Tunnel(s); then, Save Changes.![]() To view the detailed IKE and IPSec parameters and the public IP address used by the VeloCloud gateway, click View IKE IPSec Template. The public IP address displays in the Local Identification : IP address : area.
To view the detailed IKE and IPSec parameters and the public IP address used by the VeloCloud gateway, click View IKE IPSec Template. The public IP address displays in the Local Identification : IP address : area.![]() Verify the status of the remote network connection between the VeloCloud gateway and Prisma Access by selecting MonitorNetwork Services. A Status in green indicates that the connection has been successfully established.
Verify the status of the remote network connection between the VeloCloud gateway and Prisma Access by selecting MonitorNetwork Services. A Status in green indicates that the connection has been successfully established.![]() Configure the customer profile to service-chain the Non-VeloCloud site to the customer’s SD-WAN.
Configure the customer profile to service-chain the Non-VeloCloud site to the customer’s SD-WAN.- Select ConfigureProfiles Profile-Name, where Profile-Name is the customer’s profile, then click the Device tab.Enable the Cloud VPN feature to turn on VPN connectivity from the Branch and data center sites.In the Branch to Non-VeloCloud Site section, select Enable; then, select the Prisma Access site you created in step 1.
![]() Save your changes.
Save your changes.

