Strata Logging Service
Forward Logs to Snowflake
Table of Contents
Expand All
|
Collapse All
Strata Logging Service Docs
Forward Logs to Snowflake
Learn how to forward logs from the Strata Logging Service to the Snowflake
warehouse.
| Where Can I Use This? | What Do I Need? |
|---|---|
| One of these:
|
Configure log forwarding in Strata Logging Service to forward browser events
and logs, device attributes, and audit logs in Strata Logging Service to a
Snowflake warehouse. Strata Logging Service aggregates the data together for
your organization before forwarding it to Snowflake for analytics and data
processing. Strata Logging Service forwards logs to Snowflake warehouse in
JSON format.
- Enable communication between the Strata Logging Service and your Snowflake account.
- Log in to the Snowflake account with the ACCOUNTADMIN role.Run the following script in the Snowsight worksheet:CREATE WAREHOUSE IF NOT EXISTS SLS_WH; CREATE DATABASE IF NOT EXISTS SLS_DB; USE SCHEMA SLS_DB.PUBLIC; CREATE OR REPLACE ROLE SLS_ROLE; CREATE OR REPLACE USER SLS_USER LOGIN_NAME='<username' PASSWORD='<password>' DISPLAY_NAME='SLS Event Forwarding' DEFAULT_WAREHOUSE = SLS_WH DEFAULT_ROLE = SLS_ROLE; GRANT USAGE ON WAREHOUSE SLS_WH TO ROLE SLS_ROLE; GRANT USAGE ON DATABASE SLS_DB TO ROLE SLS_ROLE; GRANT USAGE ON SCHEMA SLS_DB.PUBLIC TO ROLE SLS_ROLE; GRANT CREATE PIPE ON SCHEMA SLS_DB.PUBLIC TO ROLE SLS_ROLE; GRANT CREATE STAGE ON SCHEMA SLS_DB.PUBLIC TO ROLE SLS_ROLE; GRANT CREATE TABLE ON SCHEMA SLS_DB.PUBLIC TO ROLE SLS_ROLE; GRANT ALL PRIVILEGES ON ALL TABLES IN SCHEMA SLS_DB.PUBLIC TO ROLE SLS_ROLE; GRANT ROLE SLS_ROLE TO USER SLS_USER; GRANT OWNERSHIP ON USER SLS_USER TO ROLE SLS_ROLE;Make a note of the username and password you provide here. You need to use the same credentials when configuring the Snowflake log forwarding profile.Sign In to the hub.Select the Strata Logging Service instance that you want to configure for log forwarding.If you have multiple Strata Logging Service instances, click the Strata Logging Service tile and select an instance from the list of those available.If you are using Strata Cloud Manager to manage Strata Logging Service, click System SettingsStrata Logging ServiceLog Forwarding to forward logs to an external server.Select Log ForwardingSnowflake + to add a new Snowflake log forwarding profile.
![]() Configure the log forwarding profile to forward logs to Snowflake.
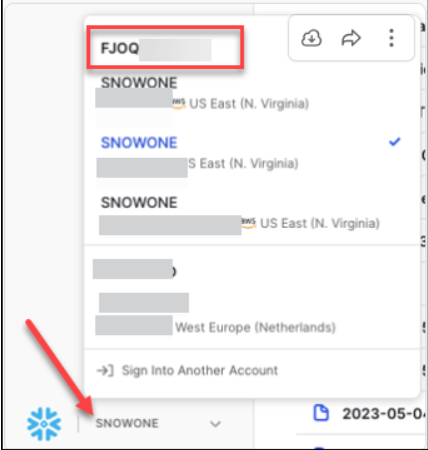
Configure the log forwarding profile to forward logs to Snowflake.- Enter a descriptive Name for the profile.Enter the Account Identifier of your Snowflake account. Ensure to replace the period with a hyphen in the Account Identifier.You can get the name from the Snowflake Console. Click the account name next to the Snowflake icon on the lower left of the screen. The Account Identifier is displayed at the top on the pop-up window.
![]() Enter the credentials to authenticate your Snowflake account. Use the same username and password entered in step 1.Enter a name for the table where you want to view the Strata Logging Service logs. To keep all log types organized in a single table, provide a table name. If you leave the field empty, logs are organized in separate tables based on the log type. You cannot edit or add a table name after the profile is configured.Test Connection to ensure that the Strata Logging Service can communicate with the receiver.This sends an empty log to the configured destination to verify that transmission is possible.If the test fails, you won't be able to proceed.Click Next.Specify the Payload Format as JSON - the log format in which the Strata Logging Service forwards logs.(Optional) To receive a STATUS NOTIFICATION when the Strata Logging Service is unable to connect to the Snowflake, enter the email address at which you’d like to receive the notification.You will continue to receive these notifications at least once every 60 minutes until connectivity is restored. If the connectivity issue is addressed within 72 hours, no logs will be lost. However, any log older than 72 hours following the service disconnection could be lost.Select the log type and optionally write a query to create filter to forward only the logs that are most critical to you. Save your changesIf you want to forward all logs of the type you selected, do not enter a query.Save your changes.Verify that the Status of your forwarding profile is Running ().
Enter the credentials to authenticate your Snowflake account. Use the same username and password entered in step 1.Enter a name for the table where you want to view the Strata Logging Service logs. To keep all log types organized in a single table, provide a table name. If you leave the field empty, logs are organized in separate tables based on the log type. You cannot edit or add a table name after the profile is configured.Test Connection to ensure that the Strata Logging Service can communicate with the receiver.This sends an empty log to the configured destination to verify that transmission is possible.If the test fails, you won't be able to proceed.Click Next.Specify the Payload Format as JSON - the log format in which the Strata Logging Service forwards logs.(Optional) To receive a STATUS NOTIFICATION when the Strata Logging Service is unable to connect to the Snowflake, enter the email address at which you’d like to receive the notification.You will continue to receive these notifications at least once every 60 minutes until connectivity is restored. If the connectivity issue is addressed within 72 hours, no logs will be lost. However, any log older than 72 hours following the service disconnection could be lost.Select the log type and optionally write a query to create filter to forward only the logs that are most critical to you. Save your changesIf you want to forward all logs of the type you selected, do not enter a query.Save your changes.Verify that the Status of your forwarding profile is Running ().![]() (Optional) You can use the running Snowflake forwarding profile to forward past logs spanning up to 3 days.
(Optional) You can use the running Snowflake forwarding profile to forward past logs spanning up to 3 days.


