Enterprise DLP
Create Microsoft Exchange Connectors
Table of Contents
Expand All
|
Collapse All
Enterprise DLP Docs
Create Microsoft Exchange Connectors
Create an outbound and inbound Microsoft Exchange Online Connector to forward and
return outbound emails sent from Microsoft Exchange to and from Enterprise Data Loss Prevention (E-DLP) for
inline inspection of emails.
On May 7, 2025, Palo Alto Networks is introducing new Evidence Storage and Syslog Forwarding service IP
addresses to improve performance and expand availability for these services
globally.
You must allow these new service IP addresses on your network
to avoid disruptions for these services. Review the Enterprise DLP
Release Notes for more
information.
| Where Can I Use This? | What Do I Need? |
|---|---|
|
|
To prevents sensitive data exfiltration contained in outbound emails using Enterprise Data Loss Prevention (E-DLP), you must create outbound and inbound Microsoft Exchange
Online connector to control the flow of emails forwarded from Microsoft Exchange
Online to Enterprise DLP. The outbound connector controls the flow of outbound
emails from Microsoft Exchange to Enterprise DLP for inspection and verdict
rendering. The inbound connector to return emails forwarded to Enterprise DLP
back to Microsoft Exchange and instruct Microsoft Exchange to take action based on
the transport rule.
Create a Microsoft Exchange Outbound Connector
Create an outbound Microsoft Exchange Online Connector to connect Microsoft Exchange
with Enterprise Data Loss Prevention (E-DLP) for inline inspection of emails.
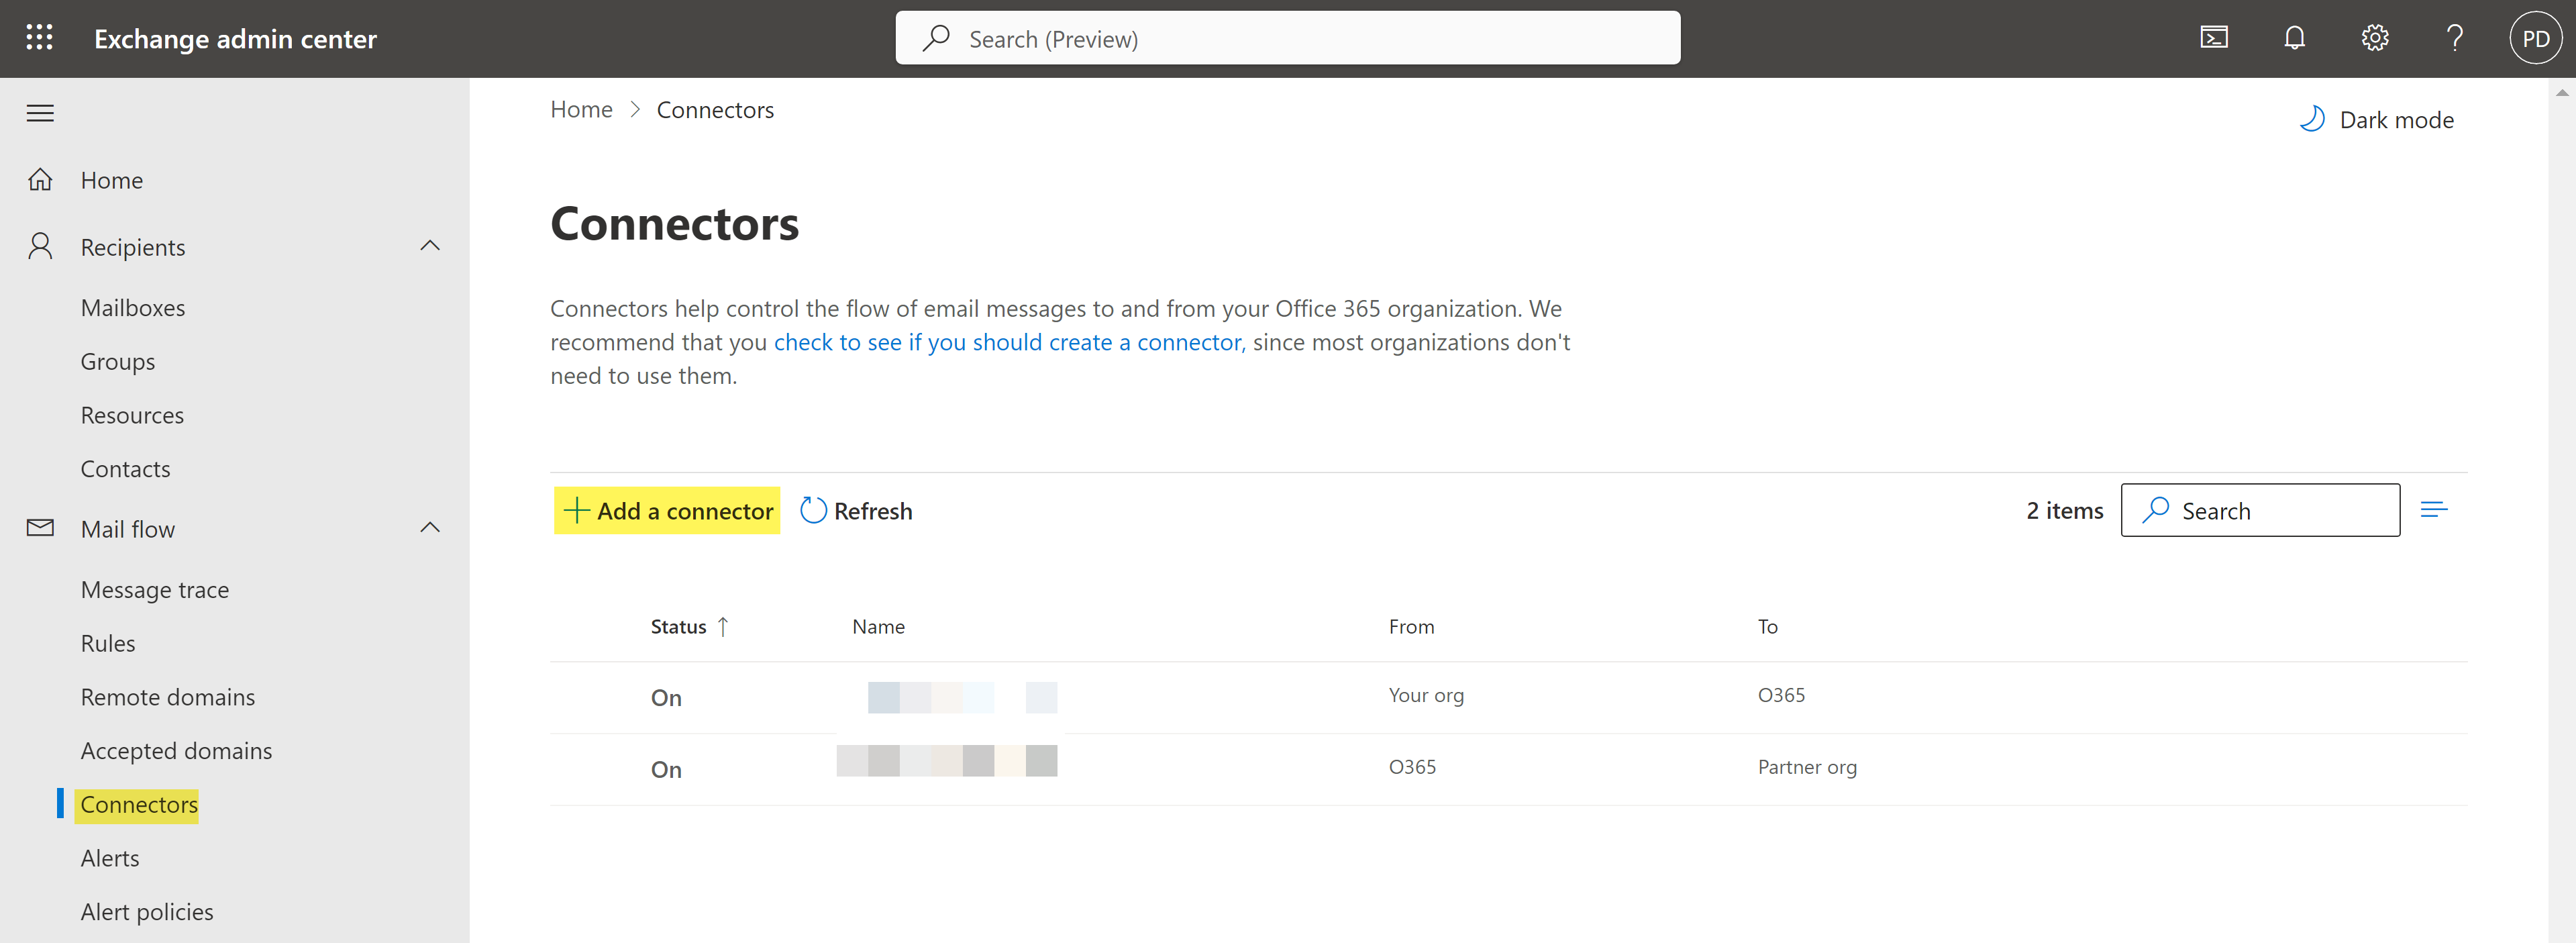
- Log in to the Microsoft Exchange Admin Center.Select Mail flowConnectors and Add a connector to launch the Microsoft Exchange Connector wizard.
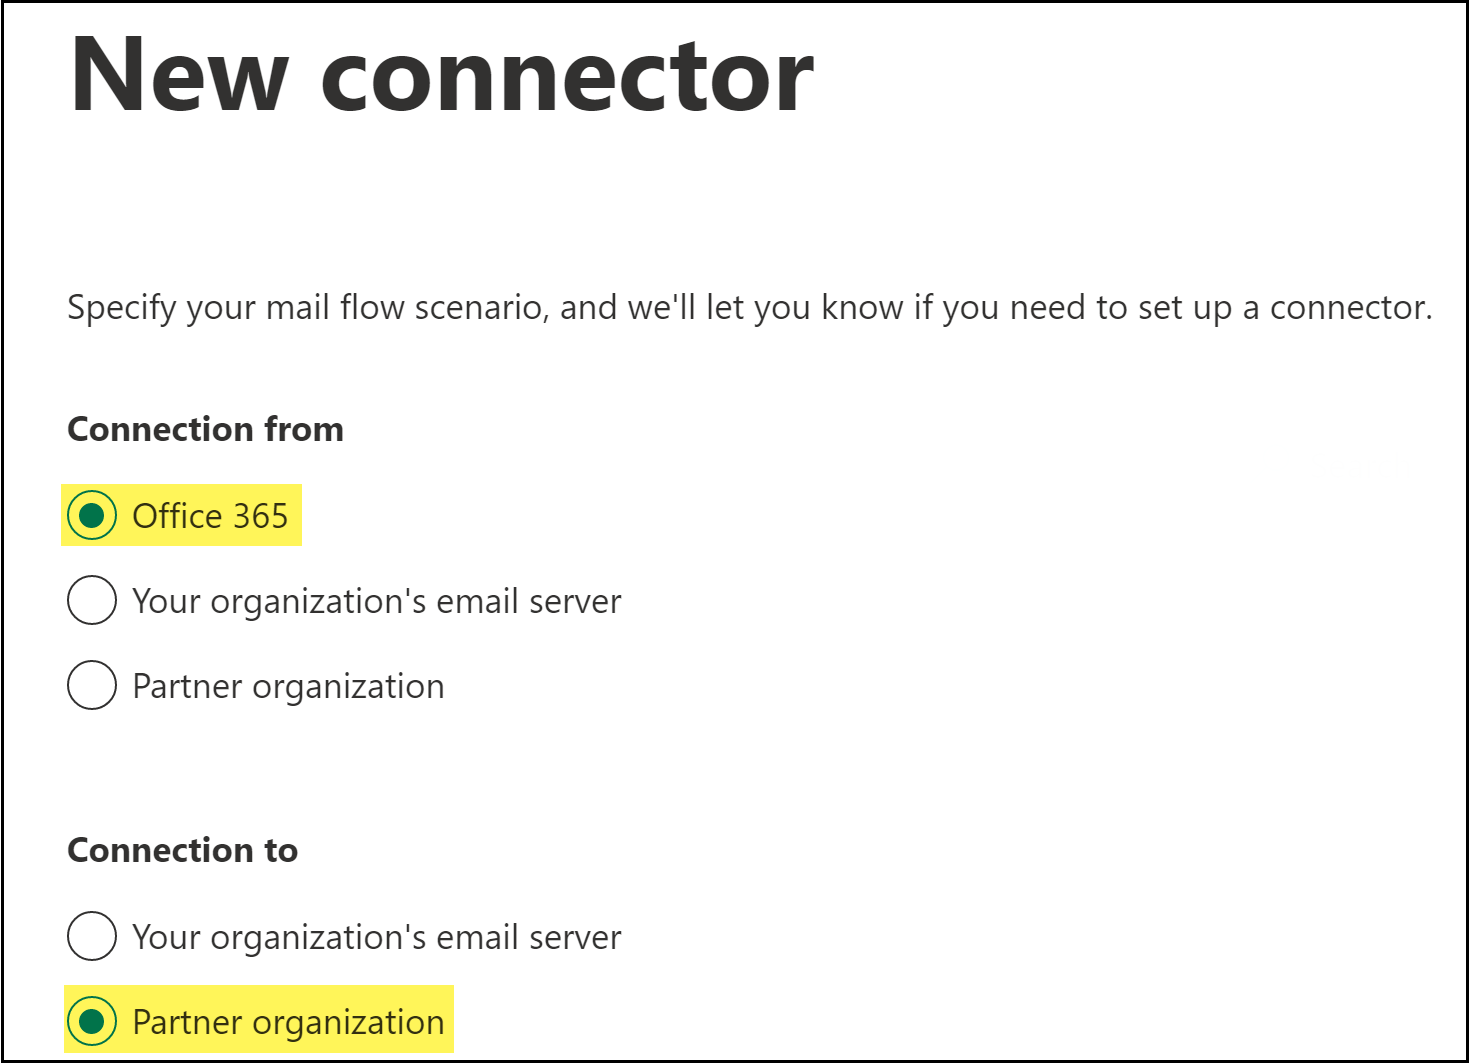
![]() Specify the connector source and destination.
Specify the connector source and destination.- For Connection from, select Office 365.For Connection to, select Partner organization.A partner can be any third-party cloud service that provides services such as services, such as data protection. In this case, the third-party partner organization is Palo Alto Networks.Click Next.
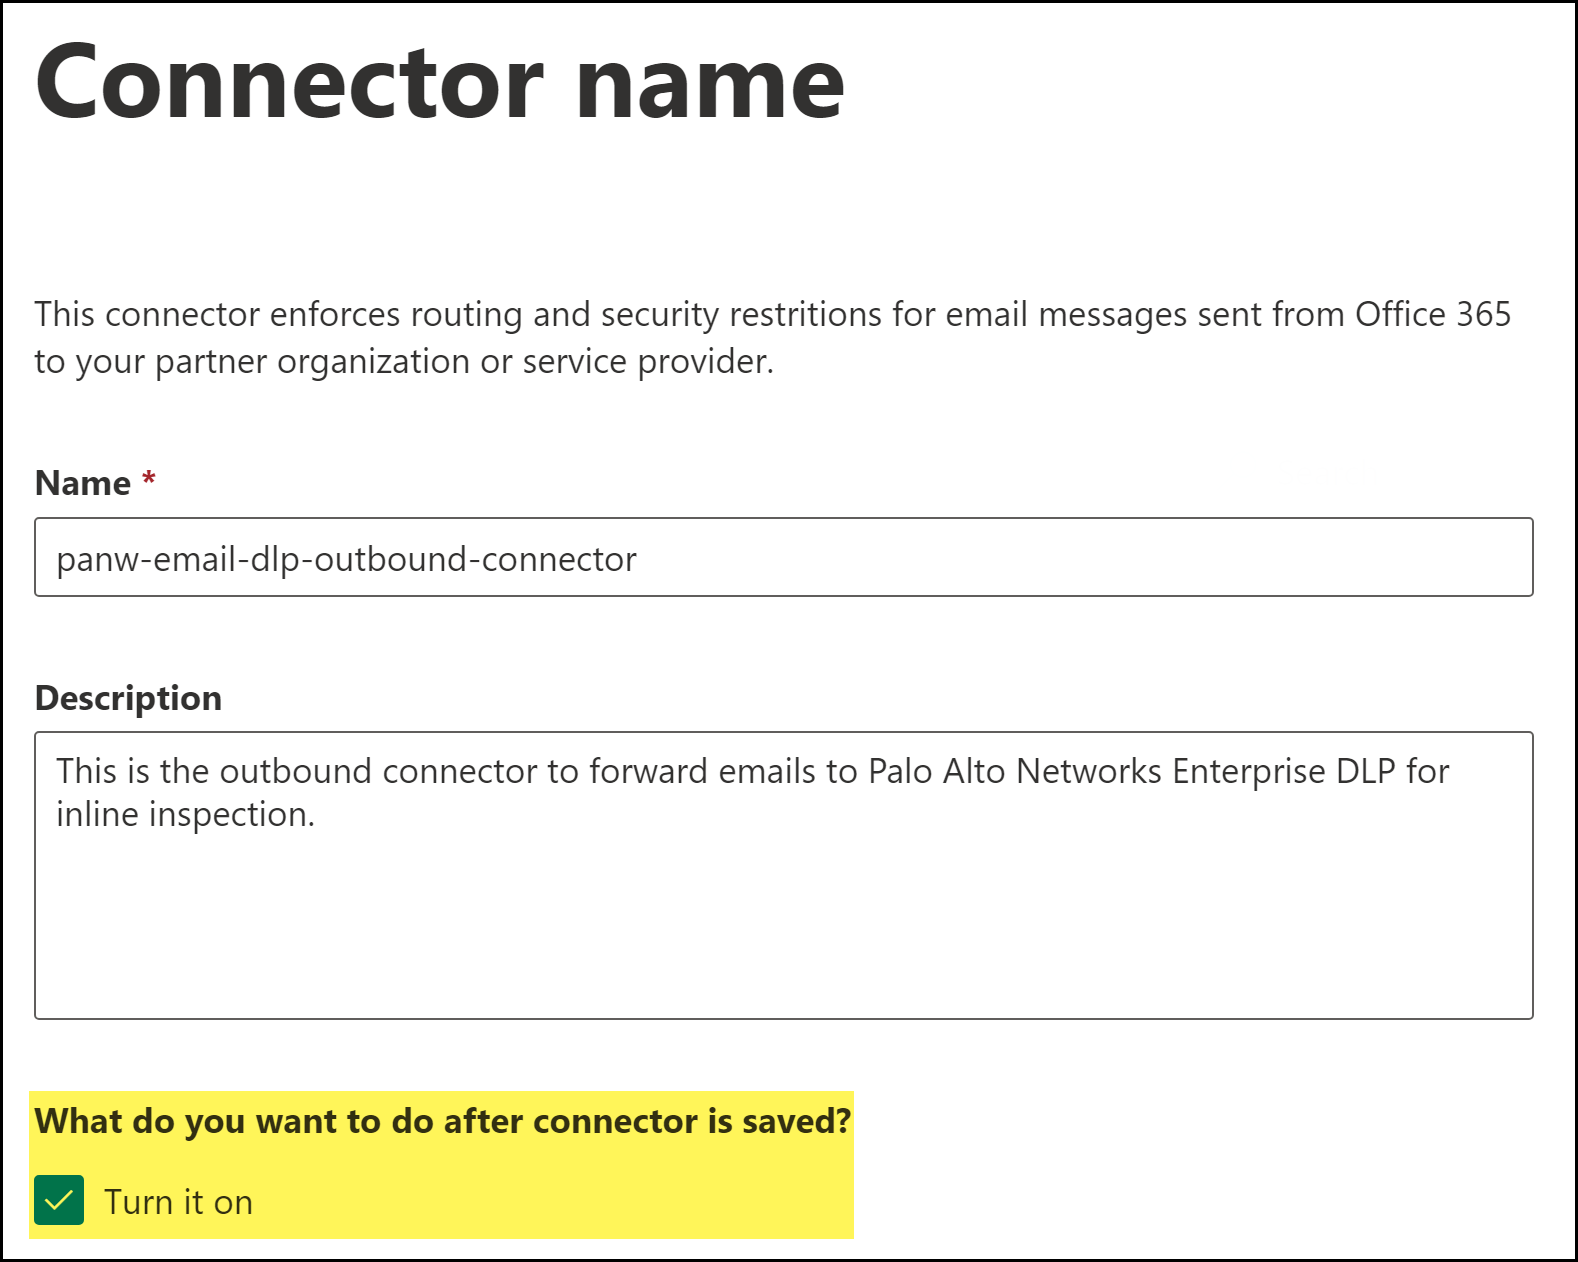
![]() Name the Microsoft Exchange connector.
Name the Microsoft Exchange connector.- Enter a descriptive Name for the connector.(Optional) Enter a Description for the connector.(Best Practices) For What do you want to do after connector is saved?, check (enable) Turn it on.Enable this to automatically turn on the connector after you have finished creating and saved the new Microsoft Exchange connector.Click Next.
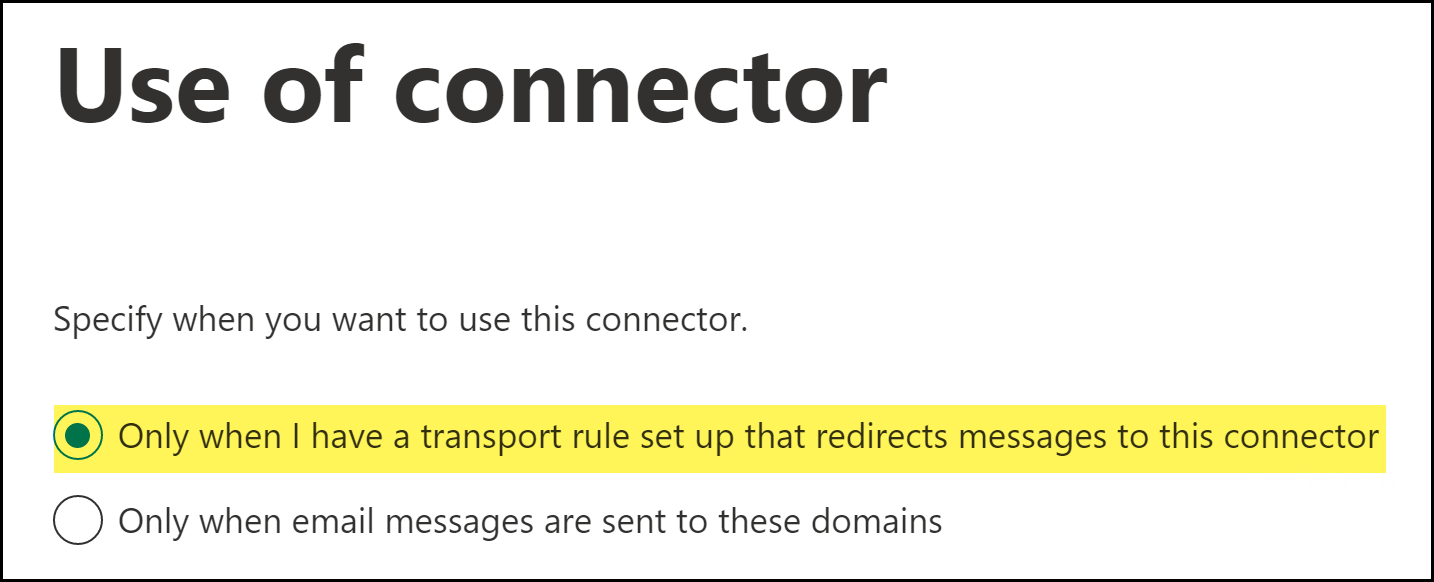
![]() To specify when the connector should be used, select Only when I have a transport rule set up that redirects messages to this connector and click Next.Using the connector only when a transport rule exists enables fine-grained control of what action to take when an email contains sensitive data. By selecting this option, Microsoft Exchange enforces action on emails based on the action specified in the Enterprise DLP data profile.
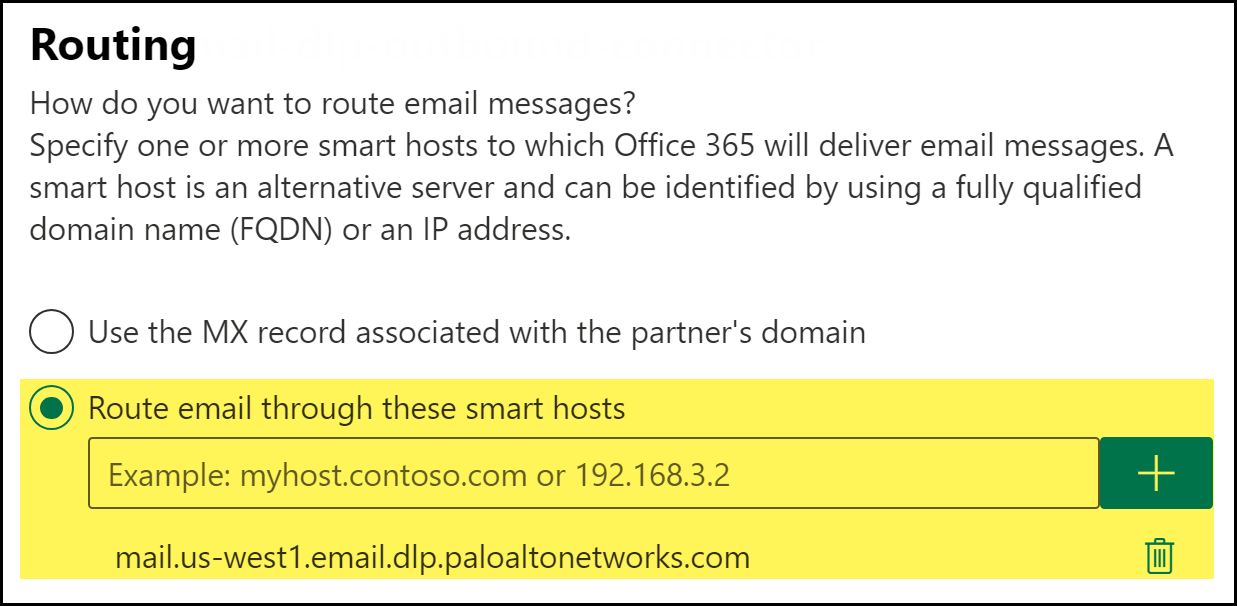
To specify when the connector should be used, select Only when I have a transport rule set up that redirects messages to this connector and click Next.Using the connector only when a transport rule exists enables fine-grained control of what action to take when an email contains sensitive data. By selecting this option, Microsoft Exchange enforces action on emails based on the action specified in the Enterprise DLP data profile.![]() To configure the route settings for emails, check (enable) Route email through these smart hosts to add the following smart host Fully Qualified Domain Name (FQDN) and click Next.The FQDN specifies the region where emails are forwarded to Enterprise DLP for inspection and verdict rendering. This also generates and displays Email DLP incidents in the specified region. All processes and data related to Email DLP occur and are stored in this region.
To configure the route settings for emails, check (enable) Route email through these smart hosts to add the following smart host Fully Qualified Domain Name (FQDN) and click Next.The FQDN specifies the region where emails are forwarded to Enterprise DLP for inspection and verdict rendering. This also generates and displays Email DLP incidents in the specified region. All processes and data related to Email DLP occur and are stored in this region.- APACmail.asia-southeast1.email.dlp.paloaltonetworks.comAustraliamail.australia-southeast1.email.dlp.paloaltonetworks.comEuropemail.europe-west3.email.dlp.paloaltonetworks.comIndiamail.asia-south1.email.dlp.paloaltonetworks.comJapanmail.asia-northeast1.email.dlp.paloaltonetworks.comUnited Kingdommail.europe-west2.email.dlp.paloaltonetworks.comUnited Statesmail.us-west1.email.dlp.paloaltonetworks.com
![]() Specify the security restrictions for the connector.
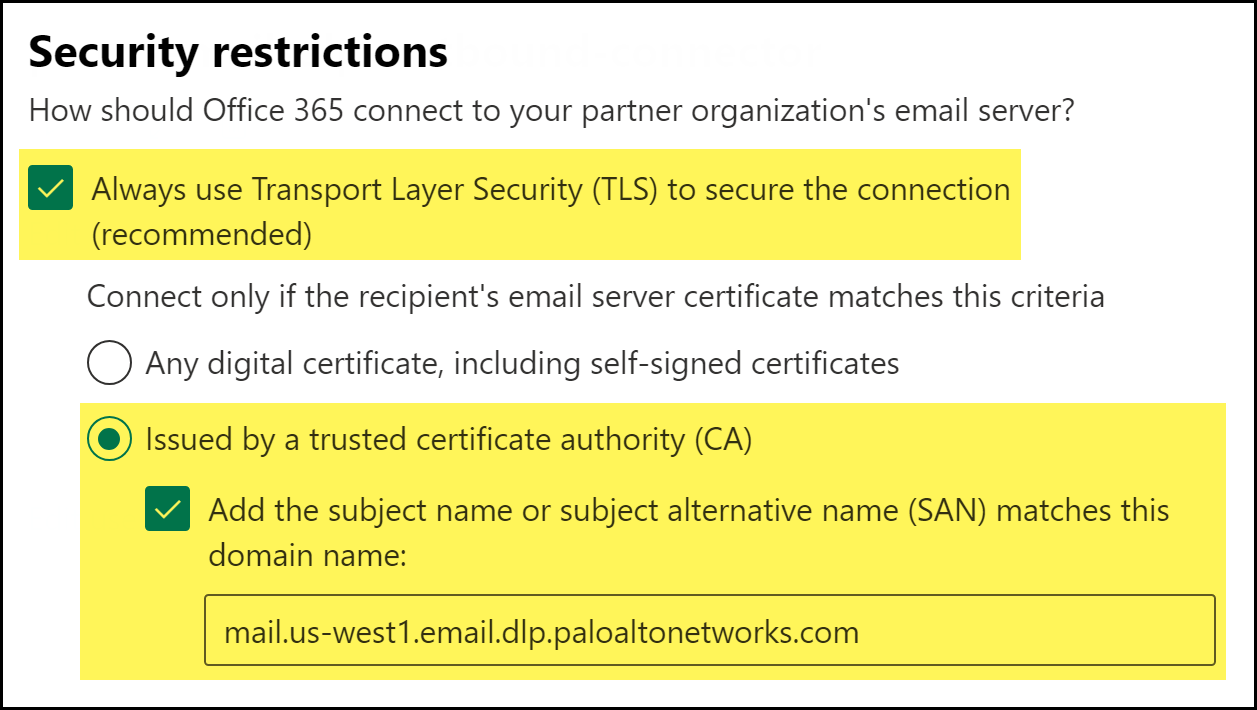
Specify the security restrictions for the connector.- Check (enable) Always use Transport Layer Security (TLS) to secure the connection.Enterprise DLP requires this setting to successfully forward emails for inspection. Enterprise DLP rejects the connect connection if you disable this setting.Select Issued by a trusted certificate authority (CA).Check (enable) Add the subject name or subject alternative (SAM) matches to this domain: and add the following domain name.Enterprise DLP requires you add the subject name for positive identification of the Enterprise DLP cloud service. The CA issuer FQDN you add must match the email routing FQDN you added in the previous step.
- APACmail.asia-southeast1.email.dlp.paloaltonetworks.comAustraliamail.australia-southeast1.email.dlp.paloaltonetworks.comEuropemail.europe-west3.email.dlp.paloaltonetworks.comIndiamail.asia-south1.email.dlp.paloaltonetworks.comJapanmail.asia-northeast1.email.dlp.paloaltonetworks.comUnited Kingdommail.europe-west2.email.dlp.paloaltonetworks.comUnited Statesmail.us-west1.email.dlp.paloaltonetworks.comClick Next.
![]() Add a validation email.A valid email address associated with the email domain used by your organization. This is required to validate connectivity between the Microsoft Exchange Admin Center and the Palo Alto Networks smart host, and that emails can be successfully delivered.
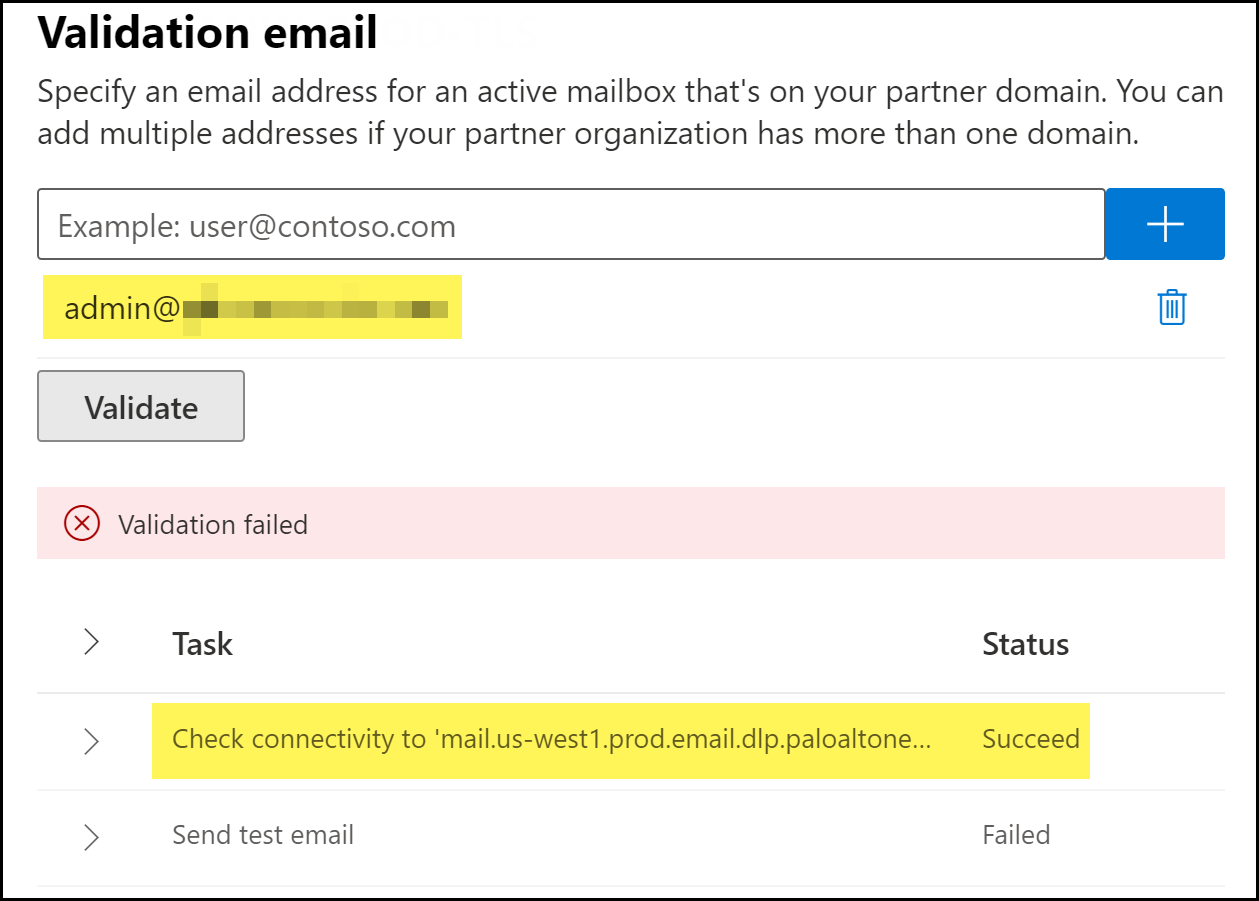
Add a validation email.A valid email address associated with the email domain used by your organization. This is required to validate connectivity between the Microsoft Exchange Admin Center and the Palo Alto Networks smart host, and that emails can be successfully delivered.- Add a valid email address for validation.Validate.The Microsoft Exchange validation tests take a few minutes to complete.Under the Task, verify that the Check connectivity validation test status to the Enterprise DLP FQDN displays Succeed.It's expected that the following errors occur when adding the validation email.
- Validation failed error is displayed.
- The Send test email validation test status displays Failed.
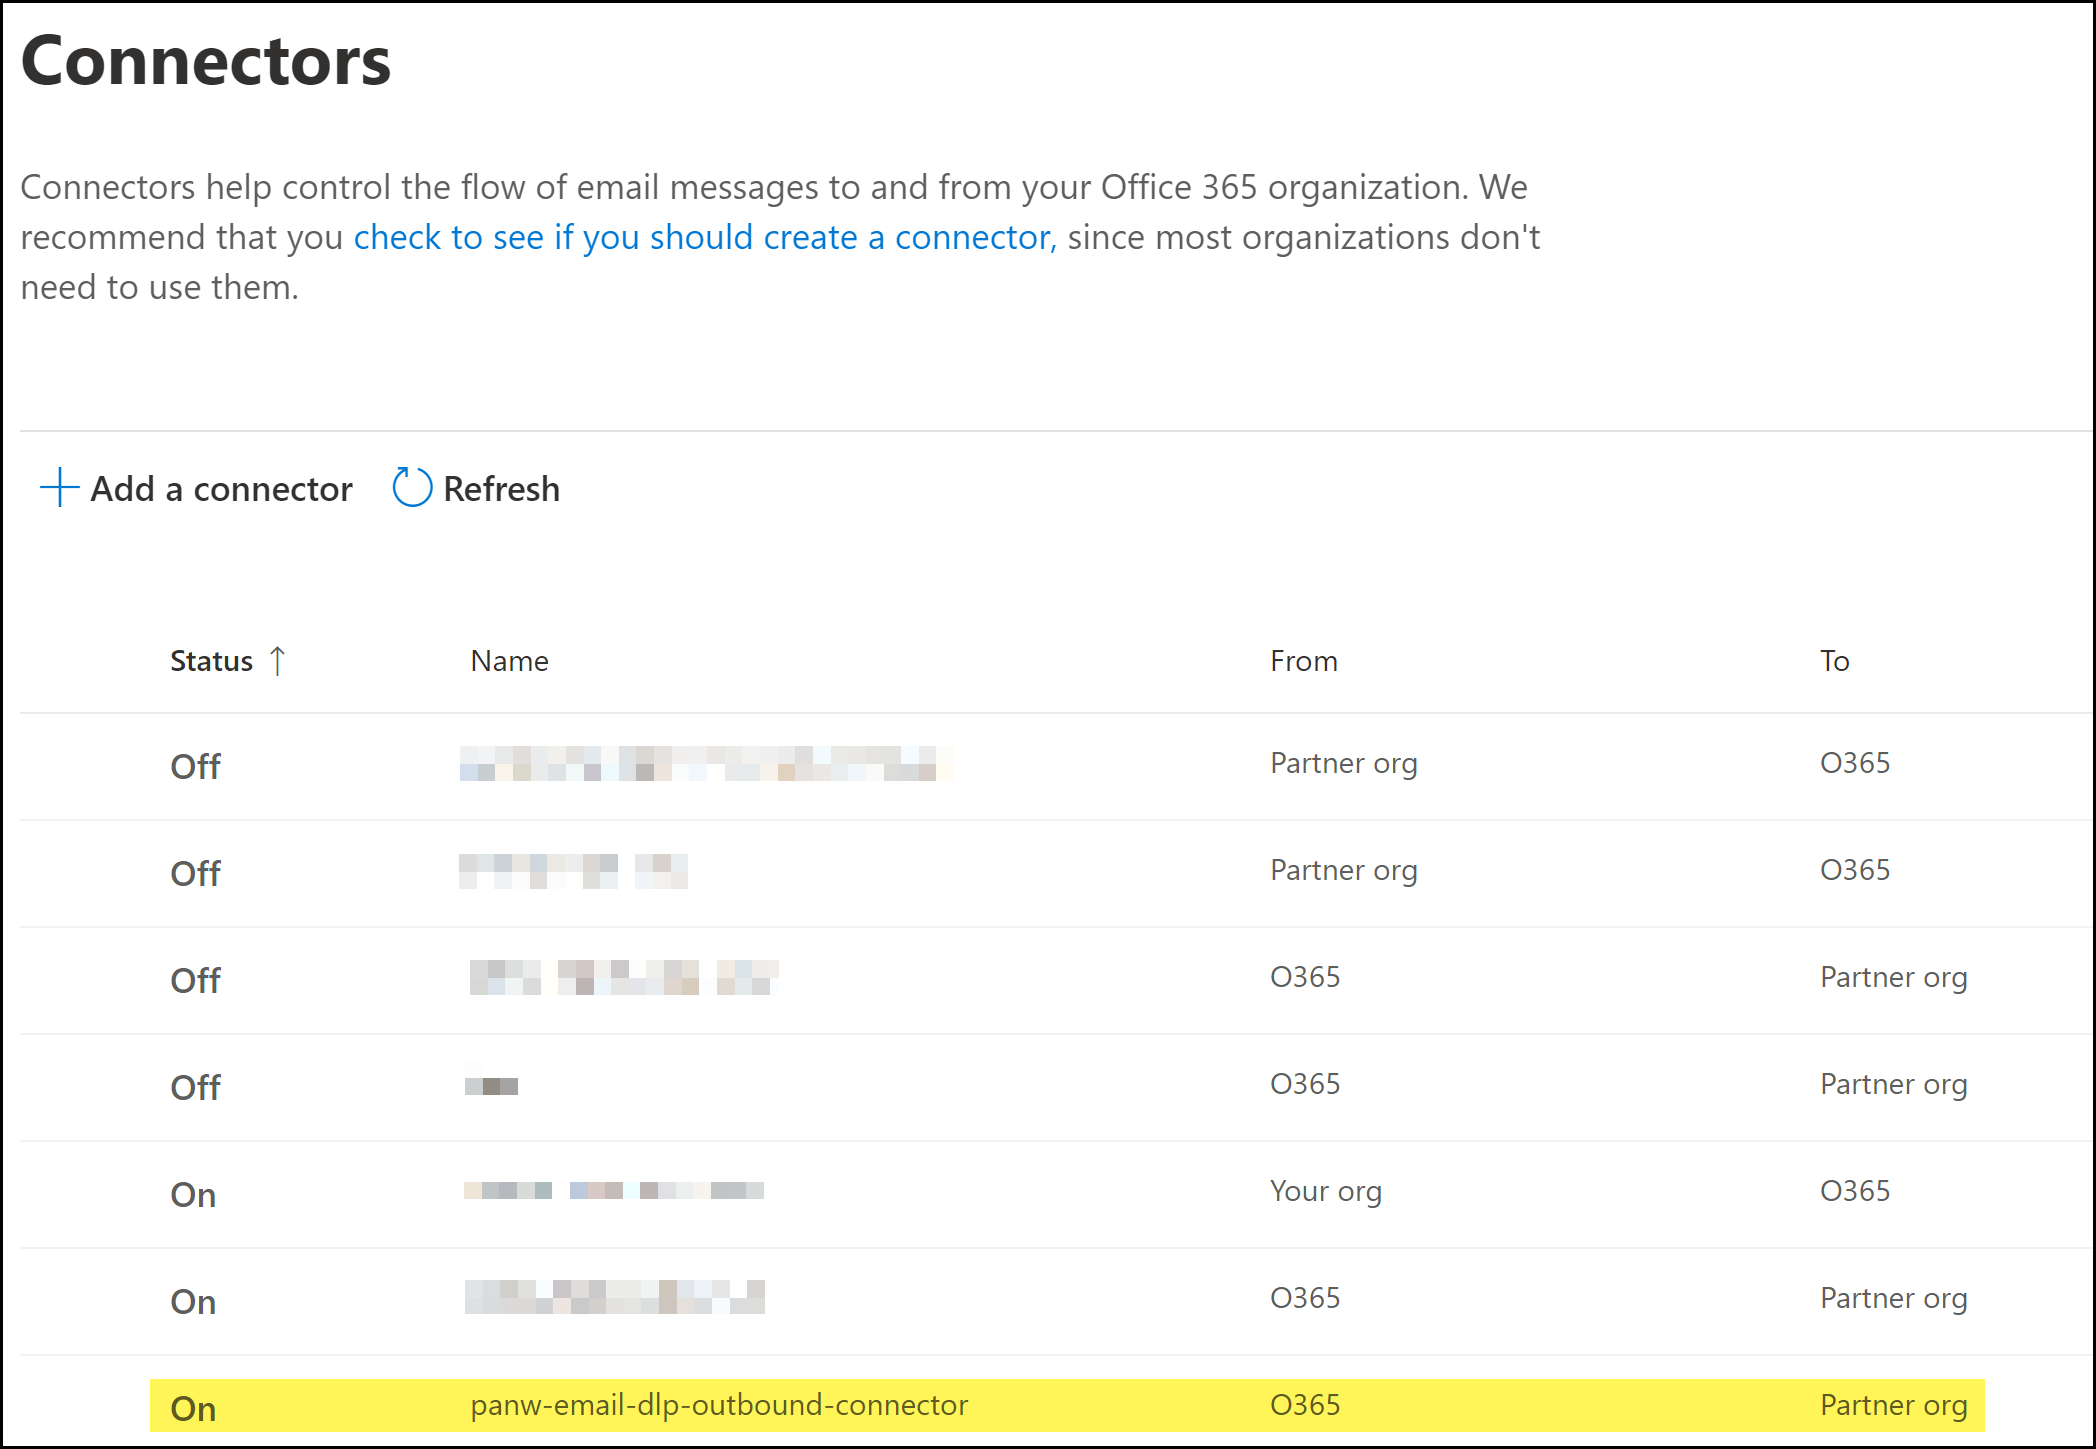
![]() Click Done.When prompted to confirm whether to proceed without successful validation, click Yes, proceed.Review the connector details and Create Connector.Click Done when prompted that the outbound connector was successfully created.Back in the Connectors page, verify the outbound connector is displayed and that the Status is On.
Click Done.When prompted to confirm whether to proceed without successful validation, click Yes, proceed.Review the connector details and Create Connector.Click Done when prompted that the outbound connector was successfully created.Back in the Connectors page, verify the outbound connector is displayed and that the Status is On.![]() Create the Microsoft Exchange inbound connector if not already created.Enterprise DLP requires the inbound connector to return emails forwarded to Enterprise DLP for inspection back to Microsoft Exchange.Skip this step if you have already created the inbound connector.Create Microsoft Exchange Transport Rules.After you successfully created the Microsoft Exchange connectors, you must create Microsoft Exchange transports rule to forward emails to and from Enterprise DLP, and to specify what actions Microsoft Exchange takes based on the Enterprise DLP verdicts.
Create the Microsoft Exchange inbound connector if not already created.Enterprise DLP requires the inbound connector to return emails forwarded to Enterprise DLP for inspection back to Microsoft Exchange.Skip this step if you have already created the inbound connector.Create Microsoft Exchange Transport Rules.After you successfully created the Microsoft Exchange connectors, you must create Microsoft Exchange transports rule to forward emails to and from Enterprise DLP, and to specify what actions Microsoft Exchange takes based on the Enterprise DLP verdicts.Create a Microsoft Exchange Inbound Connector
Create an inbound Microsoft Exchange Online Connector to return emails forwarded to Enterprise Data Loss Prevention (E-DLP) for inline inspection back to Microsoft Exchange.- Log in to the Microsoft Exchange Admin Center.Select Mail flowConnectors and Add a connector to launch the Microsoft Exchange Connector wizard.
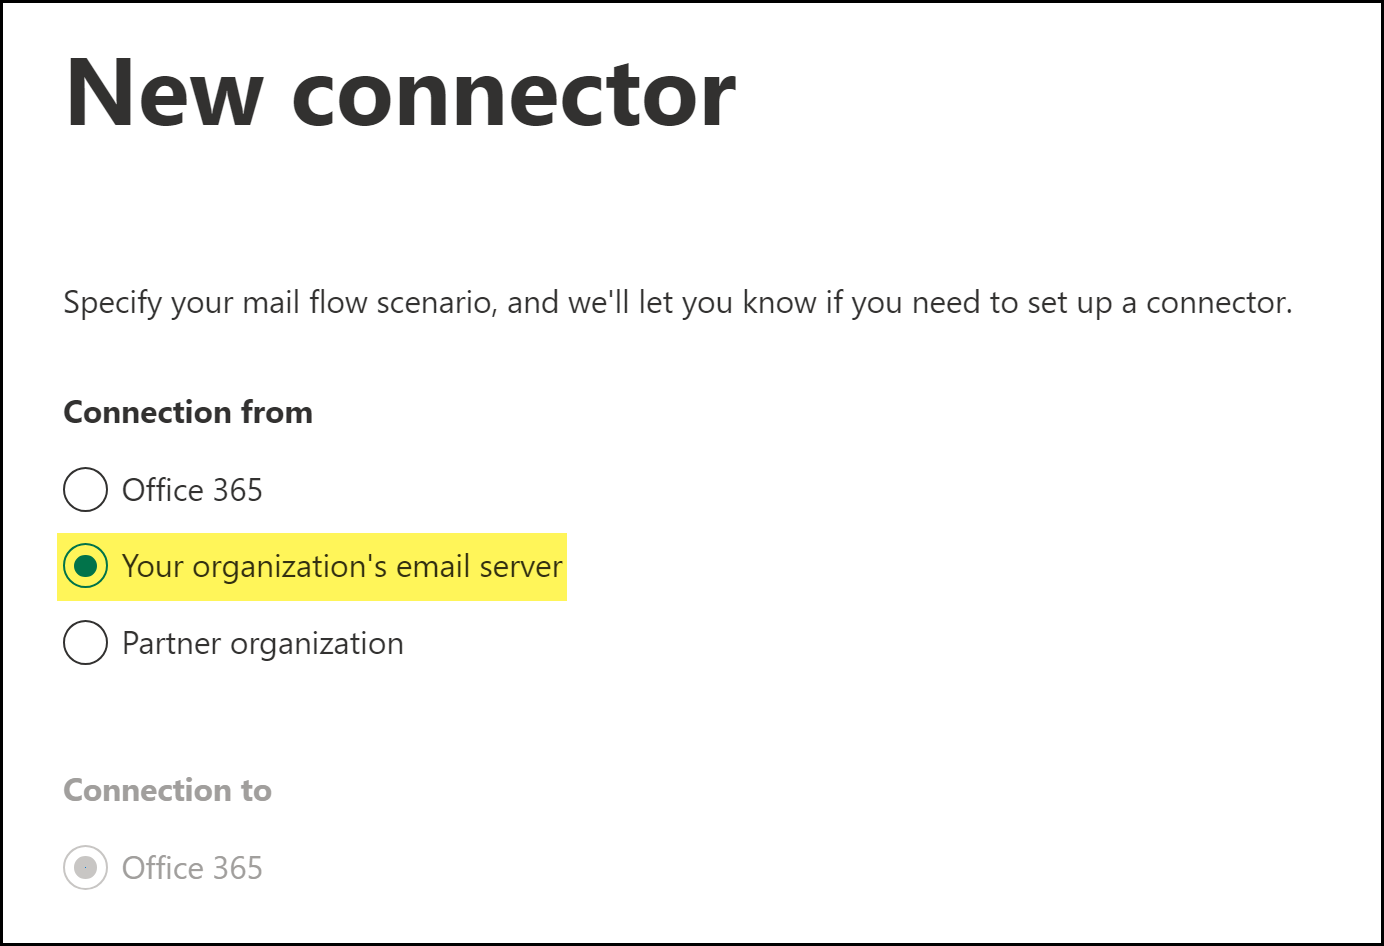
![]() Specify the connector source and destination.
Specify the connector source and destination.- For Connection from, select Your organization's email server.Click Next.
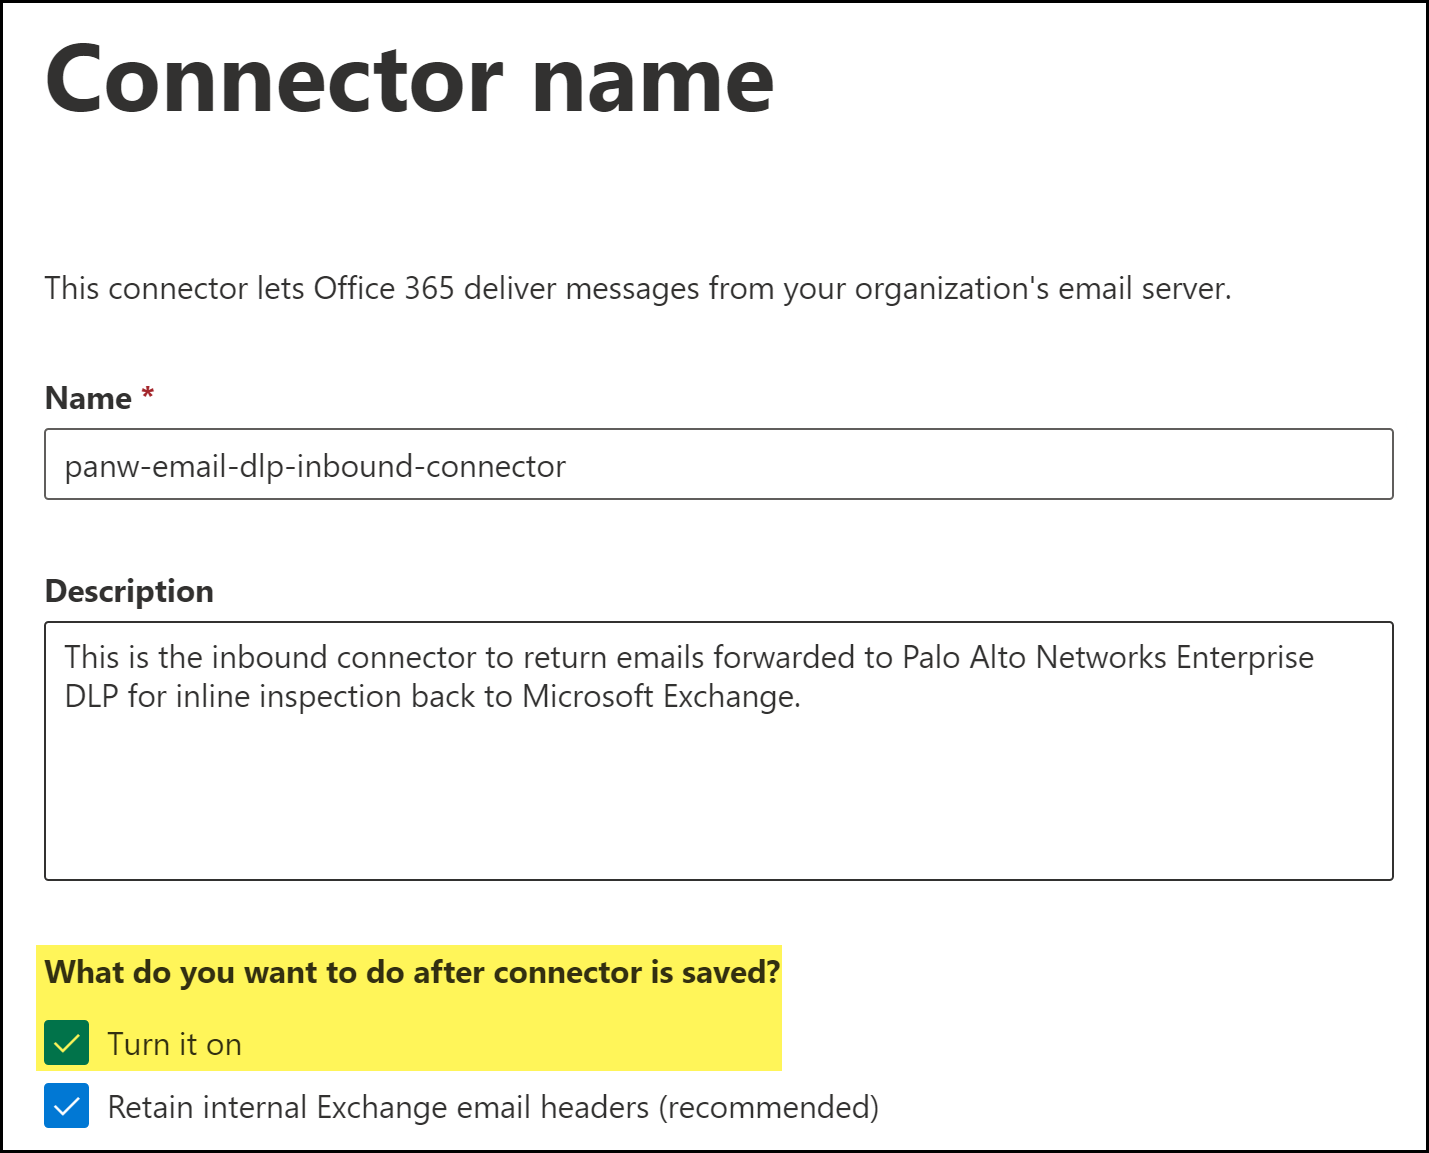
![]() Name the Microsoft Exchange connector.
Name the Microsoft Exchange connector.- Enter a descriptive Name for the connector.(Optional) Enter a Description for the connector.(Best Practices) For What do you want to do after connector is saved?, check (enable) Turn it on.Enable this to automatically turn on the connector after you have finished creating and saved the new Microsoft Exchange connector.Click Next.
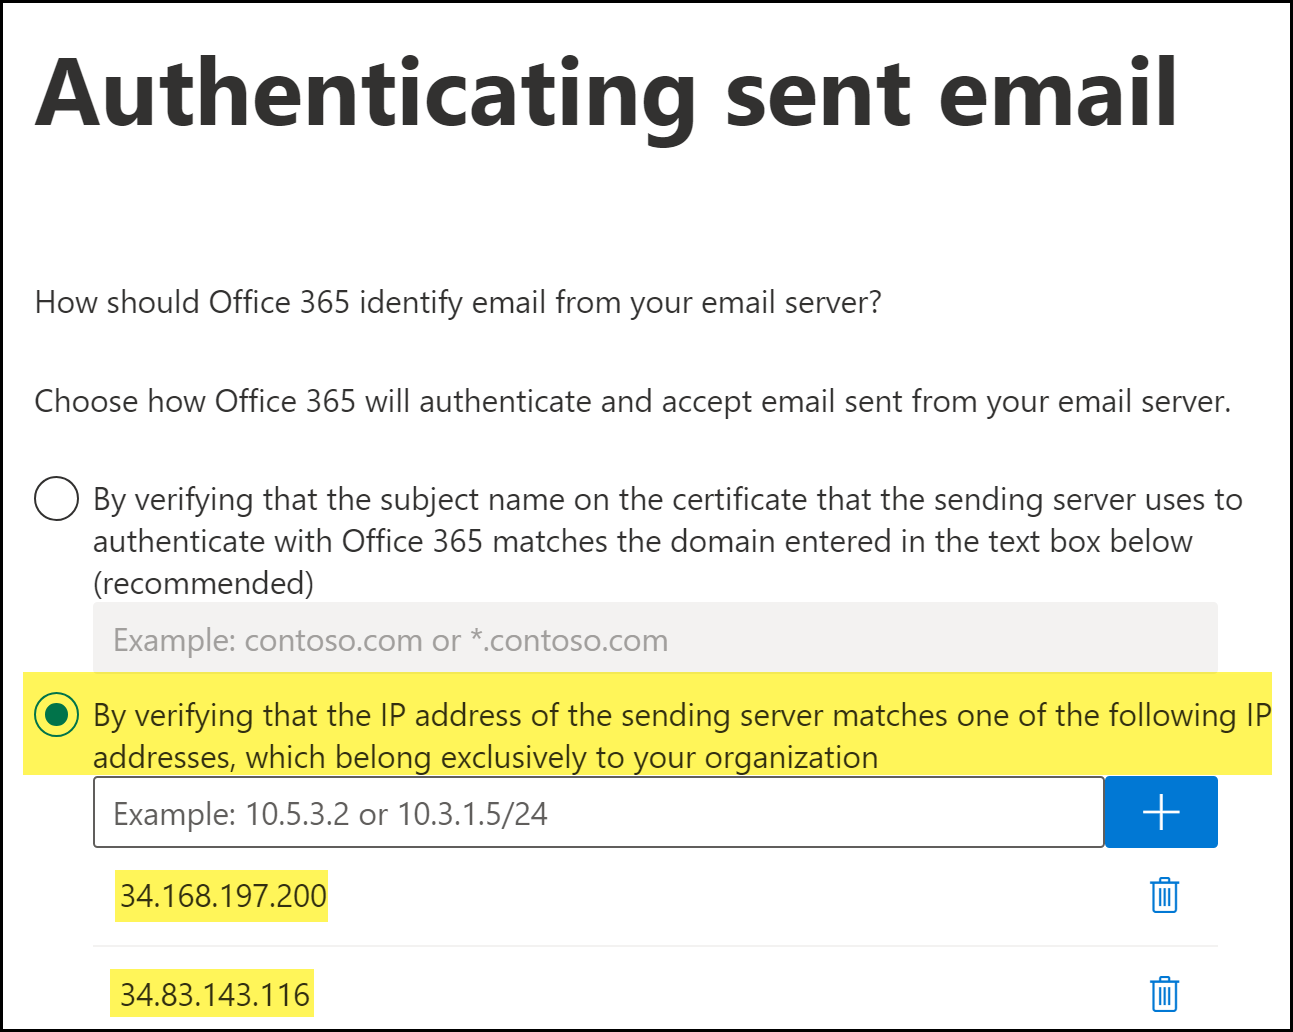
![]() Specify the authentication IP addresses that Microsoft Exchange uses to verify Enterprise DLP.Enterprise DLP requires the authentication IP addresses to forward emails back to Microsoft Exchange.
Specify the authentication IP addresses that Microsoft Exchange uses to verify Enterprise DLP.Enterprise DLP requires the authentication IP addresses to forward emails back to Microsoft Exchange.- Select By verifying that the IP address of the sending server matches one of the following IP address, which belong to your partner organization.Add the following to IP addresses.Add the IP addresses for the region where you host your email domain. You can add multiple regional IP addresses if you have email domains hosted in multiple regions.
- APAC35.186.151.226 and 34.87.43.120
- Australia35.197.179.113 and 35.244.122.65
- Europe34.141.90.172 and 34.107.47.119
- India34.93.185.212 and 35.200.159.173
- Japan34.84.8.170 and 35.221.111.27
- United Kingdom34.105.128.121 and 34.89.40.221
- United States34.168.197.200 and 34.83.143.116
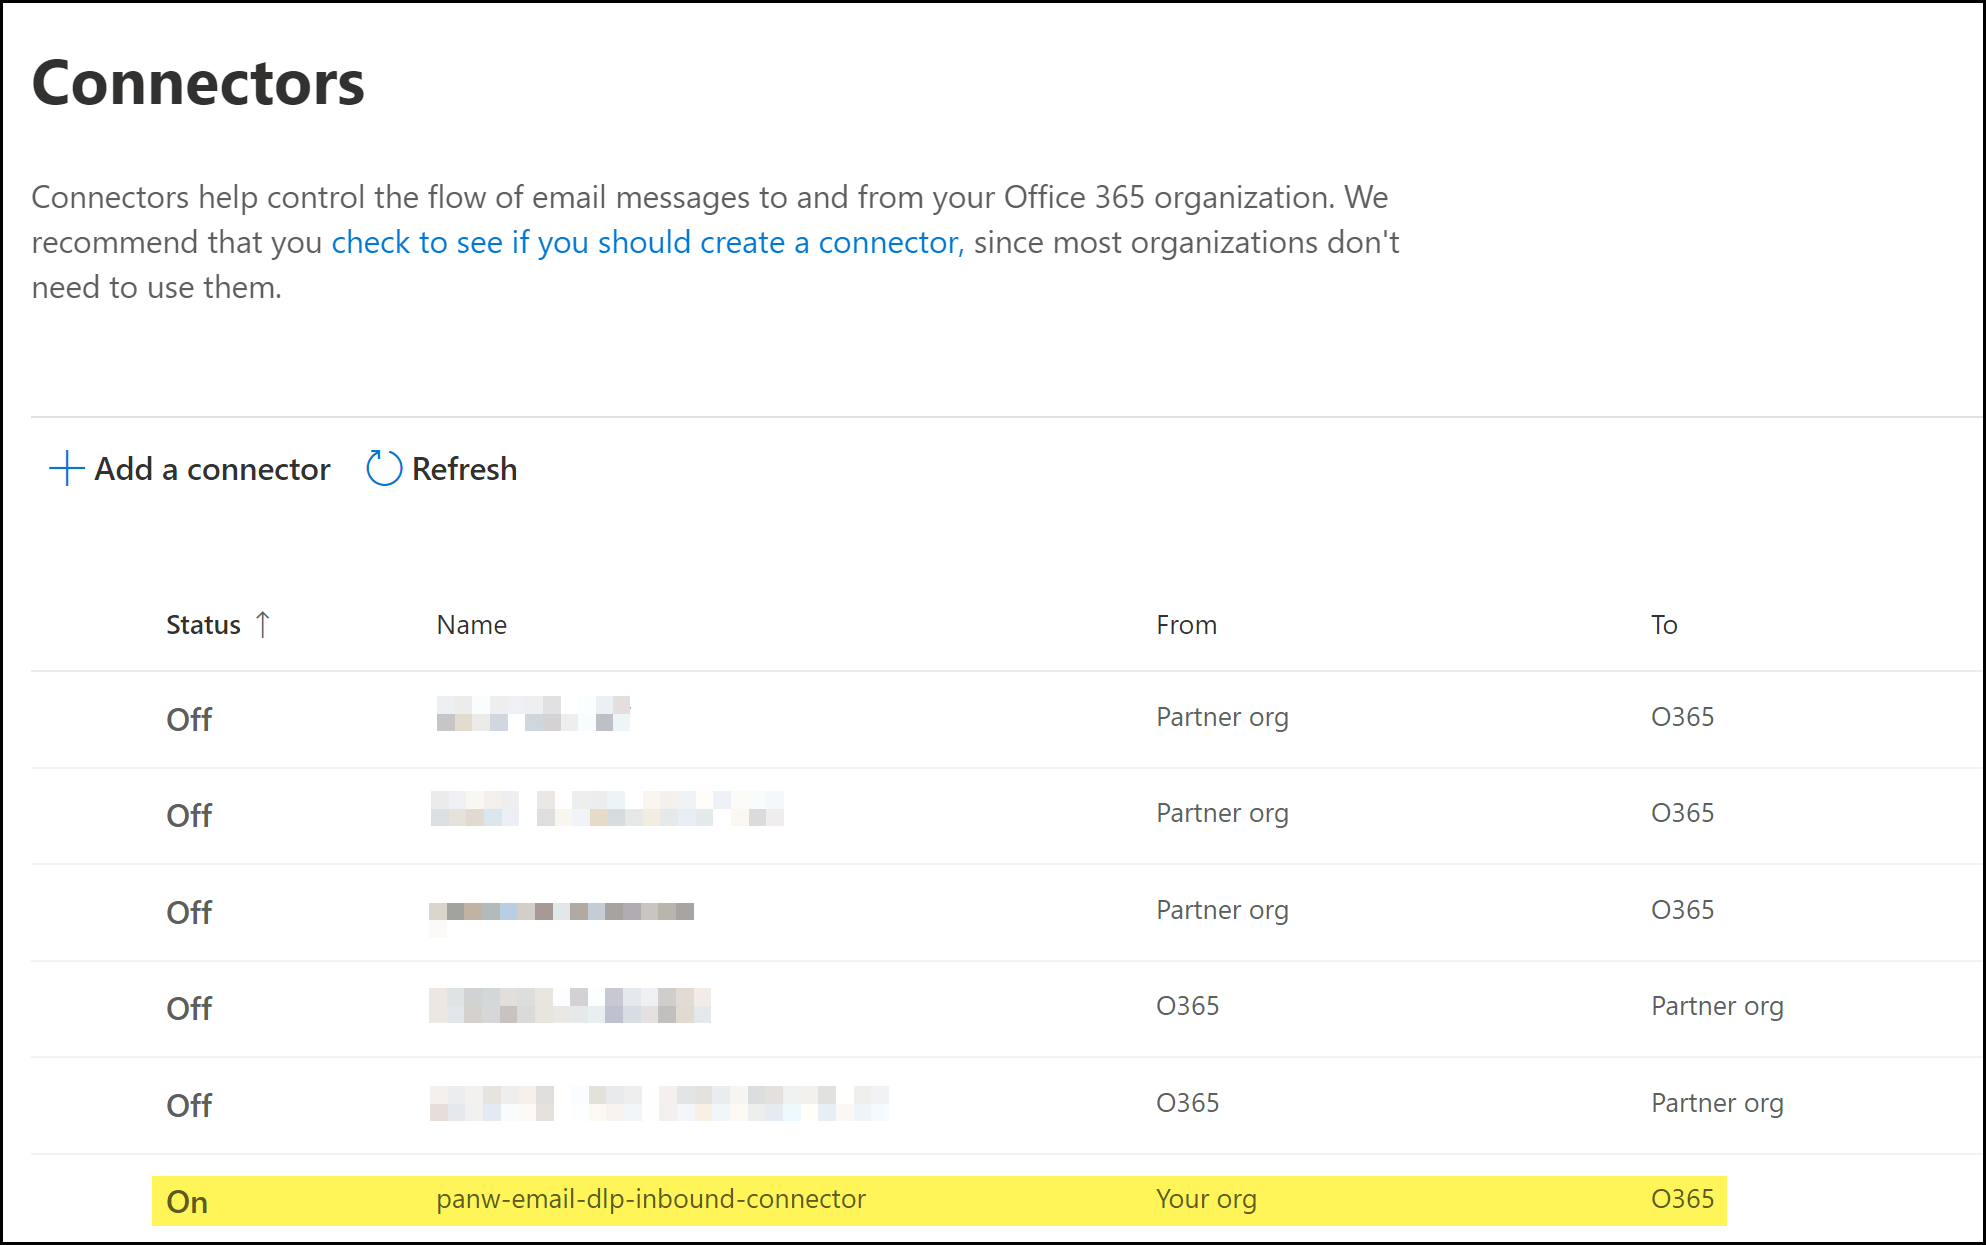
![]() Review the connector details and Create Connector.Click Done when prompted that you successfully created the inbound connector.Back in the Connectors page, verify the inbound connector is displayed and that the Status displays On.
Review the connector details and Create Connector.Click Done when prompted that you successfully created the inbound connector.Back in the Connectors page, verify the inbound connector is displayed and that the Status displays On.![]() Create the Microsoft Exchange outbound connector if not already created.Enterprise DLP requires the outbound connector to control the flow of emails forwarded from Microsoft Exchange Online to Enterprise DLP for inline inspection.Skip this step if you have already created the outbound connector.Create Microsoft Exchange Transport Rules.After you successfully created the Microsoft Exchange connectors, you must create Microsoft Exchange transports rule to forward emails to Enterprise DLP, and to specify what actions Microsoft Exchange takes based on the Enterprise DLP verdicts.
Create the Microsoft Exchange outbound connector if not already created.Enterprise DLP requires the outbound connector to control the flow of emails forwarded from Microsoft Exchange Online to Enterprise DLP for inline inspection.Skip this step if you have already created the outbound connector.Create Microsoft Exchange Transport Rules.After you successfully created the Microsoft Exchange connectors, you must create Microsoft Exchange transports rule to forward emails to Enterprise DLP, and to specify what actions Microsoft Exchange takes based on the Enterprise DLP verdicts.Create a Microsoft Exchange Proofpoint Server Connector
Create a Microsoft Exchange connector for your Proofpoint server to forward emails for encryption after Enterprise Data Loss Prevention (E-DLP) inspection and verdict rendering.- Prepare your Proofpoint server to encrypt emails inspected by Enterprise DLP.
- Enable DKIM signing for your Proofpoint server.When enabling DKIM signing, you must also select Enabled for the domain.Additionally, keep a record of your DKIM public key. This is required when updating your domain host records.Contact your email domain provider to update your SPF record.
- Add your Proofpoint IP address to your SPF record.Enterprise DLP requires this to forward emails to Proofpoint for encryption. Skip this step if you have already updated your SPF record with your Proofpoint IP address.
- Add the DKIM public key to your domain host records.
Log in to the Microsoft Exchange Admin Center.Select Mail flowConnectors and Add a connector to launch the Microsoft Exchange connector wizard.![]() Specify the connector source and destination.
Specify the connector source and destination.- For Connection from, select Office 365.For Connection to, select Partner organization.A partner can be any third-party cloud service that provides services such as services, such as data protection. In this case, the third-party partner organization is Palo Alto Networks.Click Next.
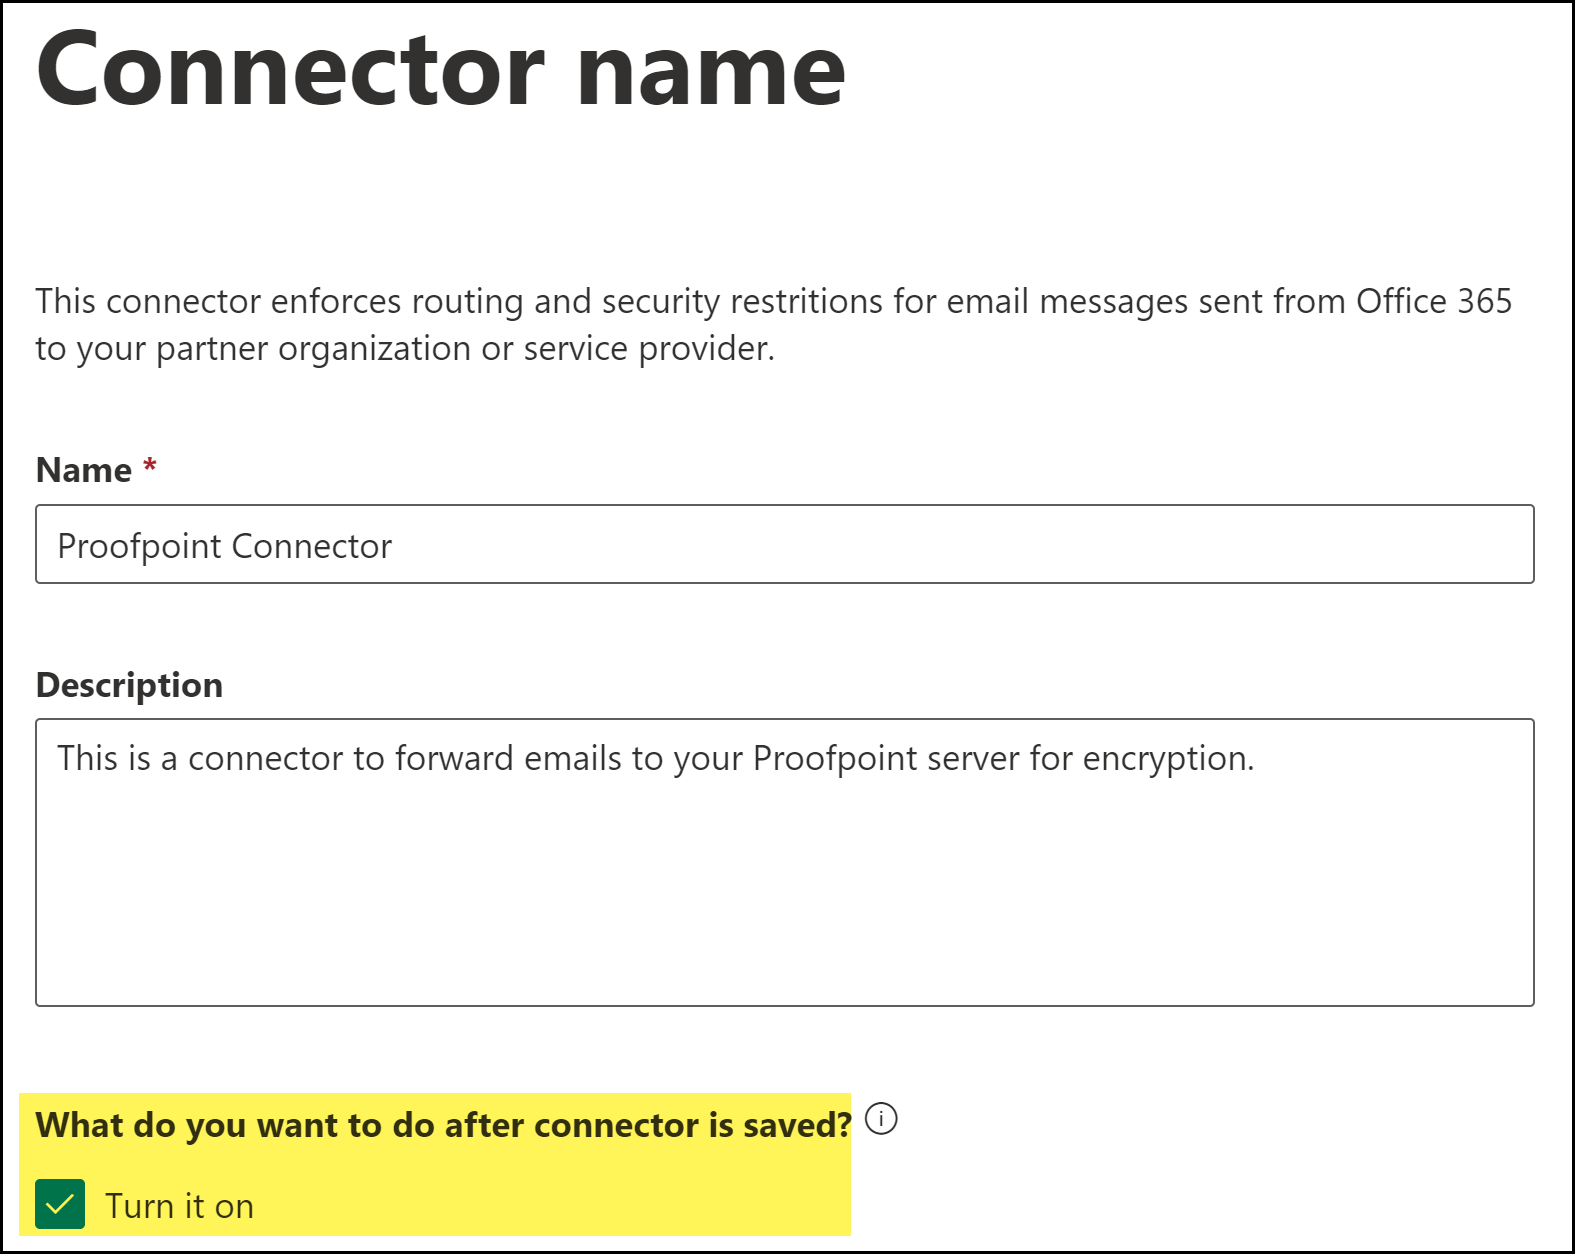
![]() Name the Microsoft Exchange connector.
Name the Microsoft Exchange connector.- Enter a descriptive Name for the connector.(Optional) Enter a Description for the connector.(Best Practices) For What do you want to do after connector is saved?, check (enable) Turn it on.Enable this to automatically turn on the connector after you have finished creating and saved the new Microsoft Exchange connector.Click Next.
![]() To specify when the connector should be used, select Only when I have a transport rule set up that redirects messages to this connector and click Next.
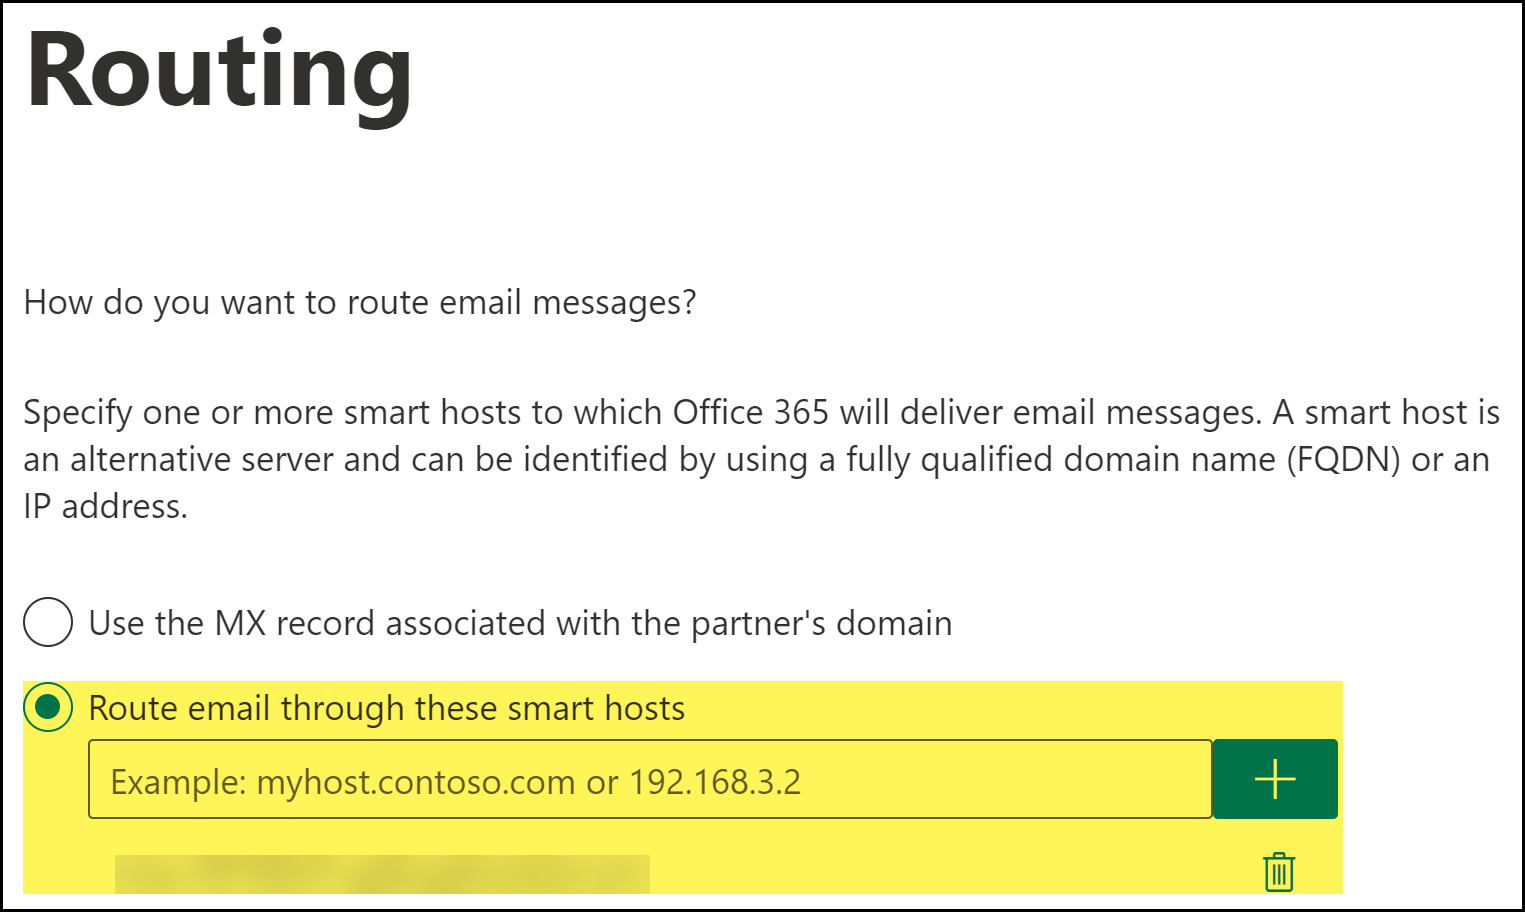
To specify when the connector should be used, select Only when I have a transport rule set up that redirects messages to this connector and click Next.![]() To configure the route settings for your Proofpoint server, check (enable) Route email through these smart hosts to add the Proofpoint server smart host Fully Qualified Domain Name (FQDN) and click Next.
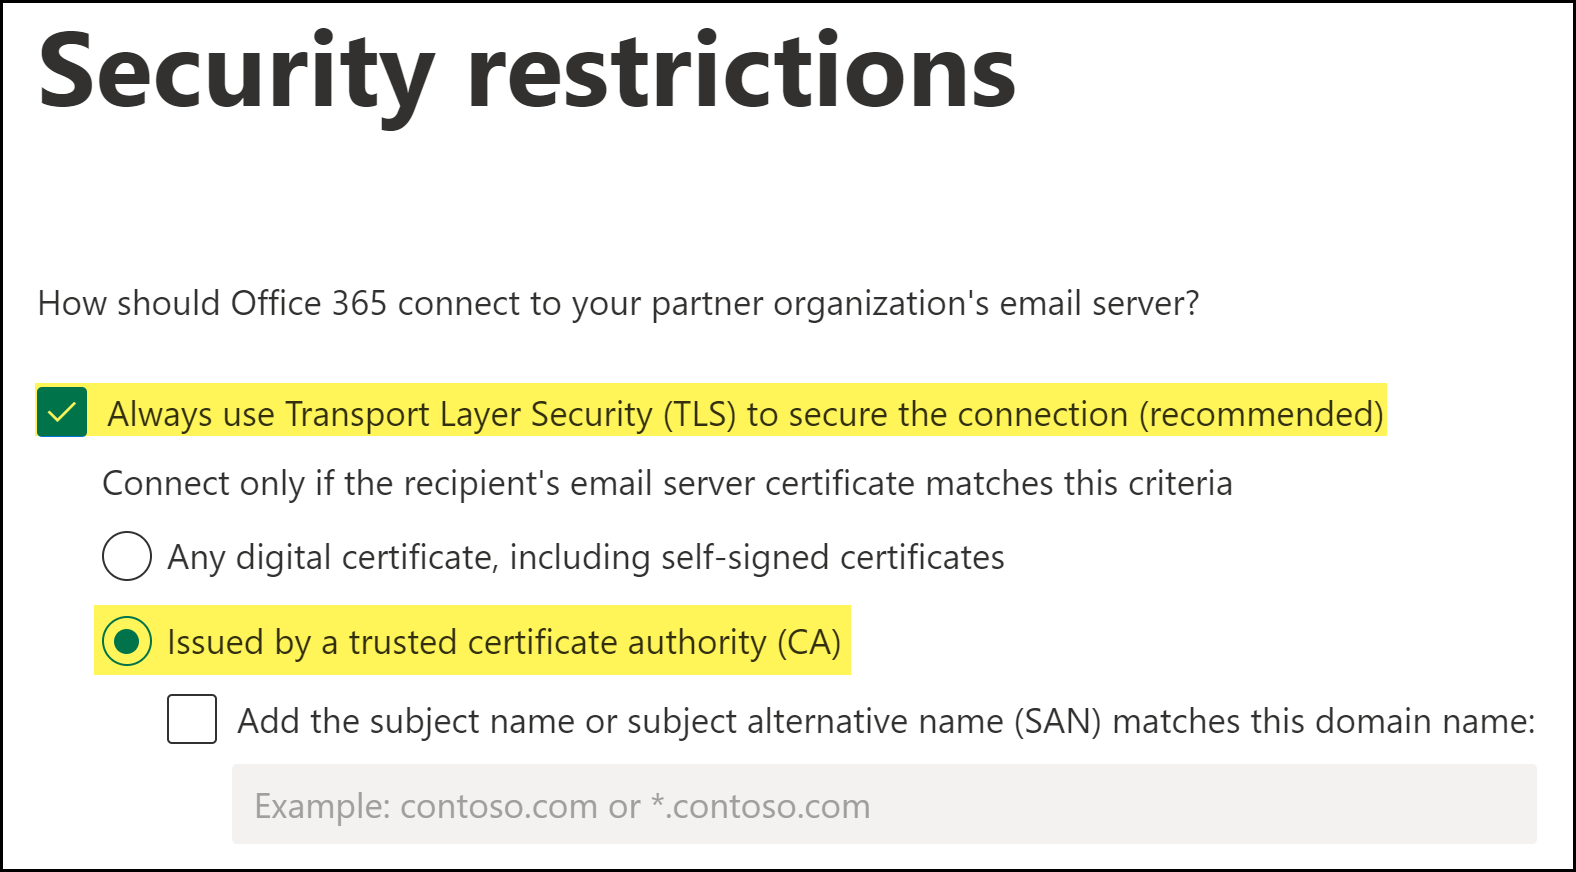
To configure the route settings for your Proofpoint server, check (enable) Route email through these smart hosts to add the Proofpoint server smart host Fully Qualified Domain Name (FQDN) and click Next.![]() Specify the security restrictions for the connector.
Specify the security restrictions for the connector.- Check (enable) Always use Transport Layer Security (TLS) to secure the connection.Enterprise DLP requires this setting to successfully forward emails for inspection. Enterprise DLP rejects the connect connection if you disable this setting.Select Issued by a trusted certificate authority (CA).Click Next.
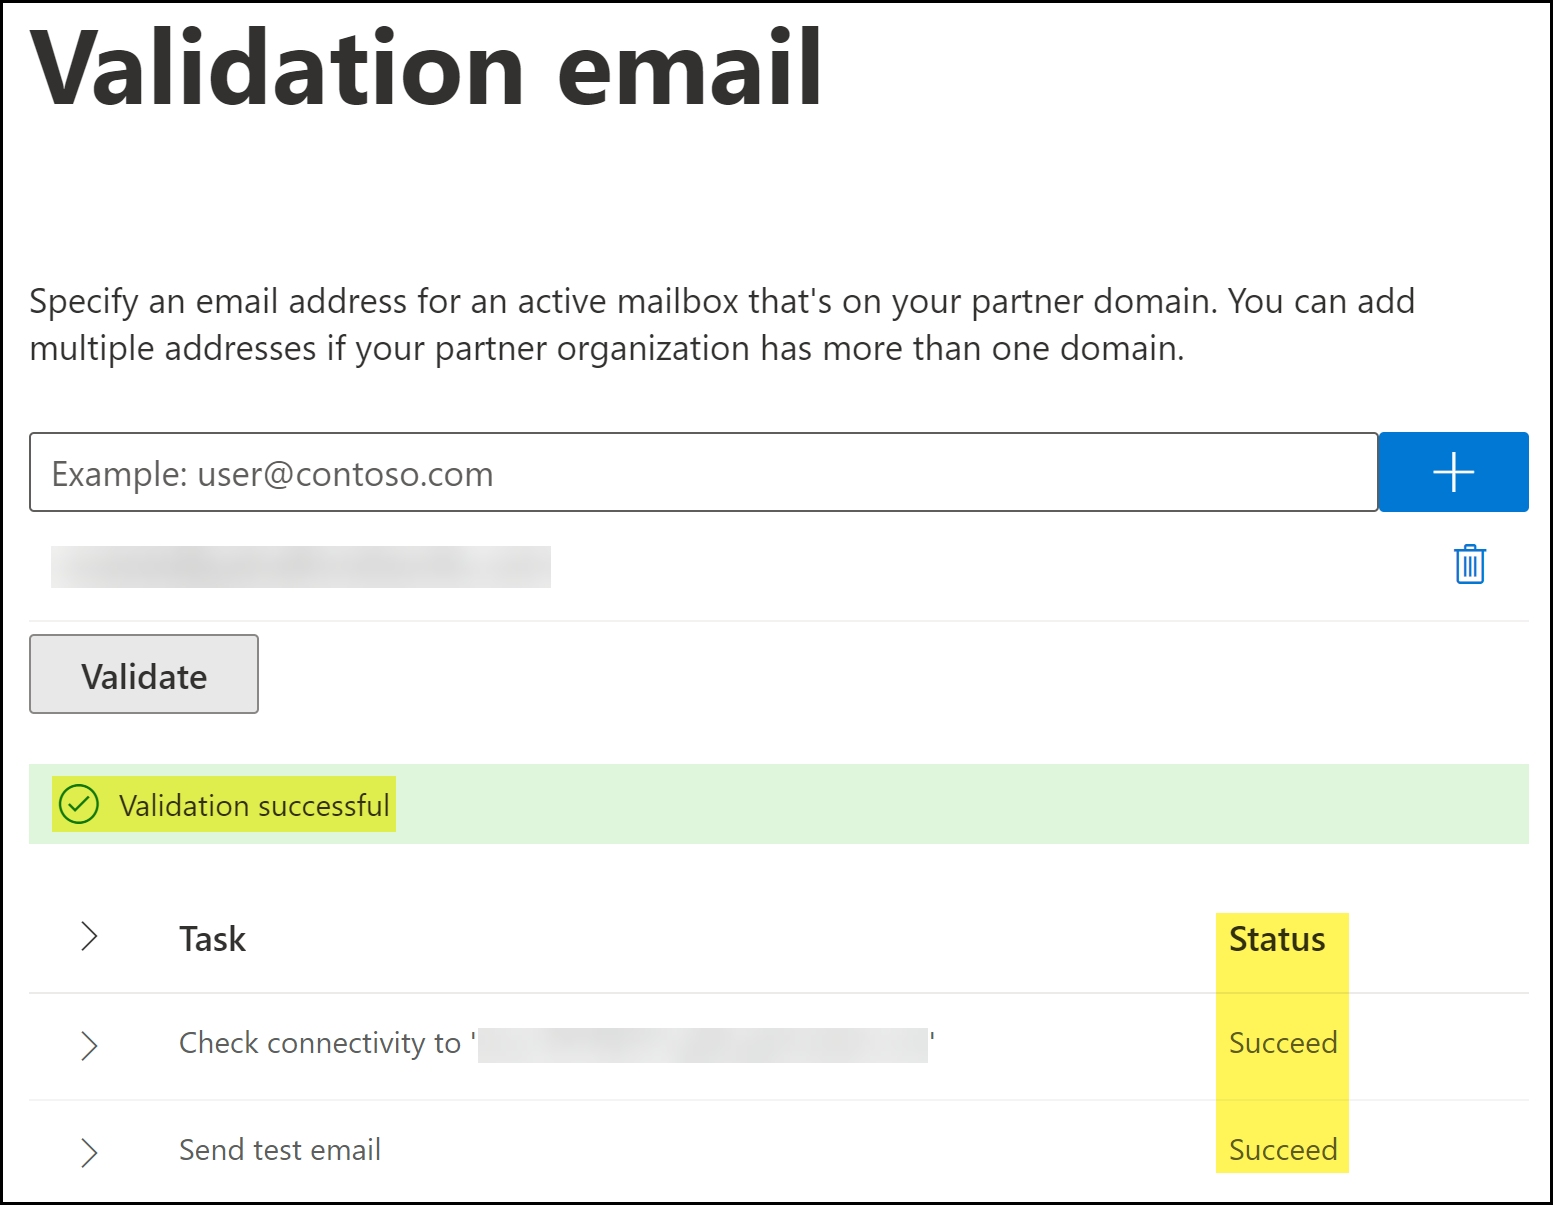
![]() Add a validation email.Enterprise DLP requires a valid email address associated with the email domain to validate connectivity between the Microsoft Exchange Admin Center and the Email DLP smart host, and to verify Enterprise DLP can successfully deliver any required notification emails.
Add a validation email.Enterprise DLP requires a valid email address associated with the email domain to validate connectivity between the Microsoft Exchange Admin Center and the Email DLP smart host, and to verify Enterprise DLP can successfully deliver any required notification emails.- Add a valid email address for validation.Validate.The Microsoft Exchange validation tests take a few minutes to complete.Under the Task, verify that the Check connectivity validation test status to the Enterprise DLP FQDN displays Succeed.
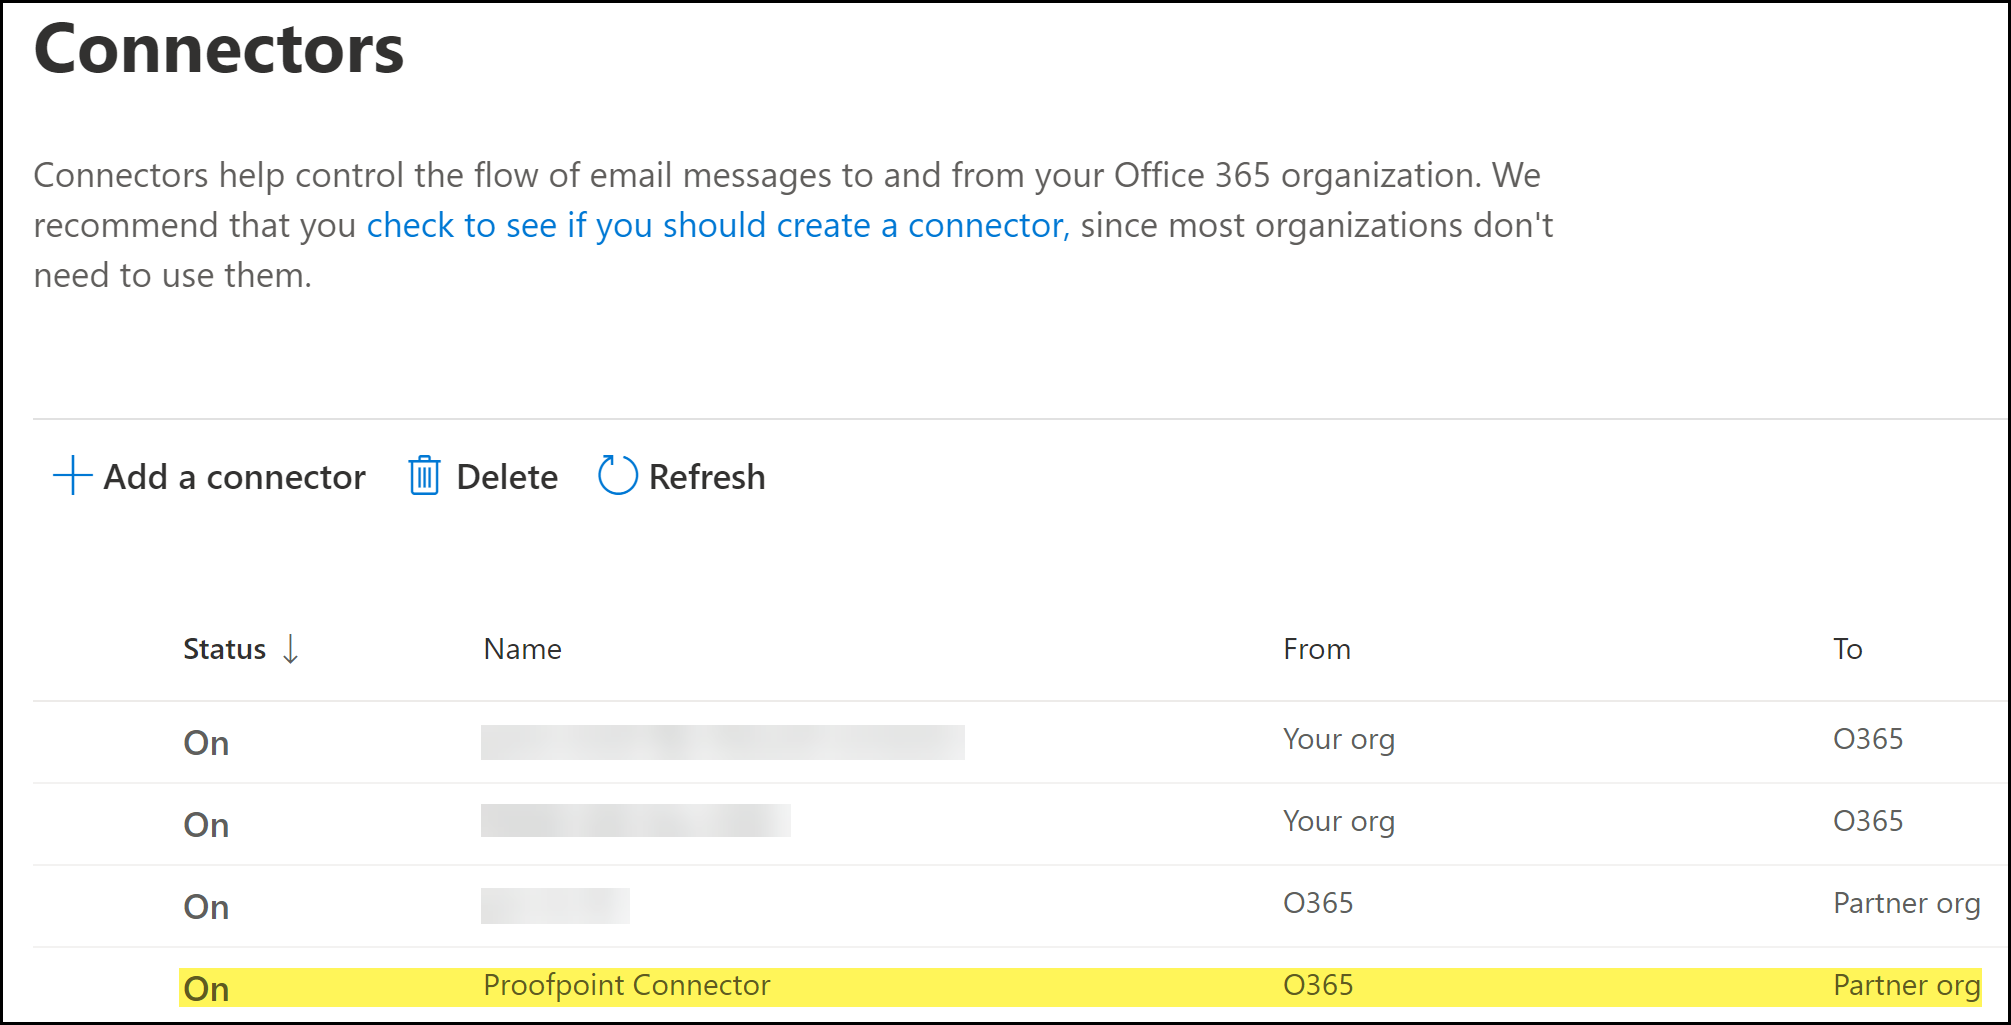
![]() Click Done.When prompted to confirm whether to proceed without successful validation, click Yes, proceed.Review the connector details and Create Connector.Click Done when prompted that you successfully created the outbound connector.Back in the Connectors page, verify that you successfully created the outbound connector and that the Status displays On.
Click Done.When prompted to confirm whether to proceed without successful validation, click Yes, proceed.Review the connector details and Create Connector.Click Done when prompted that you successfully created the outbound connector.Back in the Connectors page, verify that you successfully created the outbound connector and that the Status displays On.![]() Create the Microsoft Exchange outbound and inbound connectors if not already created.Enterprise DLP requires the outbound connector to control the flow of emails forwarded from Microsoft Exchange Online to Enterprise DLP for inline inspection and requires the inbound connector to return emails forwarded to Enterprise DLP for inspection back to Microsoft Exchange.Skip this step if you have already created the outbound and inbound connectors.Create Microsoft Exchange Transport Rules.After you successfully created the Microsoft Exchange connectors, you must create Microsoft Exchange transports rule to forward emails to and from Enterprise DLP, and to specify what actions Microsoft Exchange takes based on the Enterprise DLP verdicts.
Create the Microsoft Exchange outbound and inbound connectors if not already created.Enterprise DLP requires the outbound connector to control the flow of emails forwarded from Microsoft Exchange Online to Enterprise DLP for inline inspection and requires the inbound connector to return emails forwarded to Enterprise DLP for inspection back to Microsoft Exchange.Skip this step if you have already created the outbound and inbound connectors.Create Microsoft Exchange Transport Rules.After you successfully created the Microsoft Exchange connectors, you must create Microsoft Exchange transports rule to forward emails to and from Enterprise DLP, and to specify what actions Microsoft Exchange takes based on the Enterprise DLP verdicts.

