Enterprise DLP
Microsoft Teams
Table of Contents
Microsoft Teams
Set up Cortex XSOAR to use Enterprise Data Loss Prevention (E-DLP) End User Alerting for
Microsoft Teams.
- Set up the prerequisites needed to begin integrating Microsoft Teams with Cortex XSOAR.
- Integrate referred IP address directory service using one of the following procedures.Create the Demisto Bot in Microsoft Teams.Grant the Demisto Bot Permissions in Microsoft Graph.Configure Microsoft Teams on .Add the Demisto Bot to a Team.Integrate Microsoft Teams with Cortex XSOAR.You can use one of the following methods based on your preferences.Configure Enterprise DLP authentication.
- Strata Cloud Manager and Prisma Access (Managed by Panorama) (TSG-enabled)Access the Common Services Identity and & Access settings and add a Service Account to generate the Client ID and Client Secret.If you already have a Service Account created, you can Reset Client Secret to recover a lost Client Secret.The Client ID and Client Secret are used for authentication.When you create the Service Account, the Client ID and Client Secret are displayed in the Client Credentials. You can manually copy the Client Credentials or Download CSV File to download the Client Credentials in plaintext locally to your device.
![]()
- Panorama (Not TSG-enabled)
- Log in to the DLP app on the hub.If you don’t already have access to the DLP app on the hub, see the hub Getting Started Guide. Only Superusers can access the hub.
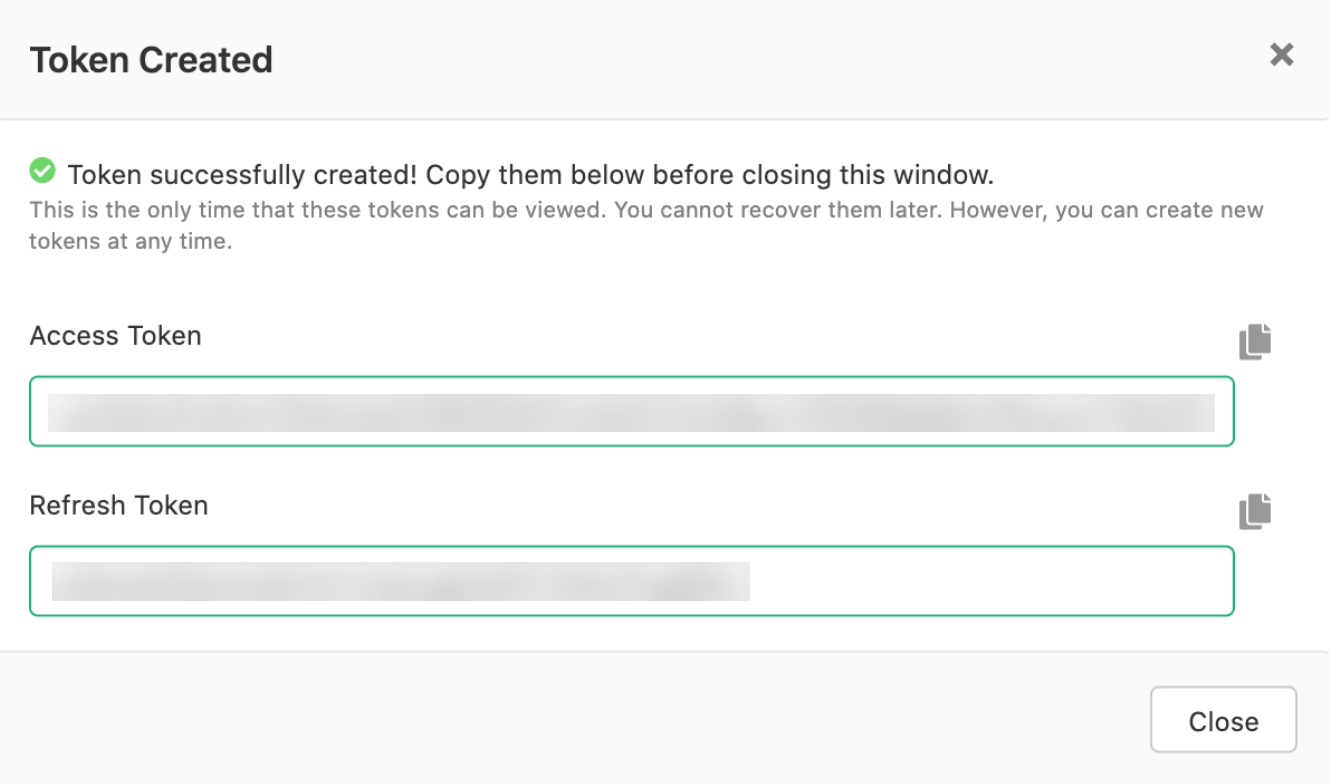
- Select API and Create Token.
- Enter a descriptive Token Name and Create the access token.
- Copy the Access Token and Refresh Token and save them in a secure location.
![]()
Enable Enterprise DLP on Cortex XSOAR.- Strata Cloud Manager and Prisma Access (Managed by Panorama) (TSG-enabled)
- Add the Client Credentials to Cortex XSOAR.
- On Cortex XSOAR, select and add a New credential.
- Enter a descriptive Credential Name.
- For the Username, enter the Client ID created in the previous step.
- For the Password, enter the Client Secret created in the previous step.
- Save.
- Select and search for Enterprise DLP.
- Install the Enterprise DLP content pack.
- Select and search for Enterprise DLP.Click Add Instance to integrate Enterprise DLP. See Integrate Enterprise DLP on XSOAR for more information.
- Select a descriptive Name.
- For the Incident Type, verify Data Loss
Prevention is selected.If Data Loss Prevention is not displayed, hover your mouse over the field to display the list of available incident types to search for and select Data Loss Prevention.
- for the Mapper, verify that Data Loss Prevention is selected.If Data Loss Prevention is not displayed, hover your mouse over the field to display the list of available incident types to search for and select Data Loss Prevention.
- Click Switch to credentials.
- Enter the Client Credentials generated in the previous step.
- Check (enable) Long running instance.
- Test to confirm Cortex XSOAR has successfully integrated with
Enterprise DLP.A Success is displayed when Cortex XSOAR successfully integrates with Enterprise DLP.
- Panorama (Not TSG-enabled)
- On Cortex XSOAR, select and search for Enterprise DLP.
- Install the Enterprise DLP content pack.
- Select and search for Enterprise DLP.Click Add Instance to integrate Enterprise DLP. See Integrate Enterprise DLP on XSOAR for more information.
- Select a descriptive Name.
- For the Incident Type, verify Data Loss
Prevention is selected.If Data Loss Prevention is not displayed, hover your mouse over the field to display the list of available incident types to search for and select Data Loss Prevention.
- for the Mapper, verify that Data Loss Prevention is selected.If Data Loss Prevention is not displayed, hover your mouse over the field to display the list of available incident types to search for and select Data Loss Prevention.
- Add the Access Token and Refresh Token you created in the previous step.
- Check (enable) Long running instance.
- (Optional) Modify the automated Slack Bot Message.
- Test to confirm Cortex XSOAR has successfully integrated with
Enterprise DLP.A Success is displayed when Cortex XSOAR successfully integrates with Enterprise DLP.
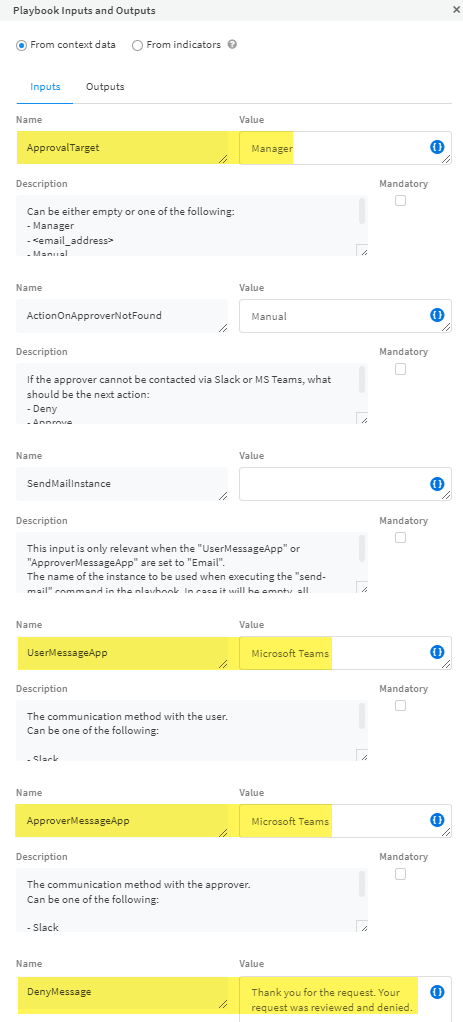
Configure the DLP Incident Feedback Loop Cortex XSOAR playbook- In Dashboard & Reports, select Playbooks.Select .Configure the Cortex XSOAR playbook.
- For ApprovalTarget, enter Manager to send an exemption request to the sender's manager. This information is pulled from your preferred IP address directory service.
- For the UserMessageApp, verify Microsoft Teams is displayed.
- For the ApproverMessageApp, enter Microsoft Teams.
- (Optional) For the DenyMessage, enter a custom response when a file extension is denied by the sender's manager,
Save.![]() Confirm the Cortex XSOAR integration with Enterprise DLP.
Confirm the Cortex XSOAR integration with Enterprise DLP.- Strata Cloud Manager and Prisma Access (Panorama Managed) (TSG-enabled)
- Log in to Strata Cloud Manager.
- Select and check (enable) Confirm the status for XSOAR Integration.
- Panorama (Not TSG-enabled)
- Log in to the DLP app on the hub.If you don’t already have access to the DLP app on the hub, see the hub Getting Started Guide. Only Superusers can access the hub.
- Select Settings and check (enable) Confirm the status for XSOAR Integration.
Configure the End User Alerting with Cortex XSOAR exemption settings.- Select and configure the Exemption Duration.The file that prompted the End User Alerting with Cortex XSOAR notification that was exempted can be uploaded for the duration of the exemption duration. The default is 12 hours.Select and configure whether to Include Snippets in Message.You can select Off (default) to not include a snippet of the sensitive data or On to include a snippet of the sensitive data in the automated message on Microsoft Teams.