GlobalProtect
Create a Single Configuration Profile for the GlobalProtect App for macOS
Table of Contents
Create a Single Configuration Profile for the GlobalProtect App for macOS
Learn how to create a single configuration profile for the deployment of the
GlobalProtect app on macOS devices.
| Where Can I Use This? | What Do I Need? |
|---|---|
|
|
Before you Deploy the GlobalProtect Mobile App for macOS Using Jamf Pro, you can create and deploy a single
configuration profile that defines the configuration of GlobalProtect app 6.0.4 and
later and 6.1 and later releases on managed macOS devices. For example, you can set
up the configuration profile to load system extensions to provide a seamless
experience when users run the GlobalProtect app to access the internet, SaaS
applications, private applications, and resources in your organization.
If you want to use multiple configuration
profiles instead of a single configuration profile, skip this procedure and Enable System and Network Extensions on macOS Endpoints Using Multiple Configuration Profiles.
Before you begin, Create a Smart Computer Group for GlobalProtect App Deployment so that you can deploy this
configuration profile to the computers in the Smart Computer Group.
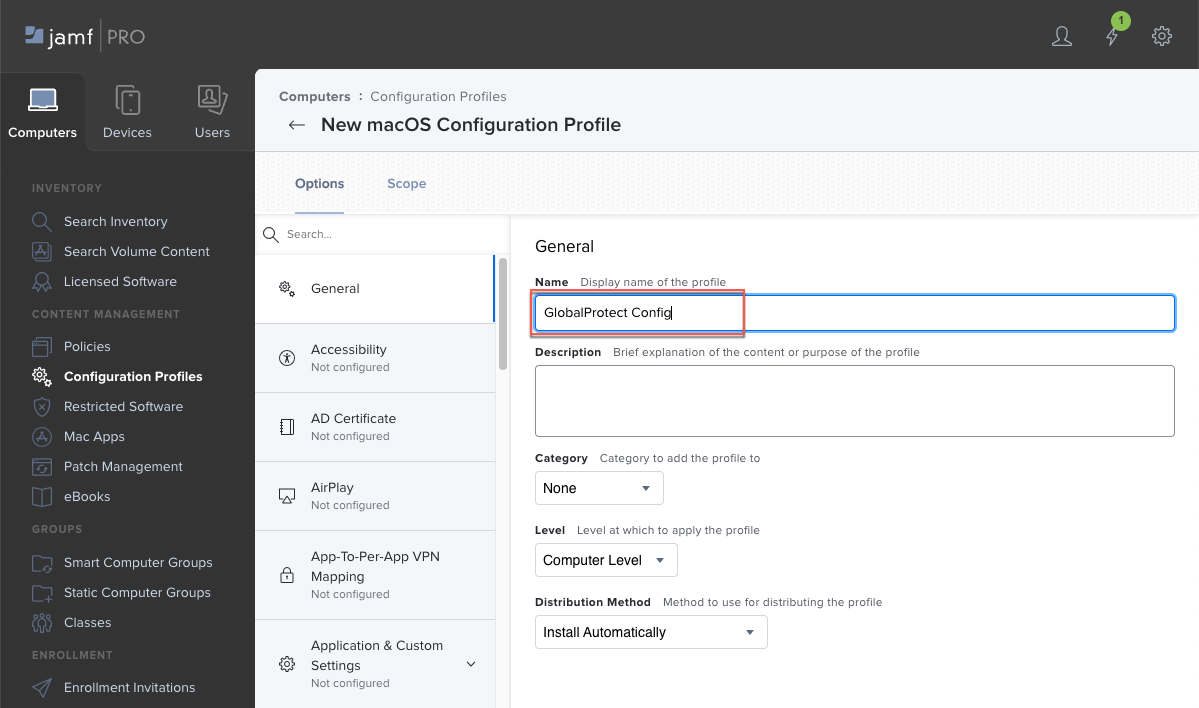
- Create a configuration profile for the GlobalProtect app and specify general settings.
- In Jamf Pro, select .Enter a Display Name for the configuration profile.
![]() Create a payload to automatically load GlobalProtect system extensions. This configuration suppresses notification pop-ups and enables the GlobalProtect app to run without prompting users to accept the extensions.
Create a payload to automatically load GlobalProtect system extensions. This configuration suppresses notification pop-ups and enables the GlobalProtect app to run without prompting users to accept the extensions.- If you saved your settings in the previous step, click Edit.Select .Specify the following settings:
- Display Name—Enter a name for the system extensions payload, such as SystemExtension_GP
- System Extension Types—Select Allowed System Extensions
- Team Identifier—Enter PXPZ95SK77
- ALLOWED SYSTEM
EXTENSIONS—Add and
Save the following system
extensions:
- com.paloaltonetworks.GlobalProtect.client.extension—Enables system extensions, which are used for the split tunnel and enforce GlobalProtect connections for network access features
- com.paloaltonetworks.traps.networkextension—Enables network extensions for Cortex XDR (required only if you are using Cortex XDR)
- com.paloaltonetworks.traps.securityextension—Enables security extensions for Cortex XDR (required only if you are using Cortex XDR)
![]() Save your settings.If you configured the GlobalProtect app with the enforce GlobalProtect connections for network access (enforcer) feature on macOS endpoints, create a payload to filter network content.
Save your settings.If you configured the GlobalProtect app with the enforce GlobalProtect connections for network access (enforcer) feature on macOS endpoints, create a payload to filter network content.- If you saved your settings in the previous step, click Edit.Select Content Filter.Specify the following settings:
- Filter Name—Enter the name of the filter, such as GlobalProtectEn
- Identifier—Enter com.paloaltonetworks.GlobalProtect.client
- Socket Filter Bundle Identifier—Enter com.paloaltonetworks.GlobalProtect.client.extension
- Socket Filter Designated
Requirement—Enter the following
requirement:anchor apple generic and identifier "com.paloaltonetworks.GlobalProtect.client.extension" and (certificate leaf[field.1.2.840.113635.100.6.1.9] /* exists */ or certificate 1[field.1.2.840.113635.100.6.2.6] /* exists */ and certificate leaf[field.1.2.840.113635.100.6.1.13] /* exists */ and certificate leaf[subject.OU] = PXPZ95SK77)
- Network Filter Bundle Identifier—Enter com.paloaltonetworks.GlobalProtect.client.extension
- Network Filter Designated
Requirement—Enter the following
requirement:anchor apple generic and identifier "com.paloaltonetworks.GlobalProtect.client.extension" and (certificate leaf[field.1.2.840.113635.100.6.1.9] /* exists */ or certificate 1[field.1.2.840.113635.100.6.2.6] /* exists */ and certificate leaf[field.1.2.840.113635.100.6.1.13] /* exists */ and certificate leaf[subject.OU] = PXPZ95SK77)
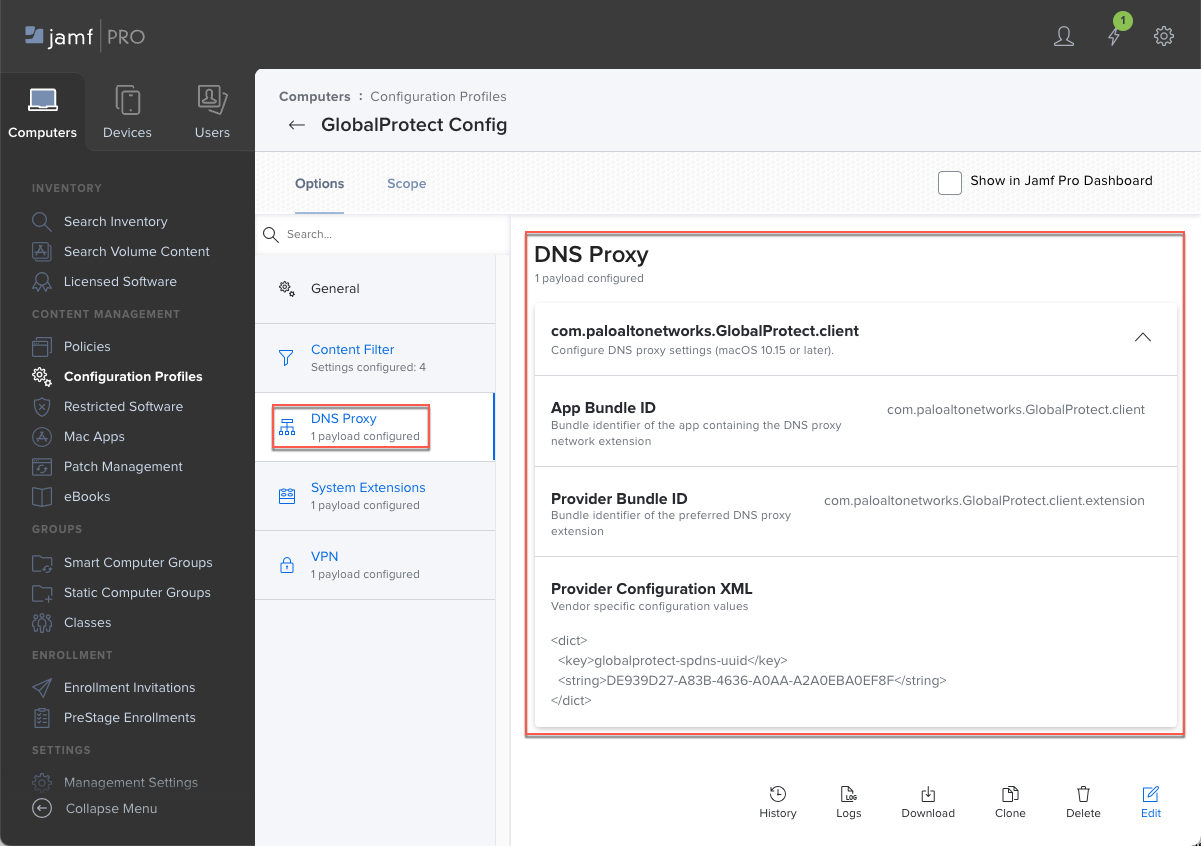
![]() Save your settings.Create a DNS Proxy payload if you configured the split DNS feature.
Save your settings.Create a DNS Proxy payload if you configured the split DNS feature.- If you saved your settings in the previous step, click Edit.Select .Specify the following settings:
- App Bundle ID—Enter com.paloaltonetworks.GlobalProtect.client
- Provider Bundle ID—Enter com.paloaltonetworks.GlobalProtect.client.extension
- Provider Configuration XML—Enter the
following text:
<dict>
  <key>globalprotect-spdns-uuid</key>
  <string>DE939D27-A83B-4636-A0AA-A2A0EBA0EF8F</string>
</dict>
![]() If you configured a split tunnel to include or exclude traffic based on the applications, create a VPN payload.There can only be one VPN payload per configuration profile. If you need more than one VPN payload, you must create a separate configuration profile with the additional payload.
If you configured a split tunnel to include or exclude traffic based on the applications, create a VPN payload.There can only be one VPN payload per configuration profile. If you need more than one VPN payload, you must create a separate configuration profile with the additional payload.- If you saved your settings in the previous step, click Edit.Select .Specify the following settings:
- Connection Name—Enter a name for the connection, such as GP_split_tunnel_app
- VPN Type—Select Per-App VPN
- Per-App VPN Connection Type—Select Custom SSL
- Identifier—Enter com.paloaltonetworks.GlobalProtect.client
- Server—Enter the hostname or IP address of the GlobalProtect portal that users will connect to
- Custom Data—Add
and Save the following key and value:
- KEY—Enter globalprotect-spapp-uuid
- VALUE—Enter B078FC83-11E5-4559-AA53-E24D2A63B0F9
- Provider Type—Select App-proxy
Save your settings.If you configured a split tunnel to include or exclude traffic based on the domain, create a VPN payload.There can only be one VPN payload per configuration profile. If you need more than one VPN payload, you must create a separate configuration profile with the additional payload.- If you saved your settings in the previous step, click Edit.Select .Specify the following settings:
- Connection Name—Enter a name for the connection, such as GP_split_tunnel_domain
- VPN Type—Select Per-App VPN
- Per-App VPN Connection Type—Select Custom SSL
- Identifier—Enter com.paloaltonetworks.GlobalProtect.client
- Server—Enter the hostname or IP address of the GlobalProtect portal that users will connect to
- Custom Data—Add
and Save the following key and value:
- KEY—Enter globalprotect-spdomain-uuid
- VALUE—Enter 0894A92D-70D2-475A-B5B6-FB07F2DEAA77
- Provider Type—Select App-proxy
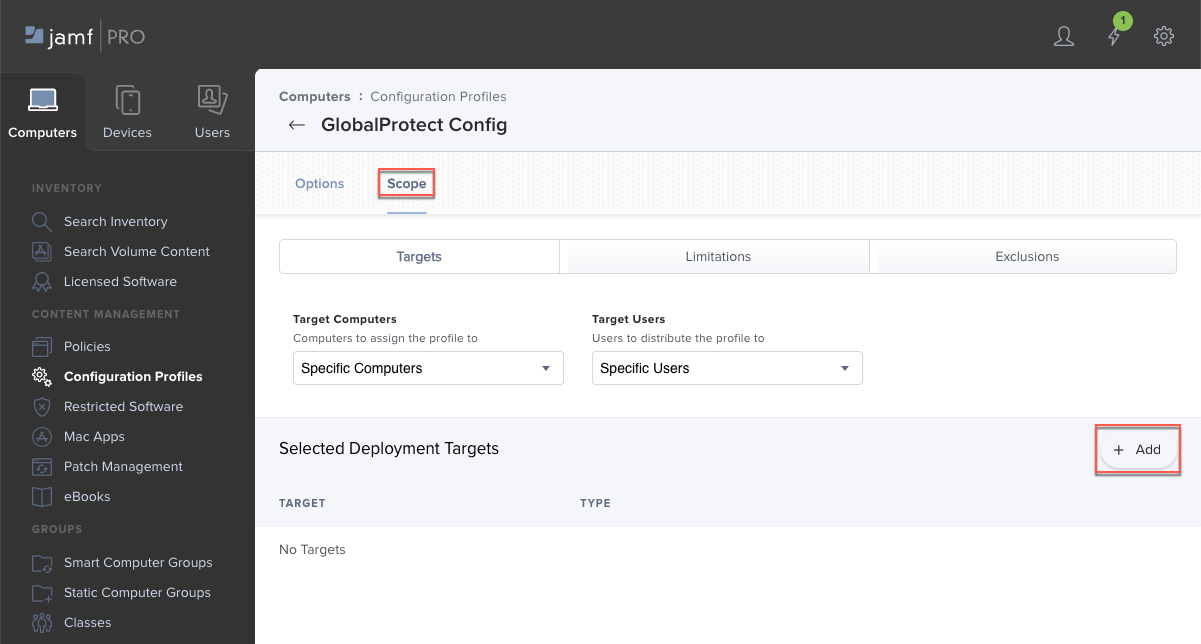
Save your settings.Set the scope for the configuration profile.- Edit the configuration profile.Select Scope and Add a deployment target.
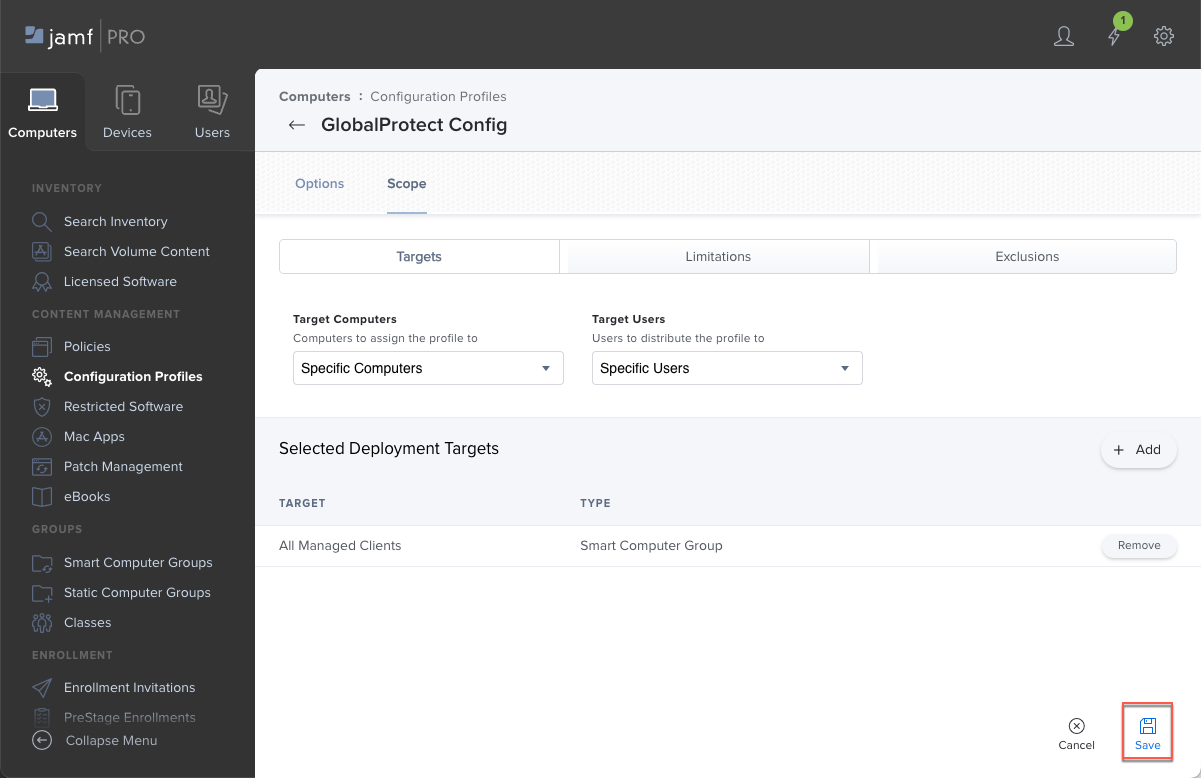
![]() Click Computer Groups and Add the Smart Computer Group that you created. Then, click Done.
Click Computer Groups and Add the Smart Computer Group that you created. Then, click Done.![]() Save the scope of the profile. Jamf will distribute the profile to the devices in the selected computer group the next time they contact Jamf Pro.
Save the scope of the profile. Jamf will distribute the profile to the devices in the selected computer group the next time they contact Jamf Pro.![]()