Configure a Managed Collector
Table of Contents
Configure a Managed Collector
Add a Log Collector to the Panorama™ management server to forward logs from your
managed firewalls for centralized monitoring.
To enable the Panorama management server to
manage a Log Collector, you must add it as a managed collector.
Log Collectors support communication using a public or private IPv4
or IPv6 address only, including when you configure custom certificates
for mutual authentication.
You can add two types of managed
collectors:
- Dedicated Log Collector—To set up a new M-700, M-600, M-500, M-300, or M-200 appliance or a Panorama virtual appliance as a Log Collector to switch an existing M-Series appliance or Panorama virtual appliance from Panorama mode to Log Collector mode, you must Set Up the M-Series Appliance as a Log Collector. Keep in mind that switching from Panorama Mode to Log Collector Mode removes the local Log Collector that is predefined on the M-Series appliance in Panorama mode.
- Local Log Collector—A Log Collector can run locally on a M-700, M-600, M-500, M-300, or M-200 appliance or a Panorama virtual appliance in Panorama mode. On the M-Series appliances, the Log Collector is predefined; on the virtual appliance, you must add the Log Collector. When the Panorama management server has a high availability (HA) configuration, each HA peer can have a local Log Collector. However, relative to the primary Panorama, the Log Collector on the secondary Panorama is remote, not local. Therefore, to use the Log Collector on the secondary Panorama, you must manually add it to the primary Panorama (for details, see Deploy Panorama M-Series Appliances with Local Log Collectors or Deploy Panorama Virtual Appliances with Local Log Collectors). If you delete a local Log Collector, you can later add it back. The following steps describe how to add a local Log Collector.
If
the Panorama virtual appliance is in Legacy mode, you must switch
to Panorama mode to create a Log Collector. For details, see Set
Up the Panorama Virtual Appliance with Local Log Collector.
A
device registration authentication key is used to securely authenticate
and connect the Panorama management server and the managed collector
on first connect. To configure the device registration authentication
key, specify the key lifetime and the number of times you can use
the authentication key to onboard new Log Collectors. Additionally,
you can specify one or more Log Collector serial numbers for which
the authentication key is valid.
The authentication key expires
90 days after the key lifetime expires. After 90 days, you are prompted
to re-certify the authentication key to maintain its validity. If
you do not re-certify, then the authentication key becomes invalid.
A system log is generated each time a Log Collector uses the Panorama-generated
authentication key. The Log Collector uses the authentication key
to authenticate Panorama when it delivers the device certificate
that is used for all subsequent communications.
As a best practice, retain a local Log
Collector and Collector Group on the Panorama management server,
regardless whether it manages Dedicated Log Collectors.
(Panorama
evaluation only) If you are evaluating a Panorama virtual appliance
with a local Log Collector, Configure Log Forwarding from Panorama to External Destinations to preserve
logs generated during your evaluation period.
Logs stored
on the local Log Collector cannot be preserved when you Convert Your Evaluation
Panorama Instance to a Production Panorama Instance with a Local
Log Collector.
For Dedicated Log Collectors running a PAN-OS 10.1 release, Panorama running PAN-OS 11.0 supports
onboarding Dedicated Log Collectors running PAN-OS 10.1.3 or later release only.
You cannot add a Dedicated Log Collector running PAN-OS 10.1.2 or earlier PAN-OS
10.1 release to Panorama management if Panorama is running PAN-OS 11.0.
Panorama supports
onboarding Dedicated Log Collectors running the following releases:
- Panorama running PAN-OS 10.2 or later release— Dedicated Log Collectors running PAN-OS 10.1.3 or later release, and Dedicated Log Collectors running PAN-OS 10.0 or earlier PAN-OS release.
There is no impact to Dedicated Log Collectors already managed by Panorama on upgrade to PAN-OS
10.2 or later release.
If you are experiencing issues adding a Dedicated Log Collector to Panorama
management, you may need to recover managed device connectivity to
Panorama.
- Record the serial number of the Log Collector.You will need the serial number when you add the Log Collector as a managed collector.
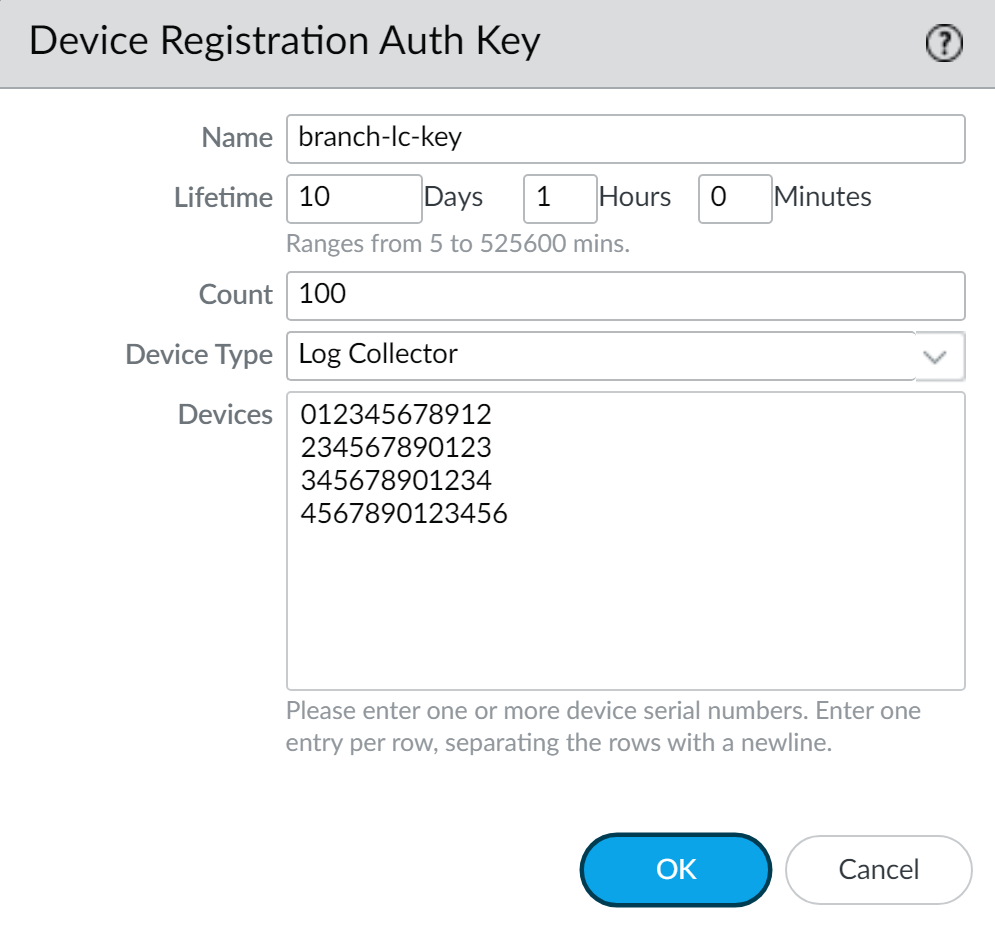
- Access the Panorama web interface.Select Dashboard and record the Serial # in the General Information section.Log in to the Panorama Web Interface.Create a device registration authentication key.
- Select and Add a new authentication key.Configure the authentication key.
- Name—Add a descriptive name for the authentication key.
- Lifetime—Specify the key lifetime for how long you can use the authentication key to onboard new Log Collectors.
- Count—Specify how many times you can use the authentication key to onboard new Log Collectors.
- Device Type—Specify that this authentication key is used to authenticate only a Log Collector.You can select Any to use the device registration authentication key to onboard firewalls, Log Collectors, and WildFire appliances.
- (Optional) Devices—Enter one or more device serial numbers to specify for which Log Collectors the authentication key is valid.
Click OK.![]() Copy Auth Key and Close.
Copy Auth Key and Close.![]() (Dedicated Log Collector only) Add the device registration authentication key to the Log Collector.Add the device registration authentication key only to a Dedicated Log Collector. A Panorama in Panorama mode does not need to authenticate its own local Log Collector.
(Dedicated Log Collector only) Add the device registration authentication key to the Log Collector.Add the device registration authentication key only to a Dedicated Log Collector. A Panorama in Panorama mode does not need to authenticate its own local Log Collector.- Log in to the Log Collector CLI.Add the device registration authentication key.admin> request authkey set <auth-key>
![]() Add the Log Collector as a managed collector.
Add the Log Collector as a managed collector.- In the Panorama web interface, select and Add a new Log Collector.In the General settings, enter the serial number (Collector S/N) you recorded for the Log Collector.Click OK to save your changes.Select .(Optional) Configure the Log Collector admin authentication.Palo Alto Networks recommends adding at least one Local Administrator with Superuser privileges for Authentication if you configure an authorization list for your managed collector.If you added any Imported Panorama Admin Users, then you are required to add at least one Local Administrator with Superuser privileges.
- Select and edit the Log Collector by clicking its name.Configure the Log Collector admin password:
- Select the password Mode.
- If you selected Password mode, enter a plaintext Password and Confirm Password. If you selected Password Hash mode, enter a hashed password string of up to 63 characters.
Configure the admin login security requirements:If you set the Failed Attempts to a value other than 0 but leave the Lockout Time at 0, then the admin user is indefinitely locked out until another administrator manually unlocks the locked out admin. If no other administrator has been created, you must reconfigure the Failed Attempts and Lockout Time settings on Panorama and push the configuration change to the Log Collector. To ensure that an admin is never locked out, use the default 0 value for both Failed Attempts and Lockout Time.- Enter the number of login Failed Attempts value. The range is between the default value 0 to the maximum of 10 where the value 0 specifies unlimited login attempts.
- Enter the Lockout Time value between the default value 0 to the maximum of 60 minutes.
Click OK to save your changes.Enable the logging disks.- Select and edit the Log Collector by clicking its name.The Log Collector name has the same value as the hostname of the Panorama management server.Select Disks and Add each disk pair.Click OK to save your changes.Select .(Optional) If your deployment is using custom certificates for authentication between Panorama and managed devices, deploy the custom client device certificate. For more information, see Set Up Authentication Using Custom Certificates.
- Select and choose the certificate profile from the drop-down or click New Certificate Profile to create one.Select and Add a new Log Collector or select an existing one. Select Communication.Select the type of device certificate the Type drop-down.
- If you are using a local device certificate, select the Certificate and Certificate Profile from the respective drop-downs.
- If you are using SCEP as the device certificate, select the SCEP Profile and Certificate Profile from the respective drop-downs.
Click OK.(Optional) Configure Secure Server Communication on a Log Collector. For more information, see Set Up Authentication Using Custom Certificates.- Select and click Add. Select Communication.Verify that the Custom Certificate Only check box is not selected. This allows you to continue managing all devices while migrating to custom certificates.When the Custom Certificate Only check box is selected, the Log Collector does not authenticate and cannot receive logs from devices using predefined certificates.Select the SSL/TLS service profile from the SSL/TLS Service Profile drop-down. This SSL/TLS service profile applies to all SSL connections between the Log Collector and devices sending it logs.Select the certificate profile from the Certificate Profile drop-down.Select Authorize Client Based on Serial Number to have the server check clients against the serial numbers of managed devices. The client certificate must have the special keyword $UDID set as the CN to authorize based on serial numbers.In Disconnect Wait Time (min), enter the number of minutes Panorama should before breaking and reestablishing the connection with its managed devices. This field is blank by default and the range is 0 to 44,640 minutes.The disconnect wait time does not begin counting down until you commit the new configuration.(Optional) Configure an authorization list.
- Add an Authorization List.
- Select the Subject or Subject Alt Name as the Identifier type.
- Specify an identifier of the selected type.
- Click OK.
- Enable the Log Collector to Check Authorization List to enforce the authorization list.
Click OK.Select .Verify your changes.- Verify that the page lists the Log Collector you added. The Connected column displays a check mark to indicate that the Log Collector is connected to Panorama. You might have to wait a few minutes before the page displays the updated connection status.Until you Configure a Collector Group and push configuration changes to the Collector Group, the Configuration Status column displays Out of Sync, the Run Time Status column displays disconnected, and the CLI command show interface all displays the interfaces as down.Click Statistics in the last column to verify that the logging disks are enabled.Next steps...Before a Log Collector can receive firewall logs, you must:
- Configure Log Forwarding to Panorama.Configure a Collector Group—On the M-Series appliances, a default Collector Group is predefined and already contains the local Log Collector as a member. On the Panorama virtual appliance, you must add the Collector Group and add the local Log Collector as a member. On both models, assign firewalls to the local Log Collector for log forwarding.You must add the Log Collector to a Collector Group before it can start ingesting firewall logs. The ElasticSearch health status displays as degraded and the Log Collector cannot ingest logs until added to a Collector Group.Monitor Managed Collector Health Status to identify and resolve issues impacting log collection should they arise.