Prisma Access
Traffic Replication in Prisma Access (Panorama)
Table of Contents
Expand All
|
Collapse All
Prisma Access Docs
-
- 6.1 Preferred and Innovation
- 6.0 Preferred and Innovation
- 5.2 Preferred and Innovation
- 5.1 Preferred and Innovation
- 5.0 Preferred and Innovation
- 4.2 Preferred
- 4.1 Preferred
- 4.0 Preferred
- 3.2 Preferred and Innovation
- 3.1 Preferred and Innovation
- 3.0 Preferred and Innovation
- 2.2 Preferred
-
-
- 4.0 & Later
- Prisma Access China
-
-
Traffic Replication in Prisma Access (Panorama)
Learn how to replicate Prisma Access traffic and capture PCAP files for forensics and
analysis.
To configure traffic replication and access the PCAP files, complete the following
steps.
- Onboard and configure Mobile Users—GlobalProtect (if configuring traffic replication for mobile users), Remote Networks (if configuring traffic replication for remote networks), or both (if you are configuring traffic replication for both mobile users and remote networks).(Optional) Apply SSL decryption on the packet captures.
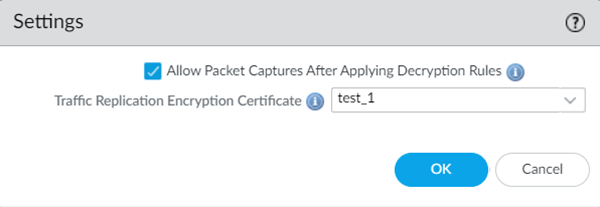
- Go to PanoramaCloud ServicesConfigurationTraffic Replication and click the gear to edit the Settings.Select Allow packet captures after applying decryption rules to apply your already-configured SSL decryption policies on the PCAP files.If you select this option, the PCAP files will use the same decryption rules that you have specified in your deployment. If you deselect this option, no decryption will be performed on the PCAP files, regardless of the decryption rules you have configured.Select the Traffic Replication Encryption Certificate (public key) you created in an earlier step in the Mobile_User_Template (for mobile user deployments) or Remote_Network_Template (for remote network deployments) to use for SSL decryption.This step is required. You can select any certificate you have added in the DeviceCertificate ManagementCertificatesDevice Certificates area in the Mobile_User_Template or Remote_Network_Template. If you enable traffic replication for both mobile users and remote networks, put the certificate in both the Mobile_User_Template and Remote_Network_Template..The certificate consists of a public and private key. Upload the public key in Prisma Access; you keep the private key and use it for decryption when you download the zipped PCAP files from the storage bucket. In this way, you guarantee that only your organization can access the storage bucket where the PCAP files are stored.
![]() Configure traffic replication for one or more Mobile Users—GlobalProtect locations, remote network locations, or both by selecting the location in the Configuration area and selecting the locations where you want to enable traffic replication, then selecting MU-GP, RN, or both.Select the Compute Location that is associated with Prisma Access Locations. Traffic replication is enabled for all Mobile Users—GlobalProtect clients, remote network users, or both, that are connected to the selected locations.
Configure traffic replication for one or more Mobile Users—GlobalProtect locations, remote network locations, or both by selecting the location in the Configuration area and selecting the locations where you want to enable traffic replication, then selecting MU-GP, RN, or both.Select the Compute Location that is associated with Prisma Access Locations. Traffic replication is enabled for all Mobile Users—GlobalProtect clients, remote network users, or both, that are connected to the selected locations.![]() Add an account that lets you access traffic replication packet capture (PCAP) data.This service account is used to share read-only access to the storage buckets where the PCAP files are stored in the locations where you have enabled traffic replication. You create these service accounts in your GCP account using normal GCP service account creation procedures. It is your responsibility to control what users have access to these service accounts. Any users who have both access to the PCAP files and access to the private key would have access to the PCAP files.
Add an account that lets you access traffic replication packet capture (PCAP) data.This service account is used to share read-only access to the storage buckets where the PCAP files are stored in the locations where you have enabled traffic replication. You create these service accounts in your GCP account using normal GCP service account creation procedures. It is your responsibility to control what users have access to these service accounts. Any users who have both access to the PCAP files and access to the private key would have access to the PCAP files.- In the Traffic Replication Access area, Add an account.Enter the following parameters:
- Give the account a unique Account Name.
- Specify Gcp as the
Type for the account. Traffic replication is supported only for GCP accounts.
- Specify the Account information from the GCP service account you created.
- Enter a Member/User name for the GCP service account.
![]() (Optional) If you want to add Pub/Sub notifications that notify you when a new folder or new files are added to a bucket, set up Pub/Sub notifications in your Google Cloud Service Account.Prisma Access creates a single Pub/Sub channel per tenant for all locations in that tenant.Pub/Sub notifications are supported starting with Prisma Access 5.2. If you have an existing account and want to add Pub/Sub notifications, upgrade to Prisma Access 5.2, then choose one of the following options to add Pub/Sub notifications:
(Optional) If you want to add Pub/Sub notifications that notify you when a new folder or new files are added to a bucket, set up Pub/Sub notifications in your Google Cloud Service Account.Prisma Access creates a single Pub/Sub channel per tenant for all locations in that tenant.Pub/Sub notifications are supported starting with Prisma Access 5.2. If you have an existing account and want to add Pub/Sub notifications, upgrade to Prisma Access 5.2, then choose one of the following options to add Pub/Sub notifications:- Modify the existing Google Cloud Service Account you have already configured in Prisma Access.
- Add a new account for the existing service account and specify
that account in your Prisma Access configuration. If you add a new account, you need to disable traffic replication on the existing account and enable traffic replication on the new account.
- Disable and enable traffic replication on the existing location.
Prisma Access sends Pub/Sub messages with the heading panw-traffic-replication-file- notifications-<tenantid>, where <tenantid> is the ID of the tenant that’s sending the notifications. The messages are in this format:Message { data: b'' ordering_key: '' attributes: { "bucketId": "xxxx-xx-xxx-xxxxxxxxx-us-west1", "eventTime": "2024-04-24T23:12:59.xxxxxxx", "eventType": "OBJECT_FINALIZE", "notificationConfig": "projects/_/buckets/xxxx-xx-xxx-xxxxxxxxx-us-west1/notificationConfigs/1", "objectGeneration": "xxxxxxxxxxxxxxxx", "objectId": "instance-group-xxxxxxx/12345678_190000_xxxxx.zip", "payloadFormat": "NONE" } }Where:- objectGeneration is the generation number of the changed object.
- objectID is the name of the changed object.
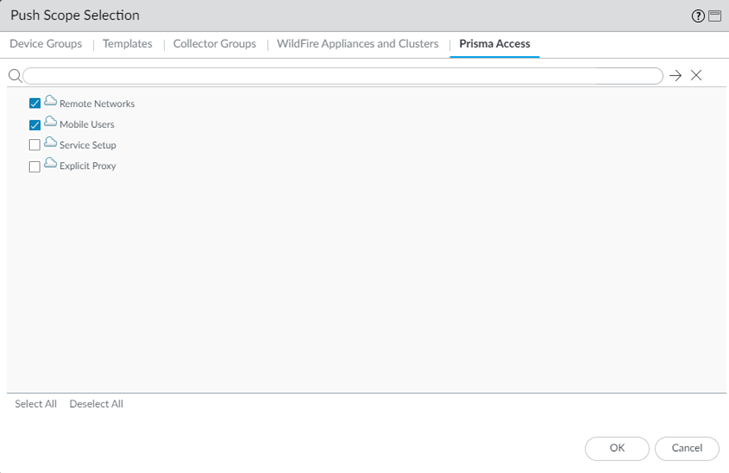
Commit and push your changes, making sure that Mobile Users (for a mobile user deployment), Remote Networks (for a remote networks deployment), or both are selected in the Push Scope.- Click CommitCommit and Push.Edit Selections and, in the Prisma Access tab, make sure that Mobile Users and Remote Networks are selected in the Push Scope, then click OK.The Push Scope might not be automatically selected.
![]() Click Commit and Push.Check the status of traffic replication by going to PanoramaCloud ServicesStatusTraffic Replication.
Click Commit and Push.Check the status of traffic replication by going to PanoramaCloud ServicesStatusTraffic Replication.![]() The Storage Links is the name of the GCP storage bucket where you can access the PCAP files, The Cloud Provider Location is the location where the GCP instance is onboarded.Download the PCAP files using the private key that only you possess.Use the Storage Links to access the PCAP files in your GCP storage buckets.
The Storage Links is the name of the GCP storage bucket where you can access the PCAP files, The Cloud Provider Location is the location where the GCP instance is onboarded.Download the PCAP files using the private key that only you possess.Use the Storage Links to access the PCAP files in your GCP storage buckets.- These storage buckets support the same regular operations, commands, and queries as any other GCP storage buckets.
- You can download PCAP data for up to 72 hours. After 72 hours, the files are permanently deleted.
- Files are encrypted using your public key.
- Maximum file size is 200 MB or 5 minutes of packet capture, whichever is smaller.
- List the files in your service by entering enter gsutil ls gs://<storage_bucket_link>/, where <storage_bucket_link> is the storage link in your GCP service account where the files are stored.Download the files from your service account by entering the enter gsutil cp gs://<storage_bucket_link>/<file_name> <destination folder>, where:
- <storage_bucket_link> is the storage link in your GCP service account where the files are stored.
- <file_name> is the name of the PCAP file.
- <destination folder> is the folder where you want the PCAP file to be downloaded.
Unzip the downloaded files.Decrypt the downloaded files using the private key that only you possess.


