AI Access Security
Create Custom Policy Rules to Control GenAI App Usage (Panorama)
Table of Contents
Create Custom Policy Rules to Control GenAI App Usage (Panorama)
Create policy rules in Panorama® management server to control GenAI App usage in your
enterprise.
- Use the AI Access Security Insights dashboard to discover risks posed by GenAI apps.The AI Access Security Insights dashboard provides detailed and comprehensive visibility into GenAI app usage across your organization. You can discover risky GenAI app use cases, individual risky GenAI apps, as well as risky users accessing GenAI apps.Perform the initial AI Access Security configuration.This includes creating an Enterprise Data Loss Prevention (E-DLP) data profile to define the sensitive data match criteria and the Vulnerability Protection profile used to stop attempts to exploit system flaws or gain unauthorized access to systems.For NGFW, this also includes creating an internal trust zone and an outbound untrusted zone.Log in to the Panorama® management server web interface.Select and specify the Device Group.Add a new Security policy rule.Configure the Security policy rule General, Source, and Destination settings.Refer to the Security Policy Administration Guide for detailed information about writing a Security policy rule.
- General—Give the Security rule a descriptive Name. You also have the option to provide a Description for the Security policy rule and to apply tags to help identify the purpose of the Security policy rule.
- Source—Define from where traffic must originate for the Security policy rule to apply.For the Source Zone, you can select an internal trust zone. If you want the Security policy rule to apply to all traffic regardless of where it originated, select Any for all source settings.For example, based on your risk discovery assessment you determine that access to a GenAI app is over provisioned and must be narrowed to specific users. In this case you can write an Allow policy rule and add the required Source User.
- Destination—Define the target destination for traffic for the Security policy rule to apply.For the Destination Zone, you can select an outbound untrust zone. If you want the Security policy rule to apply to all traffic regardless of what the traffic destination is, select Any for all destination settings.
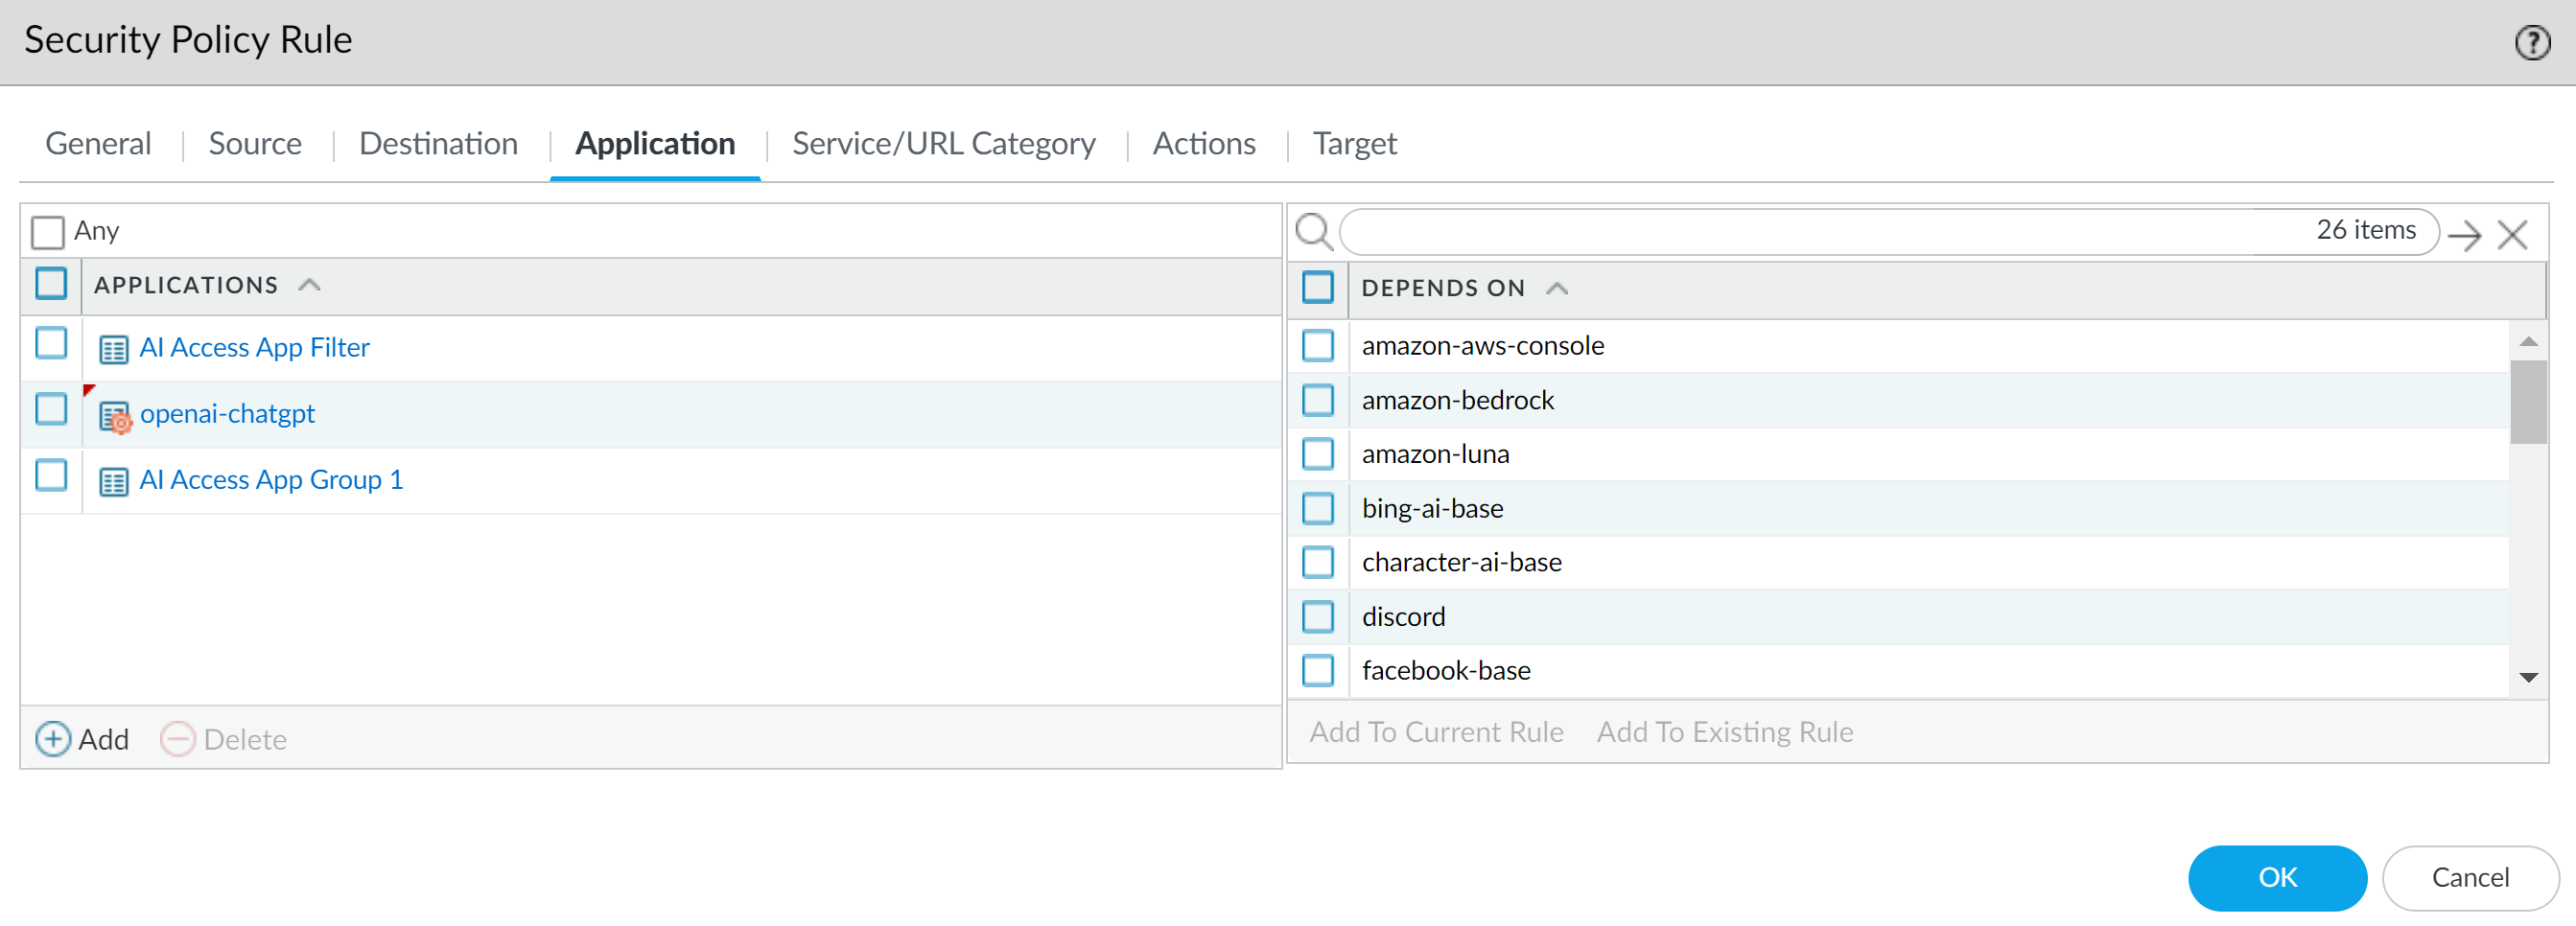
In the Application settings, specify the GenAI Application Group, Application Filter, or Applications.(Allowed Web Applications) Only add supported GenAI apps to the list of allowed apps.- Application—Add one or more GenAI apps.
- Application Category—An application category, otherwise referred to as an application filter, dynamically groups applications based on application filters you define.For example, you can use a predefined or custom GenAI app filter to dynamically control access to GenAI apps in your organization rather than adding individual GenAI apps or creating an application group that must be updated manually each time a change is required.
- Application Group—An application group is a static grouping of individual apps that you create.
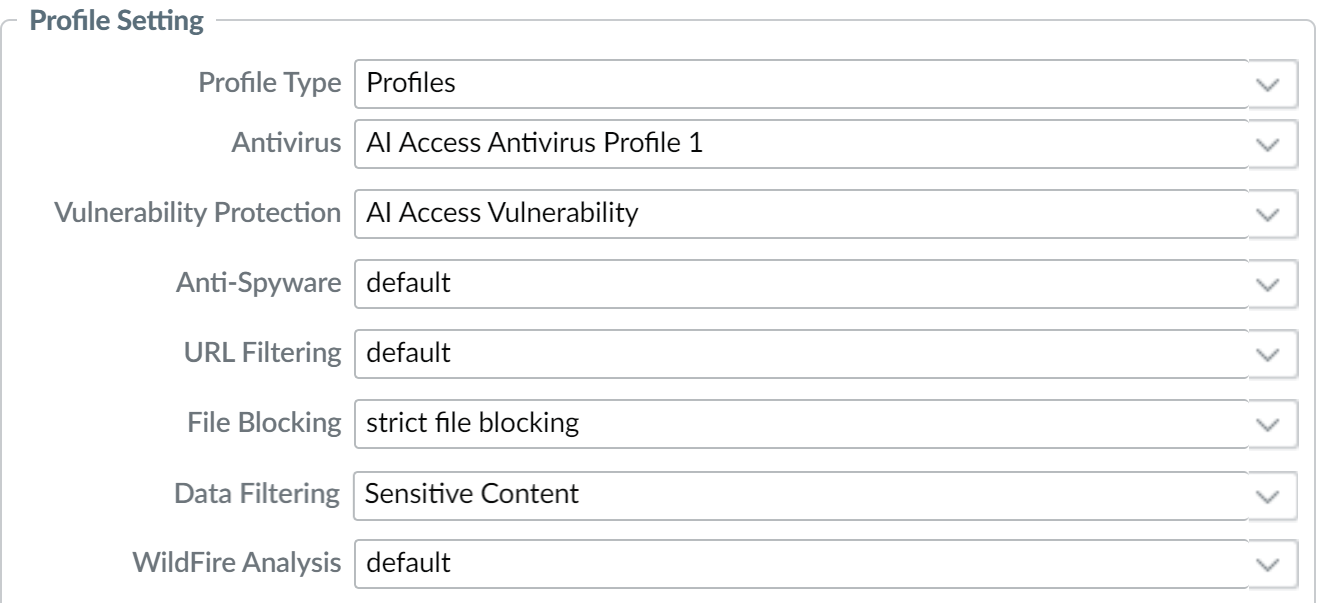
![]() Configure the Security policy rule Actions. Decide what Actions you want to take on your policy rule. As a best practice, attach Security Profiles to enable the firewall to scan all allowed traffic for threats. Select Profiles from the Profile Type drop-down and then select the individual Security Profiles to attach to the rule. Choose the required actions for the following settings for your GenAI apps:
Configure the Security policy rule Actions. Decide what Actions you want to take on your policy rule. As a best practice, attach Security Profiles to enable the firewall to scan all allowed traffic for threats. Select Profiles from the Profile Type drop-down and then select the individual Security Profiles to attach to the rule. Choose the required actions for the following settings for your GenAI apps:- For the Action, configure the Action the NGFW takes when traffic from Security policy rule Source to the Destination is detected.For example, select Allow if you want to allow access to one or more GenAI apps or Deny if you want to block all access to one or more GenAI apps.For the Profile Type, select Profile.At a minimum you must add the Vulnerability Protection and Data Filtering profiles. These are required to generate Threats and Sensitive Assets data when discovering risks posed by GenAI apps. The remaining profiles are optional and can be configured as needed. For each of the Security Profile types below you can select an existing profile or create a new one.
- Antivirus
- Vulnerability Protection
- Anti-Spyware
- URL Filtering
- File Blocking
- Data Filtering
- WildFire Analysis
![]() In the Actions tab, Profile Setting takes precedence over Action Setting. So, as a best practice, ensure that both settings are matched properly. For example, even if you have the Action Setting as Allow and one of the Profile Settings as Block for ChatGPT, it will be blocked.Commit and push the new configuration to your managed firewalls to complete the Enterprise DLP plugin installation.This step is required for Enterprise DLP data filtering profile names to appear in Data Filtering logs.The Commit and Push command isn't recommended for Enterprise DLP configuration changes. Using the Commit and Push command requires the additional and unnecessary overheard of manually selecting the impacted templates and managed firewalls in the Push Scope Selection.
In the Actions tab, Profile Setting takes precedence over Action Setting. So, as a best practice, ensure that both settings are matched properly. For example, even if you have the Action Setting as Allow and one of the Profile Settings as Block for ChatGPT, it will be blocked.Commit and push the new configuration to your managed firewalls to complete the Enterprise DLP plugin installation.This step is required for Enterprise DLP data filtering profile names to appear in Data Filtering logs.The Commit and Push command isn't recommended for Enterprise DLP configuration changes. Using the Commit and Push command requires the additional and unnecessary overheard of manually selecting the impacted templates and managed firewalls in the Push Scope Selection.- Full configuration push from Panorama
- Select and Commit.
- Select and Edit Selections.
- Select Device Groups and Include Device and Network Templates.
- Click OK.
- Push your configuration changes to your managed firewalls that are using Enterprise DLP.
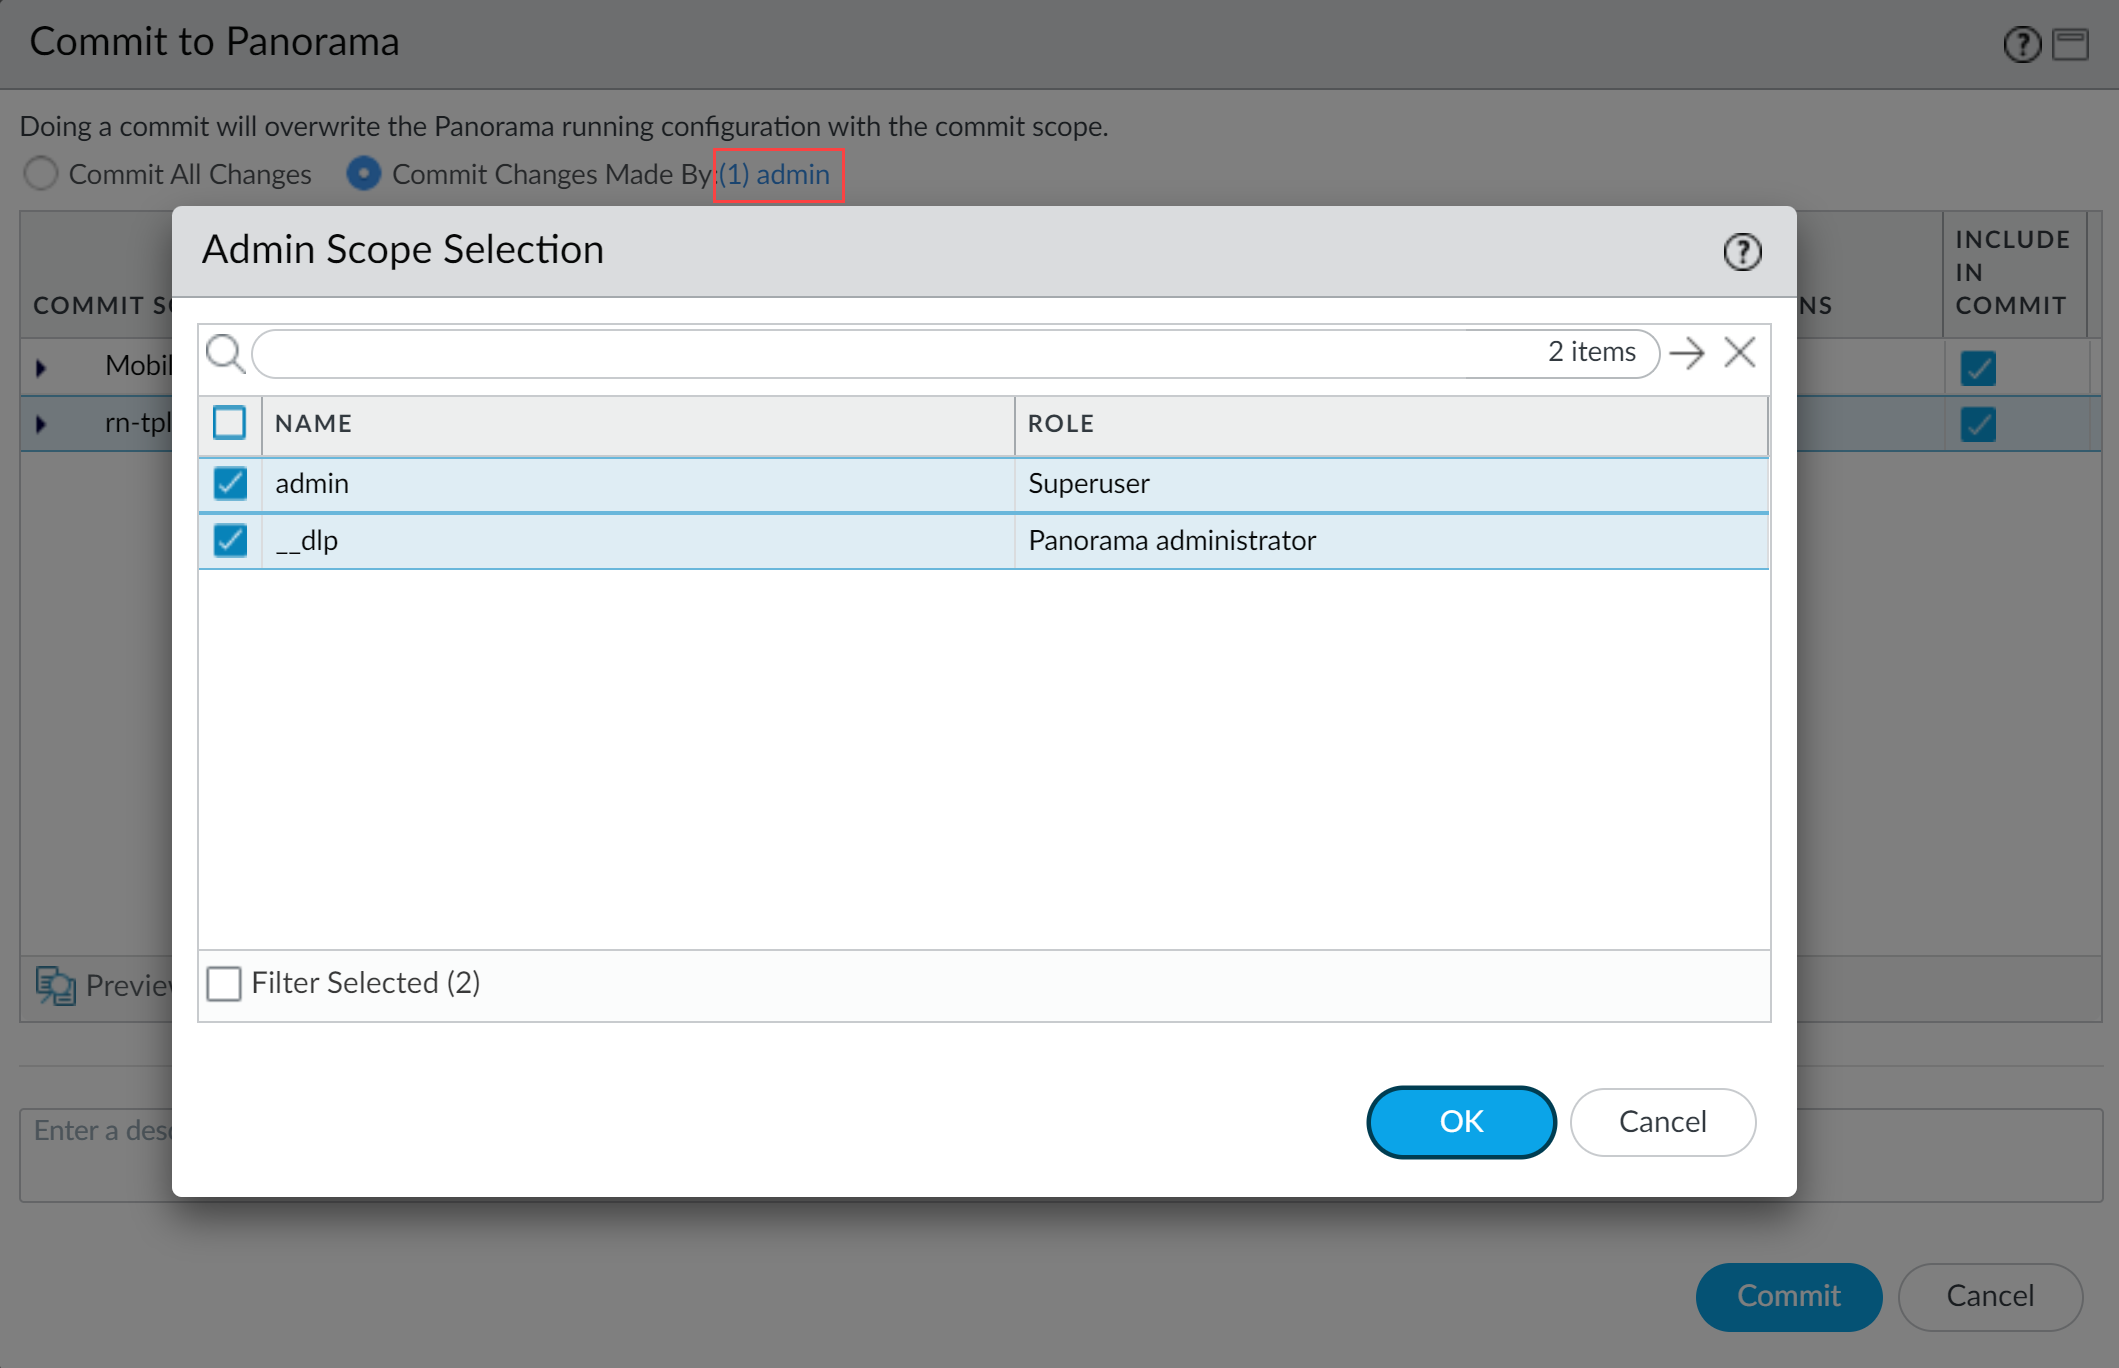
- Partial configuration push from PanoramaAlways include the temporary __dlp administrator when performing a partial configuration push. This is required to keep Panorama and the DLP cloud service in sync.For example, you have an admin Panorama admin user who is allowed to commit and push configuration changes. The admin user made changes to the Enterprise DLP configuration and only wants to commit and push these changes to managed firewalls. In this case, the admin user is required to also select the __dlp user in the partial commit and push operations.
- Select .
- Select Commit Changes Made By and then click the current Panorama admin user to select additional admins to include in the partial commit.In this example, the admin user is currently logged in and performing the commit operation. The admin user must click admin and then select the __dlp user. If there are additional configuration changes made by other Panorama admins they can be selected here as well.Click OK to continue.
![]()
- Commit.
- Select .
- Select Push Changes Made By and then click the current Panorama admin user to select additional admins to include in the partial push.In this example, the admin user is currently logged in and performing the push operation. The admin user must click admin and then select the __dlp user. If there are additional configuration changes made by other Panorama admins they can be selected here as well.Click OK to continue.
![]()
- Select Device Groups and Include Device and Network Templates.
- Click OK.
- Push your configuration changes to your managed firewalls that are using Enterprise DLP.