Cloud NGFW for Azure
Sample Configuration for Post VNet Deployment
Table of Contents
Expand All
|
Collapse All
Cloud NGFW for Azure Docs
Sample Configuration for Post VNet Deployment
Sample configuration for VNet deployments in CNGFW for Azure.
| Where Can I Use This? | What Do I Need? |
|---|---|
|
|
After successfully deploying the Cloud NGFW in an Azure VNet, you can begin
configuring the Cloud NGFW service. The information provided in this section
illustrates common tasks to get the Cloud NGFW running in your Azure environment:
Create or update a rulestack
In this section you will update a local rulestack by adding a rule and enabling
logging.
To update an existing rulestack:
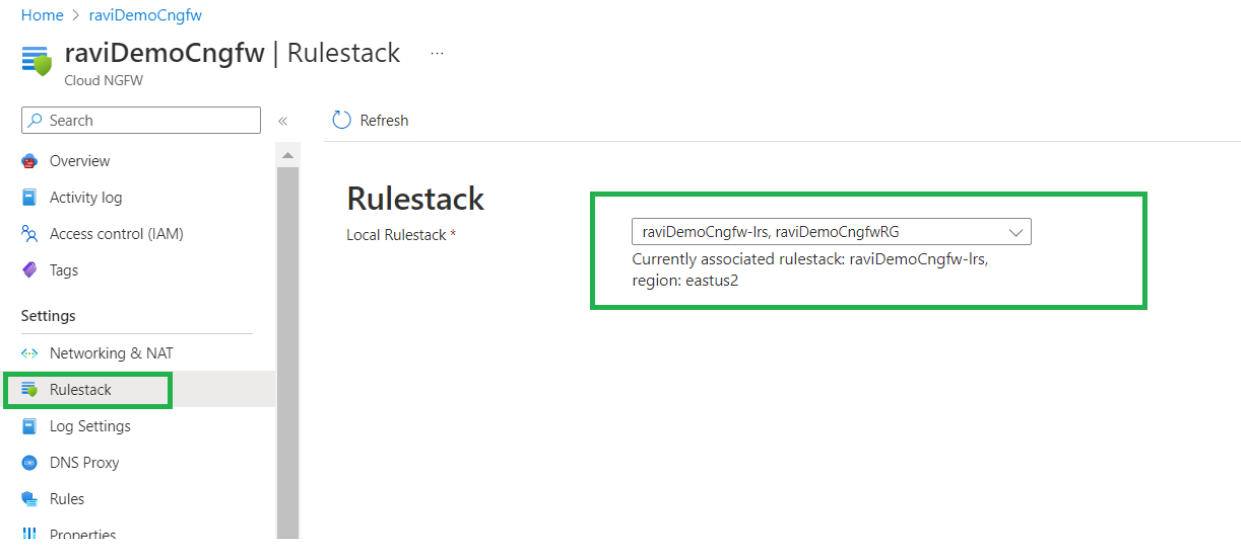
- In the Azure Resource Manager (ARM) console, click Rulestacks for the Cloud NGFW resource you want to configure. The rulestack associated with the Cloud NGFW service appears, along with the resource group.
![]() Modify the rulestack to add firewall rules. These rules allow some traffic while blocking specific traffic. By default, Cloud NGFW blocks all traffic. Search for the local rulestack using the global search option provided by the Azure portal.
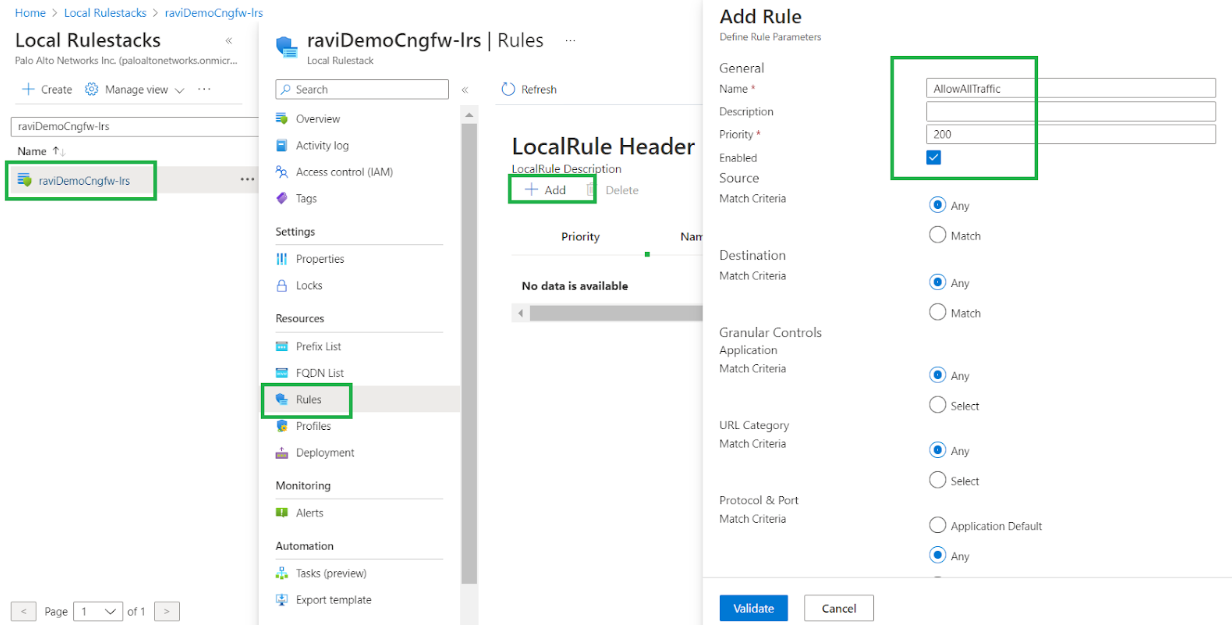
Modify the rulestack to add firewall rules. These rules allow some traffic while blocking specific traffic. By default, Cloud NGFW blocks all traffic. Search for the local rulestack using the global search option provided by the Azure portal.![]() Select the local rulestack service to navigate to the list of local rulestacks associated with your Cloud NGFW subscription. Search for a local rulestack, and verify that the state is Succeeded.
Select the local rulestack service to navigate to the list of local rulestacks associated with your Cloud NGFW subscription. Search for a local rulestack, and verify that the state is Succeeded.![]() Click the rulestack to add rules. In the Add Rule window, modify the rules. For example, add a rule that allows traffic; complete the mandatory fields and use the default settings for remaining fields.
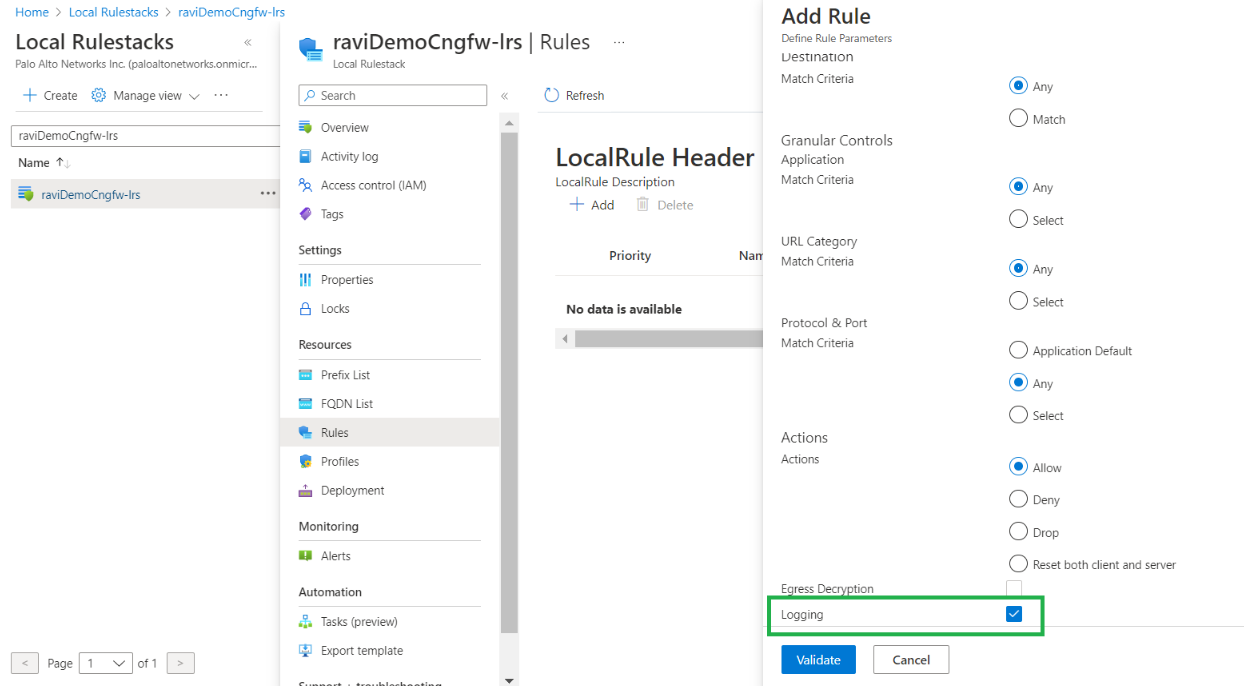
Click the rulestack to add rules. In the Add Rule window, modify the rules. For example, add a rule that allows traffic; complete the mandatory fields and use the default settings for remaining fields.![]() Enable logging for the rule. In the Add Rule window, select Logging.
Enable logging for the rule. In the Add Rule window, select Logging.![]() Click Validate, then Add to add the rule to the rulestack.
Click Validate, then Add to add the rule to the rulestack.Add a FQDN list
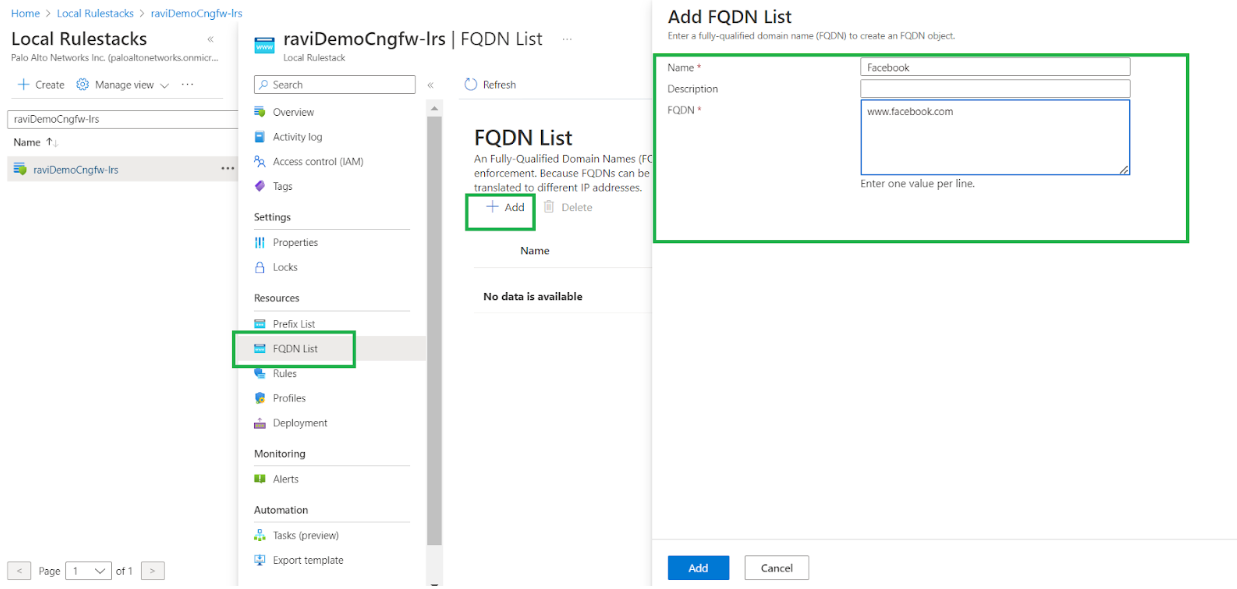
Add a FQDN list to the local rulestack that includes Facebook. Use this list to add a rule that blocks traffic to facebook.com- In the local rulestack page for the Cloud NGFW resource, click FQDN List.Click Add.In the Add FQDN List screen, enter a name and description. In the FQDN field, enter one or more URLs, such as www.facebook.com. Only one FQDN URL can exist on a single line in the FQDN field.Click Add.
![]() Verify that the specified URLs appear in the FQDN list.
Verify that the specified URLs appear in the FQDN list.![]()
Add a Rule
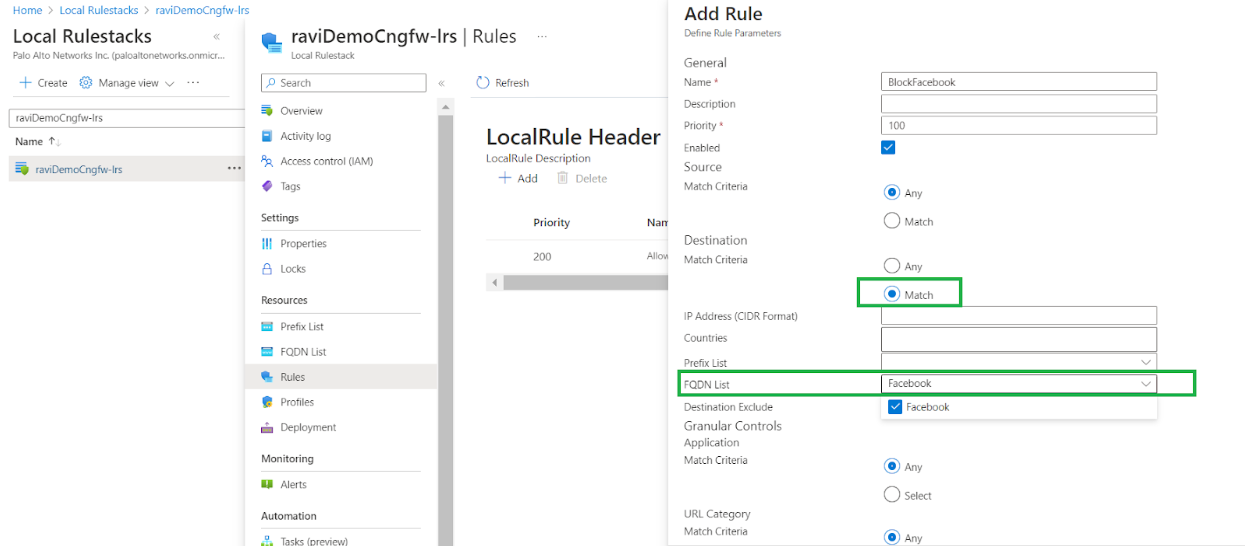
Add a rule to the local rulestack that matches the FQDN list previously created. With the rule you can set an action, like dropping traffic. For example, you can apply an action to the FQDN rule to drop traffic attempting to access the URL www.facebook.com.- In the local rulestack page for the Cloud NGFW resource, click Rules.Click Add.In the Add Rule screen, set the Match Criteria to Match. In the FQDN List field, use the drop-down menu to select FacebookIn the Actions field, select Drop.Click Add.
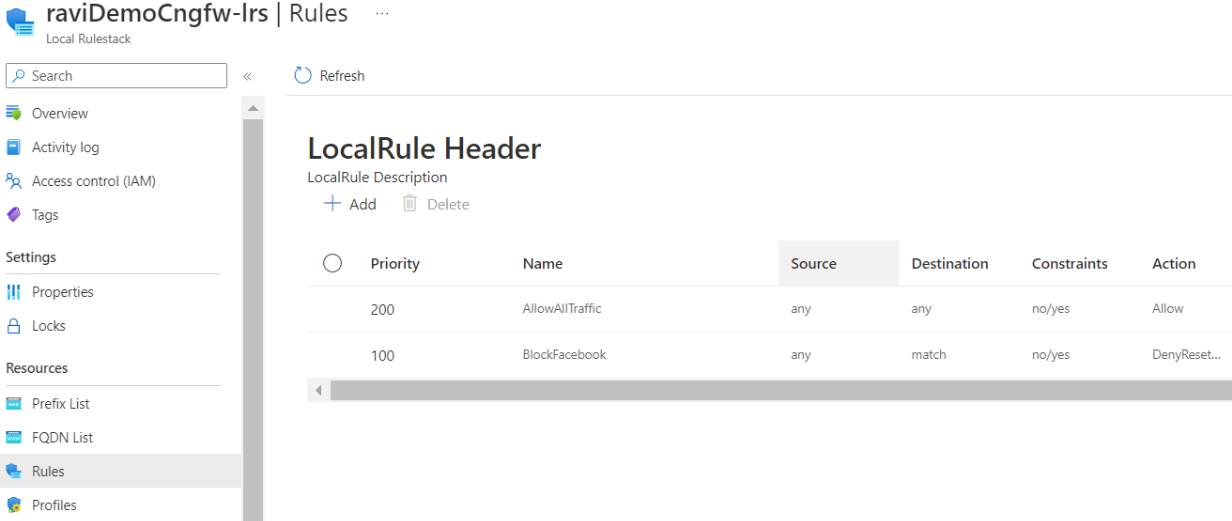
![]() Both rules appear in the local rulestack header page.
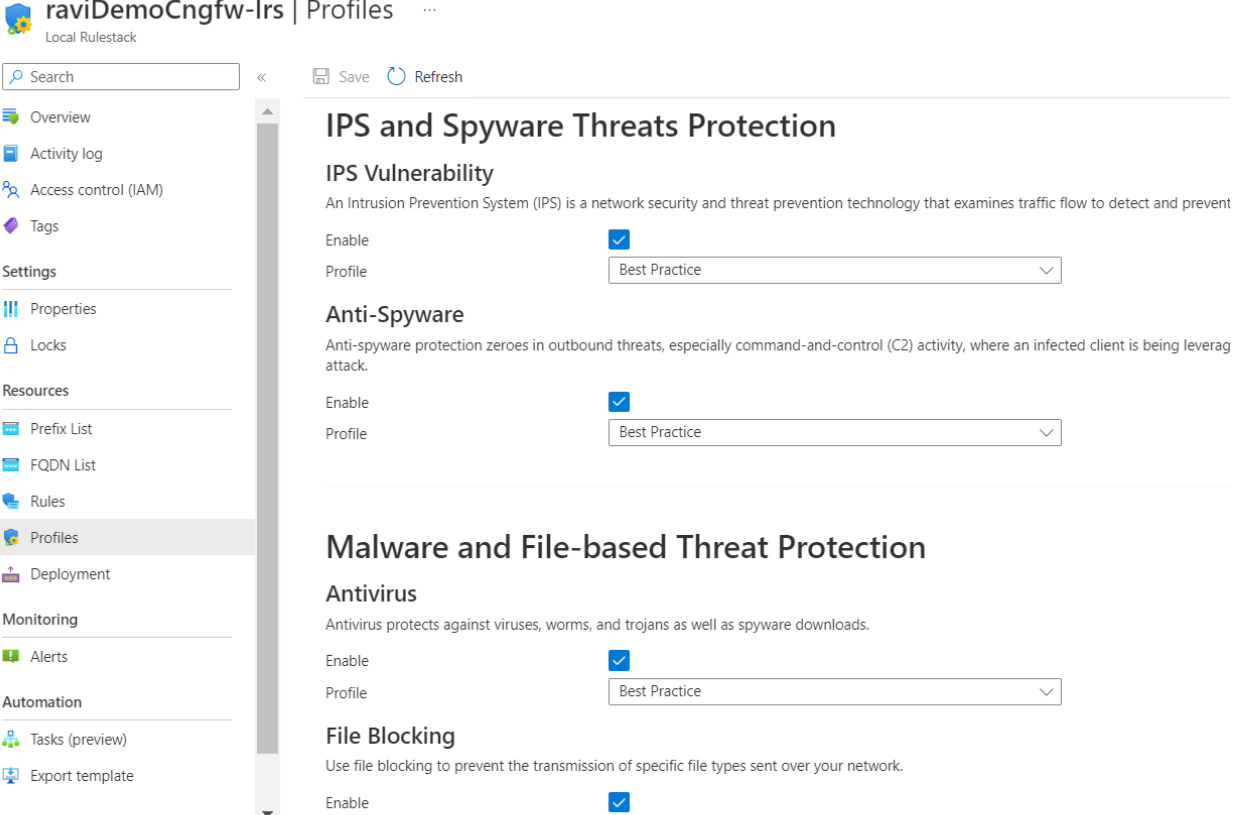
Both rules appear in the local rulestack header page.![]() As part of this Cloud NGFW service, security profiles are enabled with best practice configurations by default. Traffic is secured with the best security profiles once the Cloud NGFW is deployed in the network. View these using the Profiles page for the local rulestack.
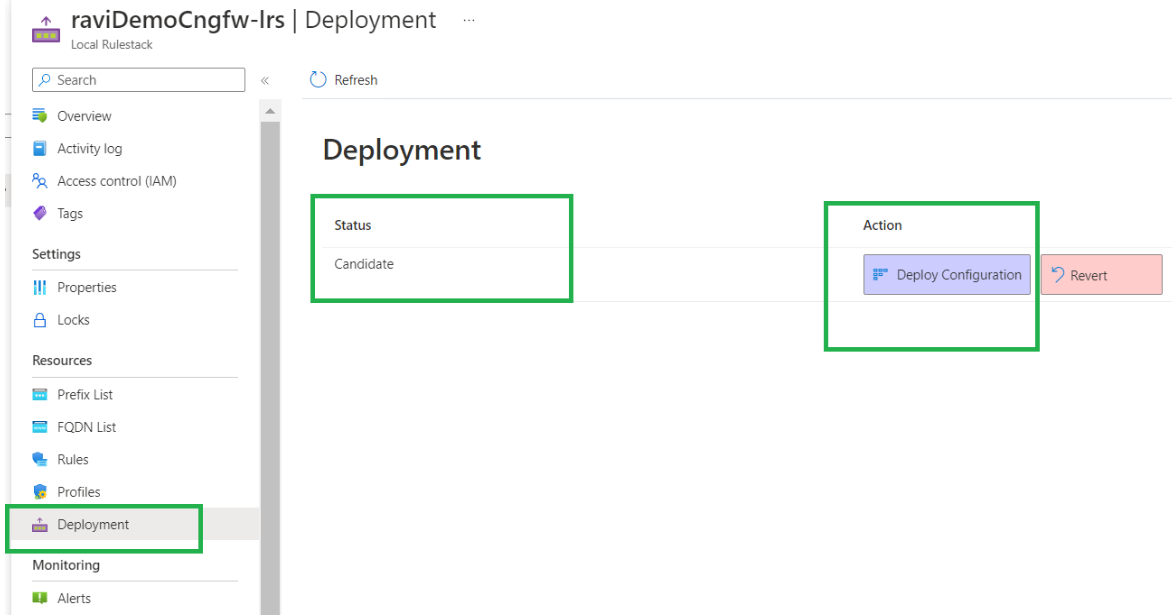
As part of this Cloud NGFW service, security profiles are enabled with best practice configurations by default. Traffic is secured with the best security profiles once the Cloud NGFW is deployed in the network. View these using the Profiles page for the local rulestack.![]() After modifying rules,deploy them onto the local rulestack associated with the Cloud NGFW service.In the local rulestack, click Deployment. The deployment status page displays as Candidate; this means that the configuration was built but not deployed.Click Deploy Configuration to deploy the configuration onto the Cloud NGFW service. You must perform this step in order to deploy the rules onto the rulestack.
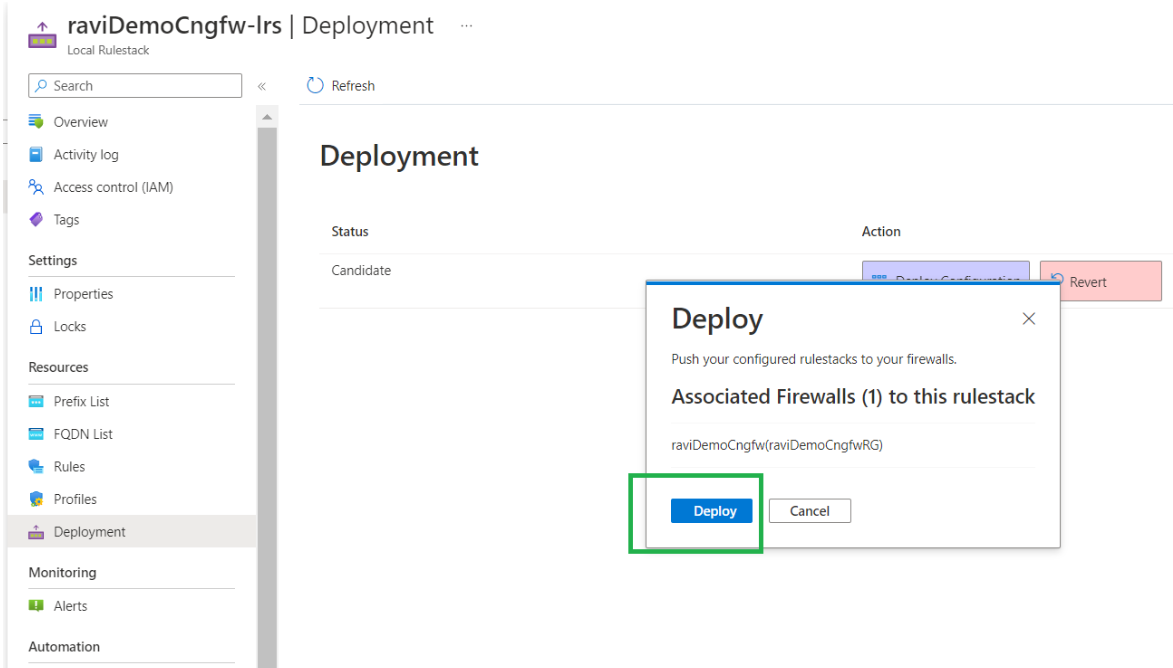
After modifying rules,deploy them onto the local rulestack associated with the Cloud NGFW service.In the local rulestack, click Deployment. The deployment status page displays as Candidate; this means that the configuration was built but not deployed.Click Deploy Configuration to deploy the configuration onto the Cloud NGFW service. You must perform this step in order to deploy the rules onto the rulestack.![]() After clicking Deploy Configuration, a pop-up message displays the firewalls associated with this rulestack. Click Deploy to configure this rulestack on all associated firewalls.
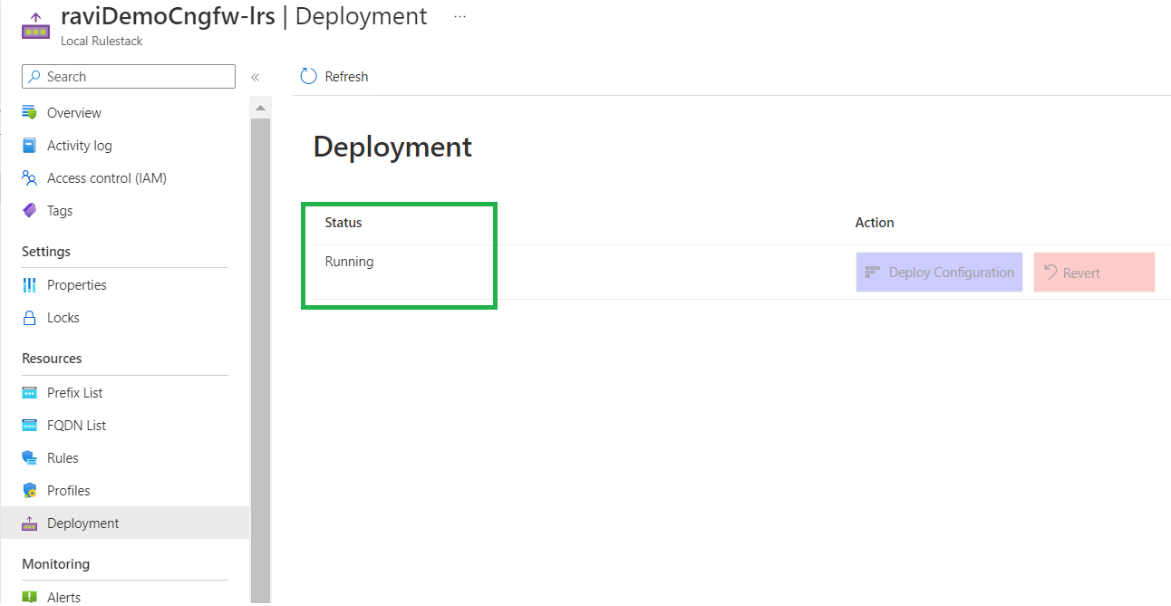
After clicking Deploy Configuration, a pop-up message displays the firewalls associated with this rulestack. Click Deploy to configure this rulestack on all associated firewalls.![]() After successfully deploying the configuration, the Deployment status is Running.
After successfully deploying the configuration, the Deployment status is Running.![]()
Configure a source and destination NAT rule
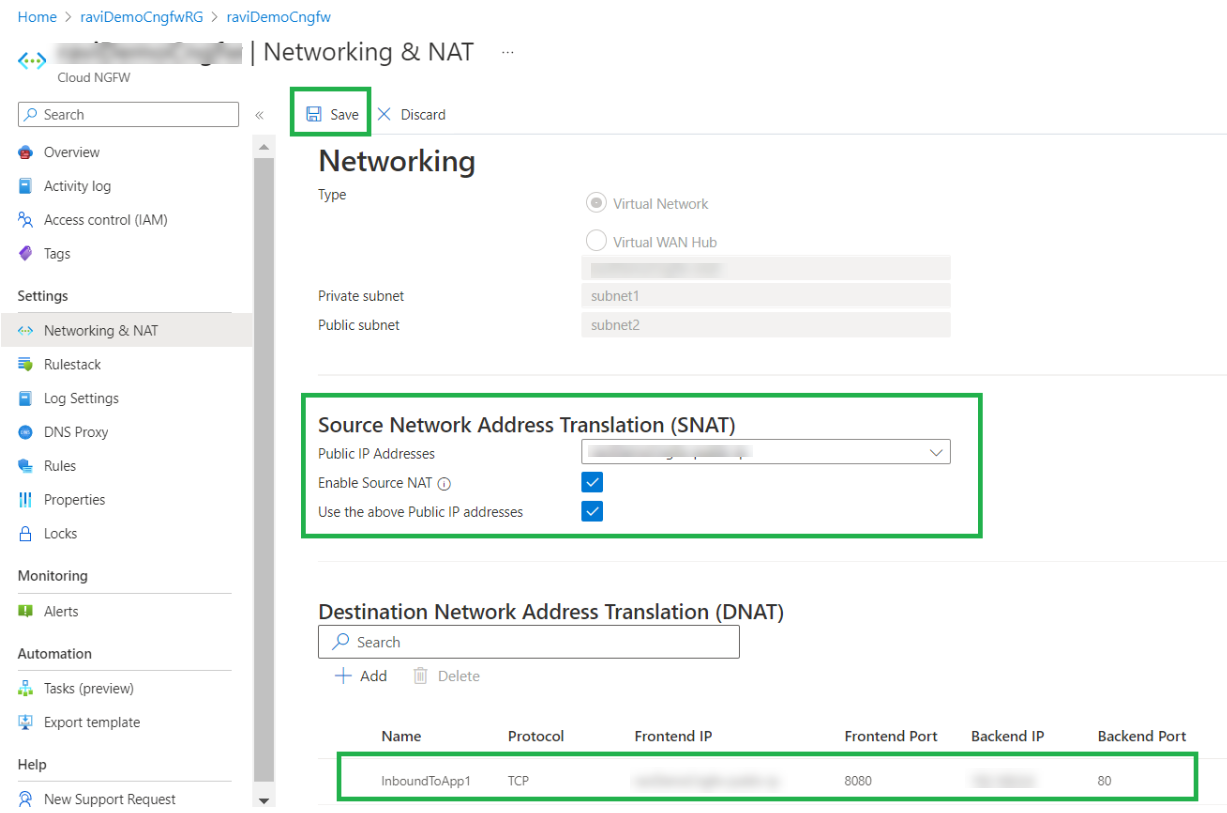
You can configure a destination NAT rule to address inbound traffic.When configuring egress NAT, consider the following:- If Egress NAT is disabled—The Firewall will use Public IP address assigned to it as a Source for Outbound traffic.
- If Egress NAT is enabled—The selected public IP from the pool will be used as a Source for Outbound traffic.
- You can chose more than one public IP addresses however in that case, the traffic cannot be pined for a particular source to use a particular public IP address. It will be randomly selected for each flow individually.
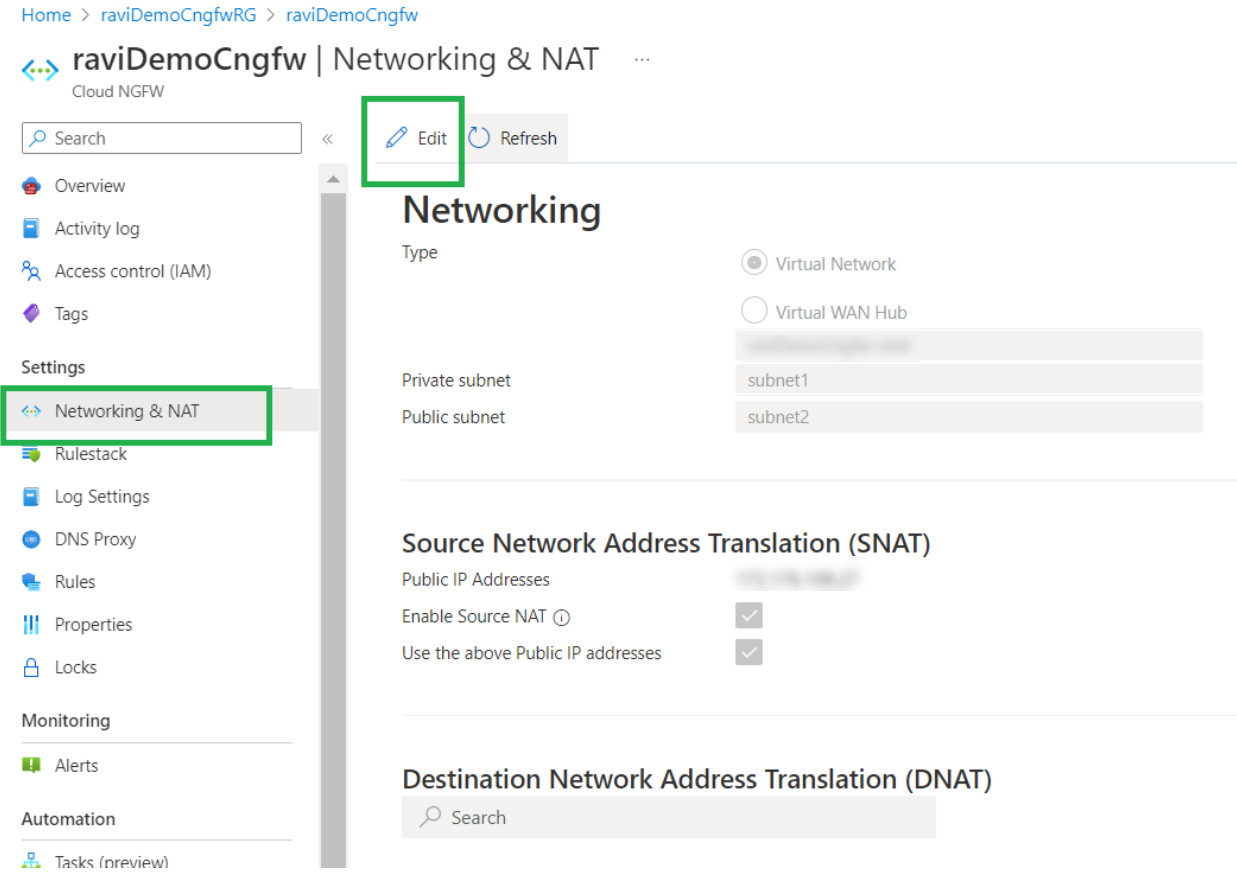
- Access the Networking and NAT settings for the Cloud NGFW resource. To determine if the Source NAT setting is enabled.Click Edit to add the destination NAT rule.
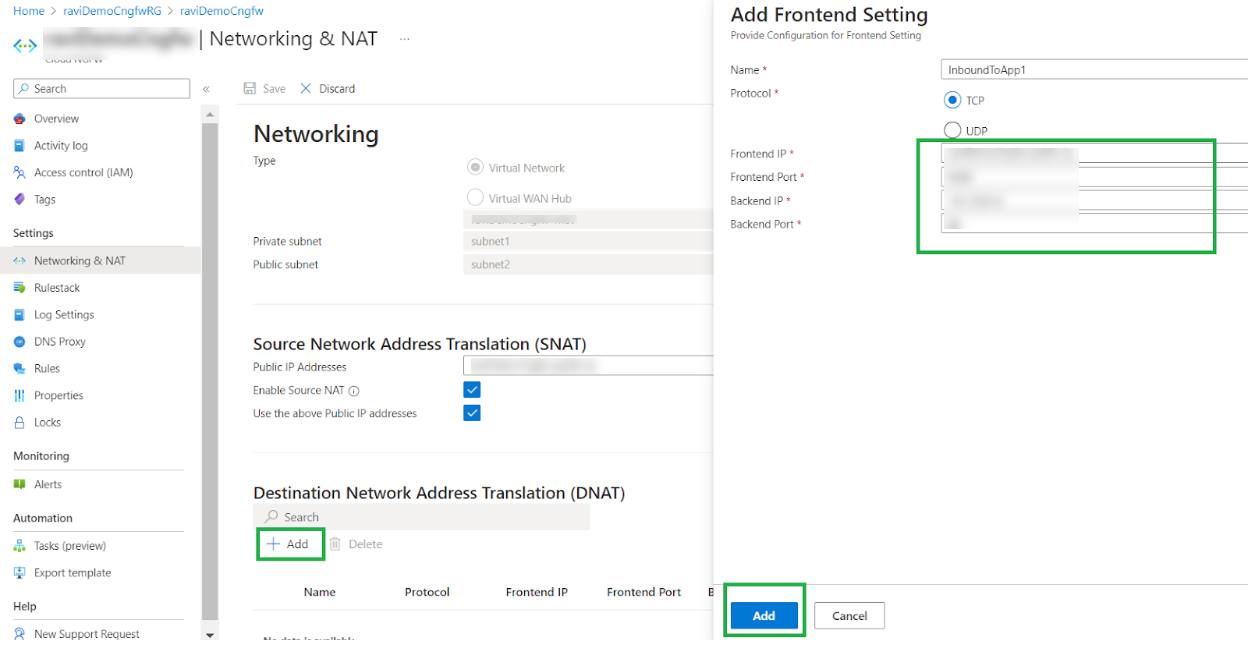
![]() Add a Destination NAT rule. The frontend IP represents the public IP address associated with the Cloud NGFW. Enter the frontend port number and click Add.
Add a Destination NAT rule. The frontend IP represents the public IP address associated with the Cloud NGFW. Enter the frontend port number and click Add.![]() After adding the destination NAT rule, click Save to deploy the configuration on the Cloud NGFW resource.
After adding the destination NAT rule, click Save to deploy the configuration on the Cloud NGFW resource.![]() The frontend address is now redirected through the configured port through Cloud NGFW. Inbound traffic is now flowing through the Cloud NGFW.
The frontend address is now redirected through the configured port through Cloud NGFW. Inbound traffic is now flowing through the Cloud NGFW.Configure Logging
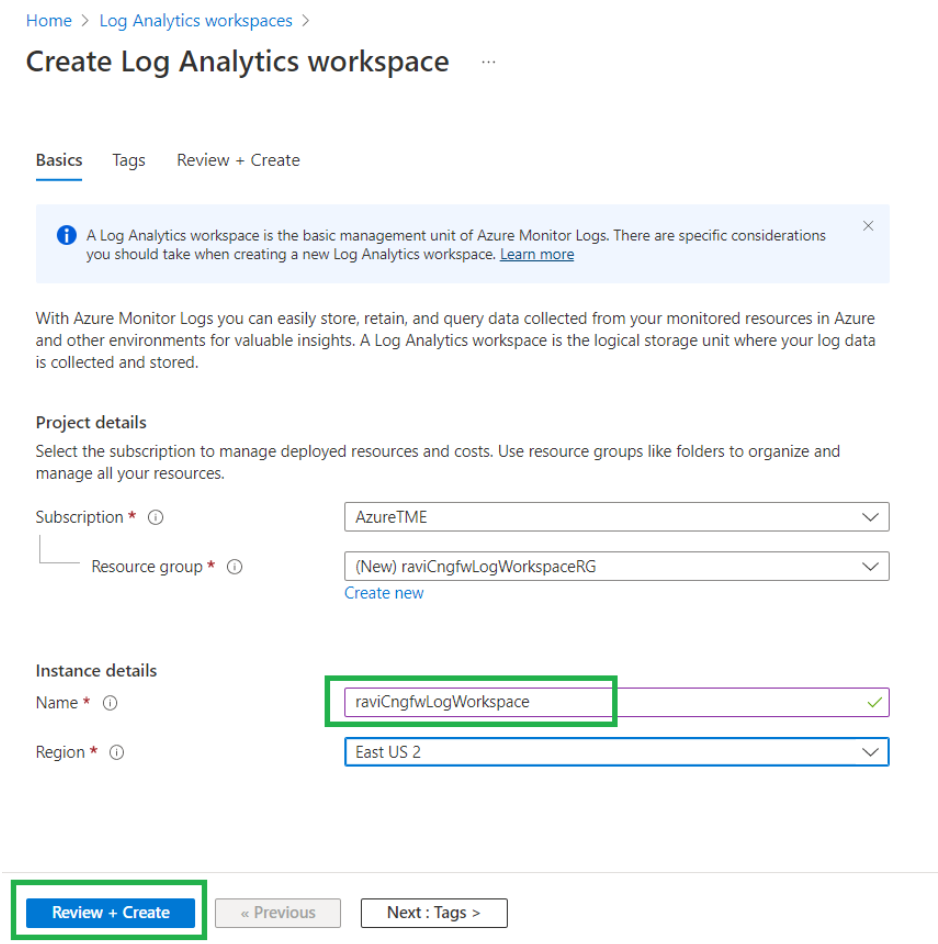
Before configuring logging on the Cloud NGFW, create the Log Analytics workspace on Azure.- In the Azure portal search for the Azure Log Analytics workspace. Click Log Analytics Workspaces to add it as a service.Click Create to establish a new Log Analytics workspace:
![]() In the Create Log Analytics workspace provide Instance details. Select the Name of the workspace from the drop-down menu, and specify the Region.
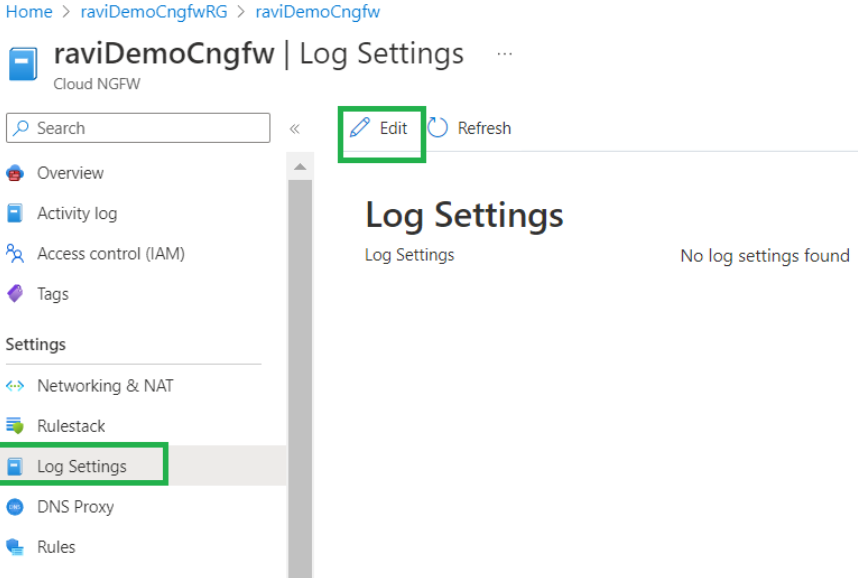
In the Create Log Analytics workspace provide Instance details. Select the Name of the workspace from the drop-down menu, and specify the Region.![]() Configure log settings in the Cloud NGFW resource. Select Log Settings. Click Edit.
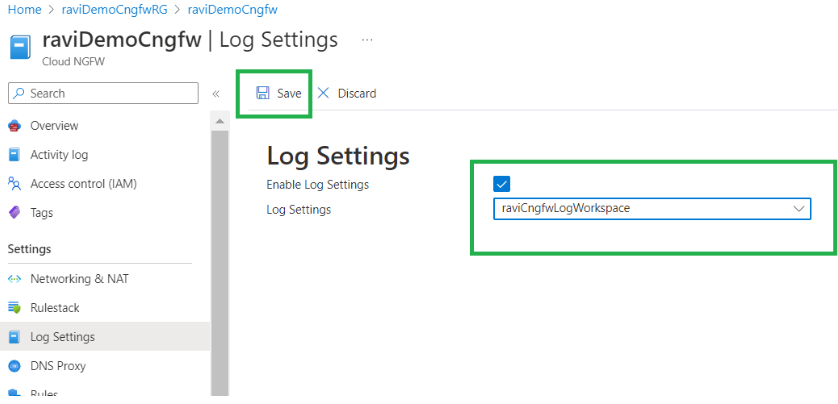
Configure log settings in the Cloud NGFW resource. Select Log Settings. Click Edit.![]() In the Log Settings field, select the Log Analytics workspace previously created, then click Save.
In the Log Settings field, select the Log Analytics workspace previously created, then click Save.![]()
Update the Network Security Group
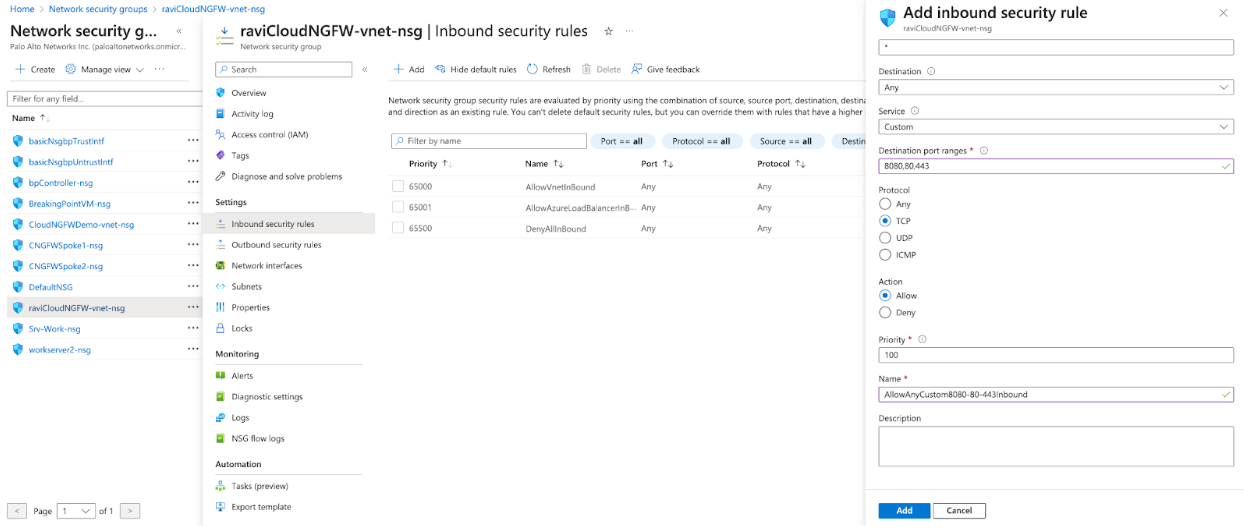
Update the network security group that was created as part of the Cloud NGFW deployment. This security group is associated with both private and public subnet as part of the VNet in the Cloud NGFW subscription.- Allow traffic as part of the frontend (destination) NAT rule configuration. Allow HTTP and HTTPS traffic so that the internet is accessible from application VNets through the Cloud NGFW.
![]() Click Add to incorporate this inbound security rule:
Click Add to incorporate this inbound security rule:![]()
Configure VNet peering
To configure VNet peering:- Locate your VNet and select Peerings.Click Add to create a new peering.Provide a name for the peering and retain the default settings.Select the hub VNet that you want to peer. When deploying the Cloud NGFW in a VNet using an existing VNet hub, the minimum size should be /25. You must have 2 subnets with the minimum size /26; these subnets must be delegated to the PaloAltoNetworks.Cloudngfw/firewalls service
![]() Configure VNet peering between additional VNets by repeating the steps outlined in this section.
Configure VNet peering between additional VNets by repeating the steps outlined in this section.Add a Route Table to route traffic through the Cloud NGFW
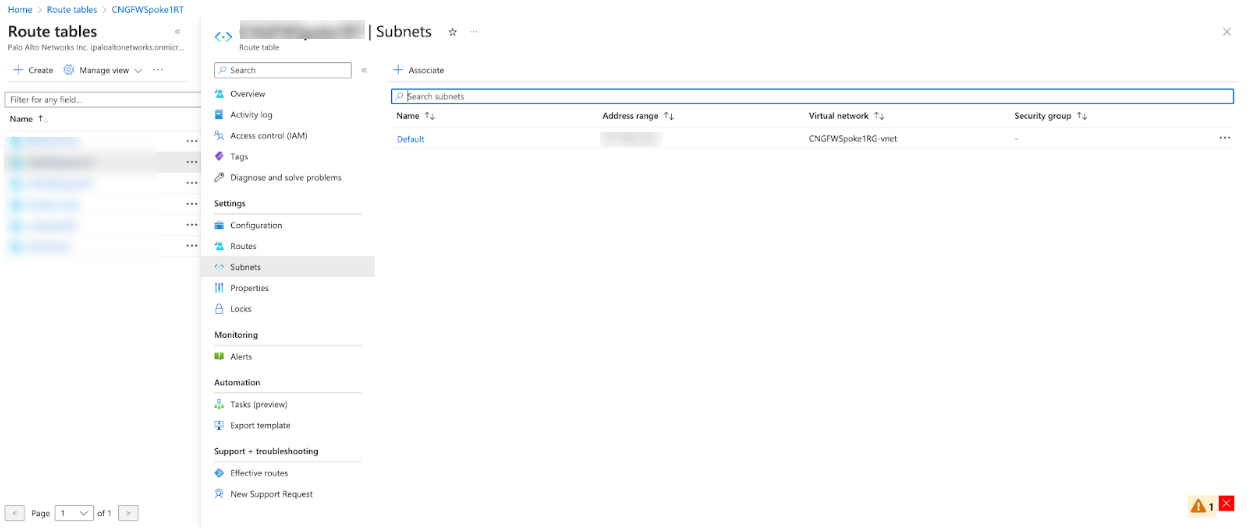
- Search for the Route table in the Azure portal search bar.Click Create to establish a new route table.Complete the route table fields, then click Review+create.After creating the route table, select the Subnets section and associate the table with the subnet.
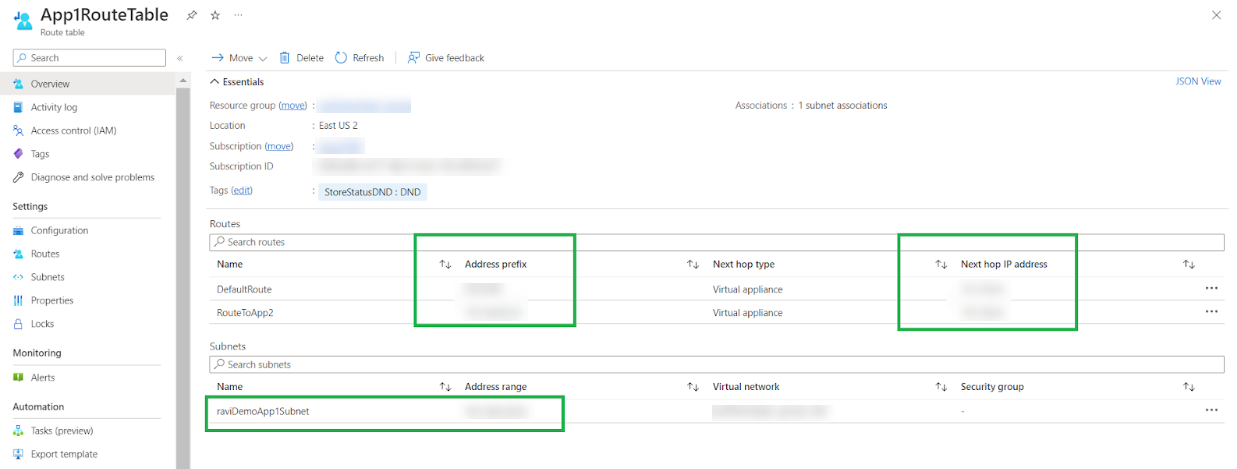
![]() Configure the default route for outbound traffic, and route towards toward the subnet (for east-west traffic) with the next hop as the Cloud NGFW private IP address.
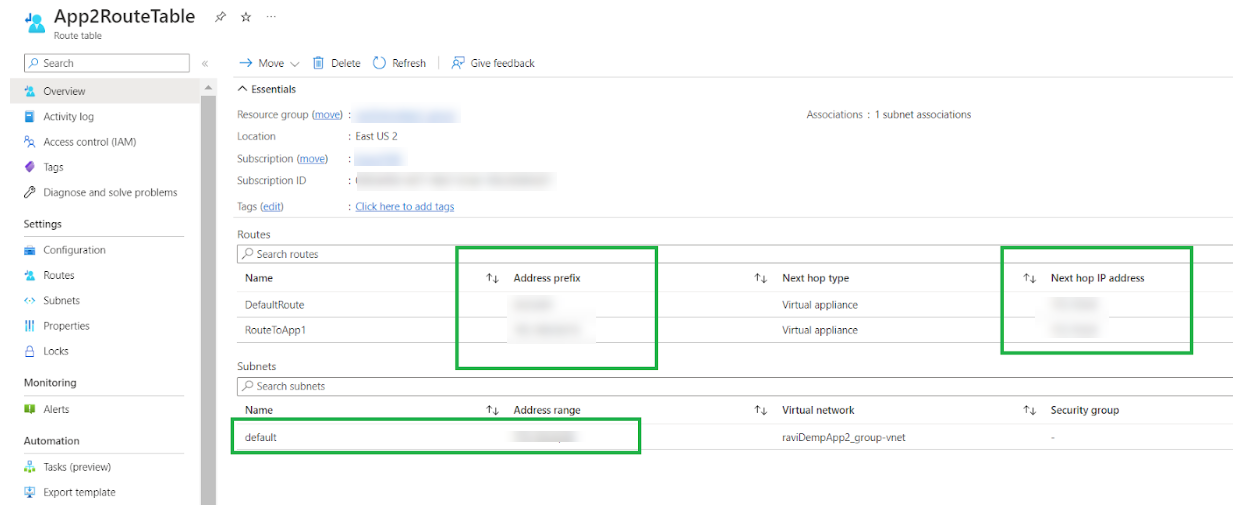
Configure the default route for outbound traffic, and route towards toward the subnet (for east-west traffic) with the next hop as the Cloud NGFW private IP address.![]() Associate one or more route tables with another subnet from the VNet. Configure a default route (for outbound traffic) and route it towards a different subnet (for east-west traffic) with the next hop as the Cloud NGFW private IP address.
Associate one or more route tables with another subnet from the VNet. Configure a default route (for outbound traffic) and route it towards a different subnet (for east-west traffic) with the next hop as the Cloud NGFW private IP address.![]()

