GlobalProtect
Remote Access VPN (Certificate Profile)
Table of Contents
Remote Access VPN (Certificate Profile)
With certificate authentication, the user
must present a valid client certificate that identifies them to
the GlobalProtect portal or gateway. To verify that a client certificate
is valid, the portal or gateway checks if the client holds the private
key of the certificate by using the Certificate Verify message exchanged during
the SSL handshake. In addition, the client certificate is signed
by the certificate authority (CA) specified in the Issuer field
of the certificate chain. In addition to the certificate itself,
the portal or gateway can use a certificate profile to determine
whether the user that sent the certificate is the user to which
the certificate was issued.
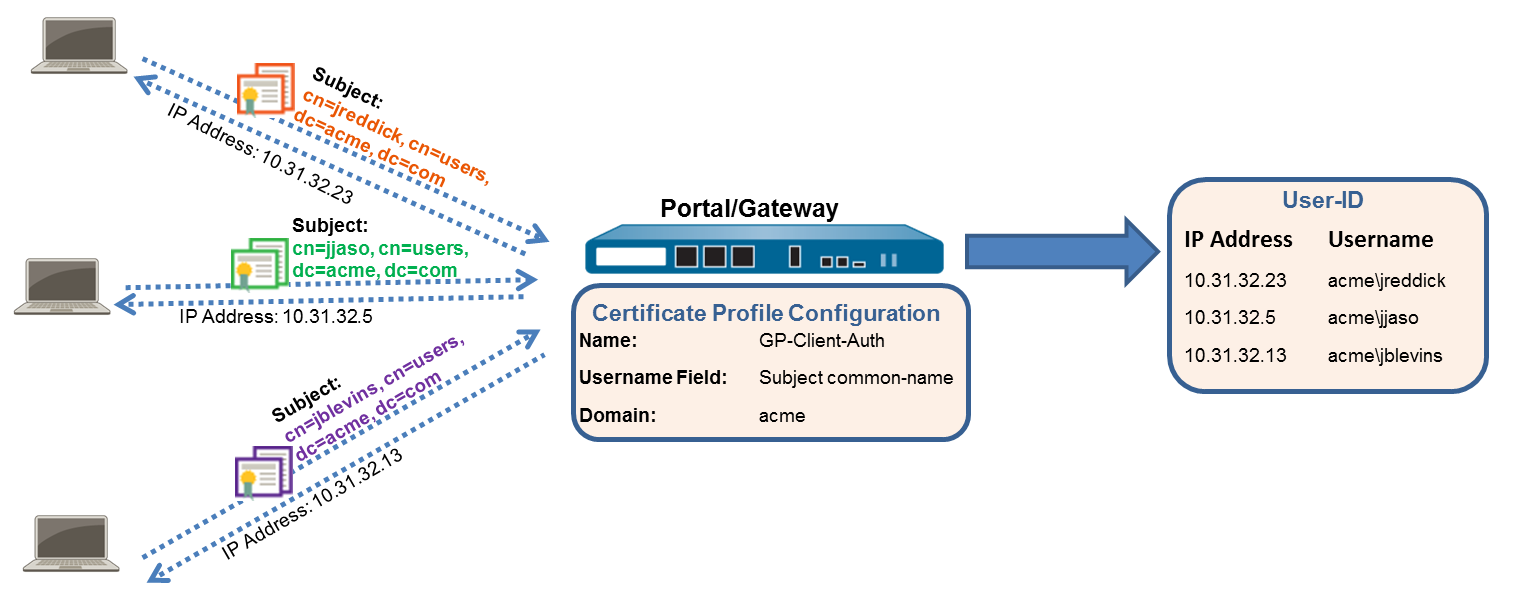
When a client certificate is the
only means of authentication, the certificate that the user presents
must contain the username in one of the certificate fields; typically the
username corresponds to the common name (CN) in the Subject field
of the certificate.
Upon successful authentication, the GlobalProtect
app establishes a tunnel with the gateway and is assigned an IP
address from the IP pool in the gateway’s tunnel configuration.
To support user-based policy enforcement on sessions from the corp-vpn zone,
the username from the certificate is mapped to the IP address assigned
by the gateway. If a security policy requires a domain name in addition
to the user name, the domain value specified in the certificate profile
is appended to the username.
This
quick configuration uses the same topology as GlobalProtect
VPN for Remote Access. The only configuration difference
is that instead of authenticating users against an external authentication
server, this configuration uses client certificate authentication
only.
- Create
Interfaces and Zones for GlobalProtect.Use the default virtual router for all interface configurations to avoid having to create inter-zone routing.
- Select . Configure ethernet1/2 as a Layer 3 Ethernet interface with IP address 203.0.113.1, and then assign it to the l3-untrust Security Zone and the default Virtual Router.
- Create a DNS “A” record that maps IP address 203.0.113.1 to gp.acme.com.
- Select and Add the tunnel.2 interface. Add the tunnel interface to a new Security Zone called corp-vpn, and then assign it to the default Virtual Router.
- Enable User Identification on the corp-vpn zone.
- Create security policies to enable traffic flow between
the corp-vpn zone and the l3-trust zone,
which enables access to your internal resources.
- Select , and then Add a new rule.
- For this example, you would define the rule with the
following settings:
- Name (General tab)—VPN Access
- Source Zone (Source tab)—corp-vpn
- Destination Zone (Destination tab)—l3-trust
![]()
- Use one of the following methods to obtain a server certificate
for the interface hosting the GlobalProtect portal and gateway:Select to manage certificates as follows:
- Obtain a server certificate. Because the portal and gateway are on the same interface, the same server certificate can be used for both components.
- The CN of the certificate must match the FQDN, gp.acme.com.
- To enable users to connect to the portal without receiving certificate errors, use a server certificate from a public CA.
- Issue
client certificates to GlobalProtect clients and endpoints.
- Use your enterprise PKI or a public CA to issue a unique client certificate to each GlobalProtect user.
- Install certificates in the personal certificate store on the endpoints.
- Create
a client certificate profile.
- Select . Add a new certificate profile, and then enter a profile Name such as GP-client-cert.
- Select Subject from the Username Field drop-down.
- In the CA Certificates area, Add the CA certificate that issued the client certificates. Click OK twice.
- Configure
a GlobalProtect Gateway.See the topology diagram shown in GlobalProtect VPN for Remote Access.Select , and then Add the following configuration:Interface—ethernet1/2IP Address—203.0.113.1Server Certificate—GP-server-cert.pem issued by GoDaddyCertificate Profile—GP-client-certTunnel Interface—tunnel.2IP Pool—10.31.32.3 - 10.31.32.118
- Configure the GlobalProtect
Portals.Select , and then Add the following configuration:
- Set
Up Access to the GlobalProtect Portal:Interface—ethernet1/2IP Address—203.0.113.1Server Certificate—GP-server-cert.pem issued by GoDaddyCertificate Profile—GP-client-cert
- Define
the GlobalProtect Agent Configurations:Connect Method—On-demand (Manual user initiated connection)External Gateway Address—gp.acme.com
- Set
Up Access to the GlobalProtect Portal:
- Deploy
the GlobalProtect App Software.Select . Follow the procedure to Host App Updates on the Portal.
- (Optional) Enable use of the GlobalProtect mobile app.Purchase and install a GlobalProtect subscription () to enable use of the app.
- Save the GlobalProtect configuration.Click Commit.
