GlobalProtect
Remote Access VPN (Authentication Profile)
Table of Contents
Remote Access VPN (Authentication Profile)
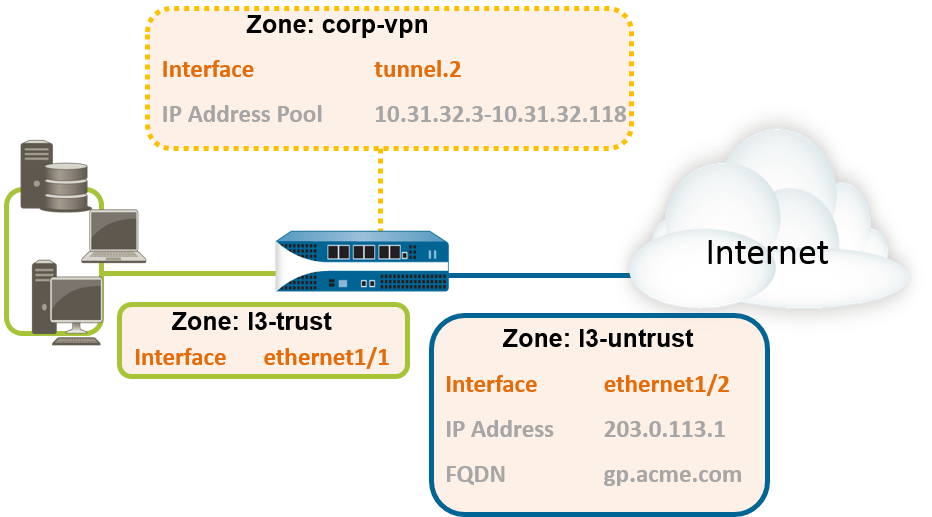
In the GlobalProtect
VPN for Remote Access, the GlobalProtect portal and gateway
are configured on ethernet1/2, so this is
the physical interface where GlobalProtect users connect. After
a user connects and authenticates to the portal and gateway, the
endpoint establishes a tunnel from its virtual adapter, which has
been assigned an IP address from the IP pool associated with the
gateway tunnel.2 configuration—10.31.32.3-10.31.32.118 in this example.
Because GlobalProtect VPN tunnels terminate in a separate corp-vpn zone,
you have visibility into the connection traffic as well as the ability
to customize security policies for remote users.
- Create
Interfaces and Zones for GlobalProtect.Use the default virtual router for all interface configurations to avoid having to create inter-zone routing.
- Select . Configure ethernet1/2 as a Layer 3 Ethernet interface with IP address 203.0.113.1, and then assign it to the l3-untrust Security Zone and the default Virtual Router.
- Create a DNS “A” record that maps IP address 203.0.113.1 to gp.acme.com.
- Select and Add the tunnel.2 interface. Add the tunnel interface to a new Security Zone called corp-vpn, and then assign it to the default Virtual Router.
- Enable User Identification on the corp-vpn zone.
- Create security policies to enable traffic flow between
the corp-vpn zone and the l3-trust zone,
which enables access to your internal resources.
- Select , and then Add a new rule.
- For this example, you would define the rule with the
following settings:
- Name (General tab)—VPN Access
- Source Zone (Source tab)—corp-vpn
- Destination Zone (Destination tab)—l3-trust
![]()
- Use one of the following methods to obtain a server certificate
for the interface hosting the GlobalProtect portal and gateway:Select to manage certificates as follows:
- Obtain a server certificate. Because the portal and gateway are on the same interface, the same server certificate can be used for both components.
- The CN of the certificate must match the FQDN, gp.acme.com.
- To enable users to connect to the portal without receiving certificate errors, use a server certificate from a public CA.
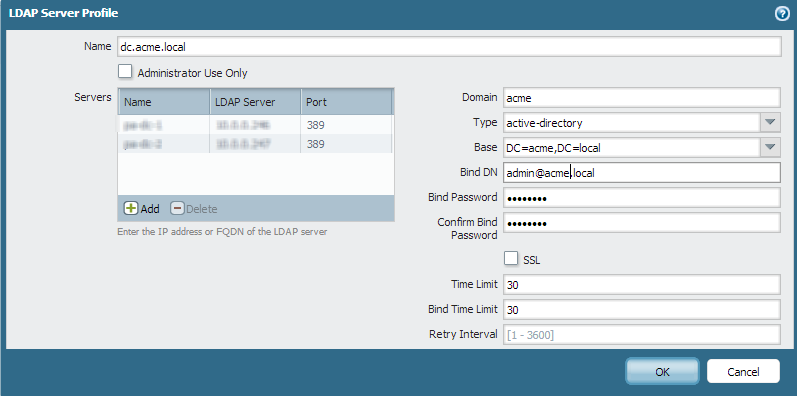
- Create
a server profile.The server profile instructs the firewall on how to connect to the authentication service. Local, RADIUS, Kerberos, SAML, and LDAP authentication methods are supported. This example shows an LDAP authentication profile for authenticating users against the Active Directory.Create the server profile for connecting to the LDAP server ().
![]()
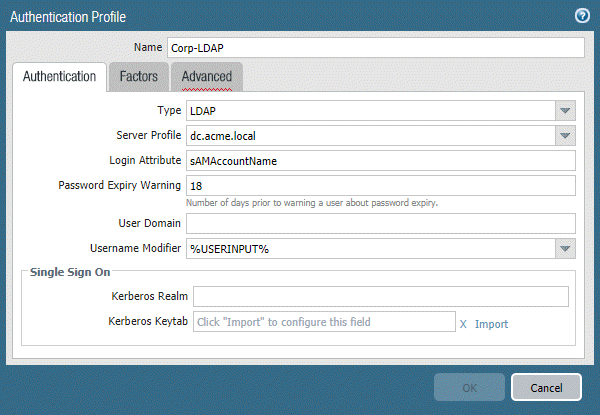
- (Optional)
Create an authentication profile.Attach the server profile to an authentication profile ().
![]()
- Configure
a GlobalProtect Gateway.Select , and then Add the following configuration:Interface—ethernet1/2IP Address—203.0.113.1Server Certificate—GP-server-cert.pem issued by GoDaddyAuthentication Profile—Corp-LDAPTunnel Interface—tunnel.2IP Pool—10.31.32.3 - 10.31.32.118
- Configure the GlobalProtect
Portals.Select , and then Add the following configuration:
- Set
Up Access to the GlobalProtect Portal:Interface—ethernet1/2IP Address—203.0.113.1Server Certificate—GP-server-cert.pem issued by GoDaddyAuthentication Profile—Corp-LDAP
- Define
the GlobalProtect Client Authentication Configurations:Connect Method—On-demand (Manual user initiated connection)External Gateway Address—gp.acme.com
- Set
Up Access to the GlobalProtect Portal:
- Deploy
the GlobalProtect App Software.Select . Follow the procedure to Host App Updates on the Portal.
- (Optional) Enable use of the GlobalProtect mobile
app.Purchase and install a GlobalProtect subscription () to enable use of the app.
- Save the GlobalProtect configuration.Click Commit.