Configure Advanced Routing for SD-WAN
Table of Contents
Configure Advanced Routing for SD-WAN
Configure advanced routing for SD-WAN traffic.
Advanced Routing Engine allows the firewall
to scale and provide stable, high-performing, and highly available
routing functions to large data centers, ISPs, enterprises, and
cloud users. The Advanced Routing Engine relies
on industry-standard configuration methodology, which facilitates
the administrator tasks. It allows the creation of profiles that
are used for different functions (such as, filtering, redistribution,
and metric changes), all of which can be used across logical routers. These
profiles provide finer granularity to filter routes for each dynamic routing
protocol and improve route redistribution across multiple protocols.
Although
conceptually equivalent, the advanced routing engine uses logical
routers rather than virtual routers to instantiate routing domains.
Unlike
virtual routers, logical routers are not created by default; you
must create one before configuring the routing functions.
You
can use an advanced routing engine or a legacy engine based on your
network requirements:
- When you enable Advanced Routing, logical routers are created and advanced routing engine is used for routing.
- When you disable Advanced Routing, virtual routers are created and legacy engine is used for routing.
The
advanced route engine supports multiple logical routers (known as
a virtual router on the legacy route engine). The advanced route
engine has more convenient menu options and there are more BGP settings
that you can easily configure in a profile (authentication, timers,
address family, or redistribution profile) that applies to a BGP
peer group or peer, for example.
The Advanced Routing Engine
supports static routes, MP-BGP, OSPFv2, OSPFv3, RIPv2, Protocol
Independent Multicast Sparse Mode (PIM-SM), PIM Source-Specific
Multicast (SSM), BFD, redistribution, route filtering into the RIB,
access lists, prefix lists, and route maps.
You’ll need the
following to configure advanced routing engine on SD-WAN:
Platform | Firewalls running PAN-OS Release | SD-WAN Plugin |
|---|---|---|
PanoramaTM | 11.0 and later | 3.1.0 and later |
SD-WAN plugin creates logical
router or virtual router based on the value of the advanced routing
option. When Advanced Routing is enabled, a logical router is created;
Otherwise, virtual router is created.
When you enable advanced
routing in template stack and perform a Panorama commit and push
to the firewall, SD-WAN plugin runs the migration script to create
the SD-WAN related objects (static, interfaces, redistribution profile,
BGP) in Logical Router. The migration script creates the logical
router name same as the virtual router name for the same template.
Hence the hubs and branches have always the same router name.
After
migration, Panorama does not allow you to delete the migrated virtual
routers.
The Panorama SD-WAN plugin 3.1.0 can concurrently
manage firewalls using the Advanced Routing Engine and firewalls using
the legacy routing engine. The benefit is that you can migrate select
managed firewalls to the new Advanced Routing Engine while still
maintaining your current legacy routing engine configuration on
others.
While the SD-WAN plugin 3.1.0 manages a firewall regardless
of the routing engine, only one routing engine configuration can
be in effect at a time on a managed firewall. You can use the Advanced
Routing option to enable or disable the advanced routing
engine. Each time you change the engine that the firewall uses (you
enable or disable Advanced Routing to access the advanced engine
or legacy engine, respectively), you must commit the configuration
and reboot the firewall for the changes to take effect.
Before you switch to the advanced route
engine, make a backup of your current configuration. Similarly, if you configure Panorama with a template
stack that enables or disables Advanced Routing, after you commit
and push the template stack to devices, you must reboot the devices
in the template stack for the change to take effect.
When configuring Panorama, create device
groups and template stack for devices that all use the same Advanced
Routing setting (all enabled or all disabled). Panorama won’t push
configurations with Advanced Routing enabled to smaller firewalls
that don’t support Advanced Routing. For those firewalls, Panorama
will push a legacy configuration if one is present.
Ensure
that you downgrade to an appropriate SD-WAN plugin and PAN-OS version,
and disable Advanced Routing if you plan
to use a virtual router. Use a separate template where the Advanced Routing is
disabled (in this case, virtual routers are created) when downgrading
the SD-WAN plugin.
If you have configured Advanced
Routing and want to switch to a virtual router, then
disable Advanced Routing to return to the previously saved virtual
router configuration. Commit and push any changes made to the firewall
after disabling advanced routing before attempting a downgrade procedure,
such as downgrading PAN-OS and SD-WAN plugin versions.
If
you enable Advanced Routing, SD-WAN interfaces must be configured
in the same logical router; they cannot be split among logical routers.
- Add your hub and branch firewalls as managed devices to the PanoramaTM management server.
- Make a backup of your current configuration before you enable Advanced Routing.
- In the Device section, select appropriate template stack from the Template context drop-down.
- Enable advanced routing engine.
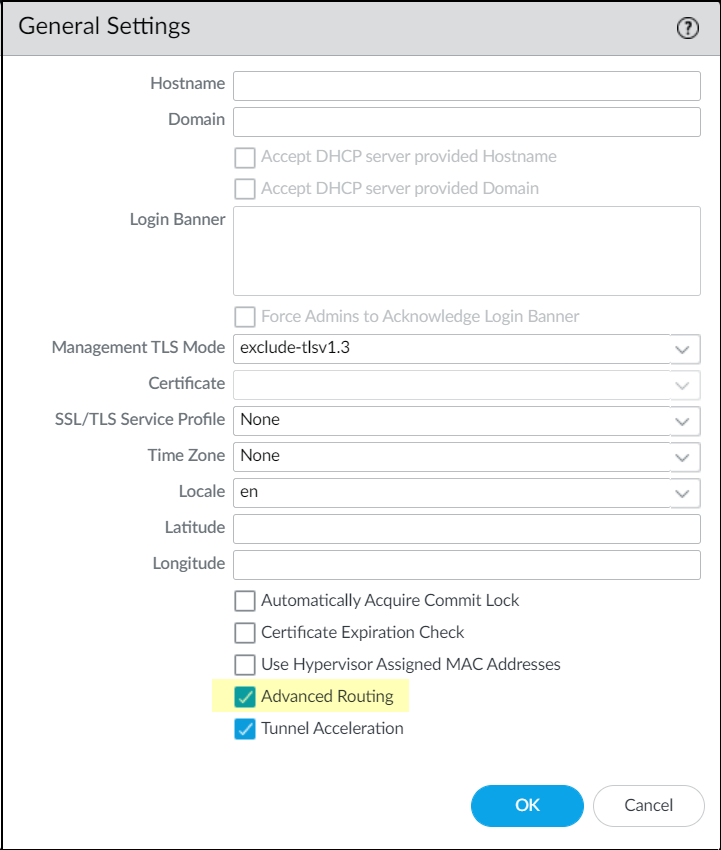
- Select and edit the General Settings.
- Enable Advanced Routing. SD-WAN plugin will create logical router or virtual router based on the value of the advanced routing option. When Advanced Routing is enabled, a logical router is created. Otherwise, virtual router is created.

- Click OK.
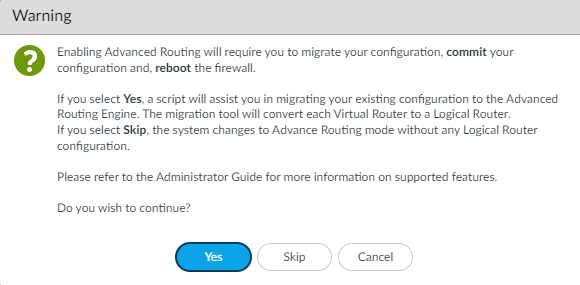
- A warning message about the migration appears; click Yes to proceed.
On clicking Yes, a built-in migration script will migrate your existing configuration to the advanced routing engine. If you select Skip, an empty configuration is created for the advanced routing engine.The Migration Configuration displays the color codes that indicate the migration status.
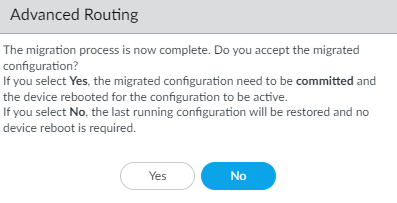
In the Virtual Router, review the STATUS of templates in template stacks. The STATUS should be green for successful migration. Otherwise, take necessary action for any templates that did not pass the migration.
The successful migration automatically converts each virtual router to a corresponding logical router. It is mandatory to commit the configuration and restart the firewall for the changes to take effect.
- Commit.
- Select and Reboot Device.
- Select and commit your changes.
- Commit and push your configuration changes to your managed firewalls. Push to Devices to view the logical routers added in the selected SD-WAN firewalls.
- Select and Edit Selections.
- Select Templates and choose the templates stack and template from the list.
- Enable Force Template Values to overwrite local configuration with the updated template values. Before you use this option, check for overridden values on the firewalls to ensure your commit does not result in any unexpected network outages or issues caused by replacing those overridden values.
- Click OK and Push to devices.
- Log back into the firewall.
- Select Network.Notice the menu items, which are more industry-standard and more detailed than the single item (Virtual Routers) on the legacy menu. Routing includes Logical Routers and Routing Profiles, which include BGP, BFD, OSPF, OSPFv3, RIPv2, Filters, and Multicast.
- You must enable Advanced Routing for each template stack individually when you have more than one template stack in your configuration. Repeat Steps5through10for other template stacks on firewalls that you intend to update for advanced routing.According to our design requirement, the logical router name must be the same as the virtual router name for the same template when using the advanced routing engine. This means that hubs and branches have always the same router name. When manually creating logical routers rather than using a migration script, you must make sure the logical router name and virtual router name are the same.
- Select virtual or logical router in your SD-WAN deployment.Select , to add an SD-WAN device (SD-WAN hub or branch firewall) to be managed by the Panorama management server.In addition to existing configuration options for adding an SD-WAN device, you can now select a logical router (for advanced routing engine) or virtual router (for legacy engine) for a Router Name. It is important that the logical router name and the virtual router name are same for the same template when using the advanced routing engine.Select the Router Name (logical or virtual router) to use for routing between the SD-WAN hub and branches:
- If the virtual router and logical router names are the same, then the Router Name displays one name.
- If virtual router and logical router names are different, then the Router Name displays both virtual and logical router name. You can select either virtual router (for legacy engine) or logical router (for advanced routing engine) based on your requirement.