Enterprise DLP
Create and Upload an Encrypted EDM Data to Enterprise DLP in Interactive Mode
Table of Contents
Create and Upload an Encrypted EDM Data to Enterprise DLP in Interactive Mode
Use the Exact Data Matching (EDM) CLI app in Interactive mode to create and upload an
EDM dataset in CSV or TSV format to Enterprise Data Loss Prevention (E-DLP).
On May 7, 2025, Palo Alto Networks is introducing new Evidence Storage and Syslog Forwarding service IP
addresses to improve performance and expand availability for these services
globally.
You must allow these new service IP addresses on your network
to avoid disruptions for these services. Review the Enterprise DLP
Release Notes for more
information.
| Where Can I Use This? | What Do I Need? |
|---|---|
|
Or any of the following licenses that include the Enterprise DLP license
|
Upload an encrypted hash Exact Data Matching (EDM) dataset to Enterprise DLP
using the EDM CLI app in Interactive mode to successfully create an EDM filtering
profile. In Interactive Mode, you must specify the EDM dataset path for upload and
configure the upload parameters directly through the EDM CLI app.
To ensure General Data Protection Regulation (GDPR) compliance, the EDM CLI app
hashes and encrypts EDM datasets before upload to the Enterprise DLP
EDM dataset storage bucket. The EDM CLI
app first hashes the dataset using the SHA256 hash function when you initiate an EDM
dataset upload. The EDM CLI app then encrypts the EDM dataset using AES Symmetric
encryption before beginning the EDM dataset upload to the Enterprise DLP EDM
dataset storage bucket. The raw data in your EDM datasets never leave your
organization's network, and Enterprise DLP does not store or have access to the
raw EDM dataset data. Enterprise DLP stores only hashed and encrypted EDM
dataset data in the EDM dataset storage bucket. Review the Enterprise DLP
Privacy Datasheet for more information
about how Enterprise DLP captures, processes, and stores personal
information.
Create and Upload an Encrypted EDM Data Set 3.5 and Earlier
Use the Exact Data Matching (EDM) CLI app version 3.5 and earlier in Interactive mode
to create and upload an EDM dataset in CSV or TSV format to Enterprise Data Loss Prevention (E-DLP).
- Create a Service Account for EDM Dataset Uploads.Set Up the EDM CLI App.Create a Service Account for EDM Dataset Uploads.You must provide the service account Client ID and Client Secret to successfully authenticate the EDM CLI app and upload EDM datasets.(EDM CLI app 6.0 and later) If you encrypted your Client ID and Client Secret, you must provide the 32-byte AES encryption key for each to successfully authenticate the EDM CLI app and upload EDM datasets.Configure EDM CLI App Connectivity to Enterprise DLP.This is required to successfully upload hashed and encrypted EDM datasets.Review the Supported EDM Data Set Formats and prepare the EDM dataset for upload to Enterprise DLP.Enter Interactive mode in the EDM CLI app to begin the EDM dataset upload.
- Open the terminal and navigate to the package-edm-secure-cli-<version>-<platform> directory where the EDM CLI app is located.Enter Interactive mode in the EDM CLI app.
- Windowsadmin: edm-secure-cli.bat interactiveLinuxadmin: ./edm-secure-cli.sh interactiveEntering this command begins the interactive upload process for EDM datasets to Enterprise DLP.
![]() Enter the path of the EDM dataset for upload.
Enter the path of the EDM dataset for upload.![]() Enter the delimiter used to specify boundaries between values in the EDM dataset.Enterprise DLP supports the “,” and “tab (t) delimiters for CSV or TSV files. The EDM CLI app uses the delimiter “,” by default. The EDM dataset might only use one delimiter.
Enter the delimiter used to specify boundaries between values in the EDM dataset.Enterprise DLP supports the “,” and “tab (t) delimiters for CSV or TSV files. The EDM CLI app uses the delimiter “,” by default. The EDM dataset might only use one delimiter.![]() Enter the EDM dataset file encoding method.
Enter the EDM dataset file encoding method.![]() Enter the error threshold percentage for the EDM dataset.The EDM CLI app does not create an encrypted version of the EDM dataset if it encounters errors exceeding the specified error threshold percentage.
Enter the error threshold percentage for the EDM dataset.The EDM CLI app does not create an encrypted version of the EDM dataset if it encounters errors exceeding the specified error threshold percentage.![]() Specify whether the EDM dataset has a header row.
Specify whether the EDM dataset has a header row.![]() Specify whether to allow uploads of EDM datasets that include empty or blank cells.Enter true to allow rows that include empty or blank cells in an EDM dataset.Enter false to reject rows that include empty or blank cells in an EDM dataset.
Specify whether to allow uploads of EDM datasets that include empty or blank cells.Enter true to allow rows that include empty or blank cells in an EDM dataset.Enter false to reject rows that include empty or blank cells in an EDM dataset.![]() Specify whether the EDM CLI app should abort the EDM dataset upload if the EDM dataset includes more than the maximum number of cells supported.Enter true to upload the maximum number of dataset cells supported.Enter false to abort EDM CLI app if the EDM dataset has more than the maximum number of dataset cells supported.
Specify whether the EDM CLI app should abort the EDM dataset upload if the EDM dataset includes more than the maximum number of cells supported.Enter true to upload the maximum number of dataset cells supported.Enter false to abort EDM CLI app if the EDM dataset has more than the maximum number of dataset cells supported.![]() Enter the number of columns in your EDM dataset.Accurately map your CSV or TSV columns to the supported data types to allow Enterprise DLP to accurately ingest your EDM dataset.
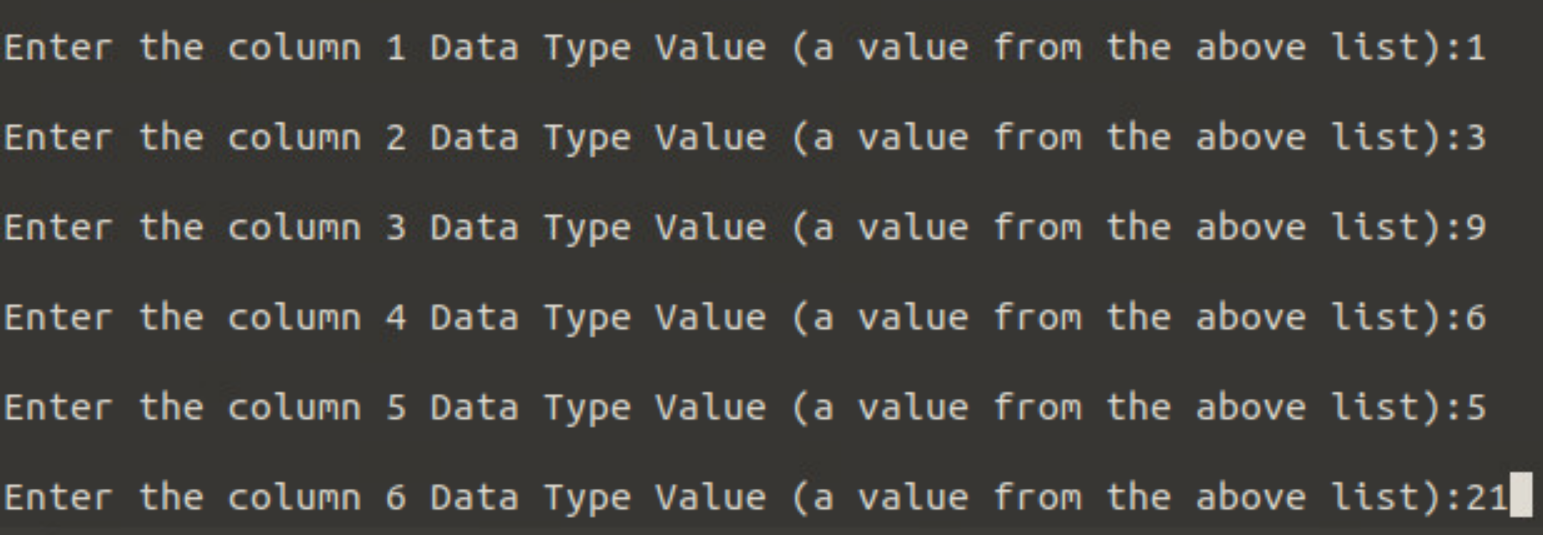
Enter the number of columns in your EDM dataset.Accurately map your CSV or TSV columns to the supported data types to allow Enterprise DLP to accurately ingest your EDM dataset.![]() Map your columns using the supported Data Types Value to accurately map each column in your EDM dataset to a specific Data Type.The EDM CLI app presents a table with each Data Type Name and the corresponding Data Type Value. You can also view this table in the README.txt file packaged with the EDM CLI app.When you create a data profile on Strata Cloud Manager, you’re required to add at least one column where the column values occurs up to 12 times in the selected EDM dataset for the Primary Field.When mapping your columns to a specific Data Type, be sure to include at least one column with up to 12 occurrences across the entire EDM dataset. Otherwise, Enterprise DLP is unable to match traffic against the EDM data profile you create using this EDM dataset.
Map your columns using the supported Data Types Value to accurately map each column in your EDM dataset to a specific Data Type.The EDM CLI app presents a table with each Data Type Name and the corresponding Data Type Value. You can also view this table in the README.txt file packaged with the EDM CLI app.When you create a data profile on Strata Cloud Manager, you’re required to add at least one column where the column values occurs up to 12 times in the selected EDM dataset for the Primary Field.When mapping your columns to a specific Data Type, be sure to include at least one column with up to 12 occurrences across the entire EDM dataset. Otherwise, Enterprise DLP is unable to match traffic against the EDM data profile you create using this EDM dataset.![]() Specify whether to upload the EDM dataset to Enterprise DLP. Enter y to continue uploading the EDM dataset or n to upload the EDM dataset later.Entering n creates a secured copy of the EDM dataset in the package-edm-secure-cli-<version>-<platform> directory for you to review.You can skip the remaining steps below and Upload an Encrypted EDM Data Set to Enterprise DLP later.
Specify whether to upload the EDM dataset to Enterprise DLP. Enter y to continue uploading the EDM dataset or n to upload the EDM dataset later.Entering n creates a secured copy of the EDM dataset in the package-edm-secure-cli-<version>-<platform> directory for you to review.You can skip the remaining steps below and Upload an Encrypted EDM Data Set to Enterprise DLP later.![]() Enter y to create a new EDM dataset and enter the dataset name.If you enter n and are uploading to Enterprise DLP, you’re still prompted to enter an EDM dataset name. This updates the existing EDM dataset you previously uploaded to Enterprise DLP.
Enter y to create a new EDM dataset and enter the dataset name.If you enter n and are uploading to Enterprise DLP, you’re still prompted to enter an EDM dataset name. This updates the existing EDM dataset you previously uploaded to Enterprise DLP.![]() Specify the authentication mechanism used to upload the EDM dataset to Enterprise DLP.
Specify the authentication mechanism used to upload the EDM dataset to Enterprise DLP.- When prompted about whether you have access and refresh token, enter n.Enterprise DLP requires you end the Client ID and Client Secret to upload EDM datasets.Enter the Client ID and Client Secret.
![]() (Proxy server only) When prompted, enter y if the local device from which you’re uploading requires a proxy server to connect to the internet.You’re required to provide the following information for your proxy server.
(Proxy server only) When prompted, enter y if the local device from which you’re uploading requires a proxy server to connect to the internet.You’re required to provide the following information for your proxy server.- Proxy hostname
- Proxy port number
- Proxy username
- Proxy password
Enter Y or y to confirm the EDM dataset upload configuration is correct and begin uploading to Enterprise DLP.The EDM CLI app creates a secured copy of the EDM dataset in the package-edm-secure-cli-<version>-<platform>. In the directory, the EDM CLI app creates a new folder with the name of the EDM dataset you appended with the date and time the EDM CLI app created it. This folder contains the encrypted output.zip file of your EDM dataset that you uploaded to Enterprise DLP.The EDM CLI app displays a progress bar and success message to notify you whether the upload is successful.During the upload process, the EDM CLI app connects to Enterprise DLP to verify that you created the output.zipfile using a supported EDM CLI app version. The upload to Enterprise DLP fails if you created the output.zip file using an unsupported EDM CLI app version.![]() Monitor the upload status of the EDM dataset.The time it takes for an EDM dataset uploaded to DLP cloud service to be available on Strata Cloud Manager depends on the EDM dataset size and internet connectivity speed. For example, a 4GB EDM dataset upload typically takes about 30 minutes to display on Strata Cloud Manager and be usable in a data profile.
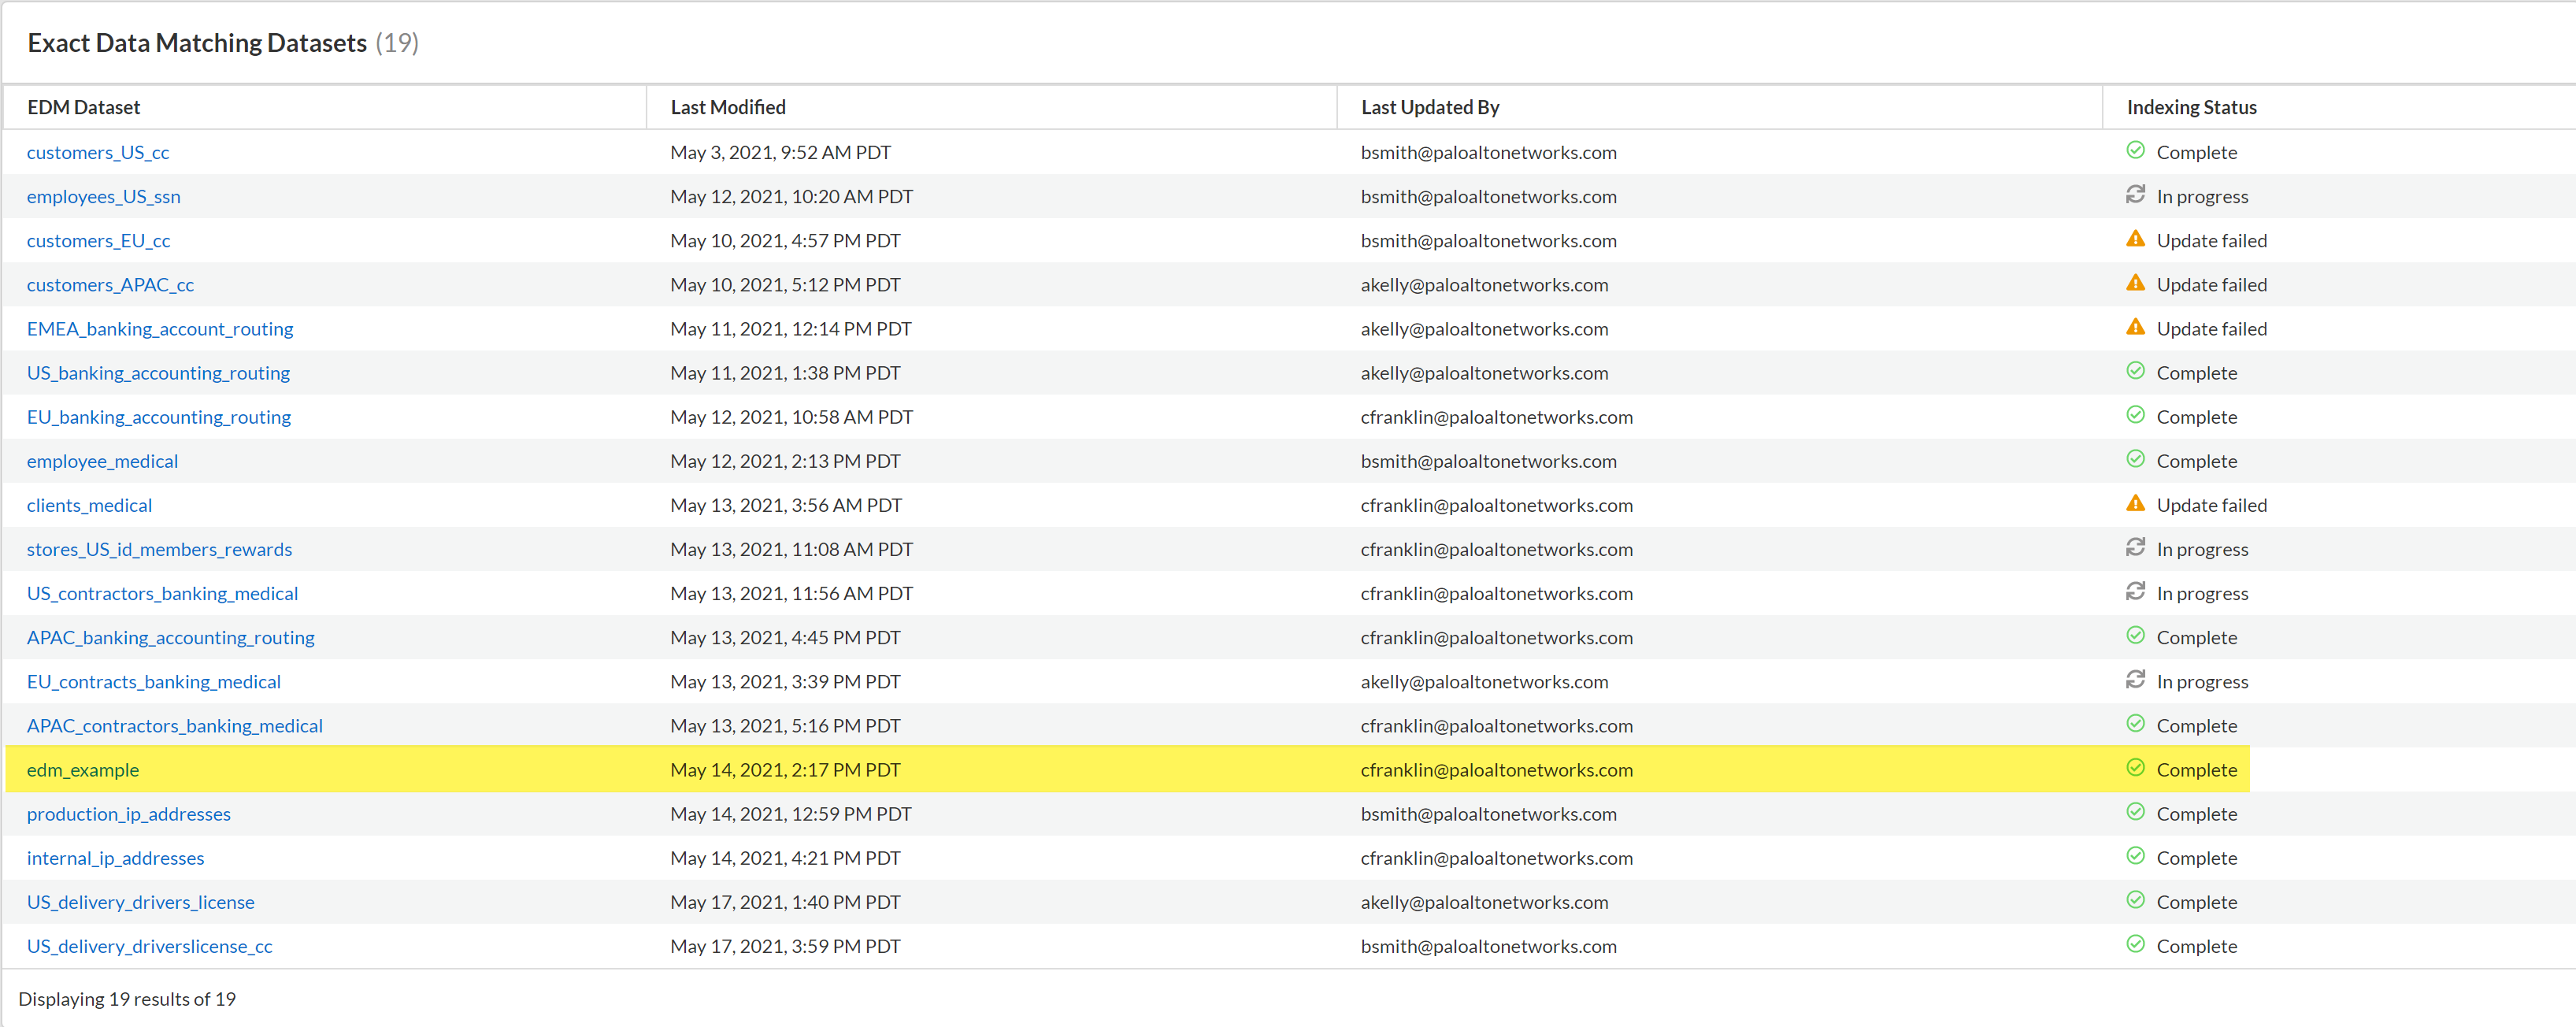
Monitor the upload status of the EDM dataset.The time it takes for an EDM dataset uploaded to DLP cloud service to be available on Strata Cloud Manager depends on the EDM dataset size and internet connectivity speed. For example, a 4GB EDM dataset upload typically takes about 30 minutes to display on Strata Cloud Manager and be usable in a data profile.- Log in to Strata Cloud Manager.Select .The EDM dataset upload is complete when the Indexing Status column displays Complete.
![]()
Create and Upload an Encrypted EDM Data Set in Interactive Mode 4.0 and Later
Use the Exact Data Matching (EDM) CLI app version 4.0 and later in Interactive mode to create and upload an EDM dataset in CSV or TSV format to Enterprise Data Loss Prevention (E-DLP).- Create a Service Account for EDM Dataset Uploads.Set Up the EDM CLI App.Create a Service Account for EDM Dataset Uploads.You must provide the service account Client ID and Client Secret to successfully authenticate the EDM CLI app and upload EDM datasets.(EDM CLI app 6.0 and later) If you encrypted your Client ID and Client Secret, you must provide the 32-byte AES encryption key for each to successfully authenticate the EDM CLI app and upload EDM datasets.Configure EDM CLI App Connectivity to Enterprise DLP.This is required to successfully upload hashed and encrypted EDM datasets and to specify the region where you want your EDM datasets uploaded to if you have data residency requirements your organization must adhere to.Review the Supported EDM Data Set Formats and prepare the EDM dataset for upload to Enterprise DLP.Enter Interactive mode in the EDM CLI app to begin the EDM dataset upload.
- Open the terminal and navigate to the package-edm-secure-cli-<version>-<platform> directory where the EDM CLI app is located.Enter Interactive mode in the EDM CLI app.
- All VersionsWindowsadmin: edm-secure-cli.bat interactiveLinuxadmin: ./edm-secure-cli.sh interactiveEncrypted using EDM CLI App 6.0 or LaterWindowsadmin: edm-secure-cli.bat interactive --key /path/to/folder/<key-name>.keyLinuxadmin: ./edm-secure-cli.sh interactive --key /path/to/folder/<key-name>.keyEntering this command begins the interactive upload process for EDM datasets to Enterprise DLP.
![]() Enter the path of the EDM dataset for upload.
Enter the path of the EDM dataset for upload.![]() Enter the delimiter used to specify boundaries between values in the EDM dataset.Enterprise DLP supports the “,” and “tab (t) delimiters for CSV or TSV files. The EDM CLI app uses the delimiter “,” by default. The EDM dataset might only use one delimiter.
Enter the delimiter used to specify boundaries between values in the EDM dataset.Enterprise DLP supports the “,” and “tab (t) delimiters for CSV or TSV files. The EDM CLI app uses the delimiter “,” by default. The EDM dataset might only use one delimiter.![]() Enter the EDM dataset file encoding method.
Enter the EDM dataset file encoding method.![]() Enter the error threshold percentage for the EDM dataset.The EDM CLI app does not create an encrypted version of the EDM dataset if it encounters errors exceeding the specified error threshold percentage.
Enter the error threshold percentage for the EDM dataset.The EDM CLI app does not create an encrypted version of the EDM dataset if it encounters errors exceeding the specified error threshold percentage.![]() Specify whether the EDM dataset has a header row.
Specify whether the EDM dataset has a header row.![]() Specify whether to allow uploads of EDM datasets that include empty or blank cells.Enter true to allow rows that include empty or blank cells in an EDM dataset.Enter false to reject rows that include empty or blank cells in an EDM dataset.
Specify whether to allow uploads of EDM datasets that include empty or blank cells.Enter true to allow rows that include empty or blank cells in an EDM dataset.Enter false to reject rows that include empty or blank cells in an EDM dataset.![]() Specify whether the EDM CLI app should abort the EDM dataset upload if the EDM dataset includes more than the maximum number of cells supported.Enter true to upload the maximum number of dataset cells supported.Enter false to abort EDM CLI app if the EDM dataset has more than the maximum number of dataset cells supported.
Specify whether the EDM CLI app should abort the EDM dataset upload if the EDM dataset includes more than the maximum number of cells supported.Enter true to upload the maximum number of dataset cells supported.Enter false to abort EDM CLI app if the EDM dataset has more than the maximum number of dataset cells supported.![]() Enter the number of columns in your EDM dataset.Accurately map your CSV or TSV columns to the supported data types to allow Enterprise DLP to accurately ingest your EDM dataset.
Enter the number of columns in your EDM dataset.Accurately map your CSV or TSV columns to the supported data types to allow Enterprise DLP to accurately ingest your EDM dataset.![]() Map your columns using the supported Data Types Value to accurately map each column in your EDM dataset to a specific Data Type.The EDM CLI app presents a table with each Data Type Name and the corresponding Data Type Value. You can also view this table in the README.txt file packaged with the EDM CLI app.When you create a data profile on Strata Cloud Manager, you’re required to add at least one column where the column values occurs up to 12 times in the selected EDM dataset for the Primary Field.When mapping your columns to a specific Data Type, be sure to include at least one column with up to 12 occurrences across the entire EDM dataset. Otherwise, Enterprise DLP is unable to match traffic against the EDM data profile you create using this EDM dataset.
Map your columns using the supported Data Types Value to accurately map each column in your EDM dataset to a specific Data Type.The EDM CLI app presents a table with each Data Type Name and the corresponding Data Type Value. You can also view this table in the README.txt file packaged with the EDM CLI app.When you create a data profile on Strata Cloud Manager, you’re required to add at least one column where the column values occurs up to 12 times in the selected EDM dataset for the Primary Field.When mapping your columns to a specific Data Type, be sure to include at least one column with up to 12 occurrences across the entire EDM dataset. Otherwise, Enterprise DLP is unable to match traffic against the EDM data profile you create using this EDM dataset.![]() Enter 1 create and upload a new EDM dataset.Entering 1 creates a secured copy of the EDM dataset in the package-edm-secure-cli-<version>-<platform> directory for you to review.
Enter 1 create and upload a new EDM dataset.Entering 1 creates a secured copy of the EDM dataset in the package-edm-secure-cli-<version>-<platform> directory for you to review.![]() Enter the EDM data set name.Enterprise DLP displays the EDM dataset name you enter here on Strata Cloud Manager.Enter your Client ID and Client Secret for your service account.
Enter the EDM data set name.Enterprise DLP displays the EDM dataset name you enter here on Strata Cloud Manager.Enter your Client ID and Client Secret for your service account.- EDM CLI App 5.0 and Earlier—Enter the Client ID and Client Secret exactly as provided by Strata Cloud Manager.
- EDM CLI App 6.0 and Later—Enter the Client ID and Client Secret text you generated using the EDM CLI app.(EDM CLI app 6.0 and Later) Enter the encrypted Client ID and Client Secret if encrypted when you created your service account.
(Proxy server only) When prompted, enter y if the local device from which you’re uploading requires a proxy server to connect to the internet.You’re required to provide the following information for your proxy server.- Proxy hostname
- Proxy port number
- Proxy username
- Proxy password
Specify whether your Enterprise DLP tenant is in a FedRAMP environment.- Enter y if you're a FedRAMP user. Otherwise, enter n.
- (FedRAMP only) Enter your FedRAMP level (high or moderate). The default FedRAMP level is moderate.
Enter Y or y to confirm the EDM dataset upload configuration is correct and begin uploading to Enterprise DLP.The EDM CLI app creates a secured copy of the EDM dataset in the package-edm-secure-cli-<version>-<platform>. In the directory, the EDM CLI app creates a new folder with the name of the EDM dataset you appended with the date and time the EDM CLI app created it. This folder contains the encrypted output.zip file of your EDM dataset that you uploaded to Enterprise DLP.The EDM CLI app displays a progress bar and success message to notify you whether the upload is successful.During the upload process, the EDM CLI app connects to Enterprise DLP to verify that you created the output.zipfile using a supported EDM CLI app version. The upload to Enterprise DLP fails if you created the output.zip file using an unsupported EDM CLI app version.![]() Monitor the upload status of the EDM dataset.The time it takes for an EDM dataset uploaded to Enterprise DLP to be available on Strata Cloud Manager depends on the EDM dataset size and internet connectivity speed. For example, a 4GB EDM dataset upload typically takes about 30 minutes to display on Strata Cloud Manager and be usable in a data profile.
Monitor the upload status of the EDM dataset.The time it takes for an EDM dataset uploaded to Enterprise DLP to be available on Strata Cloud Manager depends on the EDM dataset size and internet connectivity speed. For example, a 4GB EDM dataset upload typically takes about 30 minutes to display on Strata Cloud Manager and be usable in a data profile.- Log in to Strata Cloud Manager.Select .The EDM dataset upload is complete when the Indexing Status column displays Complete.
![]()