GlobalProtect
Configure GlobalProtect to Facilitate Multi-Factor Authentication Notifications
Table of Contents
Configure GlobalProtect to Facilitate Multi-Factor Authentication Notifications
To protect critical applications and stop
attackers from using stolen credentials to conduct lateral movement
throughout your network, you can configure policy-based multi-factor
authentication (MFA). This ensures that
each user responds to multiple authentication challenges of different types
(factors) before they can access highly sensitive services and applications.
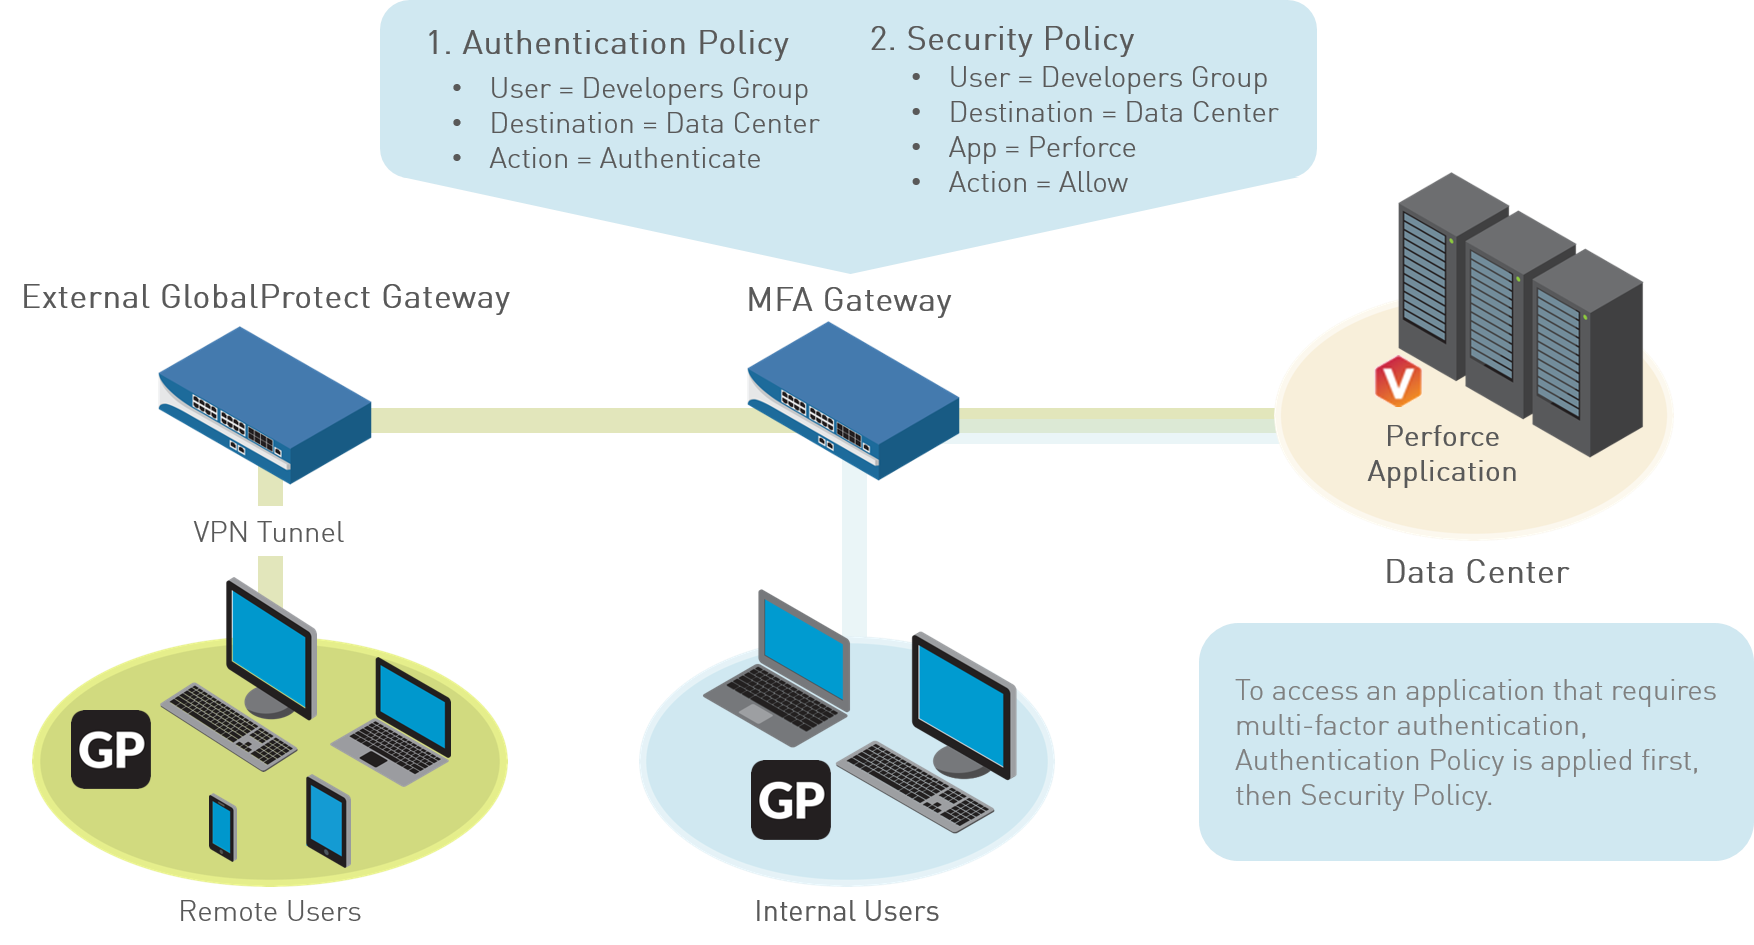
If
a user session matches the Authentication policy, the type of application
or service determines the user experience for notifications about
the authentication challenge:
- (Windows or macOS endpoints only) Non-browser-based applications—To facilitate MFA notifications for non-HTTP applications (such as Perforce) on Windows or macOS endpoints, a GlobalProtect app is required. When a session matches an Authentication policy rule, the firewall sends a UDP notification to the GlobalProtect app with an embedded URL link to the Authentication Portal page. The GlobalProtect app then displays this message as a pop up notification to the user.
- Browser-based applications—Browser-based applications do not require GlobalProtect to display notification messages to the user. When the firewall identifies a session as web-browsing traffic (based on App-ID), the firewall automatically presents the user with Authentication Portal page (previously called the Captive Portal page) specified in the Authentication policy rule. For more information, see Configure Multi-Factor Authentication.
To
configure GlobalProtect to display MFA notifications for non-browser-based applications,
use the following workflow:
- Before you configure GlobalProtect, configure multi-factor
authentication on the firewall.If you are using two-factor authentication with GlobalProtect to authenticate to the gateway or portal, a RADIUS server profile is required. If you are using GlobalProtect to notify the user about an authentication policy match (UDP message), a Multi Factor Authentication server profile is sufficient.To use multi-factor authentication for protecting sensitive resources, the easiest solution is to integrate the firewall with an MFA vendor that is already established in your network. When your MFA structure is ready, you can start configuring the components of your authentication policy. For more information, refer to Configure Multi-Factor Authentication.
- Enable Captive Portal to record authentication timestamps and update user mappings.
- Create server profiles that define how the firewall will connect to the services that authenticate users.
- Assign the server profiles to an Authentication profile which specifies authentication parameters.
- Configure a Security policy rule that allows users to access the resources that require authentication.
- (External gateways only) For GlobalProtect to
support multi-factor authentication on external gateways, you must Configure a response page for
the ingress tunnel interface on the firewall:
- Select .
- Select and then Export the Predefined template to a location of your choice.
- On your endpoint, use an HTML editor to customize the downloaded response page and save it with a unique filename.
- Return to the MFA Login Page dialog on the firewall, Import your customized page, Browse to select the Import File, and select the Destination (virtual system or shared location). Click OK, and then click Close.
- (External gateways only) Enable Response Pages as
a permitted service on the Interface Mgmt profile:
- Select and then select the profile.
- In the Permitted Services area, select Response Pages and click OK.
- (External gateways only) Attach the Interface
Mgmt profile to a tunnel interface:
- Select , and the tunnel interface on which you want to use the response page.
- Select Advanced, and then select the Interface Mgmt profile you configured in the previous step as the Management Profile.
- (External gateways only) Enable User Identification on the Zone associated with the tunnel interface ().
- Configure GlobalProtect clients to support multi-factor
authentication notifications for non-browser-based applications.
- Select and select a portal configuration (or Add one).
- Select Agent, and then select an existing agent configuration or Add a new one.
- On the App tab, specify the following:
- Set Enable Inbound Authentication Prompts from MFA Gateways to Yes. To support multi-factor authentication (MFA), the GlobalProtect app must receive and acknowledge UDP authentication prompts that are inbound from the gateway. Select Yes to enable the GlobalProtect app to receive and acknowledge the prompt. By default, this value is set to No, meaning GlobalProtect will block UDP authentication prompts from the gateway.
- In the Network Port for Inbound Authentication Prompts (UDP) field, specify the port number that the GlobalProtect app uses to receive inbound UDP authentication prompts from MFA gateways. The default port is 4501. To change the port, specify a number from 1 to 65535.
- In the Trusted MFA Gateways field, specify the gateway address and port number (required only for non-default ports, such as 6082) of the redirect URL that the GlobalProtect app will trust for multi-factor authentication. When a GlobalProtect app receives a UDP authentication prompt with a redirect URL destined for the specified network port, GlobalProtect displays an authentication message only if the redirect URL is trusted.
- Configure the Default Message for Inbound Authentication Prompts. When users try to access a resource that requires additional authentication, GlobalProtect receives a UDP packet containing the inbound authentication prompt and displays this message. The UDP packet also contains the URL for the Authentication Portal page you specified in Configure Multi-Factor Authentication. GlobalProtect automatically appends the URL to the message. For example, to display the notification shown in the beginning of this topic enter the following message:You have attempted to access a protected resource that requires additional authentication. Proceed to authenticate at:
- Save the agent configuration (click OK twice), and then Commit your changes.