Prisma Access
Prisma Access Internal Gateway
Table of Contents
Expand All
|
Collapse All
Prisma Access Docs
-
- 6.1 Preferred and Innovation
- 6.0 Preferred and Innovation
- 5.2 Preferred and Innovation
- 5.1 Preferred and Innovation
- 5.0 Preferred and Innovation
- 4.2 Preferred
- 4.1 Preferred
- 4.0 Preferred
- 3.2 Preferred and Innovation
- 3.1 Preferred and Innovation
- 3.0 Preferred and Innovation
- 2.2 Preferred
-
-
- 4.0 & Later
- Prisma Access China
-
-
Prisma Access Internal Gateway
Learn how to set up the Prisma Access internal gateway and its
requirements.
| Where Can I Use This? | What Do I Need? |
|---|---|
|
|
Previously, to generate User-ID-to-IP address mappings and HIP information for hosts
running GlobalProtect client software in Prisma Access remote networks, you'd have
to deploy an on-premises NGFW as an internal gateway. This solution isn't cloud-native.
With the Prisma Access cloud-native internal gateway, you can get User-ID and HIP
information without deploying an on-premises internal gateway.
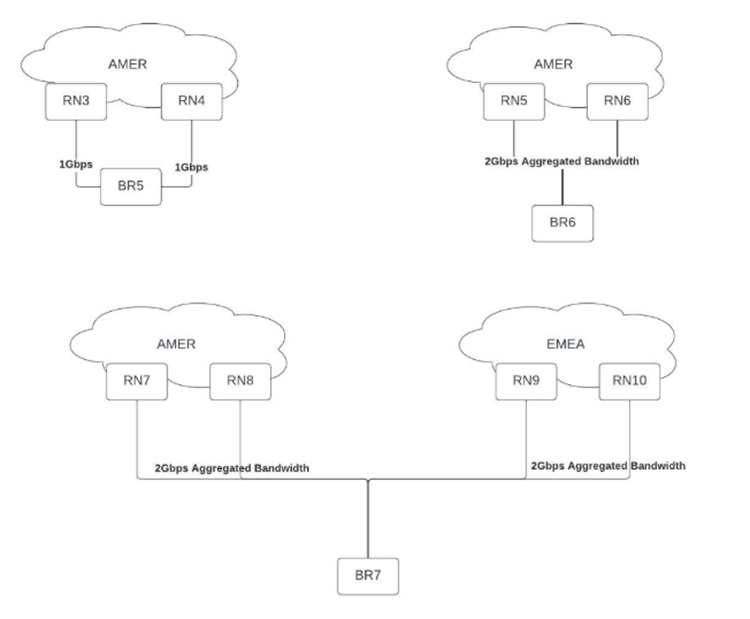
You can’t deploy an internal gateway
that has a single branch terminating multiple IPSec tunnels (for example, an
active/active tunnel or aggregated bandwidth site).
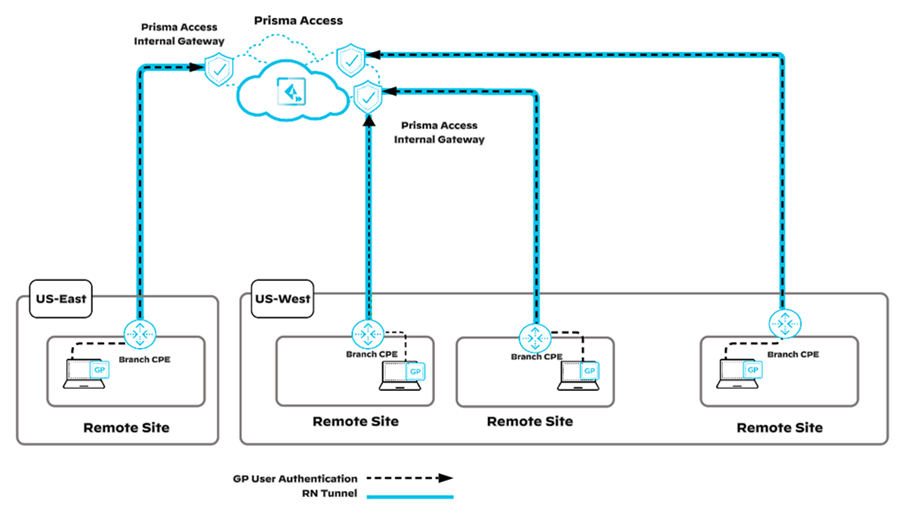
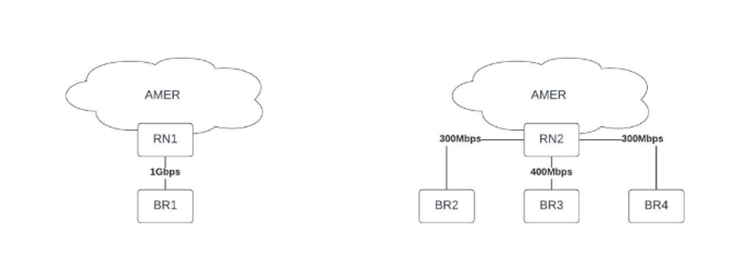
The following diagram shows an example
of a supported environment for an internal gateway deployment.
The following diagram provides examples
of deployments where internal gateways are not supported.
Use one of the following procedures to set up an internal gateway.
Prisma Access Internal Gateway (Strata Cloud Manager)
Learn how to set up the Prisma Access internal gateway and its
requirements.
Complete the following steps to set up the Prisma Access internal gateway.
- In Strata Cloud Manager, set up GlobalProtect, add app settings, and onboard remote networks.Notice that there are no internal host detection and internal gateway configurations at present.Make a note of the Remote Networks DNS IP Address from ConfigurationNGFW and Prisma AccessConfiguration ScopePrisma Access Infrastructure.Make a note of the Gateway FQDNs from ConfigurationNGFW and Prisma AccessConfiguration ScopePrisma AccessGlobalProtectInfrastructureInfrastructure SettingsGateway FQDNs.Select ConfigurationNGFW and Prisma AccessConfiguration ScopePrisma AccessRemote NetworksAdvanced Settings.Edit the settings of Prisma Access Internal Gateway to enable the internal gateway and Save the changes.(Optional) Enable Internal Host Detection for IPv4 if you don't want to use your own DNS server. You can enable the internal host detection only after you select Enable Internal Gateway.
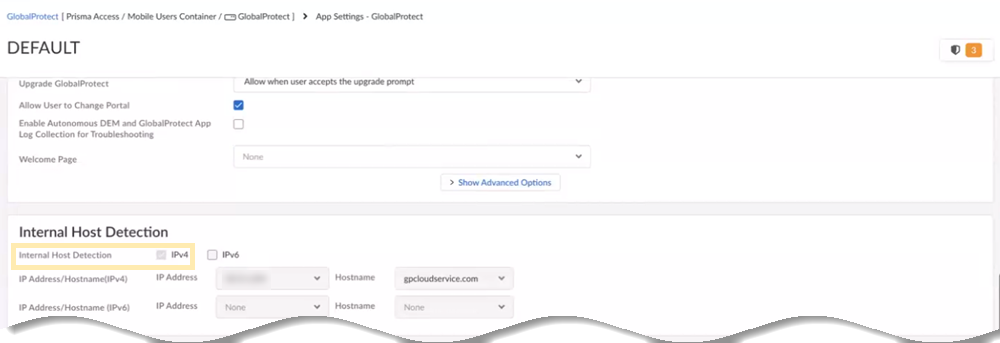
![]() When you enable the internal gateway, the remote network instances act as internal gateways. When you enable the internal host detection, Prisma Access creates PTR records on the remote network DNS proxy servers for the internal host detection process.Select ConfigurationNGFW and Prisma AccessConfiguration ScopePrisma AccessGlobalProtectGlobalProtect App.Select an app setting and view the internal host detection details and internal gateway details.When you enable the internal gateway and internal host detection in step 5, Prisma Access enables IPv4 internal host detection and internal gateway here as well. Prisma Access populates the Remote Networks DNS IP Address value, from step 2, as the IP address.
When you enable the internal gateway, the remote network instances act as internal gateways. When you enable the internal host detection, Prisma Access creates PTR records on the remote network DNS proxy servers for the internal host detection process.Select ConfigurationNGFW and Prisma AccessConfiguration ScopePrisma AccessGlobalProtectGlobalProtect App.Select an app setting and view the internal host detection details and internal gateway details.When you enable the internal gateway and internal host detection in step 5, Prisma Access enables IPv4 internal host detection and internal gateway here as well. Prisma Access populates the Remote Networks DNS IP Address value, from step 2, as the IP address.![]() IPv6 internal host detection on Prisma Access DNS proxies isn't supported.You can't remove this Prisma Access Internal Gateway entry. However, you can add your self-deployed internal gateways. You can deploy your own DNS servers in the internal network for internal host detection, but ensure to add PTR records so that the internal host detection is possible. Prisma Access appends the Gateway FQDNs value, from step 3, to the address.
IPv6 internal host detection on Prisma Access DNS proxies isn't supported.You can't remove this Prisma Access Internal Gateway entry. However, you can add your self-deployed internal gateways. You can deploy your own DNS servers in the internal network for internal host detection, but ensure to add PTR records so that the internal host detection is possible. Prisma Access appends the Gateway FQDNs value, from step 3, to the address.![]() You can view the DNS proxy server IP address details by selecting ConfigurationNGFW and Prisma AccessConfiguration ScopePrisma Access Infrastructure.If you enable Internal Host Detection, verify that the DNS resolution is working, perform a reverse DNS lookup from your internal network to DNS proxy server IP address, and ensure it returns an FQDN starting with any-igw.Push the changes to mobile users and remote networks at the same time.Log in to the endpoint.When you connect to GlobalProtect, first you authenticate with the GlobalProtect portal. The internal host detection triggers GlobalProtect to connect to the internal gateway. Then, as the GlobalProtect app continues to operate in the nontunnel mode, the second authentication appears and submits the host information to the internal gateway on remote networks.
You can view the DNS proxy server IP address details by selecting ConfigurationNGFW and Prisma AccessConfiguration ScopePrisma Access Infrastructure.If you enable Internal Host Detection, verify that the DNS resolution is working, perform a reverse DNS lookup from your internal network to DNS proxy server IP address, and ensure it returns an FQDN starting with any-igw.Push the changes to mobile users and remote networks at the same time.Log in to the endpoint.When you connect to GlobalProtect, first you authenticate with the GlobalProtect portal. The internal host detection triggers GlobalProtect to connect to the internal gateway. Then, as the GlobalProtect app continues to operate in the nontunnel mode, the second authentication appears and submits the host information to the internal gateway on remote networks.Prisma Access Internal Gateway (Panorama)
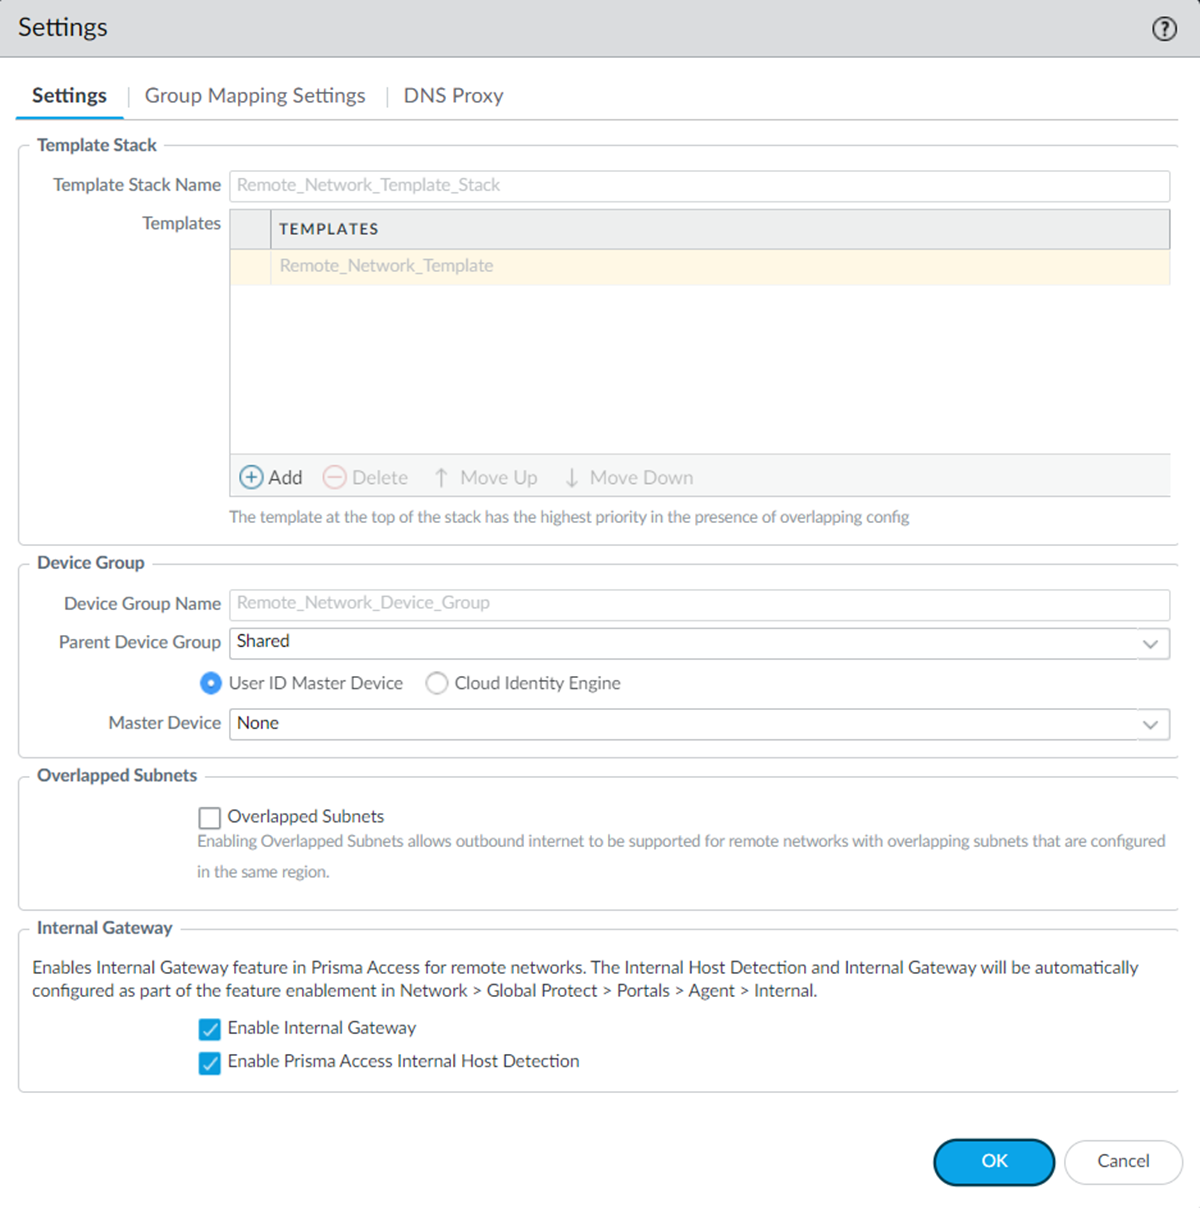
- In Panorama, set up GlobalProtect, add app settings, and onboard remote networks.Notice that there are no internal host detection and internal gateway configurations at present.Go to PanoramaCloud ServicesConfigurationRemote NetworksSettings.Enable Internal Gateway and save the changes.(Optional) Enable Prisma Access Internal Host Detection for IPv4 if you don't want to use your own DNS server. You can enable the internal host detection only after you select Enable Internal Gateway.
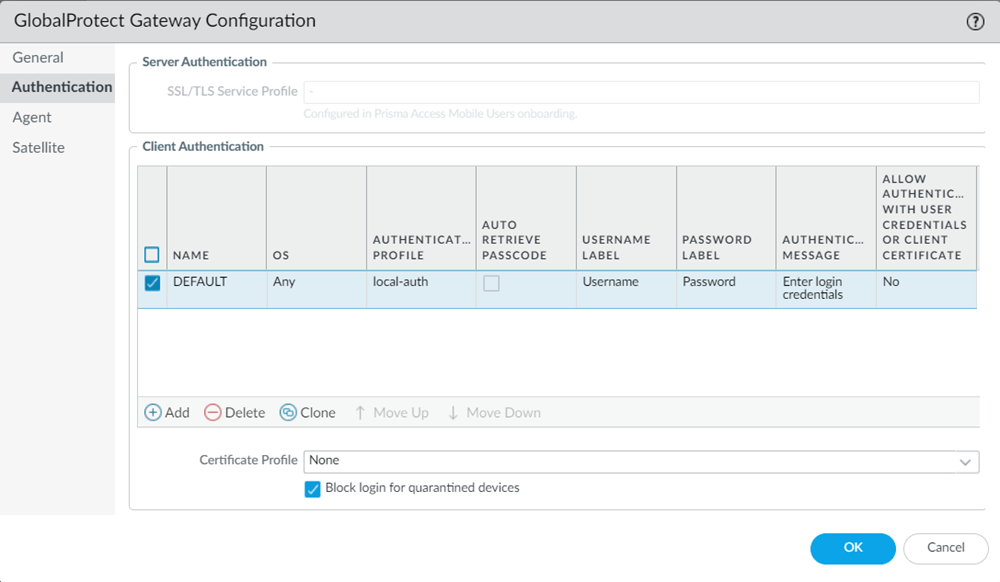
![]() When you enable the internal gateway, the remote network instances act as internal gateways. When you enable the internal host detection, Prisma Access creates PTR records on the remote network DNS proxy servers for the internal host detection process.When you enable the internal gateway, Prisma Access creates an internal gateway configuration in a remote network template.Go to TemplatesNetworkGlobalProtectGateways and select Remote_Network_Template.You will find the GlobalProtect_Internal_Gateway template created for the internal gateway.Create an authentication profile for this remote network template similar to the authentication profile in the mobile user template.
When you enable the internal gateway, the remote network instances act as internal gateways. When you enable the internal host detection, Prisma Access creates PTR records on the remote network DNS proxy servers for the internal host detection process.When you enable the internal gateway, Prisma Access creates an internal gateway configuration in a remote network template.Go to TemplatesNetworkGlobalProtectGateways and select Remote_Network_Template.You will find the GlobalProtect_Internal_Gateway template created for the internal gateway.Create an authentication profile for this remote network template similar to the authentication profile in the mobile user template.- Select the remote network template, GlobalProtect_Internal_Gateway template, hyperlink.Go to AuthenticationClient Authentication.
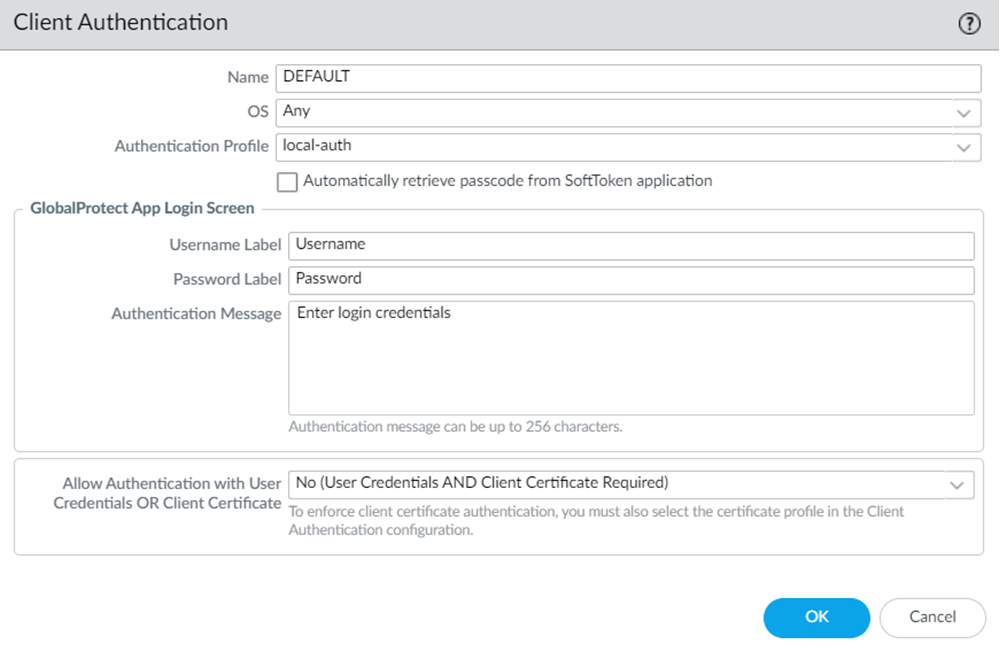
![]() Edit the authentication profile details of the DEFAULT client authentication.Create an authentication profile same as the one in the mobile user template. You can find the authentication profile used in the mobile user template under TemplateDeviceAuthentication Profile. Ensure to select Mobile_User_Template.
Edit the authentication profile details of the DEFAULT client authentication.Create an authentication profile same as the one in the mobile user template. You can find the authentication profile used in the mobile user template under TemplateDeviceAuthentication Profile. Ensure to select Mobile_User_Template.![]()
![]() You can also view the authentication profile for the remote network template by selecting TemplatesDeviceAuthentication Profile. Select Remote_Network_Template.
You can also view the authentication profile for the remote network template by selecting TemplatesDeviceAuthentication Profile. Select Remote_Network_Template.![]() Create a device certificate for the remote network template similar to the device certificate in the mobile user template.
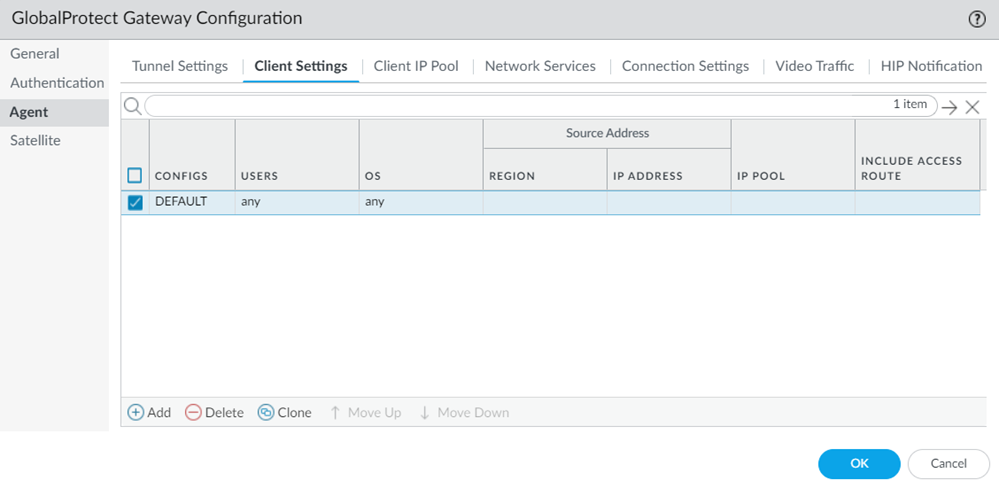
Create a device certificate for the remote network template similar to the device certificate in the mobile user template.- Select the remote network template, GlobalProtect_Internal_Gateway, hyperlink.Go to AgentClient Settings.
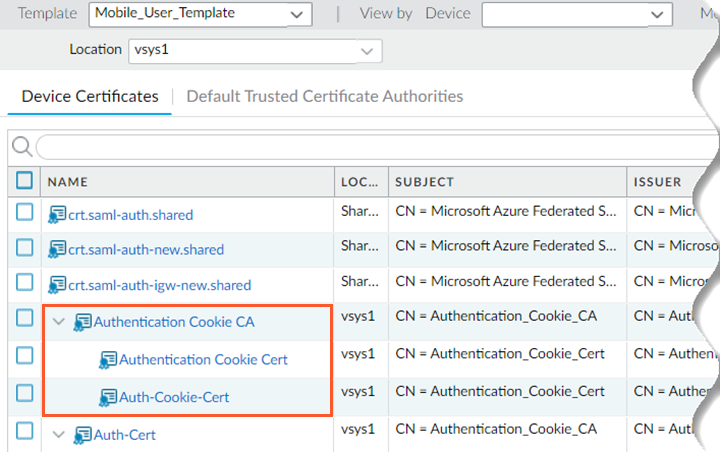
![]() Select the DEFAULT configuration, and go to Authentication Override settings.Edit the Certificate to Encrypt/Decrypt Cookie settings, and create a new device certificate.Create a device certificate same as the one in the mobile user template. You can find the device certificate used in the mobile user template under TemplateDeviceCertificate ManagementCertificatesDevice Certificates. Ensure to select Mobile_User_Template. The DEFAULT configuration references the Authentication Cookie CA certificate. Follow the same hierarchy as the one in Mobile_User_Template for successful authentication.
Select the DEFAULT configuration, and go to Authentication Override settings.Edit the Certificate to Encrypt/Decrypt Cookie settings, and create a new device certificate.Create a device certificate same as the one in the mobile user template. You can find the device certificate used in the mobile user template under TemplateDeviceCertificate ManagementCertificatesDevice Certificates. Ensure to select Mobile_User_Template. The DEFAULT configuration references the Authentication Cookie CA certificate. Follow the same hierarchy as the one in Mobile_User_Template for successful authentication.![]()
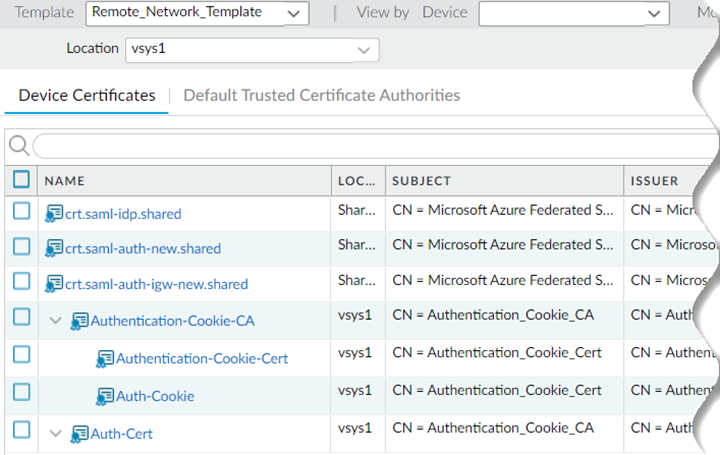
![]() You can also view the device certificate for the remote network template by selecting TemplateDeviceCertificate ManagementCertificatesDevice Certificates. Select Remote_Network_Template.
You can also view the device certificate for the remote network template by selecting TemplateDeviceCertificate ManagementCertificatesDevice Certificates. Select Remote_Network_Template.![]() Push the changes to mobile users and remote networks at the same time.
Push the changes to mobile users and remote networks at the same time.


