GlobalProtect
Customize the GlobalProtect Portal Login, Welcome, and Help Pages
Table of Contents
Customize the GlobalProtect Portal Login, Welcome, and Help Pages
GlobalProtect provides default login, welcome,
and/or help pages. However, you can create your own custom pages
with your corporate branding, acceptable use policies, and links
to your internal resources.
You can alternatively disable
browser access to the portal login page in order to prevent unauthorized
attempts to authenticate to the GlobalProtect portal (configure
the option
from . With the portal login
page disabled, you can instead use a software distribution tool,
such as Microsoft’s System Center Configuration Manager (SCCM),
to allow your users to download and install the GlobalProtect app.
- Export the default portal login, home, welcome,
or help page.
- Select .
- Select the link for the corresponding GlobalProtect portal page, such as GlobalProtect Portal Login Page.
- Select the predefined Default page and click Export.
- Edit the exported page.
- Use the HTML text editor of your choice to open and edit the page.
- To edit the login or home page, configure any of the
following variables:
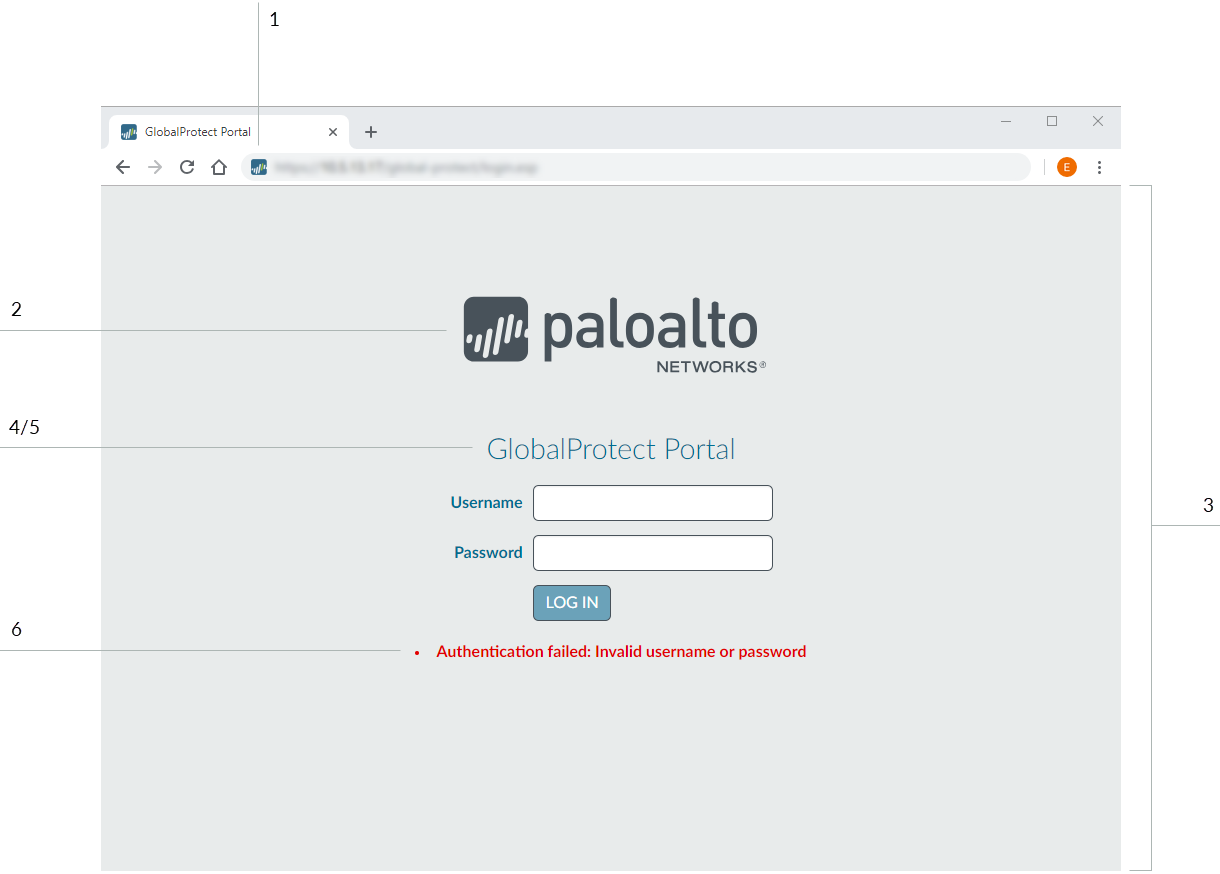
- GlobalProtect Portal Login Page:
![]() Label NumberVariableDescriptionExample1
Label NumberVariableDescriptionExample1favicon URL of the icon displayed in the address bar of the web browser.var favicon = 'http:// cdn.slidesharecdn. com/logo-24x24. jpg?3975762018';
2logo URL of the company logo.var logo = 'http:// cdn.slidesharecdn. com/logo-96x96. jpg?1382722588';
3bg_color Login page background color.var bg_color = '#D3D3D3';
4gp_portal_name Text displayed under the company logo.var gp_portal_name = 'GlobalProtect Portal';
5gp_portal_name_color Color of the text displayed under the company logo.var gp_portal_name_ color = '#000000';
6error_text_color Text color for logon failure messages.var error_text_ color = '#196390';
- GlobalProtect Portal Home Page:
![]()
![]() Label NumberVariableDescriptionExample1
Label NumberVariableDescriptionExample1favicon URL of the icon displayed in the address bar of the web browser.var favicon = 'http:// cdn.slidesharecdn. com/logo-24x24. jpg?3975762018';
2logo URL of the company logo.var logo = 'http:// cdn.slidesharecdn. com/logo-96x96. jpg?1382722588';
3navbar_text Navigation bar text.var navbar_text = 'GlobalProtect';
4navbar_text_color Navigation bar text color.var navbar_text_ color = '#D3D3D3';
5navbar_bg_color Navigation bar background color.var navbar_bg_color = '#A9A9A9';
6dropdown_bg_color Drop-down menu background color.var dropdown_bg_ color = '#FFFFFF';
7bg_color Home page background color.var bg_color = '#D3D3D3';
8label_custom_app_url Label for custom/internal application URLs.var label_custom_ app_url = 'Application URL';
9display_globalprotect_agentOption to display or hide the GlobalProtect app download button. Enter 1 to display the download button. Enter 0 to hide the download button.var display_ globalprotect_agent = 1;
10label_globalprotect_agentLabel for the GlobalProtect app download button.var label_ globalprotect_agent = 'GlobalProtect Agent';
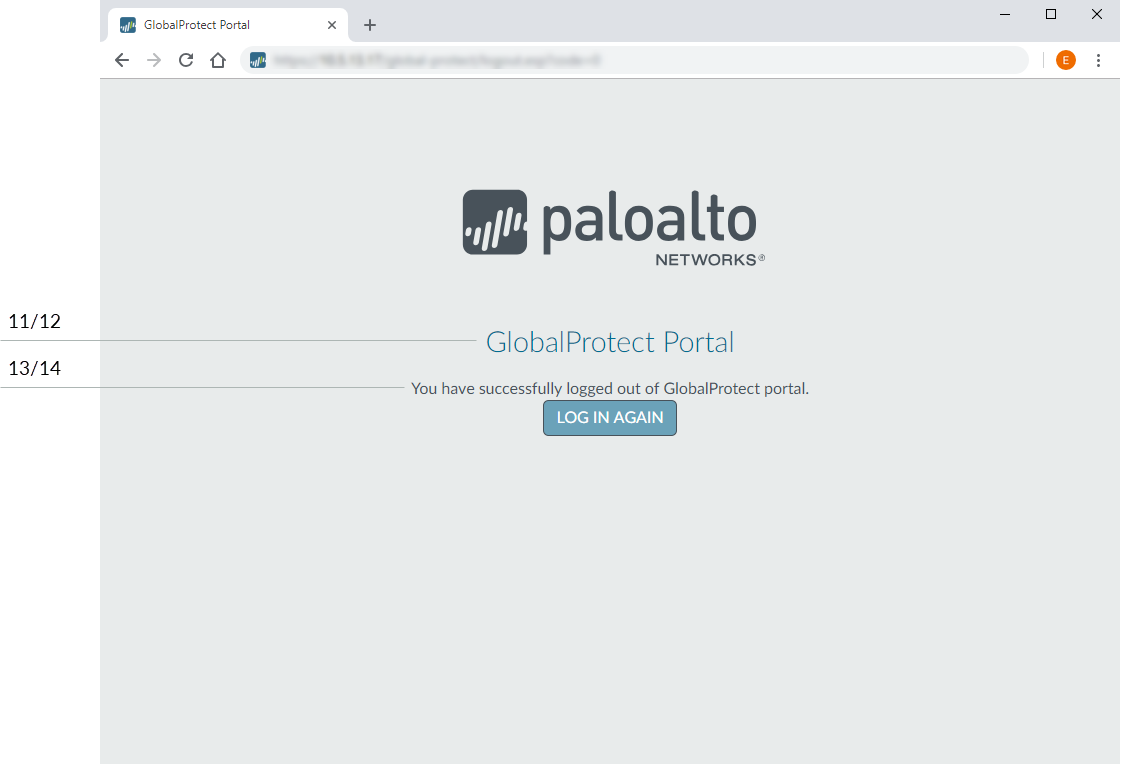
11gp_portal_name Text displayed under the company logo on the portal logout page.var gp_portal_name = 'GlobalProtect Portal';
12gp_portal_name_color Color of the text displayed under the company logo on the portal logout page.var gp_portal_name_ color = '#000000';
13logout_text_array Messages displayed on the portal logout page after users log out of the portal.You can only modify the existing messages; you cannot add new messages or delete any existing messages.var logout_text_ array = ["You have successfully logged out of GlobalProtect portal.", "GlobalProtect Gateway is not licensed. Contact system administrator.", "User not authenticated to GlobalProtect portal.", "System error, contact system administrator.", "System error, failed to delete user session. Contact system administrator.", "Can not create user session. Max-capacity reached. Contact system administrator."];
14logout_text_color Text color for messages displayed on the portal logout page after users log out of the portal.var logout_text_ color = '#000000';
- Save the edited page with a new filename. Make sure that the page retains its UTF-8 encoding.
- Import the new page(s).
- Select .
- Select the link for the corresponding GlobalProtect portal page.
- Import the new portal page. Enter the path and filename in the Import File field or Browse to locate and select the file.
- (Optional) Select the virtual system on which this page will be used from the Destination drop-down or select shared (default) to make it available to all virtual systems.
- Click OK to import the file.
- Configure the portal to use the new page(s).
- Portal Login Page, Portal
Landing Page, and App Help Page:
- Select .
- Select the portal to which you want to add the login, landing (home), or app help page.
- In the Appearance area of the General tab, select the new page from the relevant drop-down.
- Custom Welcome Page:
- Select .
- Select the portal to which you want to add the welcome page.
- On the Agent tab, select the agent configuration to which you want to add the welcome page.
- On the App tab, select the new page from the Welcome Page drop-down.
- Click OK to save the agent configuration.
- Portal Login Page, Portal
Landing Page, and App Help Page:
- Save the portal configuration.Click OK to save the portal configuration, and then Commit your changes.
- Verify that the new page displays.
- Test the login page—Open a web browser and go to the URL for your portal (do not add the :4443 port number to the end of the URL or you will be directed to the web interface for the firewall). For example, enter https://myportal rather than https://myportal:4443. The new portal login page will display.
- Test the home page—Open a web browser and go to the URL for your portal (do not add the :4443 port number to the end of the URL or you will be directed to the web interface for the firewall). For example, enter https://myportal rather than https://myportal:4443. Enter your Username and Password, and then LOG IN to the portal. The new portal home page will display.
- Test the help page—Click the GlobalProtect system tray
icon to launch the GlobalProtect app. When the status panel opens,
click the settings icon () to open the settings menu. Select Help to view the new help page.
![]()
- Test the welcome page—Click the GlobalProtect system
tray icon to launch the GlobalProtect app. When the status panel
opens, click the settings icon () to open the settings menu. Select Welcome Page to view the new welcome page.
![]()