Next-Generation Firewall
Create a Static Route
Table of Contents
Create a Static Route
Create a static route for a logical router on an Advanced Routing Engine.
| Where Can I Use This? | What Do I Need? |
|---|---|
|
One of these licenses for Strata Cloud Manager managed NGFWs:
|
Create a static route for a logical router in an Advanced Routing Engine.
- configure-a-logical-router.html#tabs-id83b76f3d-1148-43e8-b784-502628a974ab_id83b76f3d-1148-43e8-b784-502628a974ab.Create a static route.
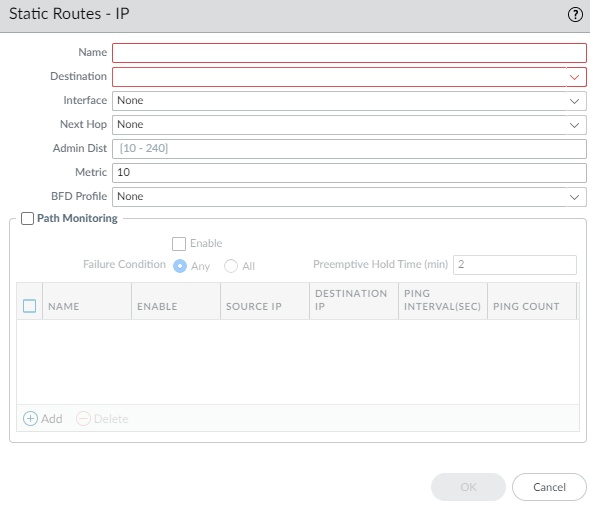
- Select and select the logical router.Select Static and Add an IPv4 or IPv6 static route by Name (maximum of 63 characters). The name must start with an alphanumeric character, underscore (_), or hyphen (-), and can contain a combination of alphanumeric characters, underscore, or hyphen. No dot (.) or space is allowed.For Destination, enter the route and netmask (for example, 192.168.2.0/24 for an IPv4 address or 2001:db8:123:1::0/64 for an IPv6 address). If you’re creating a default route, enter the default route (0.0.0.0/0 for an IPv4 address or ::/0 for an IPv6 address). Alternatively, you can select or create an address object of type IP Netmask.For Interface, specify the outgoing interface for packets to use to go to the next hop. Specifying an interface provides stricter control over which interface the firewall uses rather than using the interface in the route table for the next hop of this static route.For Next Hop, select one of the following:
- IP Address or IPv6 Address—Enter the IP address (for example, 192.168.56.1 or 2001:db8:49e:1::1) when you want to route to a specific next hop. You must Enable IPv6 on the interface (when you configure-layer-3-interfaces.html#tabs-iddc65fa08-60b8-47b2-a695-2e546b4615e9_iddc65fa08-60b8-47b2-a695-2e546b4615e9) to use an IPv6 next hop address. If you’re creating a default route, for Next Hop you must select IP Address and enter the IP address for your internet gateway (for example, 192.168.56.1 or 2001:db8:49e:1::1). Alternatively, you can create an address object of type IP Netmask. The address object must have a netmask of /32 for IPv4 or /128 for IPv6.
- Next LR—Select to make the next logical router (in the list of logical routers) the next hop.
- FQDN—Enter a Fully Qualified Domain Name.
- Discard—Select to drop packets that are addressed to this destination.
- None—Select if there is no next hop for the route. For example, a point-to-point connection does not require a next hop because there is only one way for packets to go.
Enter the Admin Dist for the static route (range is 10 to 240; default is 10). This value overrides the Static or Static IPv6 administrative distance specified for the logical router.Enter a Metric for the static route (range is 1 to 65,535; default is 10).(Optional) If you want to use BFD, select a BFD Profile you created, or select the default profile, or create a BFD profile to apply to the static route; default is None (Disable BFD).![]() (Optional) Configure path monitoring for the static route; you can monitor up to 128 static routes.
(Optional) Configure path monitoring for the static route; you can monitor up to 128 static routes.- Select Path Monitoring to allow configuration of path monitoring (default is disabled).Enable path monitoring (default is disabled).Failure Condition determines whether path monitoring for the static route is based on one (any) or all monitored destinations. Select whether Any or All of the monitored destinations for the static route must be unreachable by ICMP for the firewall to remove the static route from the RIB and FIB and add the static route that has the next lowest metric (going to the same destination) to the FiB.Select All to avoid the possibility of any single monitored destination signaling a route failure when the destination is simply offline for maintenance, for example.(Optional) Specify the Preemptive Hold Time (min), the number of minutes a downed path monitor must remain in Up state before the firewall reinstalls the static route into the RIB; range is 0 to 1,440; default is 2. A setting of 0 (zero) causes the firewall to reinstall the route into the RIB immediately upon the path monitor coming up.The path monitor evaluates all of its monitored destinations for the static route and comes up based on the Any or All failure condition. If a link goes down or flaps during the hold time, when the link comes back up, the path monitor resumes and the Preemptive Hold Time is reset, causing the timer to restart from zero.Add a path monitoring destination by Name.
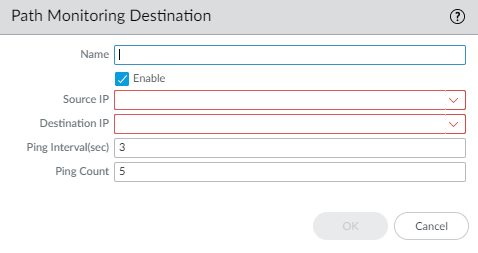
![]() Enable the path monitoring destination.For Source IP, select the IP address that the firewall uses in the ICMP ping to the monitored destination:
Enable the path monitoring destination.For Source IP, select the IP address that the firewall uses in the ICMP ping to the monitored destination:- If an interface has multiple IP addresses, select one.
- If you select an interface, the firewall uses the first IP address assigned to the interface by default.
- If you select DHCP (Use DHCP Client address), the firewall uses the address that DHCP assigned to the interface. To see the DHCP address, select and in the row for the Ethernet interface, click on Dynamic DHCP Client. The IP Address displays in the Dynamic IP Interface Status window.
For Destination IP, enter an IP address or address object to which the firewall will monitor the path. The monitored destination and static route destination must use the same address family (IPv4 or IPv6).The destination IP address should belong to a reliable endpoint; you shouldn’t base path monitoring on a device that itself is unstable or unreliable.(Optional) Specify the ICMP Ping Interval (sec) in seconds to determine how frequently the firewall monitors the path (range is 1 to 60; default is 3).(Optional) Specify the ICMP Ping Count of packets that don’t return from the destination before the firewall considers the static route down and removes it from the RIB and FIB (range is 3 to 10; default is 5).Click OK to save the path monitor destination.Click OK twice to save the static route.(Optional) Control the static routes that are placed in the global RIB.You might configure static routes and redistribute them, but not want them in the protocol’s local route table or global RIB. You might want to add only specific static routes to the global RIB.- Select and select a logical router.Select RIB Filter to allow routes into or prevent routes from being added to the global RIB.
![]() To filter IPv4 static routes and connected routes, for Static Route-Map, select a Redistribution Route Map or create a new one.To filter IPv6 static routes and connected routes, for Static Route-Map, select a Redistribution Route Map or create a new one.Click OK.(Optional) Change the default administrative distances for static IPv4 and static IPv6 routes within a logical router.Commit the changes.Access the CLI to view the static route path monitor: show advanced-routing static-route-path-monitor. The PAN-OS CLI Quick Start lists additional commands in the CLI Cheat Sheet: Networking.
To filter IPv4 static routes and connected routes, for Static Route-Map, select a Redistribution Route Map or create a new one.To filter IPv6 static routes and connected routes, for Static Route-Map, select a Redistribution Route Map or create a new one.Click OK.(Optional) Change the default administrative distances for static IPv4 and static IPv6 routes within a logical router.Commit the changes.Access the CLI to view the static route path monitor: show advanced-routing static-route-path-monitor. The PAN-OS CLI Quick Start lists additional commands in the CLI Cheat Sheet: Networking.