Set Up the M-Series Appliance as a Log Collector
Table of Contents
Set Up the M-Series Appliance as a Log Collector
If you want a dedicated appliance for log
collection, configure an M-200, M-300, M-500, M-600, or M-700 appliance
in Log Collector mode. To do this, you first perform the initial
configuration of the appliance in Panorama mode, which includes licensing,
installing software and content updates, and configuring the management (MGT)
interface. You then switch the M-Series appliance to Log Collector
mode and complete the Log Collector configuration. Additionally,
if you want to use dedicated M-Series
Appliance Interfaces (recommended) instead of the
MGT interface for log collection and Collector Group communication,
you must first configure the interfaces for the Panorama management
server, then configure them for the Log Collector, and then perform
a Panorama commit followed by a Collector Group commit.
Perform
the following steps to set up a new M-Series appliance as a Log
Collector or to convert an existing M-Series appliance that was
previously deployed as a Panorama management server.
If
you are configuring an M-Series appliance in Log Collector mode
with 10GB interfaces, you must complete this entire configuration
procedure for the 10GB interfaces to display as Up.
Switching the M-Series appliance from Panorama
mode to Log Collector mode reboots the appliance, deletes the local
Log Collector, deletes any existing log data, and deletes all configurations
except the management access settings. Switching the mode does not
delete licenses, software updates, or content updates.
- Set up the Panorama management server that will manage the Log Collector if you have not already done so.Perform one of the following tasks:Record the management IP addresses of the Panorama management server.If you deployed Panorama in a high availability (HA) configuration, you need the IP address of each HA peer.
- Log in to the web interface of the Panorama management server.Record the IP Address of the solitary (non-HA) or active (HA) Panorama by selecting and checking the Management Interface Settings.For an HA deployment, record the Peer HA IP Address of the passive Panorama by selecting and checking the Setup section.Set up the M-Series appliance that will serve as a Dedicated Log Collector.If you previously deployed this appliance as a Panorama management server, you can skip this step because the MGT interface is already configured and the licenses and updates are already installed.The M-Series appliance in Log Collector mode does not have a web interface for configuration tasks, only a CLI. Therefore, before changing the mode on the M-Series appliance, use the web interface in Panorama mode to:
- Perform Initial Configuration of the M-Series Appliance.Register Panorama and Install Licenses.Install Content and Software Updates for Panorama.Access the CLI of the M-Series appliance.
- Connect to the M-Series appliance in one of the following ways:
- Attach a serial cable from your computer to the Console port on the M-Series appliance. Then use terminal emulation software (9600-8-N-1) to connect.
- Use terminal emulation software such as PuTTY to open an SSH session to the IP address that you specified for the MGT interface of the M-Series appliance during initial configuration.
Log in to the CLI when prompted. Use the default admin account and the password that you specified during initial configuration.Switch from Panorama mode to Log Collector mode.- Switch to Log Collector mode by entering the following command:
> request system system-mode loggerEnter Y to confirm the mode change. The M-Series appliance reboots. If the reboot process terminates your terminal emulation software session, reconnect to the M-Series appliance to see the Panorama login prompt.If you see a CMS Login prompt, this means the Log Collector has not finished rebooting. Press Enter at the prompt without typing a username or password.Log back in to the CLI.Verify that the switch to Log Collector mode succeeded:> show system info | match system-modeIf the mode change succeeded, the output displays:system-mode: logger
Configure the logging disks as RAID1 pairs.If you previously deployed the appliance as a Panorama management server, you can skip this step because the disk pairs are already configured and available.The time required to configure the drives varies from several minutes to a couple of hours, based on the amount of data on the drives.- Determine which disk pairs are present for configuring as RAID pairs on the M-Series appliance:
> show system raid detailPerform the remaining steps to configure each disk pair that has present disks. This example uses disk pair A1/A2.To add the first disk in the pair, enter the following command and enter y when prompted to confirm the request:> request system raid add A1Wait for the process to finish before adding the next disk in the pair. To monitor the progress of the RAID configuration, re-enter:> show system raid detailAfter the process finishes for the first disk, the output displays the disk pair status as Available but degraded.Add the second disk in the pair:> request system raid add A2Verify that the disk setup is complete:> show system raid detailAfter the process finishes for the second disk, the output displays the disk pair status as Available and clean:Disk Pair A Available Status clean
Enable connectivity between the Log Collector and Panorama management server.Enter the following commands at the Log Collector CLI, where <IPaddress1> is for the MGT interface of the solitary (non-HA) or active (HA) Panorama and <IPaddress2> is for the MGT interface of the passive (HA) Panorama, if applicable.> configure # set deviceconfig system panorama-server <IPaddress1> panorama-server-2 <IPaddress2> # commit # exit
Record the serial number of the Log Collector.You need the serial number to add the Log Collector as a managed collector on the Panorama management server.- At the Log Collector CLI, enter the following command to display its serial number.
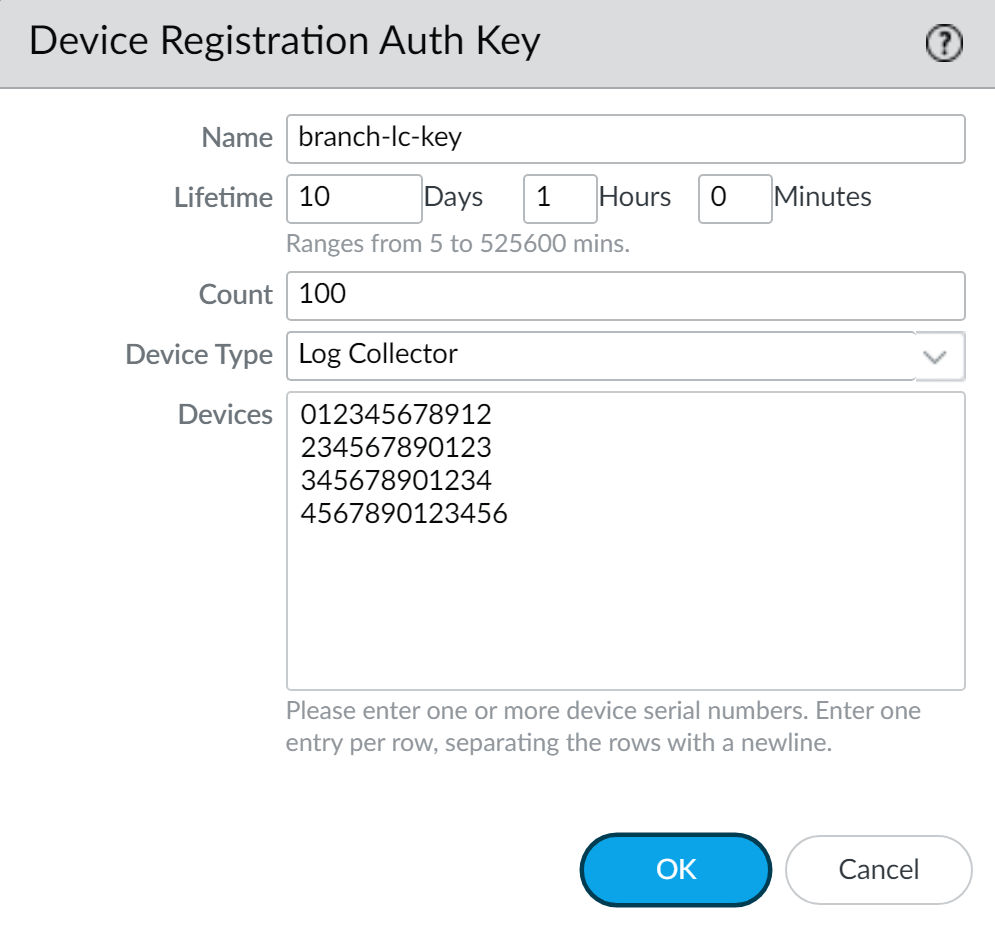
> show system info | match serialRecord the serial number.Create a device registration authentication key.- Select and Add a new authentication key.Configure the authentication key.
- Name—Add a descriptive name for the authentication key.
- Lifetime—Specify the key lifetime for how long you can use the authentication key to onboard new Log Collectors.
- Count—Specify how many times you can use the authentication key to onboard new Log Collectors.
- Device Type—Specify that this authentication key is used to authenticate only a Log Collector.You can select Any to use the device registration authentication key to onboard firewalls, Log Collectors, and WildFire appliances.
- (Optional) Devices—Enter one or more device serial numbers to specify for which Log Collectors the authentication key is valid.
Click OK.![]() Copy Auth Key and Close.
Copy Auth Key and Close.![]() Add the Log Collector as a managed collector to the Panorama management server.
Add the Log Collector as a managed collector to the Panorama management server.- Select and Add a managed collector.In the General settings, enter the serial number (Collector S/N) you recorded for the Log Collector.In the Panorama Server IP field, enter the IP address or FQDN of the solitary (non-HA) or active (HA) Panorama. For HA deployments, enter the IP address or FQDN of the passive Panorama peer in the Panorama Server IP 2 field.These IP addresses must specify a Panorama interface that has Device Management and Device Log Collection services enabled. By default, these services are enabled only on the MGT interface. However, you might have enabled the services on other interfaces when you Set Up the M-Series Appliance that is a Panorama management server.Select Interfaces, click Management, and configure one or both of the following field sets for the MGT interface based on the IP protocols of your network.
- IPv4—IP Address, Netmask, and Default Gateway
- IPv6—IPv6 Address/Prefix Length and Default IPv6 Gateway
Click OK twice to save your changes to the Log Collector.Select and Commit your changes to the Panorama configuration.This step is required before you can enable logging disks.Verify that lists the Log Collector you added. The Connected column displays a check mark to indicate that the Log Collector is connected to Panorama. You might have to wait a few minutes before the page displays the updated connection status.At this point, the Configuration Status column displays Out of Sync and the Run Time Status column displays disconnected. The status will change to In Sync and connected after you configure a Collector Group (Step Assign the Log Collector to a Collector Group.).Add the device registration authentication key to the Log Collector.Add the device registration authentication key only to a Dedicated Log Collector. A Panorama in Panorama mode does not need to authenticate its own local Log Collector.- Log in to the Log Collector CLI.Add the device registration authentication key.admin> request authkey set <auth-key>
![]() Enable the logging disks.
Enable the logging disks.- Select and edit the Log Collector.Select Disks and Add each RAID disk pair.Click OK to save your changes.Select and Commit your changes to the Panorama configuration.(Recommended) Configure the Ethernet1, Ethernet2, Ethernet3, Ethernet4, and Ethernet5 interfaces if the Panorama management server and Log Collector will use them for Device Log Collection (receiving logs from firewalls) and Collector Group Communication.If you previously deployed the Log Collector as a Panorama management server and configured these interfaces, you must reconfigure them because switching to Log Collector mode (Switch from Panorama mode to Log Collector mode.) would have deleted all configurations except the management access settings.
- Configure each interface on the Panorama management server (other than the MGT interface) if you haven’t already:
- Select and click the Interface Name.
- Select <interface-name> to enable the interface.
- Complete one or both of the following field sets based on the IP protocols of your network:IPv4—IP Address, Netmask, and Default GatewayIPv6—IPv6 Address/Prefix Length and Default IPv6 Gateway
- Select the Device Management Services that the interface supports:Device Management and Device Log Collection—You can assign one or more interfaces.Collector Group Communication—You can assign only one interface.Device Deployment (software and content updates)—You can assign only one interface.
- Click OK to save your changes.
Configure each interface on the Log Collector (other than the MGT interface):- Select and edit the Log Collector.
- Select Interfaces and click the name of the interface.
- Select <interface-name> to enable the interface.
- Complete one or both of the following field sets based on the IP protocols of your network:IPv4—IP Address, Netmask, and Default GatewayIPv6—IPv6 Address/Prefix Length and Default IPv6 Gateway
- Select the Device Management Services that the interface supports:Device Log Collection—You can assign one or more interfaces.Collector Group Communication—You can assign only one interface.
- Click OK to save your changes to the interface.
Click OK to save your changes to the Log Collector.Select and Commit your changes to the Panorama configuration.(Optional) If your deployment is using custom certificates for authentication between Panorama and managed devices, deploy the custom client device certificate. For more information, see Set Up Authentication Using Custom Certificates.- Select and choose the certificate profile from the drop-down or click New Certificate Profile to create one.Select for a Log Collector.Select the Secure Client Communication check box.Select the type of device certificate the Type drop-down.
- If you are using a local device certificate, select the Certificate and Certificate Profile from the respective drop-downs.
- If you are using SCEP as the device certificate, select the SCEP Profile and Certificate Profile from the respective drop-downs.
Click OK.(Optional) Configure Secure Server Communication on a Log Collector. For more information, see Set Up Authentication Using Custom Certificates.- Select .Verify that the Custom Certificate Only check box is not selected. This allows you to continue managing all devices while migrating to custom certificates.When the Custom Certificate Only check box is selected, the Log Collector does not authenticate and cannot receive logs from devices using predefined certificates.Select the SSL/TLS service profile from the SSL/TLS Service Profile drop-down. This SSL/TLS service profile applies to all SSL connections between the Log Collector and devices sending it logs.Select the certificate profile from the Certificate Profile drop-down.Select Authorize Client Based on Serial Number to have the server check clients against the serial numbers of managed devices. The client certificate must have the special keyword $UDID set as the CN to authorize based on serial numbers.In Disconnect Wait Time (min), enter the number of minutes Panorama should wait before breaking and reestablishing the connection with its managed devices. This field is blank by default and the range is 0 to 44,640 minutes.The disconnect wait time does not begin counting down until you commit the new configuration.(Optional) Configure an authorization list.
- Click Add under Authorization List.
- Select the Subject or Subject Alt Name as the Identifier type.
- Enter an identifier of the selected type.
- Click OK.
- Select Check Authorization List to enforce the authorization list.
Click OK.Select .Assign the Log Collector to a Collector Group.- Configure a Collector Group. You must perform a Panorama commit and then a Collector Group commit to synchronize the Log Collector configuration with Panorama and to put the Eth1, Eth2, Eth3, Eth4, and Eth5 interfaces (if you configured them) in an operational state on the Log Collector.In any single Collector Group, all the Log Collectors must run on the same Panorama model: all M-700 appliances, all M-600 appliances, all M-500 appliances, all M-300 appliances, all M-200 appliances, or all Panorama virtual appliances.As a best practice, Enable log redundancy across collectors if you add multiple Log Collectors to a single Collector group. This option requires each Log Collector to have the same number of logging disks.Select to verify that the Log Collector configuration is synchronized with Panorama.The Configuration Status column should display In Sync and the Run Time Status column should display connected.Access the Log Collector CLI and enter the following command to verify that its interfaces are operational:
> show interface allThe output displays the state as up for each interface that is operational.If the Collector Group has multiple Log Collectors, Troubleshoot Connectivity to Network Resources to verify they can communicate with each other by performing a Ping connectivity test for each interface that the Log Collectors use. For the source IP address, specify the interface of one of the Log Collectors. For the host IP address, specify the matching interface of another Log Collector in the same Collector Group.Next steps...To enable the Log Collector to receive firewall logs: