Configure an Aggregate Ethernet Interface and Subinterfaces for SD-WAN
Table of Contents
2.1
Expand all | Collapse all
-
- Create a Link Tag
- Configure an SD-WAN Interface Profile
- Configure a Physical Ethernet Interface for SD-WAN
- Configure an Aggregate Ethernet Interface and Subinterfaces for SD-WAN
- Configure Layer 3 Subinterfaces for SD-WAN
- Configure a Virtual SD-WAN Interface
- Create a Default Route to the SD-WAN Interface
- Create a Path Quality Profile
-
- Create a SaaS Quality Profile
- Use Case: Configure SaaS Monitoring for a Branch Firewall
- Use Case: Configure a Hub Firewall Failover for SaaS Monitoring from a Branch Firewall to the Same SaaS Application Destination
- Use Case: Configure a Hub Firewall Failover for SaaS Monitoring from a Branch Firewall to a Different SaaS Application Destination
- SD-WAN Traffic Distribution Profiles
- Create a Traffic Distribution Profile
- Create an Error Correction Profile
- Configure an SD-WAN Policy Rule
- Allow Direct Internet Access Traffic Failover to MPLS Link
- Configure DIA AnyPath
- Distribute Unmatched Sessions
- Configure HA Devices for SD-WAN
- Create a VPN Cluster
- Create a Full Mesh VPN Cluster with DDNS Service
- Create a Static Route for SD-WAN
Configure an Aggregate Ethernet Interface and Subinterfaces for SD-WAN
SD-WAN supports AE interfaces for link redundancy and
tagged Layer 3 subinterfaces for traffic segmentation.
Physical firewalls running PAN-OS 10.1 and
SD-WAN Plugin 2.1.0 support SD-WAN on aggregated Ethernet (AE) interfaces
so that an SD-WAN firewall in a data center, for example, can have
an aggregate interface group (bundle) of physical Ethernet interfaces
that provide link redundancy. SD-WAN supports AE interfaces with
or without subinterfaces. You can create an AE interface with subinterfaces
that you can tag for different ISP services in order to provide
end-to-end traffic segmentation. Thus, your ISP services can reach
multiple labs or buildings without needing a dedicated pair of fibers
for each connection. A Layer 3 AE interface group connects to a
router, as shown in the following figure:

VM-Series
firewalls do not support AE interfaces. An SD-WAN hub or branch
firewall that has an AE interface should not belong to the same
VPN cluster as a VM-Series SD-WAN hub or branch firewall because
AE interfaces are not supported on VM-Series firewalls.
PPPoE
is not supported on subinterfaces.
- Log in to the Panorama Web Interface.Configure an SD-WAN Interface Profile for each ISP connection (subinterface) in the AE interface group to define its link attributes.Create an AE interface group.
- Select NetworkInterfacesEthernet, select a Panorama Template, and Add Aggregate Group.For Interface Name, enter the number to identify the aggregate group; range is 1 to 16.For Interface Type, select Layer3.Click OK.Assign physical interfaces to the aggregate group.
- Select NetworkInterfacesEthernet and select the interface you want to assign to the aggregate group.Select the Interface Type as Aggregate Ethernet.Select the Aggregate Group you created; for example, ae1.On the Advanced tab, select the Link Speed, Link Duplex, and Link State.Click OK.Repeat this step for each interface you want to assign to the aggregate group.For the aggregate group, create a subinterface that uses a static IP address.
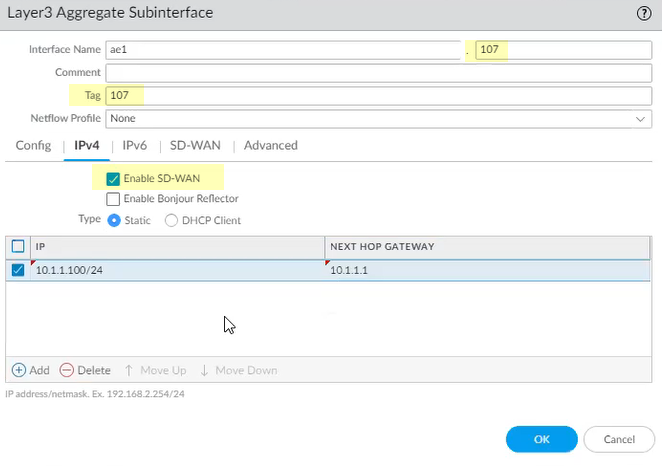
- Select NetworkInterfacesEthernet, highlight the aggregate interface, such as ae1, and click Add Subinterface at the bottom of the screen.For Interface Name, enter a number after the period, such as 107.Enter the VLAN Tag to differentiate between the subinterfaces. For ease of use, make the tag the same number as the subinterface ID.Select the IPv4 tab and Enable SD-WAN.Select the Type of address: Static.Add the IP address (and subnet mask) of the subinterface.Enter the IP address of the Next Hop Gateway.Click OK.
![]() Alternatively, for the aggregate group, create a subinterface that uses DHCP to get its address.
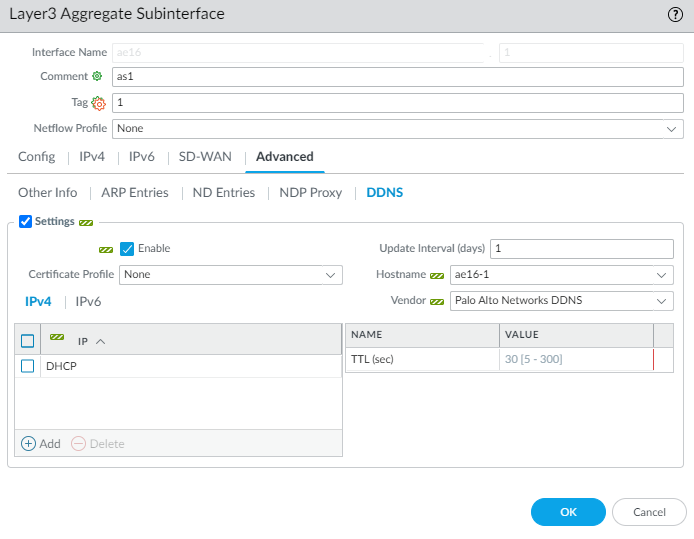
Alternatively, for the aggregate group, create a subinterface that uses DHCP to get its address.- Select NetworkInterfacesEthernet and in the Template field, select a Template Stack.Highlight the aggregate interface, such as ae1, and click Add Subinterface at the bottom of the screen.Highlight the subinterface and click Override at the bottom of the screen.Highlight the subinterface and for Interface Name, enter a number after the period, such as 1.Enter the VLAN Tag to differentiate between the subinterfaces. For ease of use, make the tag the same number as the subinterface ID.Select the IPv4 tab and Enable SD-WAN.Select the Type of address: DHCP Client.Select Enable.Uncheck (do not select) Automatically create default route pointing to default gateway provided by server.Select the Advanced tab and DDNS tab.Select Settings and Enable. The Hostname is automatically generated by the Panorama SD-WAN plugin.Select the Vendor as Palo Alto Networks DDNS.Click OK.
![]() Apply an SD-WAN Interface Profile to the subinterface.
Apply an SD-WAN Interface Profile to the subinterface.- Highlight the subinterface you created and select the SD-WAN tab.Select the SD-WAN Interface Profile you created for this link or create a new profile.
![]() Click OK.Repeat the prior steps to create additional Layer3 subinterfaces for the aggregate interface group and apply an SD-WAN Interface Profile to each subinterface.Commit.
Click OK.Repeat the prior steps to create additional Layer3 subinterfaces for the aggregate interface group and apply an SD-WAN Interface Profile to each subinterface.Commit.


