Push a Policy Rule to a Subset of Firewalls
Table of Contents
Push a Policy Rule to a Subset of Firewalls
A policy target allows you to
specify the firewalls in a device group to which to push policy
rules. It allows you to exclude one or more firewalls or virtual
systems, or to apply a rule only to specific firewalls or virtual systems
in a device group.
As your rulebase evolves and you push new
or modified rules to firewalls, changes and audit information get
lost over time unless they are archived at the time the rule is
created or modified. Use the audit comment archive to view the audit
comment and configuration log history of a selected rule, as well
to compare two policy rule versions to see how the rule changed.
The audit comment history for a rule pushed from Panorama is viewable
only from the Panorama management server. However, you can view
the audit comments in the configurations logs forwarded to Panorama
from managed firewalls. However, the audit comment archive is not
viewable for rules created or modified locally on the firewall.
To ensure that audit comments are captured at the time a rule is
created or modified, Enforce Policy Rule, Description,
Tag and Audit Comment.
The ability to target a rule
enables you to keep policies centralized on Panorama. Targeted rules
allow you to define the rules (as either shared or device group
pre- or post-rules) on Panorama and improve visibility and efficiency
when managing the rules (see Device
Group Policies). The audit comment archive adds further visibility
by allowing you to track how and why your policy rules change over
time so you can audit the rule evolution over the course of the
rule lifecycle.
- (Best Practice) Enforce audit comments
for policy rules.Although this step is optional, it is a best practice to enforce audit comments for policy rules to ensure that you capture the reason for creating or modifying the rule. This also helps maintain an accurate rule history for auditing purposes.
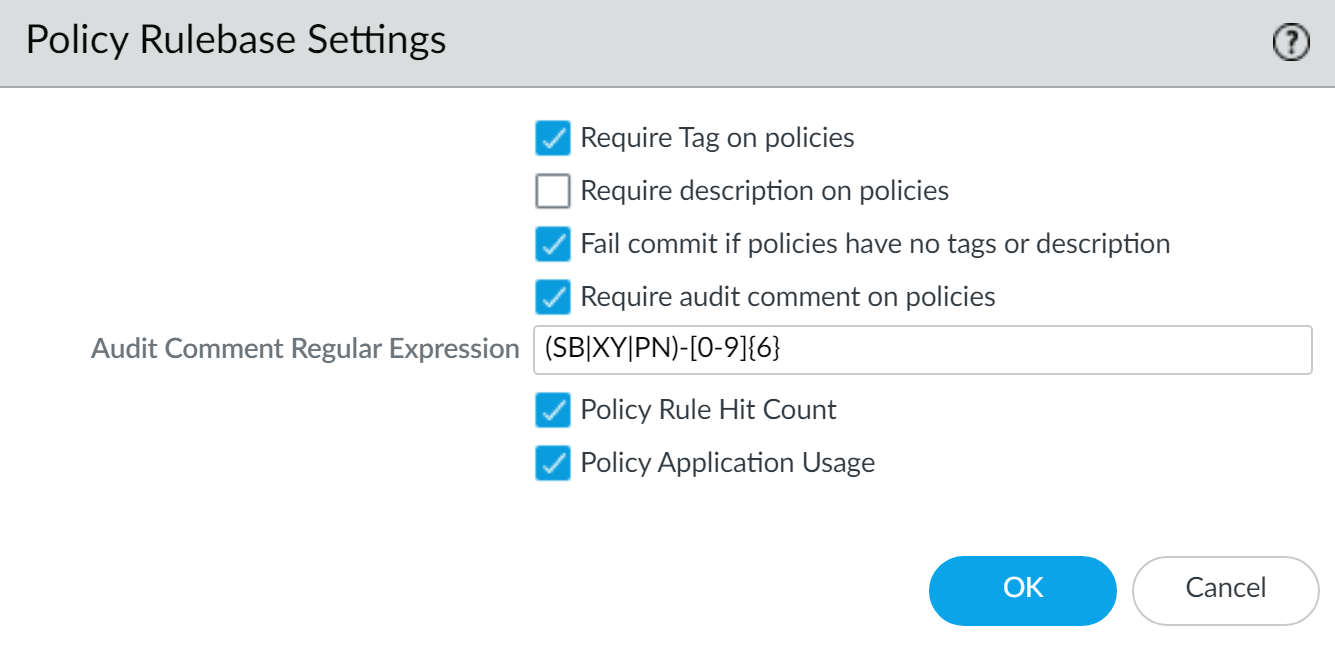
- Select and edit the Policy Rulebase Settings.
- Enable the option to Require audit comment on policies.
- Configure the Audit Comment Regular Expression to
specify the audit comment format.When creating or modifying a rule, require audit comments to adhere to a specific format based on your business and auditing needs by specifying letter and number expressions. For example, you can use this setting to specify regular expressions to match your ticketing number formats:
- [0-9]{<Number of digits>}—Requires the audit comment to contain a minimum number of digits ranging from 0 to 9. For example, [0-9]{6} requires a minimum of 6 digit numerical expression with numbers 0 to 9. Configure the minimum number of digits as needed.
- <Letter Expression>—Requires the audit comment to contain a letter expression. For example, Reason for Change- requires that the administrator to begin the audit comment with this letter expression.
- <Letter Expression>-[0-9]{<Number of digits>}—Requires the audit comment to contain a set character prefix with a minimum number of digits ranging from 0 to 9. For example, SB-[0-9]{6} requires the audit comment format to begin with SB-, followed by a minimum 6 digit numerical expression with numbers 0 to 9 such as SB-012345.
- (<Letter Expression>)|(<Letter Expression>)|(<Letter Expression>)|-[0-9]{<Number of digits>}—Requires the audit comment to contain a prefix using one of the configured set of letter expressions with a minimum number of digits ranging from 0 to 9. For example, (SB|XY|PN)-[0-9]{6} requires the audit comment format begin with SB-, XY-, or PN- followed by a minimum 6 digit numerical expression with numbers 0 to 9 such as SB-012345, XY-654321, or PN-012543.
- Click OK to apply the new policy
rulebase settings.
![]()
- Select Commit and Commit to Panorama.
- Create a rule.In this example, we define a pre-rule in the Security rulebase that permits users on the internal network to access the servers in the DMZ.
- On the Policies tab and select the Device Group for which you want to define a rule.
- Select the rulebase. For this example, select and Add a rule.
- In the General tab, enter a descriptive rule Name and enter an Audit Comment.
- In the Source tab, set the Source Zone to Trust.
- In the Destination tab, set the Destination Zone to DMZ.
- In the Service/ URL Category tab, set the Service to application-default.
- In the Actions tab, set the Action to Allow.
- Leave all the other options set to their default values.
- Target the rule to include or exclude a subset of firewalls.To apply the rule to a selected set of firewalls:
- Select the Target tab in the Policy Rule dialog.
- Select the firewalls to which you want to apply the
rule.If you do not select firewalls to target, the rule is added to all of the (unchecked) firewalls in the device group.By default, although the check box for the virtual systems in the device group is disabled, all virtual systems will inherit the rule on commit unless you select one or more virtual systems to which you want the rule to apply.
- (Optional) To exclude a subset of firewalls
from inheriting the rule, Install on all but specified
devices and select the firewalls you want to exclude.If you Install on all but specified devices and do not select any firewalls, the rule is not added to any of the firewalls in the device group.
- Click OK to add the rule.
- Commit and push the configuration changes.
- Select and Edit Selections in the Push Scope.
- Select Device Groups, select the device group where you added the rule, and click OK.
- Commit and Push your changes to the Panorama configuration and to device groups.
- Troubleshoot Policy Rule Traffic Match to verify that the rules allow and deny traffic as the intended.