Enterprise DLP
DLP App
Table of Contents
DLP App
Create an Enterprise Data Loss Prevention (E-DLP) data profile containing multiple data profiles on the
DLP app.
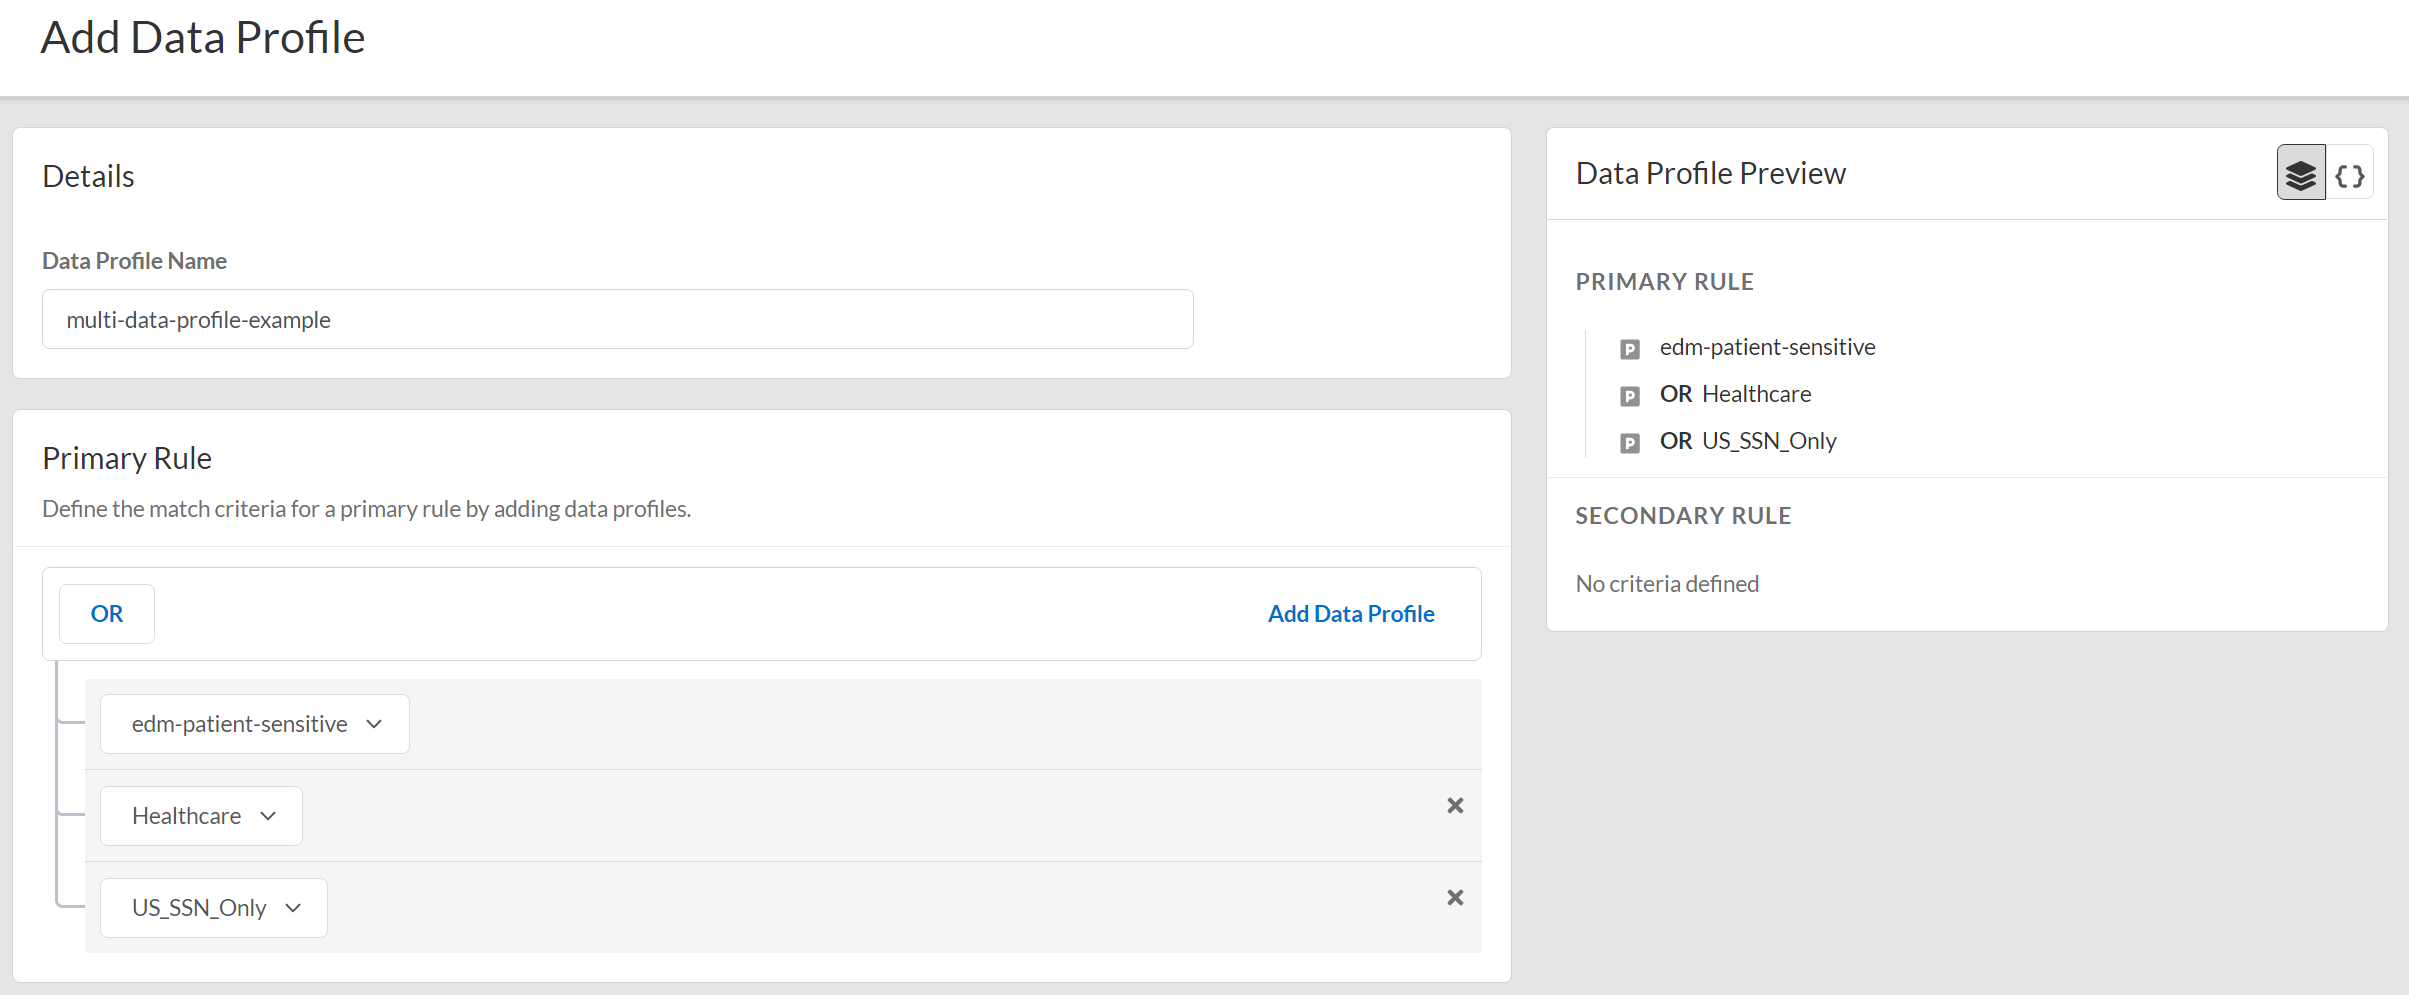
- Log in to the DLP app on the hub.If you don’t already have access to the DLP app on the hub, see the hub Getting Started Guide. Only Superusers can access the hub.(Optional) Create your classic or advanced data profiles on the DLP app.You can create a data profile that contains multiple data profiles using both predefined data profiles and custom data profiles you create.Select .You can also create a new data profile by copying an existing data profile that already contains multiple data profiles. This allows you to quickly modify an existing data profile with additional data profile match criteria while preserving the original data profile from which the new data profile was copied.Data profiles created by copying an existing data profile are appended with Copy - <name_of_original_data_profile>.Enter the Data Profile Name.Configure the Primary Rule for the data profile.Add Data Profile to add predefined or custom data profiles. Repeat this step to include additional data profiles.Data profile match criteria for traffic that you want to allow must be added to the Primary Rule. Data profiles match criteria for traffic that you want to block can be added to either Primary Rule or Secondary Rule.A data profile containing multiple data profiles support any combination of data profiles with data patterns only, data patterns and EDM data sets, and EDM data sets only.Only the OR operator is supported.
![]() (Optional) Configure a Secondary Rule.Add Data Profile to add predefined or custom data profiles. Repeat this step to include additional data profiles.Data profile match criteria added to the Secondary Rule block all traffic that meets the match criteria for the data profile by default and can’t be modified. If you want to allow traffic that matches a data profile match criteria, add it to the Primary Rule.A data profile containing multiple data profiles support any combination of data profiles with data patterns only, data patterns and EDM data sets, and EDM data sets only.Only the OR operator is supported.Save the data profile.Verify that the data profile you created.
(Optional) Configure a Secondary Rule.Add Data Profile to add predefined or custom data profiles. Repeat this step to include additional data profiles.Data profile match criteria added to the Secondary Rule block all traffic that meets the match criteria for the data profile by default and can’t be modified. If you want to allow traffic that matches a data profile match criteria, add it to the Primary Rule.A data profile containing multiple data profiles support any combination of data profiles with data patterns only, data patterns and EDM data sets, and EDM data sets only.Only the OR operator is supported.Save the data profile.Verify that the data profile you created.- DLP App on the hub—Log in to the DLP app on the hub as a Superuser and select Data Profiles to view the data profile you created.
- Strata Cloud Manager—Log in to Strata Cloud Manager and select and search for the data profile you created.
- Panorama and Prisma Access (Managed by Panorama)See Update a Data Profile for more information on which data profile settings are editable on Panorama for a data profile created on the DLP app.
- Log in to the Panorama web interface.Select and navigate to the data profile you created.(Optional) Edit the data profile Action to block traffic.The Action for a data profile created on the DLP app is configured to Alert by default.If the data profile has both Primary and Secondary Patterns, changing the data profile Action on Panorama deletes all Secondary Pattern match criteria.
- Select the data profile created on the DLP app.
- Set the data profile Action to Block traffic that matches the data profile match criteria.
- Select and Commit.
- Click OK.
- Select and Edit Selections.
- Select Device Groups and Include Device and Network Templates.
- Push your configuration changes to your managed firewalls that are using Enterprise DLP.
Attach the data profile to a Security policy rule.- Strata Cloud Manager—Modify a DLP Rule on Strata Cloud Manager
- Log in to the Panorama web interface.Select and specify the Device Group.Select the Security policy rule to which you want to add the data profile.Select Actions and set the Profile Type to Profiles.Select the Data Filtering profile you created.Click OK.Select Commit and Commit and Push.