Enterprise DLP
Create a Classic Data Profile
Table of Contents
Create a Classic Data Profile
Create a classic Enterprise Data Loss Prevention (E-DLP) data profile that contains predefined,
custom regular expression, or file property data patterns.
On May 7, 2025, Palo Alto Networks is introducing new Evidence Storage and Syslog Forwarding service IP
addresses to improve performance and expand availability for these services
globally.
You must allow these new service IP addresses on your network
to avoid disruptions for these services. Review the Enterprise DLP
Release Notes for more
information.
| Where Can I Use This? | What Do I Need? |
|---|---|
|
Or any of the following licenses that include the Enterprise DLP license
|
After you create a data pattern, you need to create a
data profile to add those data patterns and specify matches and confidence levels. A
classic data profile is a data profile that includes only regular expression (regex)
data patterns, or a data profile created on a Panorama® management server. Enterprise Data Loss Prevention (E-DLP) synchronizes all data profiles you create are shared across
Panorama, Strata Cloud Manager, deployments associated with the tenant. You can edit
all classic data profiles created on Panorama or Strata Cloud Manager as
needed.
(Panorama) A data profile for non-file traffic uses URL and
application exclusion lists. These lists let data security administrators exclude
specific traffic from inspection, with a predefined DLP App Exclusion
Filter available for common apps. When you create a data filtering
profile using predefined data patterns, be sure to consider the detection type used by the predefined data
patterns because the detection type determines how Enterprise DLP arrives at a
verdict for scanned traffic. Downgrading from PAN-OS 10.2.1 to 10.1
automatically converts non-file data filtering profiles to file-based data filtering
profiles.
When you create a data profile using predefined data patterns, be sure to consider
the detection type used by the predefined data
patterns because the detection type determines how Enterprise Data Loss Prevention (E-DLP) arrives
at a verdict for scanned files.
Updating a classic data profile to include an advanced detection method such as
Exact Data Matching (EDM) and custom document types set isn’t
supported.
You need to create an advanced data profile if you
want to create a data profile that combines a predefined or custom data pattern
and advanced detection methods, see
Strata Cloud Manager
Create an Enterprise Data Loss Prevention (E-DLP) data profile on Strata Cloud Manager.
- Log in to Strata Cloud Manager.Edit the data filtering settings on Strata Cloud Manager to configure the minimum and maximum data size limits and the actions the enforcement point takes when forwarding traffic to Enterprise DLP.Select and .You can also create a new data profile by copying an existing data profile. This allows you to quickly modify an existing data profile with additional match criteria while preserving the original data profile from which the new data profile was copied.Data profiles created by copying an existing data profile are appended with Copy - <name_of_original_data_profile>. This name can be edited as needed.Enter a descriptive Data Profile Name.Add Pattern Group and Add Data Pattern.You must add data pattern match criteria for traffic that you want to allow to the Primary Rule. You can add data pattern match criteria for traffic that you want to block to either Primary Rule or Secondary Rule.Configure the Primary Rule match criteria.You must add data pattern match criteria for traffic that you want to allow to the Primary Rule. You can add data pattern match criteria for traffic that you want to block to either Primary Rule or Secondary Rule.Configure the data pattern match criteria.
- Predefined ML-based data patterns support only the Any occurrence condition with either High or Lowconfidence. You can't configure any other traffic match criteria other than the confidence level for Predefined ML-based data patterns.
- Occurrence Condition—Specify the occurrences condition required to trigger a Security policy rule action.
- Any—Security policy rule action triggered if Enterprise DLP detects at least one instance of matched traffic.
- Less than or equal to—Security policy rule action triggered if Enterprise DLP detects instances of matched traffic, with the maximum being the specified Count.
- More than or equal to—Security policy rule action triggered if Enterprise DLP detects instances of matched traffic, with a minimum being the specified Count.
- Between (inclusive)—Security policy rule action triggered if Enterprise DLP detects any number of instances of matched traffic between the specific Count range.
- Count—Specify the number of instances of matched traffic required to trigger a Security policy rule action.For example, to match a pattern that appears three or more times in a file, select More than or equal to as the Occurrence Condition and specify 3 as the Threshold.
- Default Range—1 - 500
- Increased Range—1 - 1,500Contact Palo Alto Networks Support to increase the occurrence count supported by your Enterprise DLP tenant.
- Confidence—Specify the confidence level required for a Security policy rule action to be taken (High or Low).
(Optional) Add Data Pattern to add additional data pattern match criteria to the Primary rule.(Optional) Add Data Pattern Group to add additional data pattern conditions using AND or OR operators to the Primary Rule.Refer to the descriptions above to configure any additional data pattern conditions as needed.![]() (Optional) Configure a Secondary Rule.Data pattern match criteria added to the Secondary Rule block all traffic that meets the match criteria for the data pattern conditions. If you want to allow traffic that matches a data pattern match criteria, add it to the Primary Rule.Review the Data Profile Preview to verify the data profile match criteria.Click Test Run to test and verify the data profile accurately detects the sensitive data you configured it to detect.Save the data profile.In Data Profiles, search for the data profile you created to verify it was successfully created.Modify a DLP rule to attach the data profile to a Security policy rule.The DLP rule defines the type of traffic to inspect, the impacted file types, action, log severity, and more for the data profile match criteria. Enterprise DLP automatically creates a DLP rule with an identical name as the data profile from which it was created.
(Optional) Configure a Secondary Rule.Data pattern match criteria added to the Secondary Rule block all traffic that meets the match criteria for the data pattern conditions. If you want to allow traffic that matches a data pattern match criteria, add it to the Primary Rule.Review the Data Profile Preview to verify the data profile match criteria.Click Test Run to test and verify the data profile accurately detects the sensitive data you configured it to detect.Save the data profile.In Data Profiles, search for the data profile you created to verify it was successfully created.Modify a DLP rule to attach the data profile to a Security policy rule.The DLP rule defines the type of traffic to inspect, the impacted file types, action, log severity, and more for the data profile match criteria. Enterprise DLP automatically creates a DLP rule with an identical name as the data profile from which it was created.File Based for Panorama
Create a data filtering profile for the Enterprise Data Loss Prevention (E-DLP) on the Panorama® management server.- Log in to the Panorama web interface.Edit the data filtering settings on Panorama to configure the minimum and maximum data size limits and the actions the firewall takes when uploading files to Enterprise DLP.Create one or more data patterns.Select .Add a new data filtering profile.Enter a descriptive Name for the data profile.Verify the following settings are enabled.
- File Based—New data profiles have Yes selected by default.
- Shared—All Enterprise DLP data profiles must be Shared across all device groups. This setting is enabled by default and cannot be disabled.
Define the match criteria.- If you select Basic, configure the following:
- Primary Pattern—Add one or more data patterns to specify as the match criteria.If you specify more than one data pattern, the managed firewall uses a boolean OR match in the match criteria.
- Match—Select whether the pattern you specify should match (include) or not match (exclude) the specified criteria.
- Operator—Select a boolean operator to use with the Threshold parameter. Specify Any to ignore the threshold.
- Any—Security policy rule action triggered if Enterprise DLP detects at least one instance of matched traffic.
- Less than or equal to—Security policy rule action triggered if Enterprise DLP detects instances of matched traffic, with the maximum being the specified Threshold.
- More than or equal to—Security policy rule action triggered if Enterprise DLP detects instances of matched traffic, with a minimum being the specified Threshold.
- Between (inclusive)—Security policy rule action triggered if Enterprise DLP detects any number of instances of matched traffic between the specific Threshold range.
- Occurrence—Specify the number of instances of matched traffic required to trigger a Security policy rule action. Range is 1 - 500.For example, to match a pattern that appears three or more times in a file, select more_than_or_equal_to as the Operator and specify 3 as the Threshold.
- Confidence—Specify the confidence level required for a Security policy rule action to be taken (High or Low).
![]()
- If you select Advanced, you can create expressions by dragging and dropping data patterns, Confidence levels, Operators, and Occurrence values into the field in the center of the page.Specify the values in the order that they’re shown in the following example (data pattern, Confidence, and Operator or Occurrence).
![]() Select an Action (Alert or Block) to perform on the file.If the data profile has both Primary and Secondary Patterns, changing the data profile Action on Panorama deletes all Secondary Pattern match criteria.Specify the file types Enterprise DLP takes action against.
Select an Action (Alert or Block) to perform on the file.If the data profile has both Primary and Secondary Patterns, changing the data profile Action on Panorama deletes all Secondary Pattern match criteria.Specify the file types Enterprise DLP takes action against.- DLP plugin 4.0.0 and earlier releases
- DLP plugin 4.0.1 and later releases
- Select File Types.Select the Scan Type to create a file type include or exclude list.
- Include—Enterprise DLP inspects only the file types you add to the File Type Array.
- Exclude—Enterprise DLP inspects all supported file types except for those added to the File Type Array.
Click Modify to add the file types to the File Type Array and click OK.![]() Select traffic Direction you want to inspect.You can select Upload, Download, or Both.Set the Log Severity recorded for files that match this rule.You can select critical, high, medium, low, or informational. The default severity is informational.Click OK to save your changes.(Best Practices for File Based Inspection) Create a File Blocking profile and create a Block Rule to block the file types you don't explicitly forwarded to Enterprise DLP.Palo Alto Networks recommends creating this File Blocking profile to ensure sensitive data can't be exfiltrated in file types Enterprise DLP doesn't support.Attach the data filtering profile to a Security policy rule.
Select traffic Direction you want to inspect.You can select Upload, Download, or Both.Set the Log Severity recorded for files that match this rule.You can select critical, high, medium, low, or informational. The default severity is informational.Click OK to save your changes.(Best Practices for File Based Inspection) Create a File Blocking profile and create a Block Rule to block the file types you don't explicitly forwarded to Enterprise DLP.Palo Alto Networks recommends creating this File Blocking profile to ensure sensitive data can't be exfiltrated in file types Enterprise DLP doesn't support.Attach the data filtering profile to a Security policy rule.- Select and specify the Device Group.Select the Security policy rule to which you want to add the data filtering profile.Select Actions and set the Profile Type to Profiles.(Best Practices for File Based Inspection) For the File Blocking Profile, select the File Blocking profile you created in the previous step.For the Data Filtering profile, select the Enterprise DLP data filtering profile you created.Click OK.Commit and push your configuration changes.The Commit and Push command isn’t recommended for Enterprise DLP configuration changes. Using the Commit and Push command requires the additional and unnecessary overheard of manually selecting the impacted templates and managed firewalls in the Push Scope Selection.
- Full configuration push from Panorama
- Select and Commit.
- Select and Edit Selections.
- Select Device Groups and Include Device and Network Templates.
- Click OK.
- Push your configuration changes to your NGFW are using Enterprise DLP.
- Partial configuration push from PanoramaYou must always include the temporary __dlp administrator when performing a partial configuration push. This is required to keep Panorama and Enterprise DLP in sync.For example, you have an admin Panorama admin user who is allowed to commit and push configuration changes. The admin user made changes to the Enterprise DLP configuration and only wants to commit and push these changes to your NGFW. In this case, the admin user is required to also select the __dlp user in the partial commit and push operations.
- Select .
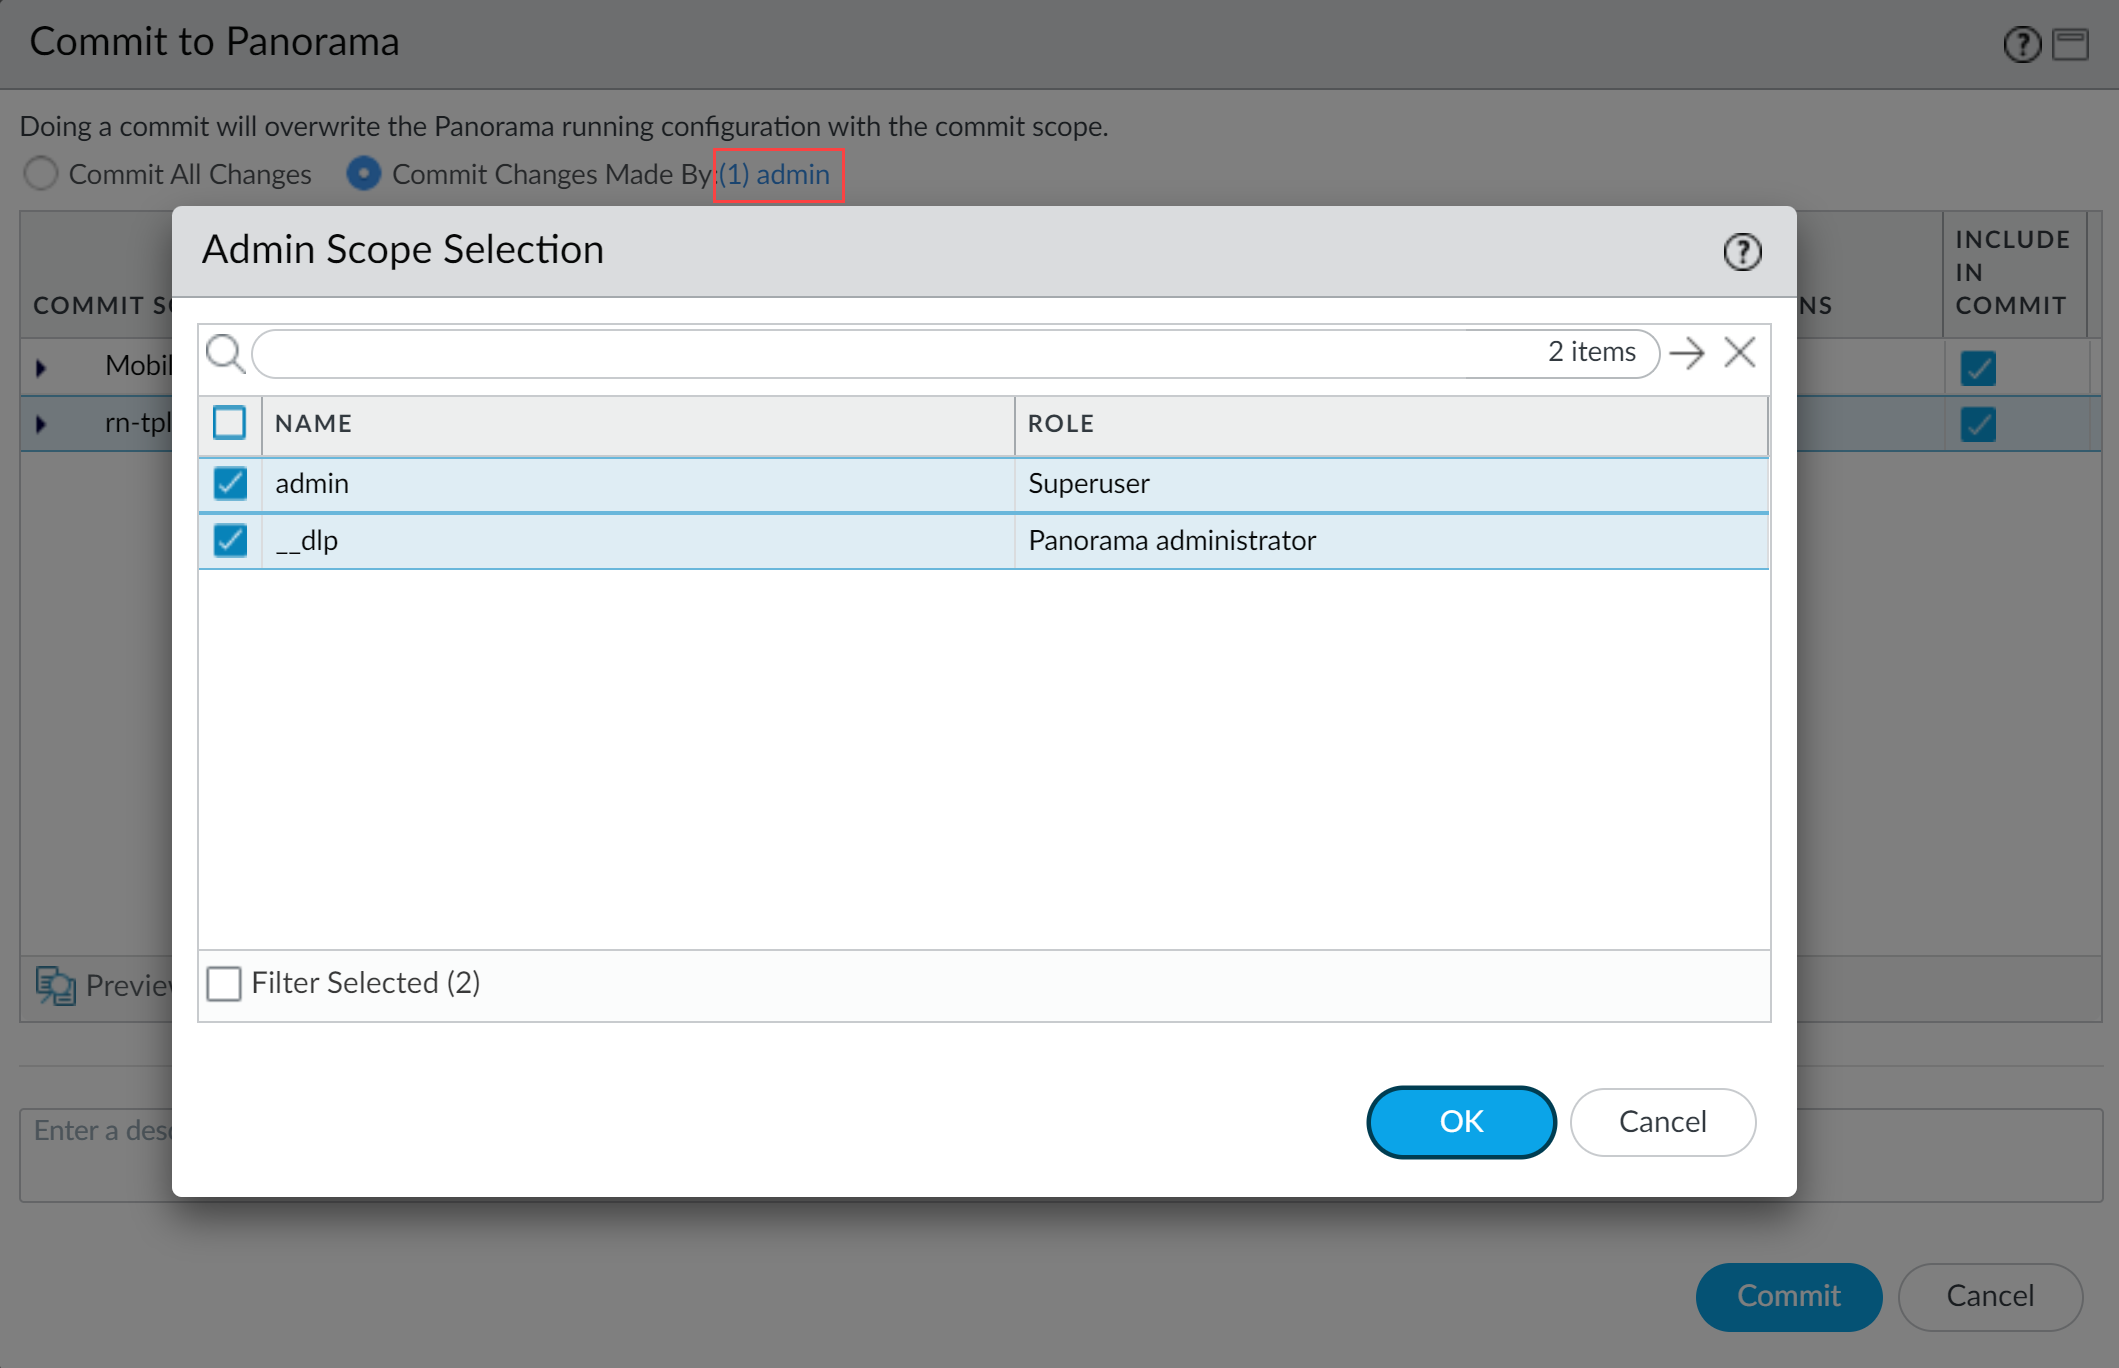
- Select Commit Changes Made By and then click the current Panorama admin user to select additional admins to include in the partial commit.In this example, the admin user is currently logged in and performing the commit operation. The admin user must click admin and then select the __dlp user. If there are additional configuration changes made by other Panorama admins they can be selected here as well.Click OK to continue.
![]()
- Commit.
- Select .
- Select Push Changes Made By and then click the current Panorama admin user to select additional admins to include in the partial push.In this example, the admin user is currently logged in and performing the push operation. The admin user must click admin and then select the __dlp user. If there are additional configuration changes made by other Panorama admins they can be selected here as well.Click OK to continue.
![]()
- Select Device Groups and Include Device and Network Templates.
- Click OK.
- Push your configuration changes to your managed firewalls that are using Enterprise DLP.
Non-File Based for Panorama
Create a data filtering profile for the Enterprise Data Loss Prevention (E-DLP) on the Panorama® management server to inspect non-file traffic for sensitive data.- Log in to the Panorama web interface.Edit the data filtering settings on Panorama to configure the minimum and maximum data size limits and the actions the firewall takes when uploading non-file data to Enterprise DLP.Palo Alto Networks recommends verifying you Enable Non File DLP after you install Panorama plugin for Enterprise DLP 3.0.1.Create one or more data patterns.(Optional) Create a custom application filter or application group to define predefined or custom application traffic you want to exclude from inspection.The application filter and application group must be Shared to be used in the data filtering profile application exclusion list. Data filtering profiles for non-file traffic inspection support either both custom application filters and application groups. You aren’t required to add both.(Optional) Create a custom URL category to define URL traffic you want to exclude from inspection.The URL category must be Shared to be used in the data filtering profile URL exclusion list.To include the custom URL category in the URL exclusion list of a data filtering profile, adding the custom URL category to a URL Filtering profile isn’t required.Select .Add a new data filtering profile.(Optional) Configure the data filtering profile to scan File Based traffic.Data filtering profiles support scanning both file based and non-file based traffic. Select Yes to scan for both file based and non-file based traffic. Select No to only scan for non-file based traffic. Configuring the data filtering profile not to scan for file based traffic has no impact on scanning non-file based traffic.Configure the data filtering profile to scan Non-File Based traffic.Select Yes to scan for non-file based traffic.Verify that Shared is enabled.All Enterprise DLP data profiles must be Shared across all device groups. This setting is enabled by default and cannot be disabled.Define the match criteria.
- If you select Basic, configure the following:
- Primary Pattern—Add one or more data patterns to specify as the match criteria.If you specify more than one data pattern, the managed firewall uses a boolean OR match in the match criteria.
- Match—Select whether the pattern you specify should match (include) or not match (exclude) the specified criteria.
- Operator—Select a boolean operator to use with the Threshold parameter. Specify Any to ignore the threshold.
- Any—Security policy rule action triggered if Enterprise DLP detects at least one instance of matched traffic.
- Less than or equal to—Security policy rule action triggered if Enterprise DLP detects instances of matched traffic, with the maximum being the specified Threshold.
- More than or equal to—Security policy rule action triggered if Enterprise DLP detects instances of matched traffic, with a minimum being the specified Threshold.
- Between (inclusive)—Security policy rule action triggered if Enterprise DLP detects any number of instances of matched traffic between the specific Threshold range.
- Occurrence—Specify the number of instances of matched traffic required to trigger a Security policy rule action. Range is 1 - 500.For example, to match a pattern that appears three or more times in a file, select more_than_or_equal_to as the Operator and specify 3 as the Threshold.
- Confidence—Specify the confidence level required for a Security policy rule action to be taken (High or Low).
![]()
- If you select Advanced, you can create expressions by dragging and dropping data patterns, Confidence levels, Operators, and Occurrence values into the field in the center of the page.Specify the values in the order that they’re shown in the following screenshot (data pattern, Confidence, and Operator or Occurrence).
![]() Select an Action (Alert or Block) to perform on matching traffic.If the data profile has both Primary and Secondary Patterns, changing the data profile Action on Panorama deletes all Secondary Pattern match criteria.(Optional) Configure the URL category list to exclude URL traffic from inspection.The URL category list can only be configured when Non-File Based traffic inspection is enabled.
Select an Action (Alert or Block) to perform on matching traffic.If the data profile has both Primary and Secondary Patterns, changing the data profile Action on Panorama deletes all Secondary Pattern match criteria.(Optional) Configure the URL category list to exclude URL traffic from inspection.The URL category list can only be configured when Non-File Based traffic inspection is enabled.- Select URL Category List Excluded From Non-File.Add a new URL category list.Select a predefined URL category, custom URL category or EDL.
![]() Configure the application exclusion list to exclude application traffic from inspection.The application list can only be configured when Non-File Based traffic inspection is enabled. At least one application list or application group is required to create a data filtering profile for inspecting non-file traffic.
Configure the application exclusion list to exclude application traffic from inspection.The application list can only be configured when Non-File Based traffic inspection is enabled. At least one application list or application group is required to create a data filtering profile for inspecting non-file traffic.- Select Application List Excluded From Non-File.Add an application filter or application group.If you didn’t create a custom application filter or application group, you must add the DLP App Exclusion Filter.
![]() For the Direction, only Upload is supported for inspection of non-file based traffic.Set the Log Severity recorded for files that match this rule.You can select critical, high, medium, low, or informational. The default severity is informational.Click OK to save your changes.Attach the data filtering profile to a Security policy rule.
For the Direction, only Upload is supported for inspection of non-file based traffic.Set the Log Severity recorded for files that match this rule.You can select critical, high, medium, low, or informational. The default severity is informational.Click OK to save your changes.Attach the data filtering profile to a Security policy rule.- Select and specify the Device Group.Select the Security policy rule to which you want to add the data filtering profile.Select Actions and set the Profile Type to Profiles.For the Data Filtering profile, select the Enterprise DLP data filtering profile you created.Click OK.Commit and push the new configuration to your managed firewalls.The Commit and Push command isn’t recommended for Enterprise DLP configuration changes. Using the Commit and Push command requires the additional and unnecessary overheard of manually selecting the impacted templates and managed firewalls in the Push Scope Selection.
- Full configuration push from Panorama
- Select and Commit.
- Select and Edit Selections.
- Select Device Groups and Include Device and Network Templates.
- Click OK.
- Push your configuration changes to your managed firewalls that are using Enterprise DLP.
- Partial configuration push from PanoramaYou must always include the temporary __dlp administrator when performing a partial configuration push. This is required to keep Panorama and Enterprise DLP in sync.For example, you have an admin Panorama admin user who is allowed to commit and push configuration changes. The admin user made changes to the Enterprise DLP configuration and only wants to commit and push these changes to managed firewalls. In this case, the admin user is required to also select the __dlp user in the partial commit and push operations.
- Select .
- Select Commit Changes Made By and then click the current Panorama admin user to select additional admins to include in the partial commit.In this example, the admin user is currently logged in and performing the commit operation. The admin user must click admin and then select the __dlp user. If there are additional configuration changes made by other Panorama admins they can be selected here as well.Click OK to continue.
![]()
- Commit.
- Select .
- Select Push Changes Made By and then click the current Panorama admin user to select additional admins to include in the partial push.In this example, the admin user is currently logged in and performing the push operation. The admin user must click admin and then select the __dlp user. If there are additional configuration changes made by other Panorama admins they can be selected here as well.Click OK to continue.
![]()
- Select Device Groups and Include Device and Network Templates.
- Click OK.
- Push your configuration changes to your managed firewalls that are using Enterprise DLP.