Convert Rules Using the Panorama Web Interface
Table of Contents
Expand all | Collapse all
-
- About Custom Application Signatures
- Create a Custom Application Signature
- Create a Custom L3 & L4 Vulnerability Signature
- Import a Custom Threat Signature from Snort and Suricata Rules
- Test a Custom Signature
- Custom Signature Pattern Requirements
- Testing Pattern Performance Impact
-
-
- dhcp-req-chaddr
- dhcp-req-ciaddr
- dhcp-rsp-chaddr
- dhcp-rsp-ciaddr
- dns-req-addition-section
- dns-req-answer-section
- dns-req-authority-section
- dns-req-header
- dns-req-protocol-payload
- dns-req-section
- dns-rsp-addition-section
- dns-rsp-answer-section
- dns-rsp-authority-section
- dns-rsp-header
- dns-rsp-protocol-payload
- dns-rsp-ptr-answer-data
- dns-rsp-queries-section
- email-headers
- file-data
- file-elf-body
- file-flv-body
- file-html-body
- file-java-body
- file-mov-body
- file-office-content
- file-pdf-body
- file-riff-body
- file-swf-body
- file-tiff-body
- file-unknown-body
- ftp-req-params
- ftp-req-protocol-payload
- ftp-rsp-protocol-payload
- ftp-rsp-banner
- ftp-rsp-message
- gdbremote-req-context
- gdbremote-rsp-context
- giop-req-message-body
- giop-rsp-message-body
- h225-payload
- http-req-cookie
- http-req-headers
- http-req-host-header
- http-req-host-ipv4-address-found
- http-req-host-ipv6-address-found
- http-req-message-body
- http-req-mime-form-data
- http-req-ms-subdomain
- http-req-origin-headers
- http-req-params
- http-req-uri
- http-req-uri-path
- http-req-user-agent-header
- http-rsp-headers
- http-rsp-non-2xx-response-body
- http-rsp-reason
- icmp-req-code
- icmp-req-data
- icmp-req-type
- icmp-req-protocol-payload
- icmp-rsp-data
- icmp-rsp-protocol-payload
- icmp-req-possible-custom-payload
- ike-req-headers
- ike-rsp-headers
- ike-req-payload-text
- ike-rsp-payload-text
- imap-req-cmd-line
- imap-req-first-param
- imap-req-params-after-first-param
- imap-req-protocol-payload
- imap-rsp-protocol-payload
- irc-req-params
- irc-req-prefix
- jpeg-file-scan-data
- jpeg-file-segment-data
- jpeg-file-segment-header
- ldap-req-searchrequest-baseobject
- ldap-rsp-searchresentry-objectname
- ms-ds-smb-req-share-name
- ms-ds-smb-req-v1-create-filename
- ms-ds-smb-req-v2-create-filename
- msrpc-req-bind-data
- mssql-db-req-body
- netbios-dg-req-protocol-payload
- netbios-dg-rsp-protocol-payload
- netbios-ns-req-protocol-payload
- netbios-ns-rsp-protocol-payload
- nettcp-req-context
- oracle-req-data-text
- pe-dos-headers
- pe-file-header
- pe-optional-header
- pe-section-header
- pe-body-data
- pop3-req-protocol-payload
- pop3-rsp-protocol-payload
- pre-app-req-data
- pre-app-rsp-data
- rtmp-req-message-body
- rtsp-req-headers
- rtsp-req-uri-path
- sip-req-headers
- snmp-req-community-text
- smtp-req-argument
- smtp-rsp-content
- smtp-req-protocol-payload
- smtp-rsp-protocol-payload
- ssh-req-banner
- ssh-rsp-banner
- ssl-req-certificate
- ssl-req-chello-sni
- ssl-req-client-hello
- ssl-req-protocol-payload
- ssl-req-random-bytes
- ssl-rsp-cert-subjectpublickey
- ssl-rsp-certificate
- ssl-rsp-protocol-payload
- ssl-rsp-server-hello
- tcp-context-free
- telnet-req-client-data
- telnet-rsp-server-data
- udp-context-free
- unknown-req-tcp-payload
- unknown-rsp-tcp-payload
- unknown-req-udp-payload
- unknown-rsp-udp-payload
-
- dnp3-req-func-code
- dnp3-req-object-type
- dns-rsp-tcp-over-dns
- dns-rsp-txt-found
- ftp-req-params-len
- http-req-connect-method
- http-req-content-length
- http-req-cookie-length
- http-req-dst-port
- http-req-header-length
- http-req-param-length
- http-req-no-host-header
- http-req-no-version-string-small-pkt
- http-req-simple-request
- http-req-uri-path-length
- http-req-uri-tilde-count-num
- http-rsp-code
- http-rsp-content-length
- http-rsp-total-headers-len
- iccp-req-func-code
- ike-req-payload-type
- ike-rsp-payload-type
- ike-req-payload-length
- ike-rsp-payload-length
- ike-version
- imap-req-cmd-param-len
- imap-req-first-param-len
- imap-req-param-len-from-second
- irc-req-protocol-payload
- irc-rsp-protocol-payload
- ntlm-req-auth-v1
- ntlm-req-auth-v2
- open-vpn-req-protocol-payload
- pfcp-req-msg-type
- pfcp-rsp-msg-type
- smtp-req-helo-argument-length
- smtp-req-mail-argument-length
- smtp-req-rcpt-argument-length
- sctp-req-ppid
- ssl-req-client-hello-ext-type
- ssl-req-client-hello-missing-sni
- ssl-rsp-version
- stun-req-attr-type
- panav-rsp-zip-compression-ratio
- Context Qualifiers
-
Convert Rules Using the Panorama Web Interface
Use the Panorama™ web interface to convert IPS rules
to custom PAN-OS® threat signatures.
After you install the intrusion prevention
system (IPS) signature converter plugin, you can use it to translate
Snort and Suricata rules into custom Palo Alto Networks threat
signatures. You can then register the custom signatures on
Palo Alto Networks firewalls that belong to device groups that you
specify and use these customer signatures in your Vulnerability
Protection and Anti-Spyware Security Profiles.
Additionally,
you can export rules that list IP address indicators of compromise (IOC)
and use the resultant text file as an external dynamic list to enforce
policy on the entries contained in the list.
The following
example uses this Snort rule:
alert tcp any any -> any any (msg:"Malformed_UA"; content:"User-Agent: Mozillar/"; depth:500; sid:99999999;)
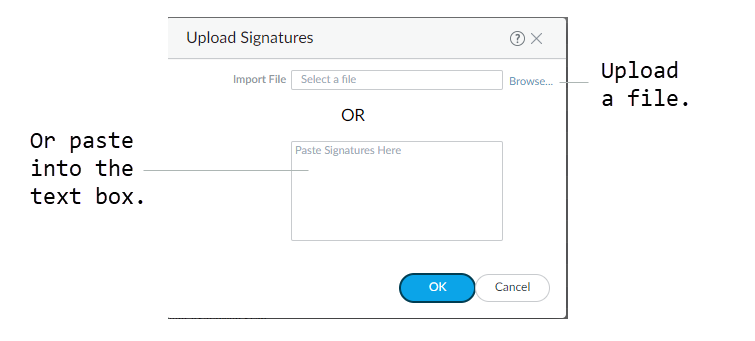
- Select PanoramaIPS Signature ConverterManage.Upload Signatures.Select one of two methods for uploading your rules:
- Browse to and select a text file.You cannot convert binary file types, such as .pdf or .docx.
- Paste the rules directly into the text box.
You can upload only 100 rules at a time for conversion.![]() Click OK.Your signatures will populate at least one of the following tabs: Succeeded, Succeeded with Warnings, Failed, Duplicates, or Existing Coverage.(Optional) Export rules to an indicator of compromise (IOC) list.Panorama converts a rule that does not contain the keywords content or PCRE into an IOC List. Export IOC List to group these rules into a text file that you can use as an external dynamic list for your Security policy rules.
Click OK.Your signatures will populate at least one of the following tabs: Succeeded, Succeeded with Warnings, Failed, Duplicates, or Existing Coverage.(Optional) Export rules to an indicator of compromise (IOC) list.Panorama converts a rule that does not contain the keywords content or PCRE into an IOC List. Export IOC List to group these rules into a text file that you can use as an external dynamic list for your Security policy rules.- Select Export IOC List.A dialog displays any rules that converted as IOC List.
![]() Select the rules that you want to export.Enter the name of the file to which you want to export your rules.Click OK.The exported text file will appear in your downloads folder.Commit converted signatures to Panorama.
Select the rules that you want to export.Enter the name of the file to which you want to export your rules.Click OK.The exported text file will appear in your downloads folder.Commit converted signatures to Panorama.- Select the signatures you want to upload.
![]() Import Custom Signatures.Select a Device Group from the drop-down.Select Shared to make the signatures available to all device groups.Under the Destination column, select whether to commit the signatures as Vulnerability or Spyware.Click OK.In the top right of the screen, selectand Commit to Panorama.
Import Custom Signatures.Select a Device Group from the drop-down.Select Shared to make the signatures available to all device groups.Under the Destination column, select whether to commit the signatures as Vulnerability or Spyware.Click OK.In the top right of the screen, selectand Commit to Panorama.![]() Verify that you successfully committed your signatures.
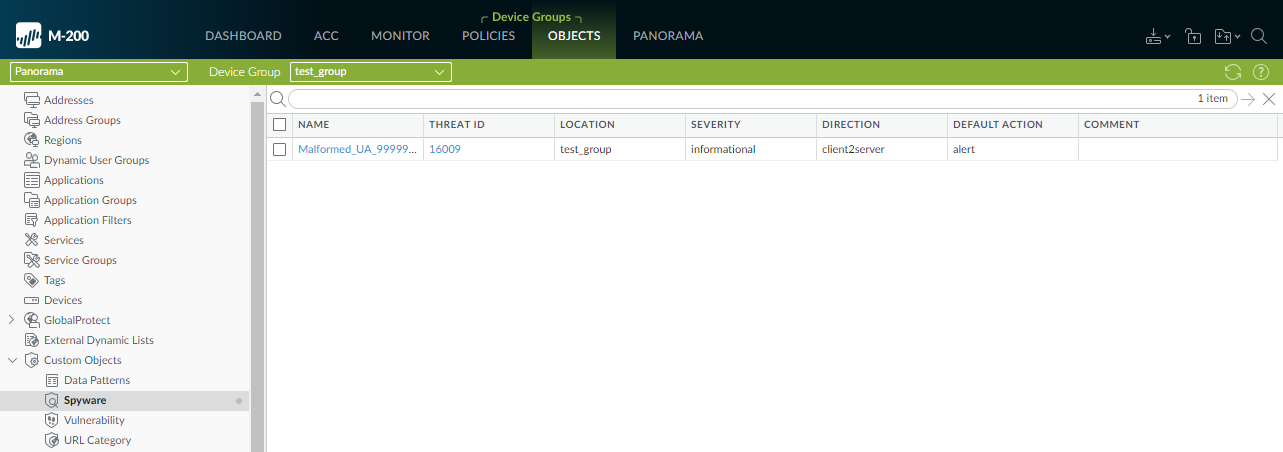
Verify that you successfully committed your signatures.- Select ObjectsCustom Objects.
- Select either Spyware or Vulnerability, depending on how you categorized your signatures in the previous step.
![]() Push the signatures to managed firewalls.The firewalls must be running PAN-OS 10.0 or a later release with an active Threat Prevention license.Test your signatures on a firewall in the device group to which you pushed the signatures.
Push the signatures to managed firewalls.The firewalls must be running PAN-OS 10.0 or a later release with an active Threat Prevention license.Test your signatures on a firewall in the device group to which you pushed the signatures.


