Enable Session Resiliency on VM-Series for GCP
Table of Contents
Enable Session Resiliency on VM-Series for GCP
Learn how to enable session resiliency on your VM-Series firewall deployed in
GCP.
Session resiliency allows the VM-Series firewall to maintain session continuity
during a failure event. The GCP Network Load Balancer (NLB) can detect and
deregister unhealthy VM-Series firewalls deployed in a horizontally scalable cluster
behind it. With session resiliency enabled, the NLB rehashes existing traffic
sessions flowing toward an unhealthy VM-Series and redirects the traffic to a
healthy VM-Series firewall. This allows a VM-Series firewall cluster to continue
inspecting long-lived application sessions, even in the case of VM-Series appliance
failures.
Traffic inspection of the rehashed traffic
flows is Layer 4 only. The VM-Series firewall inspects traffic in new sessions
up to Layer 7.
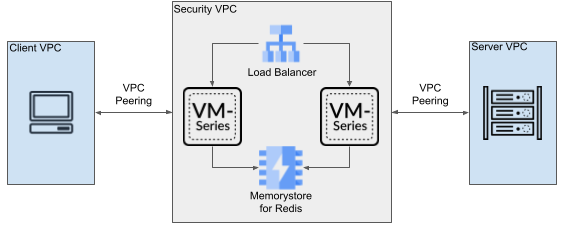
To maintain sessions failing over to healthy VM-Series firewalls, you must deploy a
Standard-tier Memorystore for Redis cache
accessible to your VM-Series firewalls. The Redis cache maintains session
information. When your load balancer detects an unhealthy VM-Series firewall, the
load balancer rebalances traffic to a healthy VM-Series firewall. The healthy
VM-Series firewall accesses the Redis cache for session information and continues to
inspect and forward the existing traffic.
Your load balancer must meet the following requirements to support session
resiliency.
- Your load balancer must be an Internal pass-through Network Load Balancer
- You must set your load balancer connection persistence on unhealthy nodes to NEVER_PERSIST.
Your Memorystore for Redis instance must meet the following requirements to
support session resiliency on the VM-Series firewall.
- Standard tier
- Deploy the Redis cache in the same region and zone as your VM-Series firewall instances.
- From the Network drop-down, select the VPC network associated with the VM-Series firewall management interface.
- Enable AUTH to limit access to only trusted users.
- Enable In-Transit Encryption to encrypt connections to Redis cache using TLS.
When sizing your Memorystore for Redis, use the following guidelines.
- Base the size of Redis cache on the maximum number of sessions supported by your VM-Series firewall instance. See Maximum Limits Based on Tier and Memory to the maximum sessions for your firewall.
- When session resiliency is enabled, the maximum number of sessions is capped at 70% of the amount listed in the link above. For example, if your firewall supports up to 10,000,000 sessions, the maximum is 7,000,000 with session resiliency.
- Each redis entry per session uses approximately 128 bytes. Therefore, one VM-Series firewall that supports 10,000,000 sessions requires approximately 1.3 GB of storage. And a cluster of 10 VM-Series firewalls requires at least 13 GB.
- Use the following formula to calculate the redis requirements.(128 x <number of sessions>) x 10-9 = require redis cache size per firewall
Session resiliency can't be enabled on existing VM-Series
firewall instances; only on newly deployed instances.
Enable session resiliency on the VM-Series firewall by passing the configuration as
part of a bootstrapping init-cfg.txt file or in the user data field.
| Bootstrap Parameter | Description |
|---|---|
| op-command-modes=mgmt-interface-swap | Allows you to swap the management interface (MGT) with the dataplane interface (ethernet 1/1) when deploying the firewall. For details, see Management Interface Swap for Google Cloud Platform Load Balancing. |
| plugin-op-commands=set-sess-ress:True | Enables session resiliency. |
| redis-endpoint= | Provide the IP address or FQDN and port of your Redis endpoint. |
| redis-auth= | Optional The auth code your VM-Series firewall uses to connect with the Redis endpoint. |
| redis-certificate= | OptionalThe root CA certificate string used to connect to the Redis endpoint. The certificate must be a base64-encoded string using utf-8 encoding. |
- Deploy your Redis cache.Prepare your boostrap file.op-command-modes=mgmt-interface-swap plugin-op-commands=set-sess-ress:True redis-endpoint=<redis-IP-address:port> redis-auth=<redis-auth-code> redis-certificate=Bootstrap your VM-Series firewalls.Log in to the firewall.Create an address object for the load balancer front-end IP address.
- Select and click Add.Enter a descriptive .Set the Type to IP Netmask and enter the load balancer front-end IP address.Click OK.Create a loopback interface to send health check packets to the load balancer.
- Select and click Add.Enter a descriptive Name.On the Config tab, set the Virtual Router to default and the Security Zone to your trust zone.On the IPv4 tab, add the address object you created previously.Click OK.Create a management profile.
- Select and click Add.Enable Ping, SSH, HTTPS, and SNMP.Don’t enable HTTP or Telnet because those protocols transmit in cleartext and therefore aren’t secure.Click OK.Add your management profile to your loopback interface.
- Select Interfaces, select your loopback interface.Select info and select the Interface Management Profile you just added.Click OK.Commit your changes.
