Install Panorama on KVM
Table of Contents
Install Panorama on KVM
How to deploy a Panorama™ virtual appliance and a virtual
Dedicated Log Collector on KVM.
You can now deploy Panorama™ and a Dedicated
Log Collector on KVM. Panorama deployed on KVM is Bring Your Own
License (BYOL), supports all deployment modes (Panorama, Log Collector,
and Management Only), and shares the same processes and functionality
as the M-Series hardware appliances. For more information on Panorama
modes, see Panorama
Models.
- Download the Panorama 9.1 base image QCOW2 file.
- Log in to the Palo Alto Networks Support Portal.
- Select and filter by Panorama Base Images to download the QCOW2 file (Panorama-KVM-9.1.0.qcow2).
- Create a new virtual machine image and add the Panorama
virtual appliance image for KVM to the Virtual Machine Manager.
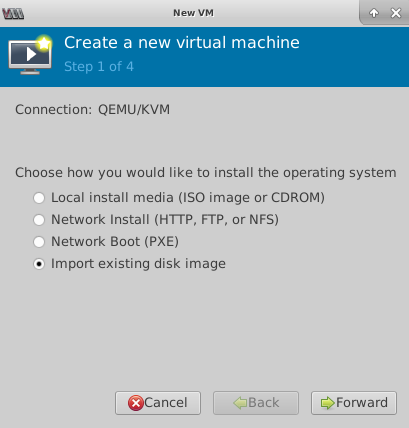
- On the Virtual Machine Manager, select Create a new virtual machine.
- Select Import Existing disk image and
click Forward.
![]()
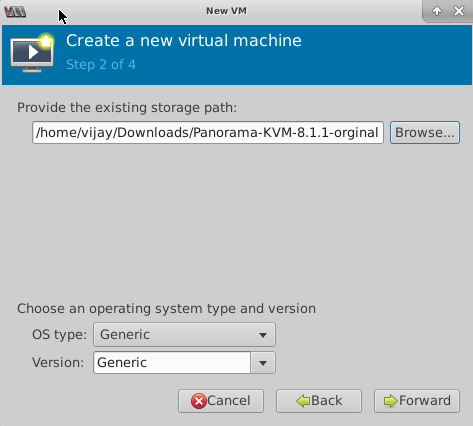
- Browse and select the Panorama virtual appliance image volume and Choose volume.
- Click Forward.
![]()
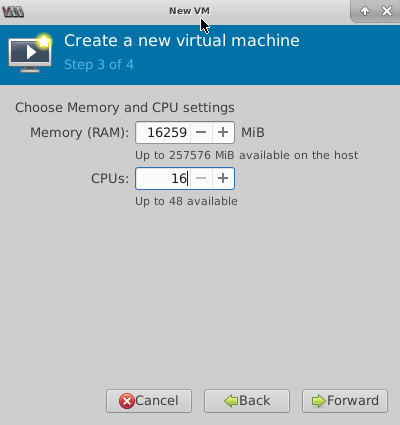
- Configure the memory and CPU settings.Review the Setup Prerequisites for the Panorama Virtual Appliance for minimum resource requirements.If you plan to use the Panorama virtual appliance as a Dedicated Log Collector, ensure that you configure the appliance with the required resources during initial deployment. The Panorama virtual appliance does not remain in Log Collector mode if you resize the virtual machine after you deploy it, and this results in a loss of log data.
- Configure the Memory based
on the requirements for the desired operational mode.The Virtual Machine Manager may use MiB (mebibyte) to allocate memory depending on the version you are running. If MiB is used, be sure to correctly convert your required memory allocation to avoid under provisioning the Panorama virtual appliance.
- Configure the CPU based on the requirements for the desired operational mode.
- Click Forward.
![]()
- Configure the Memory based
on the requirements for the desired operational mode.
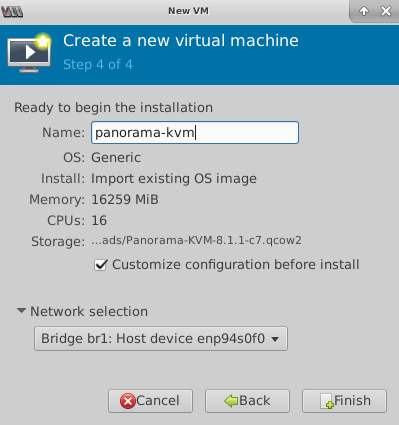
- Name the Panorama virtual appliance, enable configuration
customization, and select the management interface bridge.
- Enter a descriptive Name for the Panorama virtual appliance.
- Customize configuration before install.
- Make a Network selection—select the bridge for the management interface and accept the default settings.
- Click Finish.
![]()
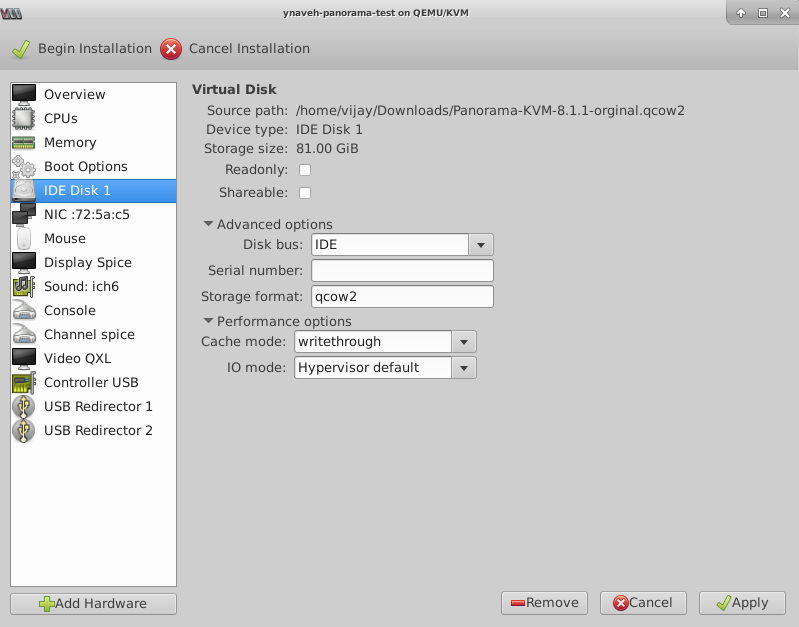
- Configure the virtual system disk settings.
- Select IDE Disk 1,
go to Advanced options, and select the following:
- Disk Bus—VirtIO or IDE, depending on your configuration.
- Storage format—qcow2
- Go to Performance options and set Cache mode to writethrough. This setting improves installation time and execution speed on the Panorama virtual appliance.
- Click Apply.
![]()
- Select IDE Disk 1,
go to Advanced options, and select the following:
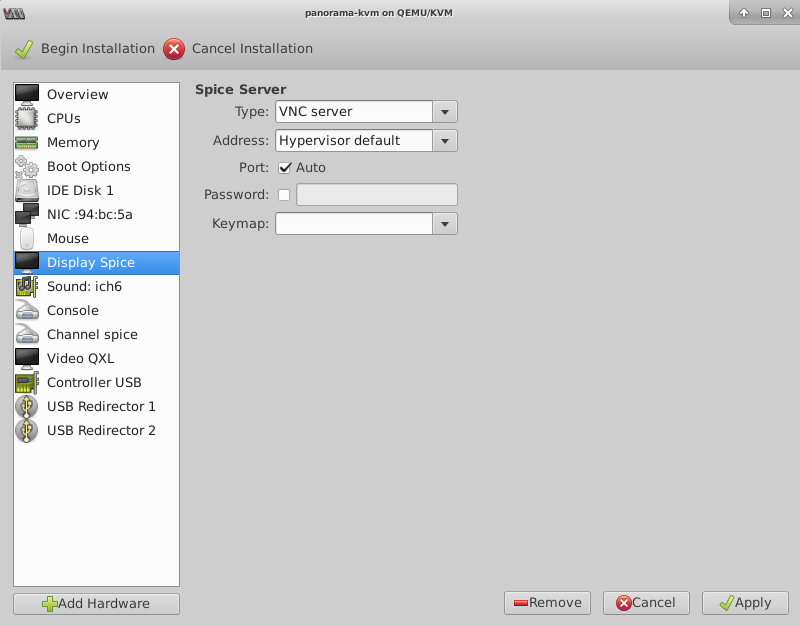
- Configure the virtual machine console display
to use the VNC server to interact with the virtual machine.
- Select Display Spice.Continue to the next step if Display VNC is listed in the Hardware list because the virtual machine is already configured to use the VNC server for the display.
- In the Type drop-down, select VNC server.
- Click Apply.
![]()
- Select Display Spice.
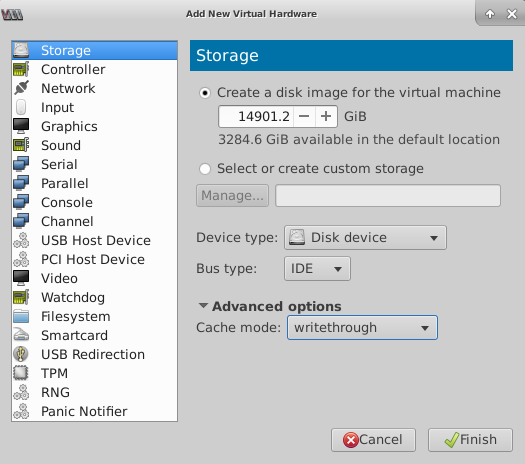
- (Optional) Add additional storage for log collection.
Repeat this step as needed to add additional virtual logging disks.If you intend to use the Panorama virtual appliance in Panorama mode or as a Dedicated Log Collector, add the virtual logging disks during the initial deployment. By default, the Panorama virtual appliance is in Panorama mode for the initial deployment when you meet the Panorama mode resource requirements and have added at least one virtual logging disk. Otherwise, the Panorama virtual appliance defaults to Management Only mode. Change the Panorama virtual appliance to Management Only mode if you just want to manage devices and Dedicated Log Collectors, and to not collect logs locally.The Panorama virtual appliance on KVM only supports 2TB logging disks, and in total supports up to 24TB of log storage. You are unable to add a logging disk smaller than 2TB, or a logging disk with a size not divisible by the 2TB logging disk requirement. The Panorama virtual appliance partitions logging disks larger than 2TB into 2TB partitions.
- Add Hardware.
- Configure the new Storage disk:
- Create a disk image for a virtual machine and configure the virtual disk storage capacity to 14901.2 GiB (this is equivalent to 2TB).The Virtual Machine Manager may use GiB (gibibyte) to allocate memory depending on the version you are running. If GiB is used, be sure to correctly convert the required storage capacity to avoid under provisioning the virtual logging disk and sending the Panorama virtual appliance into maintenance mode.
- Set the Device type to Disk device.
- Set the Bus type to VirtIO or IDE, depending on your configuration.
- Go to Advanced options and set Cache mode to writethrough.
- Click Finish.
![]()
- Begin Installation ( ). The Panorama virtual appliances takes approximately 10 minutes to boot.
![]()
- Configure a new administrative password for the Panorama virtual
appliance.You must configure a unique administrative password before you can access the web interface or CLI of the Panorama virtual appliance. The new password must be a minimum of eight characters and include a minimum of one lowercase character, one uppercase character, and one number or special character.When you first log in to the Panorama CLI, you are prompted to enter the Old Password and the New Password for the admin user before you can continue.
- Configure the network access settings for the management
interface.
- Open a connection to the console.
- Log in to the firewall using the default username and password: admin/admin.
- Enter configuration mode using the following command:
admin> configure - Use the following commands to configure and enable
access to the management interface:
admin# set deviceconfig system type static
admin# set deviceconfig system ip-address <Panorama-IP> netmask <netmask> default-gateway <gateway-IP> dns-setting servers primary <DNS-IP>
where <Panorama-IP> is the IP address you want to assign to the management interface, <netmask> is the subnet mask, <gateway-IP> is the IP address of the network gateway, and <DNS-IP> is the IP address of the DNS server.admin# commit
- Register the Panorama virtual appliance and activate
the device management license and support licenses.
- (VM Flex Licensing Only) Provisioning the Panorama Virtual
Appliance Serial Number.When leveraging VM Flex licensing, this step is required to generate the Panorama virtual appliance serial number needed to register the Panorama virtual appliance with the Palo Alto Networks Customer Support Portal (CSP).
- Register Panorama.You must register the Panorama virtual appliance using the serial number provided by Palo Alto Networks in the order fulfillment email.This step is not required when leveraging VM Flex licensing as the serial number is automatically registered with the CSP when generated.
- Activate the firewall management license.
- Activate a Panorama Support License.
- (VM Flex Licensing Only) Provisioning the Panorama Virtual
Appliance Serial Number.
- Complete configuring the Panorama virtual appliance for
your deployment needs.
- For Panorama in Log Collector Mode.
- Add a Virtual Disk to Panorama on KVM as needed.Adding at least one virtual logging disk is required before you can change the Panorama virtual appliance to Log Collector mode.
- Begin at Step 6 to switch to Log Collector mode.Enter the Public IP address of the Dedicated Log Collector when you add the Log Collector as a managed collector to the Panorama management server. You cannot specify the IP Address, Netmask, or Gateway.
- For Panorama in Panorama mode.
- Adding at least one virtual logging disk is required before you can change the Panorama virtual appliance to Panorama mode.
- For Panorama in Management Only mode.
- Configure a Managed Collector to add a Dedicated Log Collector to the Panorama virtual appliance.Management Only mode does not support local log collection, and requires a Dedicated Log Collector to store managed device logs.