Use Case: Use Dynamic Address Groups to Secure New EC2 Instances within the VPC
Table of Contents
Use Case: Use Dynamic Address Groups to Secure New EC2 Instances within the VPC
In a dynamic environment such as the AWS-VPC
where you launch new EC2 instances on demand, the administrative
overhead in managing security policy can be cumbersome. Using Dynamic
Address Groups in security policy allows for agility and prevents
disruption in services or gaps in protection.
In this example,
you can use the VM Information Source on the firewall to monitor a
VPC and use Dynamic Address Groups in security policy to discover
and secure EC2 instances. As you spin up EC2 instances, the Dynamic
Address Group collates the IP addresses of all instances that match
the criteria defined for group membership, and then security policy
is applied for the group. The security policy in this example allows
internet access to all members of the group.
Instead of
using VM Information Source on the firewall, you can opt to use Panorama
as the central point for communicating with your VPCs. Using the
AWS plugin on Panorama, you can retrieve the IP address-to-tag mapping
and register the information on the managed firewalls for which
you configure notification. For more details on this option, see VM Monitoring with
the AWS Plugin on Panorama.
This workflow in the
following section assumes that you have created the AWS VPC and
deployed the VM-Series firewall and some applications on EC2 instances.
For instructions on setting up the VPC for the VM-Series, see Use
Case: Secure the EC2 Instances in the AWS Cloud.
- Configure the firewall to monitor the VPC.
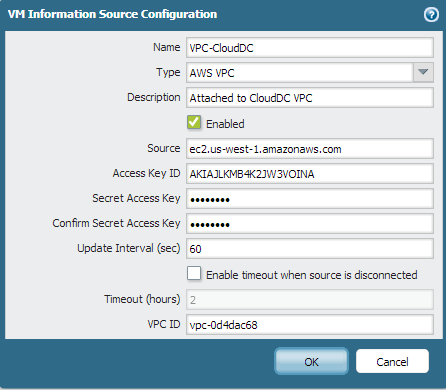
- Select .Click Add and enter the following information:
- A Name to identify the VPC that you want to monitor. For example, VPC-CloudDC.
- Set the Type to AWS VPC.
- In Source, enter the URI for the VPC. The syntax is ec2.<your_region>.amazonaws.com
- Add the credentials required for the firewall to digitally sign API calls made to the AWS services. You need the following:
- Access Key ID: Enter the alphanumeric text string that uniquely identifies the user who owns or is authorized to access the AWS account.
- Secret Access Key: Enter the password and confirm your entry.
- (Optional) Modify the Update interval to a value between 5-600 seconds. By default, the firewall polls every 5 seconds. The API calls are queued and retrieved within every 60 seconds, so updates may take up to 60 seconds plus the configured polling interval.
![]()
- Enter the VPC ID that is displayed on the VPC Dashboard in the AWS management console.
- Click OK, and Commit the changes.
- Verify that the connection Status displays asconnected
![]()
Tag the EC2 instances in the VPC.For a list of tags that the VM-Series firewall can monitor, see List of Attributes Monitored on the AWS VPC.A tag is a name-value pair. You can tag the EC2 instances either on the EC2 Dashboard on the AWS management console or using the AWS API or AWS CLI.In this example, we use the EC2 Dashboard to add the tag:![]() Create a dynamic address group on the firewall.View the tutorial to see a big picture view of the feature.
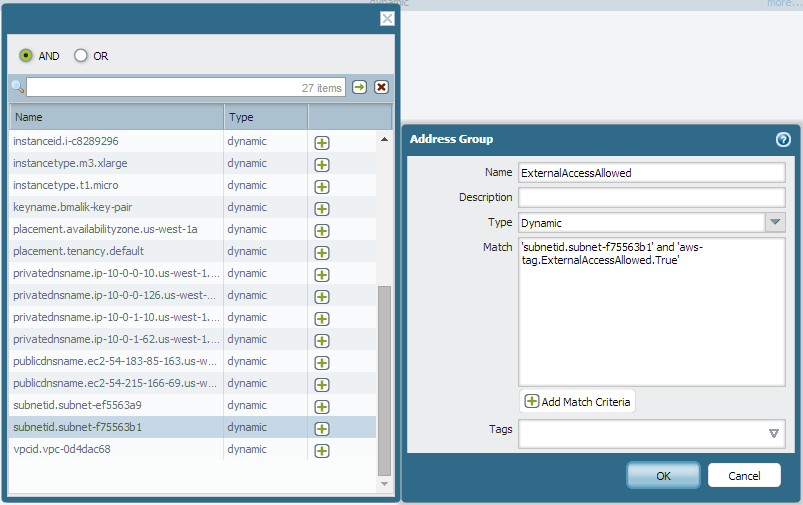
Create a dynamic address group on the firewall.View the tutorial to see a big picture view of the feature.- Select .Click Add and enter a Name and a Description for the address group.Select Type as Dynamic.Define the match criteria.
- Click Add Match Criteria, and select the And operator.
- Select the attributes to filter for or match against. In this example, we select the ExternalAccessAllowed tag that you just created and the subnet ID for the private subnet of the VPC.
![]()
Click OK.Click Commit.Use the dynamic address group in a security policy.To create a rule to allow internet access to any web server that belongs to the dynamic address group called ExternalServerAccess.- Select .Click Add and enter a Name for the rule and verify that the Rule Type is universal.In the Source tab, add trust as the Source Zone.In the Source Address section of the Source tab, Add the ExternalServerAccess group you just created.In the Destination tab, add untrust as the Destination Zone.In the Service/URL Category tab, verify that the service is set to application-default.In the Actions tab, set the Action to Allow.In the Profile Settings section of the Actions tab, select Profiles and then attach the default profiles for antivirus, anti-spyware, and vulnerability protection.Click OK.
![]() Click Commit.Verify that members of the dynamic address group are populated on the firewall.Policy will be enforced for all IP addresses that belong to this address group, and are displayed here.
Click Commit.Verify that members of the dynamic address group are populated on the firewall.Policy will be enforced for all IP addresses that belong to this address group, and are displayed here.- Select , and select the rule.Select the drop-down arrow next to the address group link, and select Inspect. You can also verify that the match criteria is accurate.Click the more link and verify that the list of registered IP addresses is displayed.
![]()