Deploy the VM-Series Firewall from the Azure China Marketplace (Solution Template)
Table of Contents
Deploy the VM-Series Firewall from the Azure China Marketplace (Solution Template)
The following instructions show you how to
deploy the solution template for the VM-Series firewall that is
available in the Azure China Marketplace. The Azure China Marketplace
supports only the BYOL model of the VM-Series firewall. You can deploy
the firewall in a existing resource group that is empty or into
a new resource group. The default VNet in the template is 10.0.0.0/16,
and it deploys a VM-Series firewall has 3 network interfaces, one
management and two dataplane interfaces as shown below. To use the
customizable ARM templates available in the GitHub repository, see Use
the ARM Template to Deploy the VM-Series Firewall.

All VM-Series firewall interfaces must be assigned an
IPv4 address when deployed in a public cloud environment.
- Set up an Azure account.
- Create a Microsoft account.Log in to the Azure portal (https://portal.azure.com) using your Microsoft account credentials.If you are using a trial subscription, you may need to open a support request () to increase the quota of allocated VM cores.Find the VM-Series solution template in the Azure Marketplace.
- Search for Palo Alto Networks on the Azure China marketplace (https://market.azure.cn). The offering for the different PAN-OS versions of the VM-Series firewalls displays.
![]() Select an offering and click Immediate deployment of.Deploy the firewall.
Select an offering and click Immediate deployment of.Deploy the firewall.- Select your Azure Subscription.Select a resource group for holding all the resources associated with the VM-Series firewall in this deployment.You can deploy the VM-Series firewall into a new Resource Group, or an existing Resource Group that is empty. To deploy the firewall into an existing resource group that has other resources, use the ARM template in the GitHub Repository or your own custom ARM template. Ensure that the existing resources match the parameter values you provide in the ARM template.
- If you create a new resource group, enter a name for the resource group and select the Azure China region where you want to deploy the firewall.
- If you select an existing resource group, select the Azure China region for this resource group, and select complete deployment.
Configure basic settings for the firewall.- Enter the storage account name for an existing account or create a new one.
- Enter the name for the blob storage container to which the firewall vhd mage will be copied and saved.
- Enter a DNS name for accessing the Public IP address on the management interface (eth0) of the firewall. To access the web interface of the firewall, you must combine the prefix you enter with the suffix, for example <yourDNSname><china_region>.cloudapp.azure.com.
- Enter a Username for the firewall administrator.
- Enter a Password for securing administrative access to the firewall.
- Select the Azure virtual machine tier and size to meet your needs. See Minimum System Requirements for the VM-Series on Azure.
- Enter a VmName, which is a display name to identify the VM-Series firewall within the resource group.
- Use a PublicIPAddressName to label the firewall management interface within the resource group. Microsoft Azure binds the DNS name that you defined with this name so that you can access the management interface on the firewall from the public internet.
- Enter a VirtualNetworkName to identify your VNet. The default IP Address Prefix for the VNet is 10.0.0.0/16. You can change this to meet your IP addressing needs.
- Configure the subnets for the network interfaces. If you use an existing VNet, you must have defined three subnets, one each for the management, trust and untrust interfaces. If you create a new VNet, verify or change the prefixes for each subnet. The default subnets are 10.0.1.0/24, 10.0.2.0/24, and 10.0.3.0/24. You can allocate these subnets to the management, trust, and untrust interfaces as you would like.
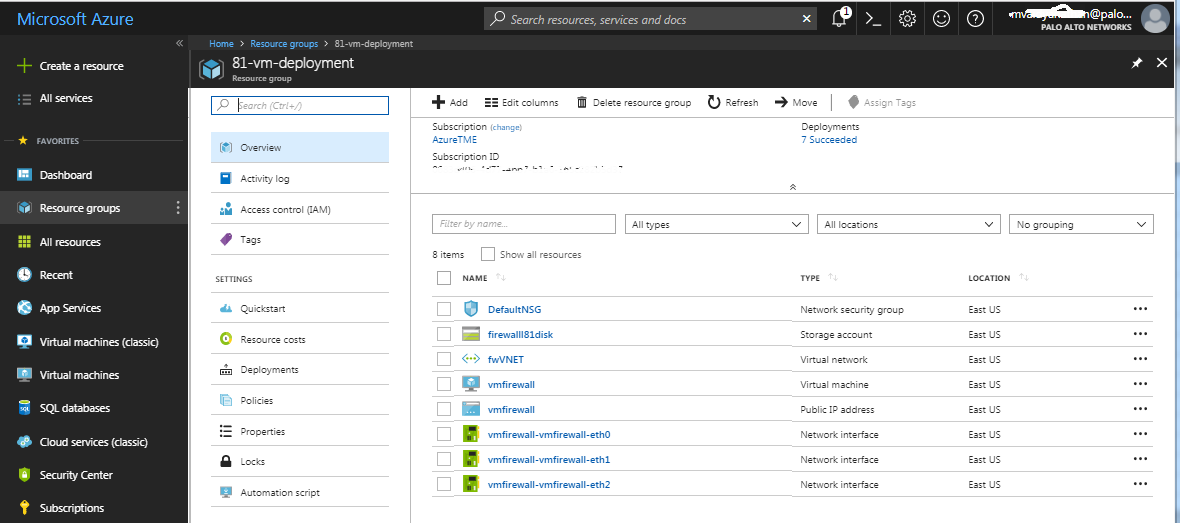
Review the summary, accept the terms of use and privacy policy, and click Immediate deployment to deploy the firewall. The deployment maybe take 20 minutes and you can use the link on the page to verify progress.Verify that you have successfully deployed the VM-Series firewall.- Log in to the Azure China portal (https://portal.azure.cn) using your Microsoft account credentials.
- Select , select the resource group.
- Select for detailed status
![]()
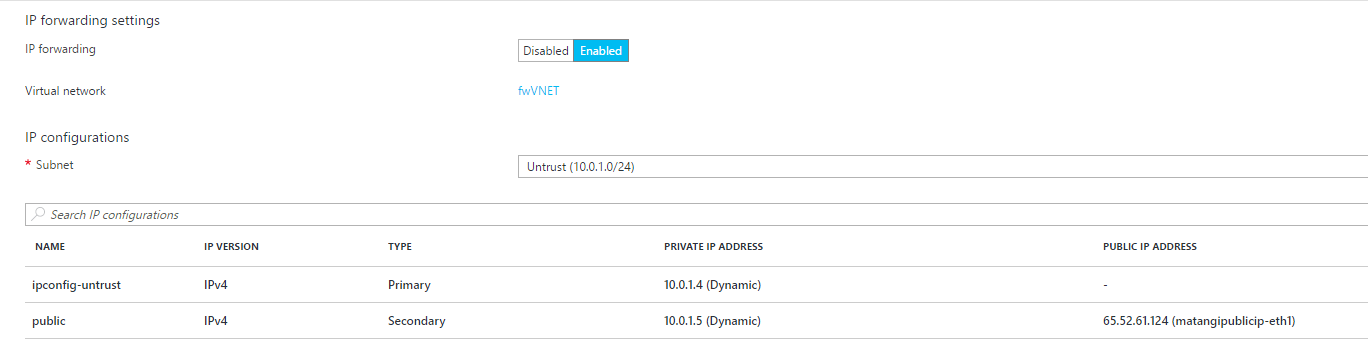
Attach a public IP address for the untrust interface of the VM-Series firewall. This allows you to access the interface from the public internet and is useful for any internet-facing application or service.- On the Azure portal, select the network interface for which you want to add a public IP address. For example the eth1 interface.Select and for Public IP address, select Enabled. Create a new public IP address or select one that you have available.Verify that you can view the secondary IP address associated with the interface.
![]() When you attach a secondary IP address to a network interface, the VM-Series firewall does not automatically acquire the private IP address assigned to the interface. You will need to manually configure the private IP address using the VM-Series firewall web interface. See Configure the dataplane network interfaces as Layer 3 interfaces on the firewall.Each interface on the VM-Series firewall on Azure can have one dynamic (default) or static private IP address, and multiple public IP addresses (static or dynamic) associated with it. The maximum number of public IP addresses you can assign to an interface is based on your Azure subscription. When you create a new public IP address you get one from the block of IP addresses Microsoft owns, so you can’t choose a specific one.Log in to the web interface of the firewall.
When you attach a secondary IP address to a network interface, the VM-Series firewall does not automatically acquire the private IP address assigned to the interface. You will need to manually configure the private IP address using the VM-Series firewall web interface. See Configure the dataplane network interfaces as Layer 3 interfaces on the firewall.Each interface on the VM-Series firewall on Azure can have one dynamic (default) or static private IP address, and multiple public IP addresses (static or dynamic) associated with it. The maximum number of public IP addresses you can assign to an interface is based on your Azure subscription. When you create a new public IP address you get one from the block of IP addresses Microsoft owns, so you can’t choose a specific one.Log in to the web interface of the firewall.- On the Azure portal, in All Resources, select the VM-Series firewall and view the full DNS name for the firewall.
![]() Using a secure connection (https) from your web browser, log in to the DNS name for the firewall.Enter the username/password you defined earlier. You will see a certificate warning; that is okay. Continue to the web page.Activate the licenses on the VM-Series firewall.
Using a secure connection (https) from your web browser, log in to the DNS name for the firewall.Enter the username/password you defined earlier. You will see a certificate warning; that is okay. Continue to the web page.Activate the licenses on the VM-Series firewall.- Create a Support Account.Register the VM-Series Firewall (with auth code).On the firewall web interface, select and select Activate feature using authentication code.Enter the capacity auth-code that you registered on the support portal. The firewall will connect to the update server (updates.paloaltonetworks.com), and download the license and reboot automatically.Log back in to the web interface and confirm the following on the Dashboard:
- A valid serial number displays in Serial#.If the term Unknown displays, it means the device is not licensed. To view traffic logs on the firewall, you must install a valid capacity license.
- The VM Mode displays as Microsoft Azure.
Configure the dataplane network interfaces as Layer 3 interfaces on the firewall.If you are hosting multiple websites or services with different IP addresses and SSL certificates on a single server, you might need to configure more than one IP address on the VM-Series firewall interfaces.- Select .Click the link for ethernet 1/1 and configure as follows:
- Interface Type: Layer3 (default).
- On the Config tab, assign the interface to the default router.
- On the Config tab, expand the Security Zone drop-down and select New Zone. Define a new zone called UnTrust, and then click OK.
- On the IPv4 tab, select DHCP Client if you plan to assign only one IP address on the interface. The private IP address assigned in the ARM template will be automatically acquired. If you plan to assign more than one IP address select Static and manually enter the primary and secondary IP addresses assigned to the interface on the Azure portal.
- Clear the Automatically create default route to default gateway provided by server check box. Disabling this option ensures that traffic handled by this interface does not flow directly to the default gateway in the VNet.
Click the link for ethernet 1/2 and configure as follows:- Set Interface Type to Layer3 (default).
- Security Zone: Trust
- IP address: Select DHCP Client or Static.
- Clear the Automatically create default route to default gateway provided by server check box. Disabling this option ensures that traffic handled by this interface does not flow directly to the default gateway in the VNet.
Click Commit. Verify that the link state for the interfaces is up.Configure the firewall for your specific deployment.- Gateway—Deploy a 3rd party load balancer in front of the UnTrust zone.
- Hybrid and Inter-VNet—Deploy an Azure VPN Gateway or a NAT virtual machine in front the UnTrust zone.
- Inter-Subnet—On the VM-Series firewall, add an intra-zone security policy rule to allow traffic based on the subnets attached to the Trust interface.
- GlobalProtect—Deploy a NAT virtual machine in front of the UnTrust zone.
Direct traffic to the VM-Series firewall.- To ensure that the VM-Series firewall secures all traffic within the Azure resource group, configure static routes on the firewall.Configure UDRs to direct all traffic through the interfaces on the VM-Series firewall. Refer to the Azure documentation on UDRs for details.The UDRs on the internal subnets must send all traffic through the Trust interface. The UDRs on the UnTrust side direct all traffic from the Internet through the UnTrust interface on the VM-Series firewall. The traffic from the Internet may be coming from an Azure Application Gateway or Azure Load Balancer, or through the Azure VPN Gateway in case of a hybrid deployment that connects your on-premises network with the Azure cloud.