Launch the Application Template
Table of Contents
11.0 (EoL)
Expand all | Collapse all
-
- VM-Series Deployments
- VM-Series in High Availability
- IPv6 Support on Public Cloud
- Enable Jumbo Frames on the VM-Series Firewall
- Hypervisor Assigned MAC Addresses
- Custom PAN-OS Metrics Published for Monitoring
- Interface Used for Accessing External Services on the VM-Series Firewall
- PacketMMAP and DPDK Driver Support
- Enable NUMA Performance Optimization on the VM-Series
- Enable ZRAM on the VM-Series Firewall
-
- VM-Series Firewall Licensing
- Create a Support Account
- Serial Number and CPU ID Format for the VM-Series Firewall
- Use Panorama-Based Software Firewall License Management
-
- Maximum Limits Based on Tier and Memory
- Activate Credits
- Create a Deployment Profile
- Activate the Deployment Profile
- Manage a Deployment Profile
- Register the VM-Series Firewall (Software NGFW Credits)
- Provision Panorama
- Migrate Panorama to a Software NGFW License
- Transfer Credits
- Renew Your Software NGFW Credits
- Deactivate License (Software NGFW Credits)
- Delicense Ungracefully Terminated Firewalls
- Set the Number of Licensed vCPUs
- Customize Dataplane Cores
- Migrate a Firewall to a Flexible VM-Series License
-
- Generate Your OAuth Client Credentials
- Manage Deployment Profiles Using the Licensing API
- Create a Deployment Profile Using the Licensing API
- Update a Deployment Profile Using the Licensing API
- Get Serial Numbers Associated with an Authcode Using the API
- Deactivate a VM-Series Firewall Using the API
- What Happens When Licenses Expire?
-
- Supported Deployments on VMware vSphere Hypervisor (ESXi)
-
- Plan the Interfaces for the VM-Series for ESXi
- Provision the VM-Series Firewall on an ESXi Server
- Perform Initial Configuration on the VM-Series on ESXi
- Add Additional Disk Space to the VM-Series Firewall
- Use VMware Tools on the VM-Series Firewall on ESXi and vCloud Air
- Use vMotion to Move the VM-Series Firewall Between Hosts
- Use the VM-Series CLI to Swap the Management Interface on ESXi
-
-
- Supported Deployments of the VM-Series Firewall on VMware NSX-T (North-South)
- Components of the VM-Series Firewall on NSX-T (North-South)
-
- Install the Panorama Plugin for VMware NSX
- Enable Communication Between NSX-T Manager and Panorama
- Create Template Stacks and Device Groups on Panorama
- Configure the Service Definition on Panorama
- Deploy the VM-Series Firewall
- Direct Traffic to the VM-Series Firewall
- Apply Security Policy to the VM-Series Firewall on NSX-T
- Use vMotion to Move the VM-Series Firewall Between Hosts
- Extend Security Policy from NSX-V to NSX-T
-
- Components of the VM-Series Firewall on NSX-T (East-West)
- VM-Series Firewall on NSX-T (East-West) Integration
- Supported Deployments of the VM-Series Firewall on VMware NSX-T (East-West)
-
- Install the Panorama Plugin for VMware NSX
- Enable Communication Between NSX-T Manager and Panorama
- Create Template Stacks and Device Groups on Panorama
- Configure the Service Definition on Panorama
- Launch the VM-Series Firewall on NSX-T (East-West)
- Add a Service Chain
- Direct Traffic to the VM-Series Firewall
- Apply Security Policies to the VM-Series Firewall on NSX-T (East-West)
- Use vMotion to Move the VM-Series Firewall Between Hosts
-
- Install the Panorama Plugin for VMware NSX
- Enable Communication Between NSX-T Manager and Panorama
- Create Template Stacks and Device Groups on Panorama
- Configure the Service Definition on Panorama
- Launch the VM-Series Firewall on NSX-T (East-West)
- Create Dynamic Address Groups
- Create Dynamic Address Group Membership Criteria
- Generate Steering Policy
- Generate Steering Rules
- Delete a Service Definition from Panorama
- Migrate from VM-Series on NSX-T Operation to Security Centric Deployment
- Extend Security Policy from NSX-V to NSX-T
- Use In-Place Migration to Move Your VM-Series from NSX-V to NSX-T
-
-
- Deployments Supported on AWS
-
- Planning Worksheet for the VM-Series in the AWS VPC
- Launch the VM-Series Firewall on AWS
- Launch the VM-Series Firewall on AWS Outpost
- Create a Custom Amazon Machine Image (AMI)
- Encrypt EBS Volume for the VM-Series Firewall on AWS
- Use the VM-Series Firewall CLI to Swap the Management Interface
- Enable CloudWatch Monitoring on the VM-Series Firewall
- VM-Series Firewall Startup and Health Logs on AWS
- Simplified Onboarding of VM-Series Firewall on AWS
-
- Use AWS Secrets Manager to Store VM-Series Certificates
- AWS Shared VPC Monitoring
- Use Case: Secure the EC2 Instances in the AWS Cloud
- Use Case: Use Dynamic Address Groups to Secure New EC2 Instances within the VPC
-
- Intelligent Traffic Offload
- KVM Host-Level Performance Tuning for VM-Series
- Software Cut-through Based Offload
-
- Deployments Supported on Azure
- Deploy the VM-Series Firewall from the Azure Marketplace (Solution Template)
- Deploy the VM-Series Firewall from the Azure China Marketplace (Solution Template)
- Deploy the VM-Series with the Azure Gateway Load Balancer
- Create a Custom VM-Series Image for Azure
- Deploy the VM-Series Firewall on Azure Stack
- Deploy the VM-Series Firewall on Azure Stack HCI
- Enable Azure Application Insights on the VM-Series Firewall
- Set up Active/Passive HA on Azure
- Use Azure Key Vault to Store VM-Series Certificates
- Use the ARM Template to Deploy the VM-Series Firewall
-
- About the VM-Series Firewall on Google Cloud Platform
- Supported Deployments on Google Cloud Platform
- Create a Custom VM-Series Firewall Image for Google Cloud Platform
- Prepare to Set Up VM-Series Firewalls on Google Public Cloud
-
- Deploy the VM-Series Firewall from Google Cloud Platform Marketplace
- Management Interface Swap for Google Cloud Platform Load Balancing
- Use the VM-Series Firewall CLI to Swap the Management Interface
- Enable Google Stackdriver Monitoring on the VM Series Firewall
- Enable VM Monitoring to Track VM Changes on Google Cloud Platform (GCP)
- Use Dynamic Address Groups to Secure Instances Within the VPC
- Use Custom Templates or the gcloud CLI to Deploy the VM-Series Firewall
-
- Prepare Your ACI Environment for Integration
-
-
- Create a Virtual Router and Security Zone
- Configure the Network Interfaces
- Configure a Static Default Route
- Create Address Objects for the EPGs
- Create Security Policy Rules
- Create a VLAN Pool and Domain
- Configure an Interface Policy for LLDP and LACP for East-West Traffic
- Establish the Connection Between the Firewall and ACI Fabric
- Create a VRF and Bridge Domain
- Create an L4-L7 Device
- Create a Policy-Based Redirect
- Create and Apply a Service Graph Template
-
- Create a VLAN Pool and External Routed Domain
- Configure an Interface Policy for LLDP and LACP for North-South Traffic
- Create an External Routed Network
- Configure Subnets to Advertise to the External Firewall
- Create an Outbound Contract
- Create an Inbound Web Contract
- Apply Outbound and Inbound Contracts to the EPGs
- Create a Virtual Router and Security Zone for North-South Traffic
- Configure the Network Interfaces
- Configure Route Redistribution and OSPF
- Configure NAT for External Connections
-
-
- Choose a Bootstrap Method
- VM-Series Firewall Bootstrap Workflow
- Bootstrap Package
- Bootstrap Configuration Files
- Generate the VM Auth Key on Panorama
- Create the bootstrap.xml File
- Prepare the Licenses for Bootstrapping
- Prepare the Bootstrap Package
- Bootstrap the VM-Series Firewall on AWS
- Bootstrap the VM-Series Firewall on Azure
- Bootstrap the VM-Series Firewall on Azure Stack HCI
- Bootstrap the VM-Series Firewall on Google Cloud Platform
- Verify Bootstrap Completion
- Bootstrap Errors
End-of-Life (EoL)
Launch the Application Template
Learn how to launch the application templates.
Complete the following procedure to launch
the application template.
- Create an S3 bucket from which you will launch the application template.
- If this is a cross-account deployment, create a new bucket.
- If there is one account you can create a new bucket or use the S3 bucket you created earlier (you can use one bucket for everything).
Upload the app.zip file into the S3 bucket.Select the application launch template you want you launch.- In the AWS Management Console, select CloudFormationCreateStackSelect Upload a template to Amazon S3, to choose the application template to deploy the resources that the template launches within the same VPC as the firewalls, or to a different VPC. Click Open and Next.Specify the Stack name. The stack name allows you to uniquely identify all the resources that are deployed using this template.Select the Availability Zones (AZ) that your setup will span in Select list of AZ.Enter a descriptive VPC Name.Configure the parameters for Lambda.
- Enter the S3 bucket name where app.zip is stored.Enter the name of the zip file name.Select the EC2 instance type for the Ubuntu web server launched by this template.Enter your Amazon EC2 key pair.Enter the name of the service configuration (Service Name) for the GWLB endpoint in the security VPC.
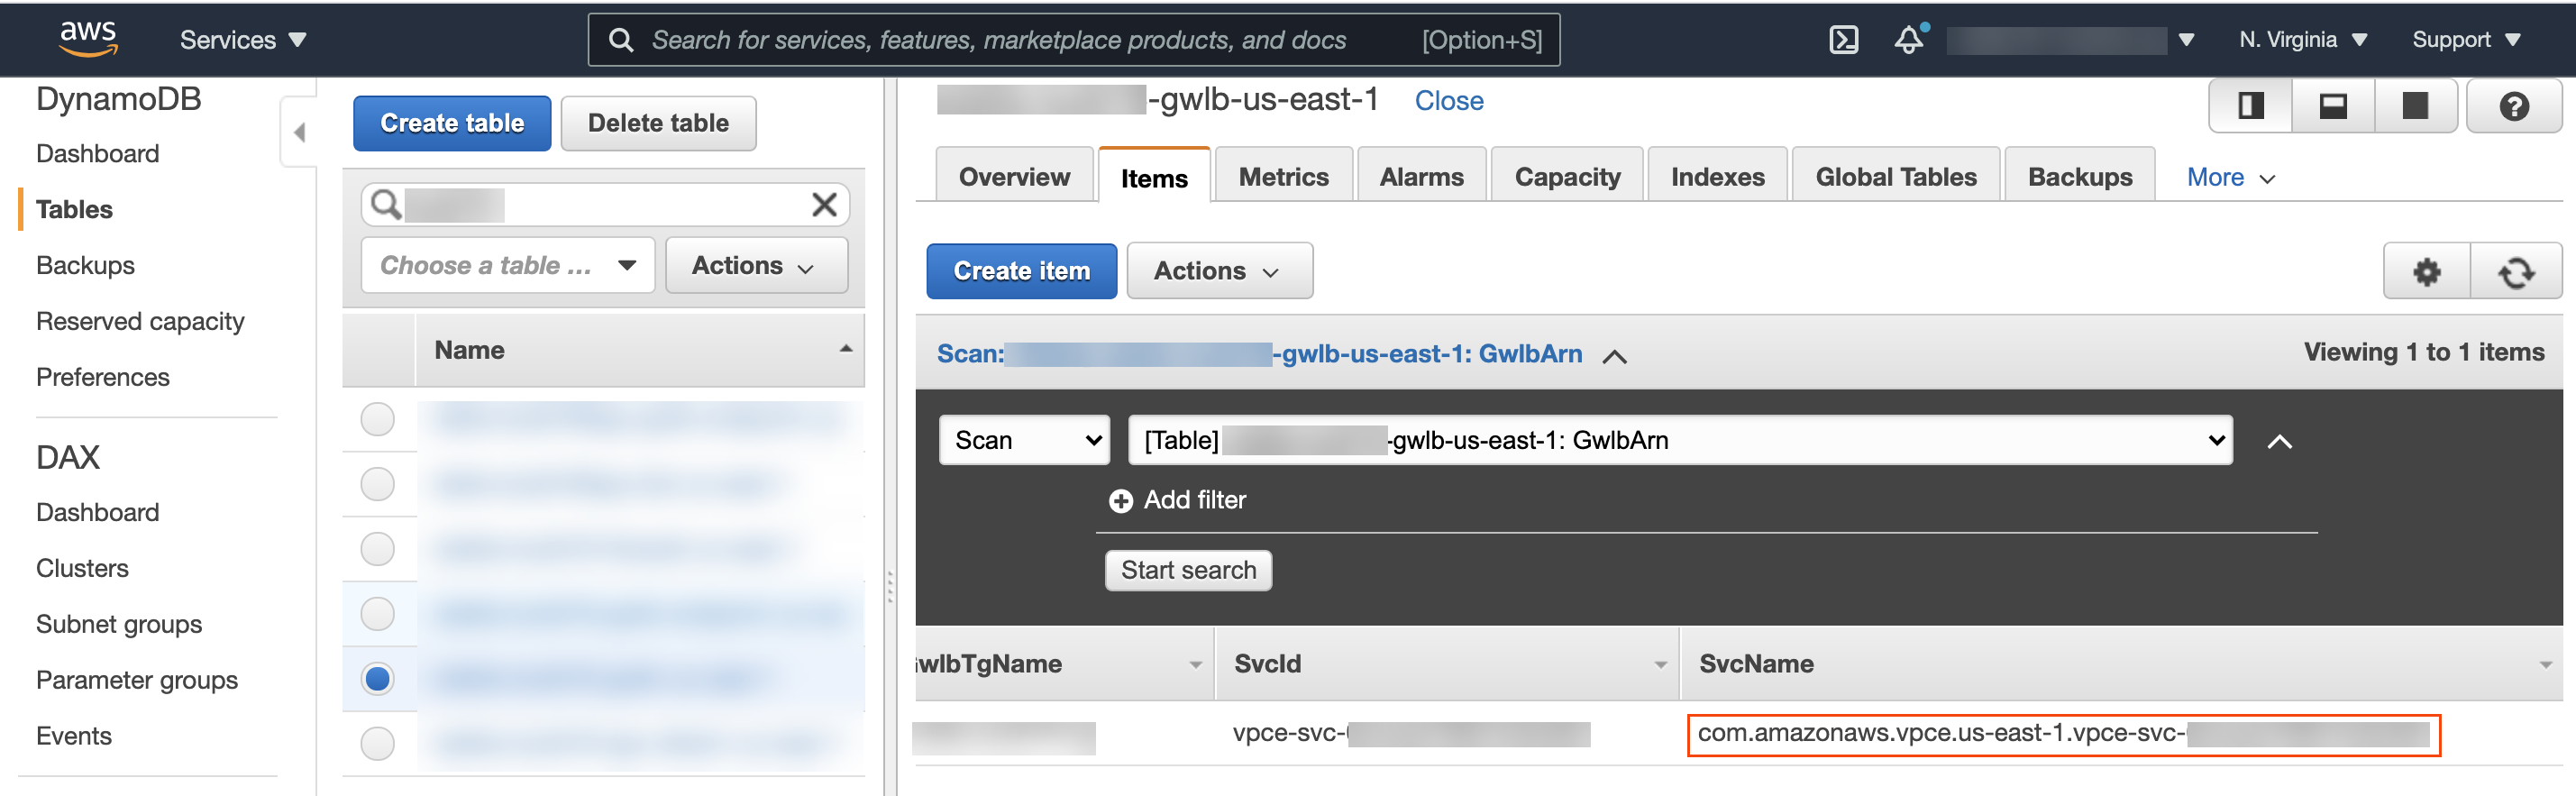
- Select DynamoDB from the Services drop-down in the AWS console.Select Tables and locate your security VPC table. The table name will be <stack name>-gwlb-<region>. For example—cft-deployment-gwlb-us-east-1.Click the Items tab and copy the Service Name.Paste the Service Name into the application template configuration parameters.
![]() Enter the transit gateway ID. This is the same transit gateway you created before deploying the firewall template.Review the template settings and launch the template.After the application has been deployed, you must add a route to the transit gateway route table to enable east-west and outbound traffic inspection.
Enter the transit gateway ID. This is the same transit gateway you created before deploying the firewall template.Review the template settings and launch the template.After the application has been deployed, you must add a route to the transit gateway route table to enable east-west and outbound traffic inspection.- Log in to the AWS VPC console.Select Transit Gateway Route Tables and choose your transit gateway route table. This route table is created by the template and is called <app-stack-name>-<region>-PANWAppAttRt.Select Routes and click Create static route.Enter 0.0.0.0/0 in the CIDR field.From the Choose attachment drop-down, select the VM-Series firewall VPC attachment.Click Create static route.(Optional) Create a bastion host (also called a jump box) to access the web server created by the application template.
- Create a public-facing subnet in your application VPC.Add a route to this subnet from your IP address to the internet gateway.Create a new EC2 instance in the public subnet with a public IP address.Create a security group for this EC2 instance that allows SSH from your IP address.